Get Started With Caller ID
Last updated: Dec 17, 2025, 10:56 AM
- Caller ID Boxes
- Site Requirements
- Cabling Requirements
- Device Configuration and Workflow
- Caller ID Troubleshooting
| At this time, Caller ID is only available for restaurants located in the U.S. |
Caller ID Boxes
Enabling Caller ID allows restaurants with a great deal of takeout and delivery orders to speed up the process of taking orders over the phone.
Because customer information is stored in Toast, returning customers who place phone orders will have their information auto-populate when their phone number matches that of an existing customer. Their name, phone number, and address will be shown in the text fields.
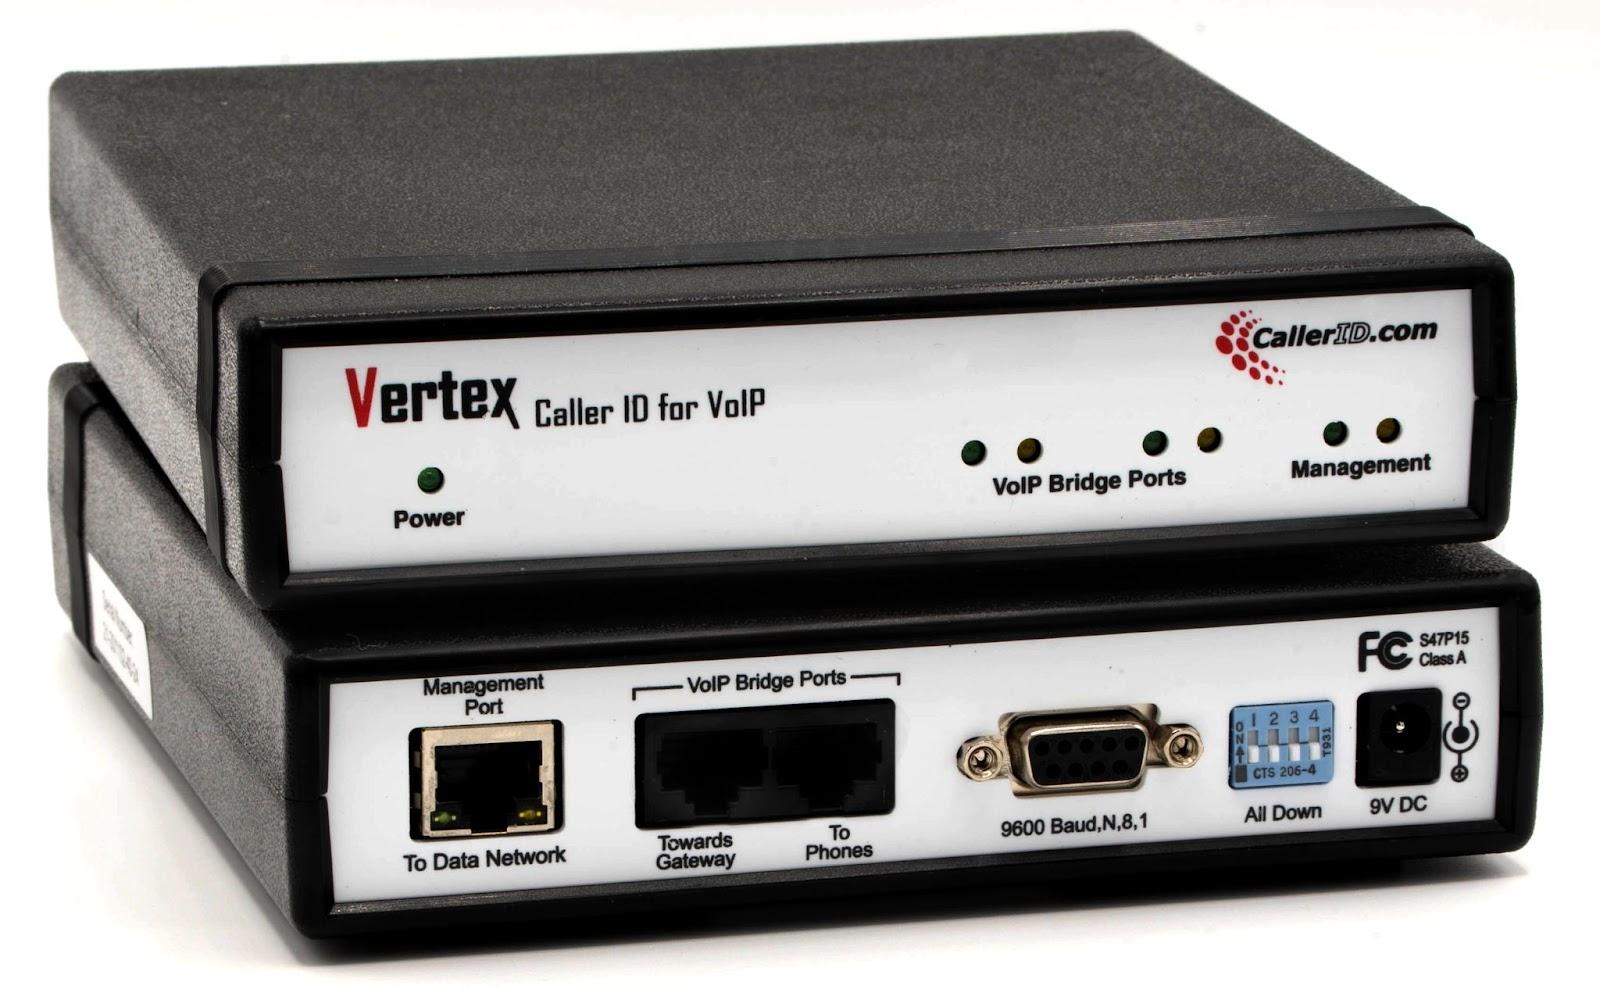
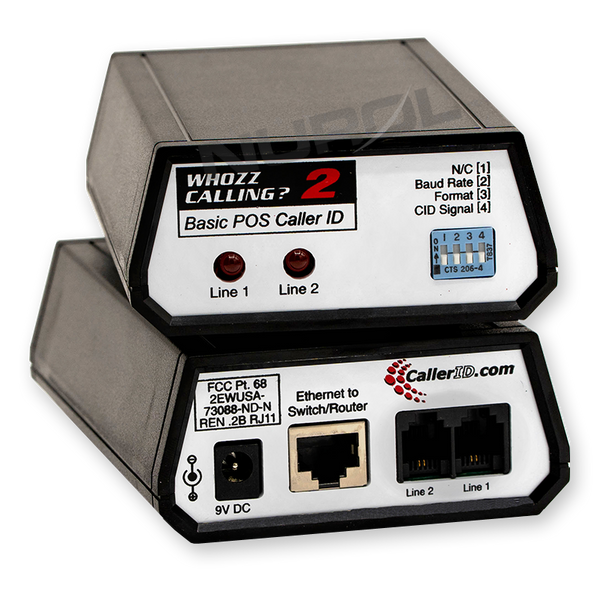
Toast supports two types of Caller ID boxes: Vertex (VoIP) and Whozz Calling (Analog). Identifying which type of Caller ID is crucial for installation and setup as each device is only compatible with its corresponding cables.
| Vertex (VOIP) Caller ID Box | Whozz Calling (Analog) Caller ID Box |
 |  |
|
|
Back to top
Site Requirements for Caller ID
The following are required to configure Caller ID:
- The type of phones in use determines the required box model. Analog phones need a Whozz Calling box, and IP phones require a Vertex. The model of the needed box is NOT determined based on the type of service used.
- If you need to rewire your system, contact your phone provider. Toast does NOT provide support for rewiring of phone systems.
- Caller ID service from your phone provider
- Hunt/rollover service (automatically sends calls to the next available line) from your phone provider
- Caller ID hardware installation
Cabling Requirements for Caller ID
Note: If you have no lines running to the location where you wish to install your Caller ID, the following will need to be run by a telephone professional. Toast does not provide cabling services.
Back to top
Vertex (VOIP)
Cabling for Vertex Caller ID box
There are 3 ports we are most concerned with when establishing cabling on the Vertex box.
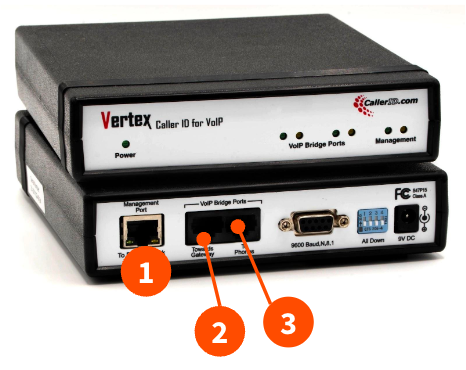
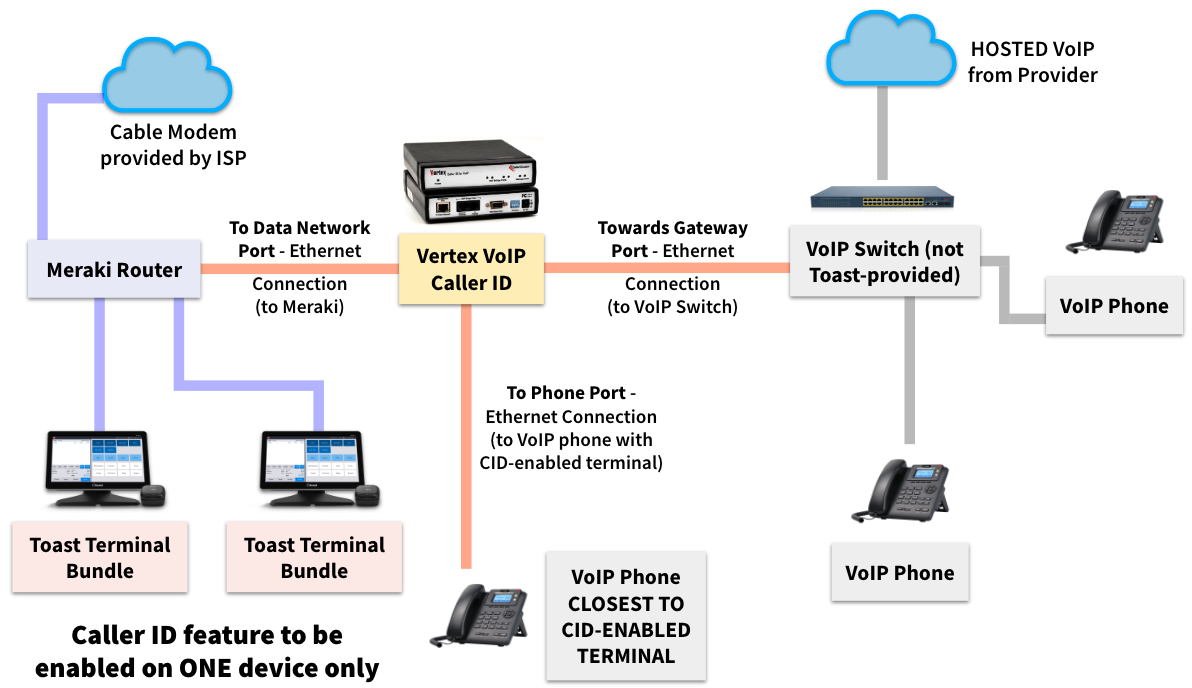
- Management Port: Once the previous cabling has been confirmed and the dial tone is heard, connect a cable from this port into one of the LAN ports of the Meraki (not the port labeled "internet"). This is the only cable that should ever be connected into our network.
- Toward Gateway: This port should be connected to your Gateway/internet modem. Again, this should not cable into Toast’s Local Area Network. At this point, you should be able to hear a dial tone if you were to pick up a phone.
- To Phones: This port should be cabled to your phones. If you have multiple phones, then it should be cabled to a non-Toast switch that your phones are cabled to.
Telephone Line Configuration
A Cat5e cable needs to be run from the VoIP server or telephone to the site where the Meraki or switch will be located. The cable needs to be terminated with RJ45 jacks on both sides.
Toast collects Caller ID via Ethernet, so the Vertex Configuration Tool will need to be run to configure the CID box. Connect the Vertex "Management Port" and your PC running the Vertex Configuration Tool (VCT) to the Data Subnet Router (Meraki or switch located near the caller ID box).
Required services for a successful install:
- Caller ID enabled by telephone company
- Hunt Group/Rollover enabled by telephone company
- Caller ID module turned on in Toast (Onboarding/Project Team can enable)
- Prompt for caller ID enabled on ONE Toast terminal
Note: The Vertex Configuration Tool (VCT) can only be run with a Windows OS-based computer.
Back to top
Whozz Calling Box (Analog)
Cabling for Whozz Calling Box
There are 3 ports we are most concerned with when establishing cabling on the Whooz calling box.
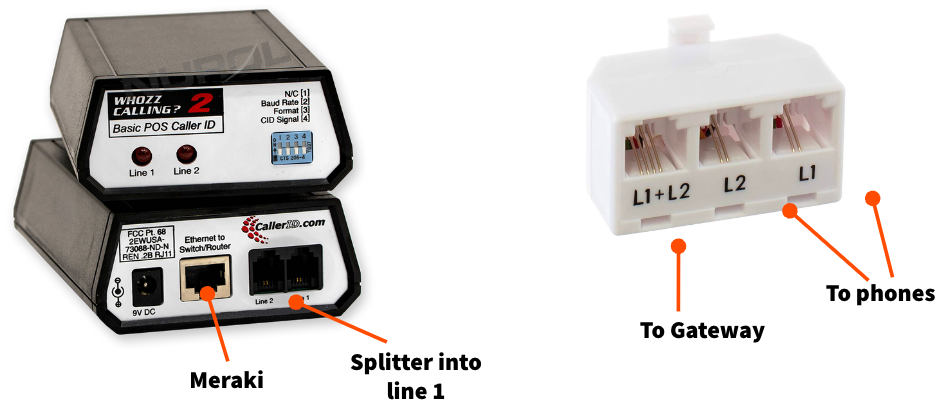
- Management Port (Ethernet to Switch/Router): Once previous cabling has been confirmed and a dial tone is heard, connect a cable from this port into one of the LAN ports of the Meraki (not the port labeled "internet"). This is the only cable that should ever be connected into our network.
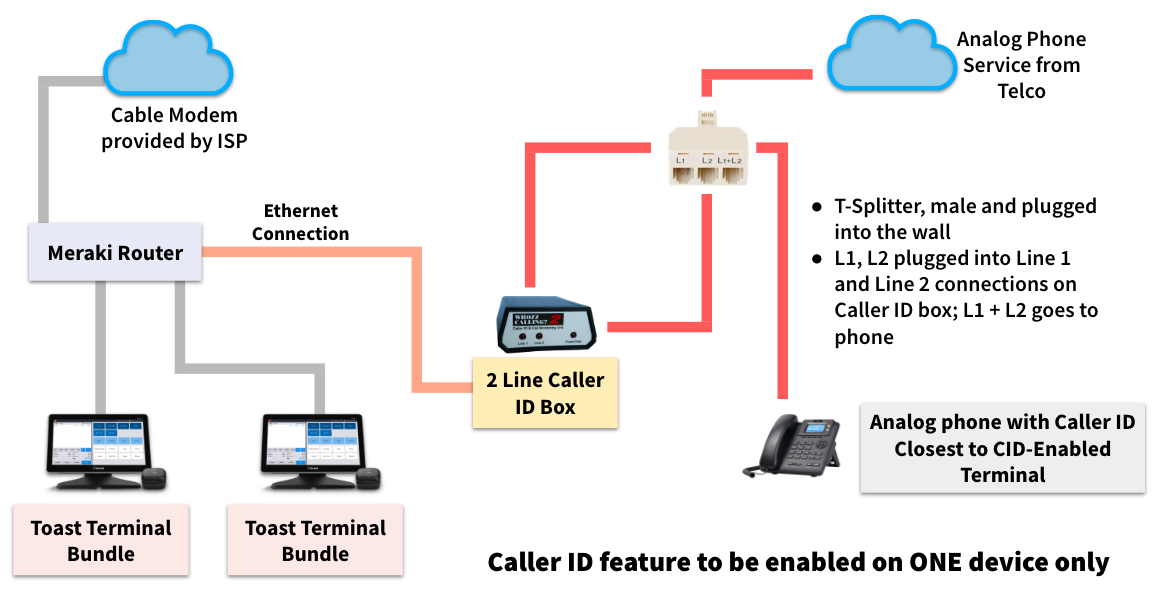
- To Gateway (using a splitter): L1+L2 will have a cable running directly to the Gateway/Modem. To clarify, this port should be connected to your Gateway/Modem. Again, this should not cable into Toast’s Local Area Network.
- To Phones (new L1 or L2): This port should be cabled to the phones. If you have multiple, then it should be cabled to a non-Toast switch that their phones are cabled to.
Telephone Line Configuration
A Cat5e cable needs to be run from the telephone modem to the Meraki router or switch. The cable needs to be patched to the telephone block or demarc. On the other end, it needs to be terminated with RJ11 jacks. If you have more than 4 telephone lines, two Cat5e cables will need to be run.
Required services for a successful install:
- Caller ID enabled by telephone company
- Hunt Group/Rollover enabled by telephone company
- Caller ID module turned on in Toast (Onboarding/Project Team can enabled)
- Prompt for caller ID enabled on ONE Toast terminal
Device Configuration and Workflow for Caller ID
Caller ID doesn't require any configuration in Toast Web and should only be enabled on one device, otherwise notifications may disrupt the workflow on other devices.
- On your device's main menu, navigate to Setup > Device Setup.
- Select Prompt for Incoming Phone Calls under the Order Screen section.
- Select Yes to enable caller ID.
- Select Continue.
Toast's Caller ID is compatible with the following boxes:
- Ethernet Link Whozz Calling? Basic 2 Line version 2.8
- Ethernet Link Whozz Calling? Basic 4 Line version 12
- Vertex VoIP Unit 2 Line version 85-19
Caller ID can be configured to speed up the process of order taking. Once configured, there are a few important things to know about its functioning.
Use Caller ID in Quick Order Mode
It's important to keep in mind that the Caller ID pop-up window will only appear when a server is in Quick Order Mode. In this mode, a pop-up will appear during an incoming call that allows the server to start the order, put the order on hold, or ignore the order.
When in another mode (such as Table Service), the call will appear as a notification in the top left corner of the screen.
Returning Customers and Caller ID
When a returning customer calls, their name, number, and address will automatically be populated in the delivery information screen.
Holding an Order
The hold button can be selected if a server is not ready to begin entering the new order. When hold is selected, it becomes a notification in the top left corner of the screen.
When the server is ready to begin taking the order, the notification can be selected.
Receiving Another Call While an Order is in Progress
When an order is in progress on the quick order screen, the Start Order button on the caller ID pop-up will be grayed out, as starting a new order would cause the current order to be lost. The server will still have the option to Hold or Ignore the call.
However, if the server selects the notification in the top left corner after selecting Hold while an order is in progress, the in-progress order will be lost and the user will be taken to the delivery information page.
Caller ID Troubleshooting
The following must be confirmed before completing any additional troubleshooting steps:
- Was this Caller ID device setup by Toast?
- Have you purchased our Caller ID software module?
Once the above has been confirmed proceed with the following troubleshooting steps:
- Step one: Confirm you are using the correct Caller ID box.
- Step two: Confirm all cabling has been connected using the instructions above.
- Step three: Remove all cabling, reboot your Caller ID box, and reconnect all cabling using the instructions above.
For additional product support or information, please call Vertex at (800)-240-4637.
Back to top