xtraCHEF: Sage Intacct Integration
Last updated: Apr 8, 2026, 10:11 AM
| Third party products like Sage Intacct are provided solely according to the warranty and other terms specified by the third party provider, who is solely responsible for service and support for its product. |
- Sage Intacct Integration Summary
- Integration Configuration
- Use Class (Location ID) with Intacct Extracts
- Intacct Sync Example
Sage Intacct Integration Summary
If you are using Sage Intacct and choose to sync your accounting system with xtraCHEF, the integration will allow you to:
- Transfer bills and their corresponding scans to your accounting system.
- Transfer journal entries to your accounting system.
- Simplifying your accounts payable workflow and saving valuable time.
To get started, connect with our support team at support@xtrachef.com to have your account's extract configured to support the Sage Intacct connection.
Integration Configuration
To support this integration, you'll need to make a few changes in your Sage Intacct account. To do this, you will need admin access in Sage Intacct.
- In Sage Intacct, subscribe to Web Services by visiting Company > Subscriptions. Next, scroll down until you see Web Services and toggle this feature on. With Web Services on, you will then need to give xtraCHEF access to your account by creating a new web user. To do this, return to your Company tab. Then, select Web Services Users and Add.
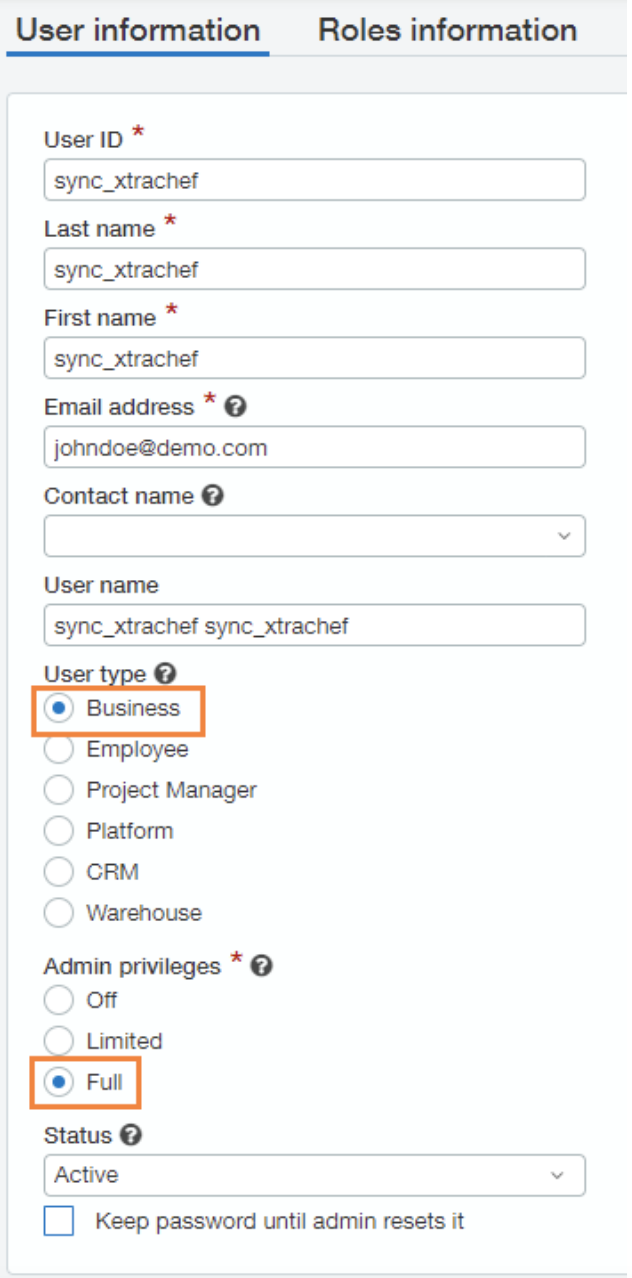
- Sage Intacct will require a User ID, First Name, Last Name, and Email Address. Enter "sync_xtrachef" as the User ID, First Name, and Last Name. This username will indicate a non-billable user and will be used strictly for the integration. For the remaining Email Address field, use the address of the person managing your xtraCHEF account so they can monitor your future syncs.
- You will also need to select Business as your User type and grant Full Admin Privileges. Once the Web Services xtraCHEF user is created, you'll receive an email from Sage Intacct containing a temporary password.
Step 2: Edit Subscription Permissions
Next, you'll need to configure permissions for this Web Services User. To do this, return to your Company tab. Then, select Web Services Users and your new user (sync_xtrachef). There, you'll see a Subscriptions button. Select Subscriptions to ensure permissions are enabled for all modules.
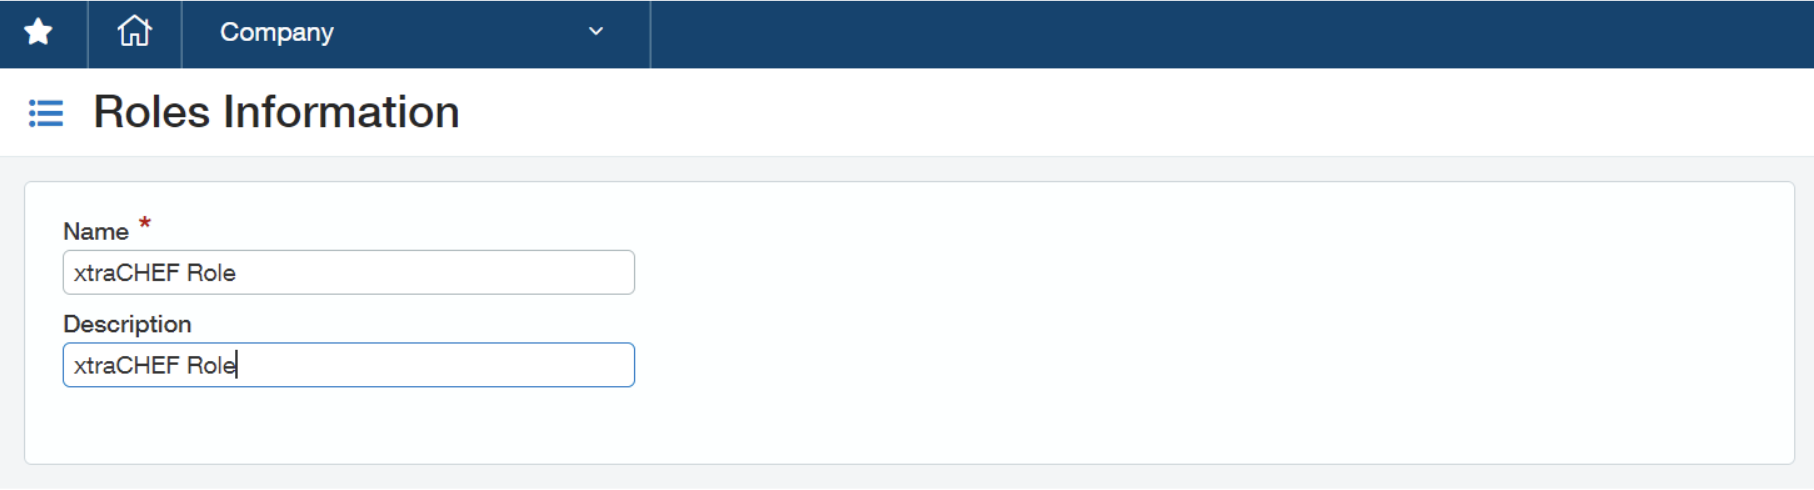
- If you're using role-based permissions, you will need to create a new role for the user (sync_xtrachef). To do this, select Company in your Sage Intacct accounts. Then, select Roles and Add.
- To create a role, you will need to add a role name. We recommend naming this "xtraCHEF Role."
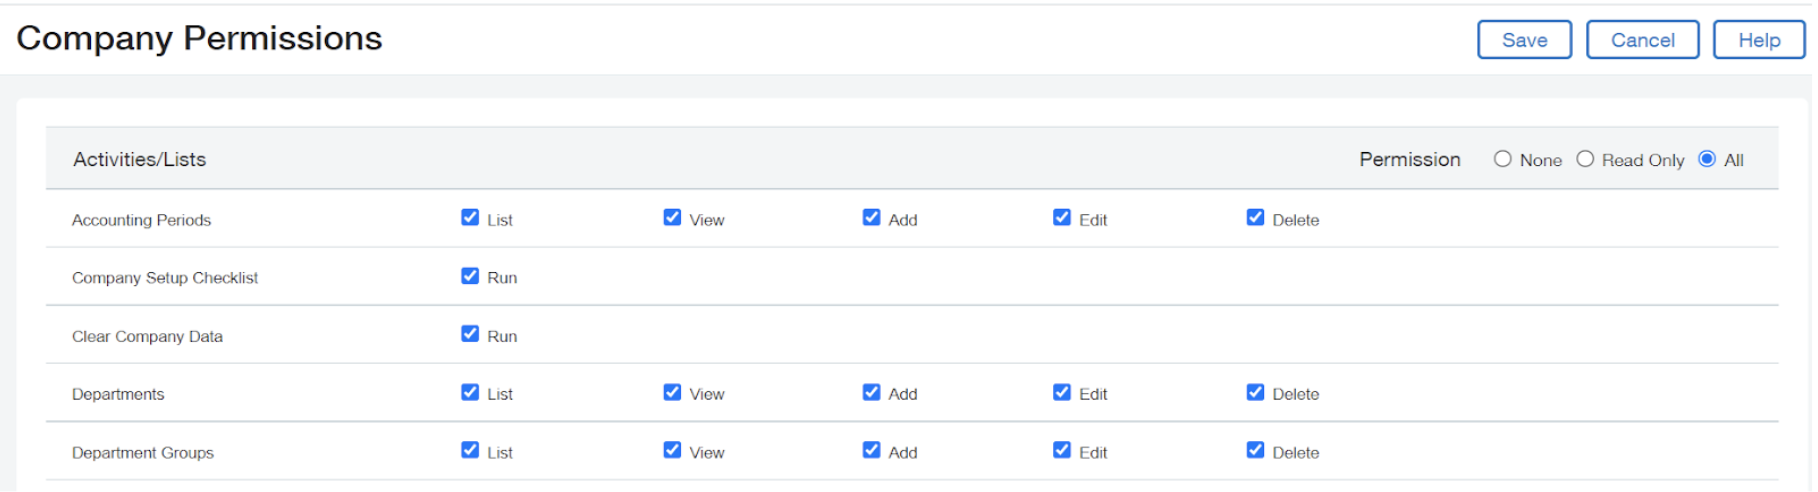
- From here, select All for each Application/Module. Be sure to save your changes once complete. Note: Some modules have an additional Reports permission section. Select All for Reports as well
Step 4: Add Sender ID
- Next, add your company's Sender ID to the allowed list in your Sage Intacct account. To do this, select Company > Company Info. Next, select Edit, then select Security.
- Scroll down to the section labeled Web Services Authorizations and add your Sender ID. Input the sender ID you received from Sage and assign a description of "Sender ID for xtraCHEF". If Sage asks for it, xtraCHEF's sender ID is xtraCHEFMPP. Finally, select Save.
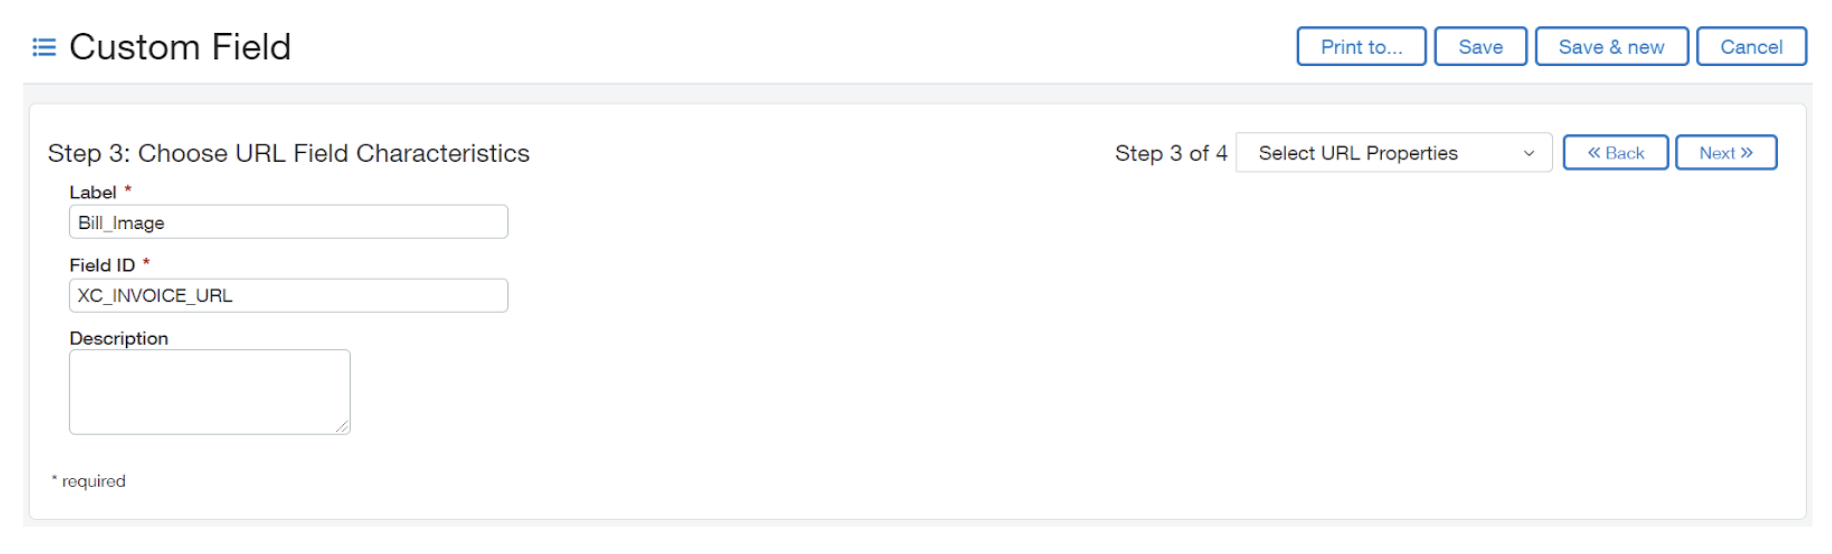
Step 5: Add Invoice URL
- For xtraCHEF to successfully sync invoice images to Sage Intacct, an Invoice URL needs to be created. To do this, select Company > Customization Service. Next, select Custom Fields.
- For some accounts, your Custom Fields section could be under Platform Services.
- Select Add, then choose AP Bill from the Choose Object to Extend drop-down.
- Next, choose URL from your Choose Field Data Type drop-down. Continue by selecting Next.
- You will then be prompted to Choose URL Field Characteristics. Under Label, enter "Bill_Image". For your Field ID, input "XC_INVOICE_URL"
- To proceed, select Next. Next, you can Choose Deployment Options. Enter Field Set as "xtraCHEF" and Show on Page as "Header." Finally, select Done.


Step 6: xtraCHEF Configuration Settings
- With your Sage Intacct setup steps completed, we can finalize your connection with xtraCHEF. To do this, log in to your xtraCHEF account and navigate to the gear icon > Account Setup.
- Then, select Integrations and Intacct. Here, you can enter the IDs you set up previously in your Sage Intacct account. Based on the previous instructions, these fields should read as follows:
- Company ID: This field will be provided by Sage
- User ID: sync_xtrachef
- Password: Check the email associated with your sync_xtrachef user. A password was emailed to that address when the user was created in step 1 above.

Use Class (Location ID) with Intacct Extracts
Customers can extract invoices from xtraCHEF using Class (at the location level), Department, or both. To have this configured in xtraCHEF, navigate to the gear icon > Locations. You will then be able to select the location that you would like to extract at the location level and edit this location’s Account Number.
- If you wish to only use Class, the value in the "Account Number" field should be the location's Class ID in Intacct followed by a tilde. For example, ABCD~
- Class may be labeled as "Location ID" in Intacct.
- If you only wish to use Department, the value in the "Account Number" field should be a tilde followed by the Department ID in Intacct. For example, ~1234
- If you wish to use both Class and Department, the value in the "Account Number" field should look something like this: ABCD~1234
Note: The integration supports extracting invoices at the Class invoice level. To have this configured, please reach out to your xtraCHEF customer care team at support@xtrachef.com.
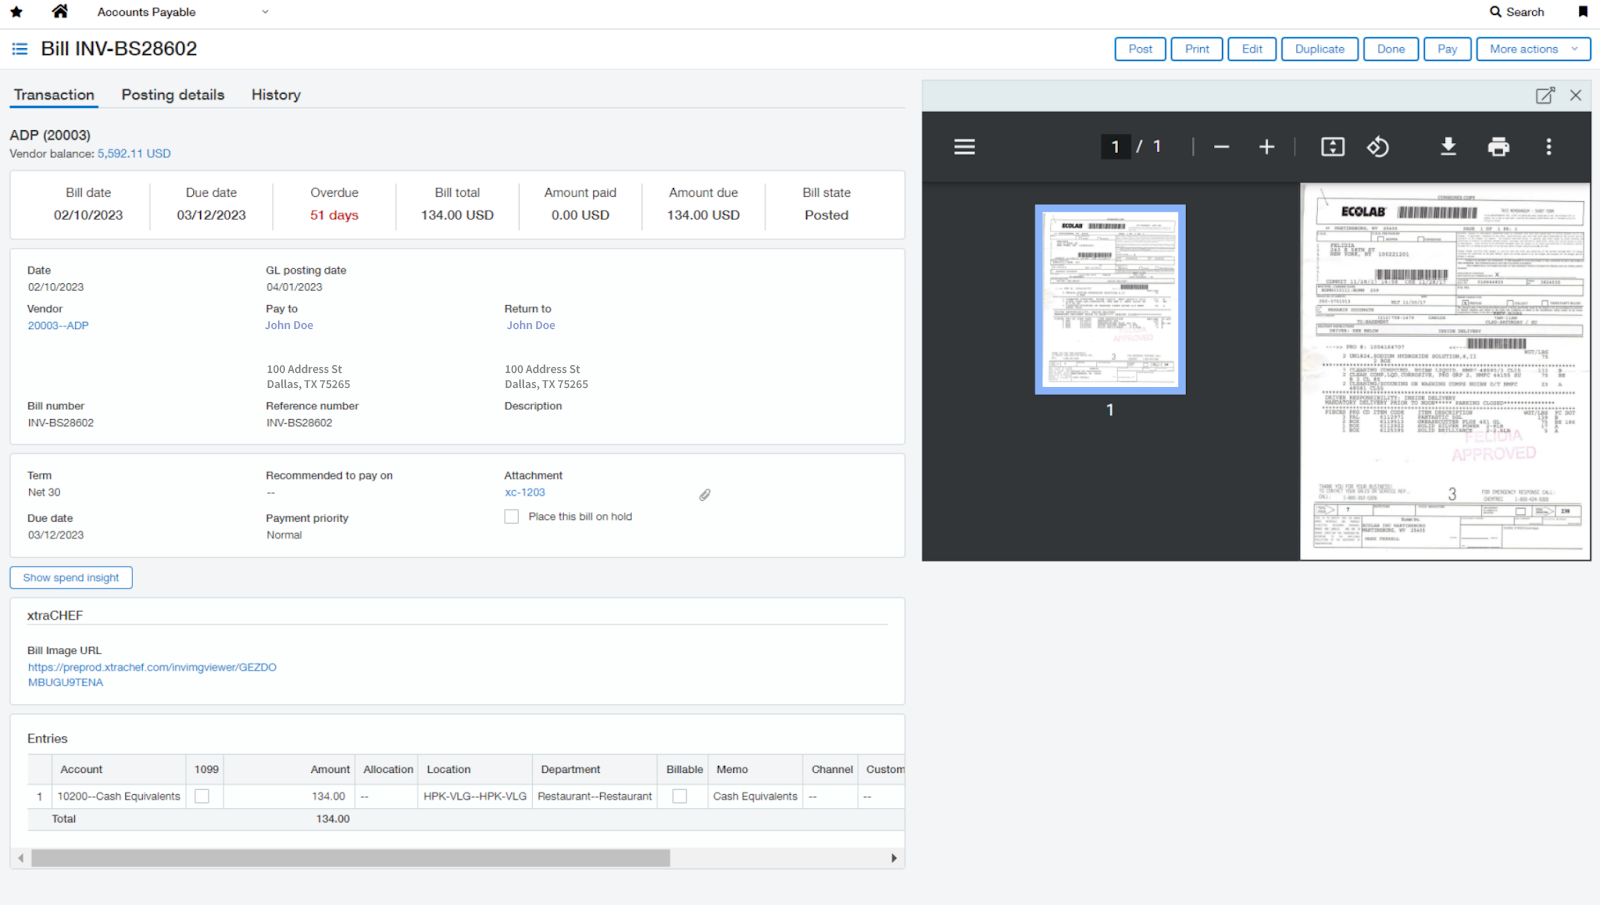
Intacct Sync Example
Once synced, invoices will carry over into your accounting system as a bill. Similarly, daily sales will appear as journal entries. The image below depicts an example of a bill synced via the xtraCHEF integration.