Create Service Areas and Table Setup
Last updated: Jun 23, 2026, 7:04 PM
- Create Service Areas
- Set Up Tables
- Table Status Colors on the POS
- Troubleshoot Tables and Service Areas
Create Service Areas
| In order to create service areas, a user must have the 6.2 Kitchen/Dining Room Setup access permission. Learn more about access permissions here: Permissions Reference Guide. |
To create service areas, follow the instructions below:
- In Toast Web, navigate to Front of House > Service areas & tables > Service areas.
- Select + Add Service Area.
- Enter a name, select whether this is your primary service area, and assign a revenue center.
- Save and publish your changes.
- Repeat these steps for every service area you wish to add for your restaurant.
Note: Service areas cannot be hidden or archived; they can only be deleted. Select the trash can icon to delete a service area, then Save and Publish all changes. If you accidentally select the trash can icon on a service area and haven't yet saved and published changes, you can select Undo Remove to revert this change.
If you wish to save specific sections of this article and turn it into a printable file, you can highlight specific text that you’d like to save, then right-click and select Print. Next, select the drop-down list next to Destination, then choose Save as PDF.
Set Up Tables
To add tables to a service area, watch this video or follow the steps below:
| In order to add tables to service areas, a user must have the 6.2 Kitchen/Dining Room Setup access permission. Learn more about access permissions here: Permissions Reference Guide. |
- Locate the desired service area by navigating to Front of House > Service areas & tables > Service areas.
- Select Edit Tables.
- Drag and drop elements from the Tables section (a) to the layout area (b). If you click on a specific table, you'll see options to adjust the table number, size, width, height, and revenue center at the bottom of the page (c). You can also use elements from the Barriers & Labels section to fully customize your dining rooms to match your exact layout.
- Save and publish your changes.
- Complete these steps for any other service area for which you'd like to have a table layout created.
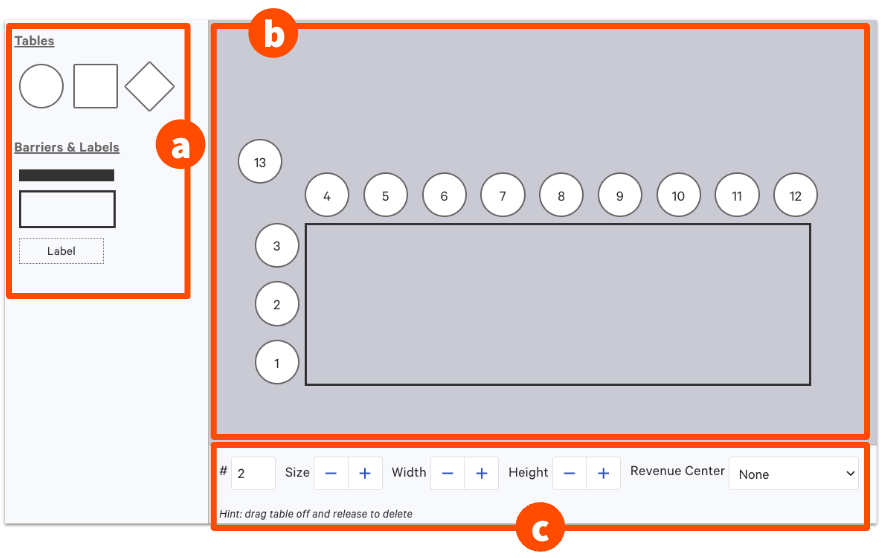
In this example in the video above, we'll start from scratch to create this table layout for this restaurant's patio. You’ll see a bird's eye view of the restaurant's patio. This is on the sidewalk of a busy street in a city. So we'll want to create barriers around each table and clearly label where the host stand is in relation to the tables. Toast Web gives you a few table shapes to choose from, as well as barriers and a label option. When you add any of these elements to your layout, you can make adjustments to it, such as changing the size, width, height, and revenue center. If you'd like to delete anything you've added, simply select the item and then select Delete below.
You can use the Label option to notate where the sidewalk is (in this example, update it to say Sidewalk and then adjust the width and height until it matches the size of the sidewalk in relation to the tables.
When you’re all finished Save and Publish these changes to see how they'll appear on the POS’s Table Management screen. Servers can now be assigned to these tables and begin taking orders.
If you've saved and published changes but you're not seeing the new layout on your POS, you may need to resync all data for the changes to show.
Table Status Colors on the POS
| In order to view and utilize the Table Service Mode feature on the POS, a user must have the 1.1 Table Service Mode access permission. Learn more about access permissions here: Permissions Reference Guide. |
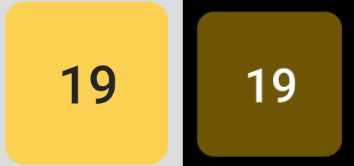
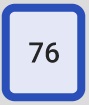
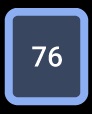
Within Table Service mode on your POS, you'll notice that your tables will change colors based on the status of orders. Both light mode and dark mode versions are shown.
Note: The POS will display table status colors for tables that are owned by the user who is signed in. This means if you don't own any tables, they'll all appear gray.
| Color | Meaning | Icon | ||
| Green | All items on an order are fulfilled in the kitchen (if you're using a KDS) | | ||
| Red | Items on an order are held and have not been sent to the kitchen | | ||
| Yellow | Items on an order are sent | | ||
| Blue | The table is selected |
| ||
| Gray | The table is served by another server (order data will be visible if the user has the 1.8 View Other Employees' Orders permission) |
| ||
| Dotted border | The table is empty |
|


Troubleshoot Tables and Service Areas
| In order to perform the troubleshooting steps indicated below, a user must have the 6.2 Kitchen/Dining Room Setup access permission. Learn more about access permissions here: Permissions Reference Guide. |
If you're having trouble with tables and service areas (for example, tables aren't syncing to the POS or certain orders are not registering with a service area), use the following steps to troubleshoot:
- Reference the instructions in Create Service Areas and Set Up Tables to ensure your restaurant's configuration is correct.
- If you're still having issues, try creating a new service area. If the new service area works, remove the previous version that wasn't working.
- If you are unable to see the table time on your tables, the size of the tables can impact whether a table time will be shown. If the table is smaller, because there is not enough space for to show the time, you won't see the table time. If you want to see the table time, please try increasing the size of the table.
Sometimes, adding a border around tables for aesthetic purposes can cause issues with accessing or editing tables. If you experience this error, try removing the decorative borders.