Create a Fixed Discount
Last updated: May 19, 2026, 8:34 AM
Create a fixed dollar amount or percentage discount in Toast Web that staff can apply to a specific item, a check, or only when certain items are on the check. This article covers how to set the discount value, what it applies to, common advanced settings (auto apply, bulk, permissions), and frequently asked questions.
- Before You Begin
- Quick Answer
- Create a Fixed Discount in Toast Web
- Choose What the Discount Applies To
- Advanced Settings
- Frequently Asked Questions
- Related Articles
Watch this video for a walkthrough of creating a fixed discount in Toast Web.
Before You Begin
Applies to: Toast Web
Permissions needed:
- A Toast Web permission that allows creating and editing discounts.
- 3.1 Discounts — required for cashiers and managers who will apply the discount on the POS.
- 6.1 Discount Setup (employees can update discounts or discount reasons in the payments section)
What you'll accomplish: Create a fixed dollar amount or percentage discount in Toast Web, choose what it applies to (a specific item or group, the entire check, or any eligible item), and configure advanced behavior such as auto apply, bulk discounting, and manager permissions.
Quick Answer
To create a fixed discount, in Toast Web navigate to Finance > Related > Settings > Discounts & promo codes, select + Add a Discount, set the Discount Type to Fixed, choose whether it is a dollar amount or a percentage, choose what the discount applies to (Specific item/group, Entire check, or Any item), then Save and Publish. Use the Advanced Settings section on the same page to set a shortened POS Name, require manager permission, allow combining with other discounts, auto apply the discount, or configure bulk discount rules.
Note: If a fixed dollar amount discount is greater than the remaining total of the check, the check total will be reduced to $0. No credit will be issued for the difference.
Create a Fixed Discount in Toast Web
Follow these steps to create a new fixed discount.
- In Toast Web, navigate to Finance > Related > Settings > Discounts & promo codes.
- Select + Add a Discount.
- Enter a Name for the discount. This name appears on the POS and on the guest receipt. The discount defaults to active — you can deactivate or reactivate it later from the Discounts page.
- Set the Discount Type to Fixed.
- Choose whether the discount is a set dollar amount or a percentage off, and enter the value.
- Under Applies to, choose how the discount applies to a check. See Choose What the Discount Applies To below for the three options.
- Adjust any other settings under Advanced Settings. See Advanced Settings below.
- Select Save and then Publish your changes.
Expected outcome: The fixed discount appears on your POS as a discount button. Staff with the 3.1 Discounts permission can apply it to checks (or any staff member can, depending on the Permissions Level you set).
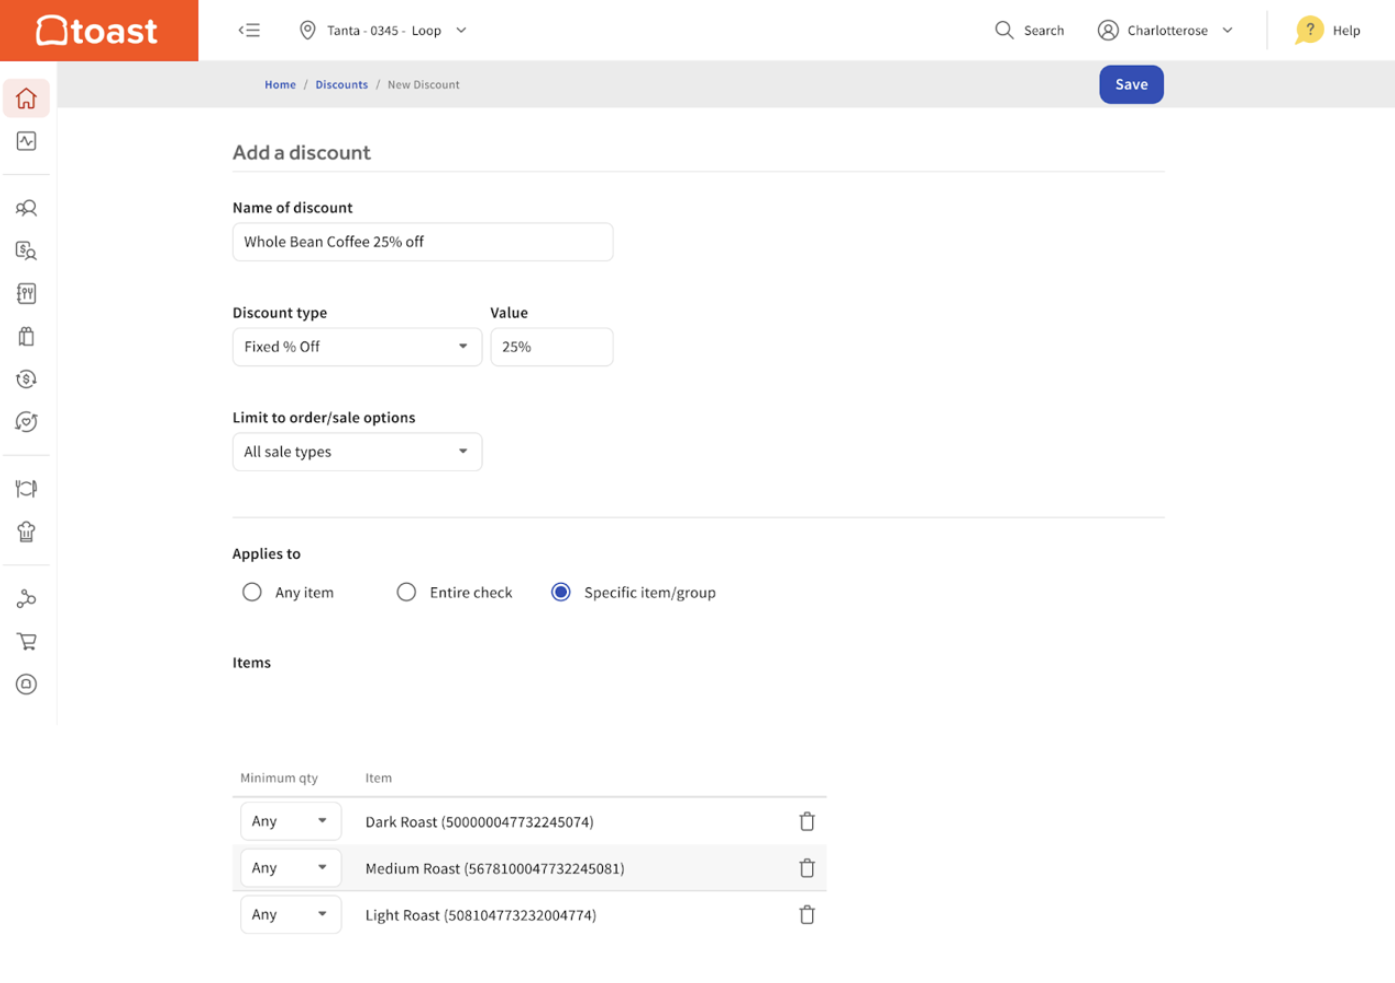
Choose What the Discount Applies To
Under Applies to, choose one of three options based on what you want to discount.
If you want to discount one or more specific items (including different sizes of the same item):
- Select Specific item/group.
- Search for the item or group in the Items search bar. If the item has multiple sizes, adjust the minimum quantity required for the discount. You can also select Any if using portions.
- Select Save.
Note: There is currently no way to set an item maximum. The discount applies to all eligible items on the check.
If you want to discount the entire check (optionally when a required item is on the check):
- Select Entire check.
- If you add an item, group, or menu, the check must contain one of those items for the discount to apply.
- You can also configure item exceptions — items that should not be eligible for the discount.
Item exceptions are most commonly used when configuring employee discounts to exclude alcoholic beverages as discounted items on the check level.
Important: For item exceptions to work, your discount cannot have Bulk discount, Auto apply discount, or Allow with other discounts selected.
If you want the discount to apply to the first eligible item on the check:
- Select Any item. The discount applies to the first eligible item on the check, unless the user highlights a specific item when the discount is applied.
Note: To allow discounts on fractional portions of an item, you must also select the Applies to quantities less than 1 checkbox in the individual discount settings.
Advanced Settings
On the discount details page, select Show to open the Advanced Settings section and reveal additional customization options.
POS Name
Enter a shortened name that will appear on the POS for this discount. Use this when the full discount name is too long to display on a POS button.
Permissions Level (Manager Permission)
Discounts default to Any User. Select Manager if you want to require a manager passcode in order to apply the discount.
Note: A staff member applying any discount on the POS must have the 3.1 Discounts permission. If they do not, the POS prompts for a manager passcode.
Allow With Other Discounts
The Allow with other discounts option determines whether multiple check-level discounts can be applied to one check. Select this checkbox if you want to allow this discount to be combined with other discounts.
- Exclusivity rules only work with Fixed and Open check-level discount types.
- All discounts are exclusive by default, meaning they cannot be combined with other discounts unless you select Allow with other discounts.
Auto Apply Discount
Fixed item-level discounts (for example, $5.00 off nachos) can be configured to automatically apply to an order. If the check meets all the necessary conditions, the discount is applied once a user selects Send, Stay, Hold, or Pay on the POS.
Rules for auto apply (also covered in Get Started With Discounts):
- Auto apply does not function for manager-only discounts. Auto apply must be assigned a permission level of Any User, which means any employee can apply the discount.
- Auto apply does not function for discounts that have promo codes attached.
- Auto apply can only be configured for item-level discounts. A discount set to Entire check will not show this option.
These three rules are also why the Auto apply discount checkbox sometimes appears grayed out — see the Frequently Asked Questions section below.
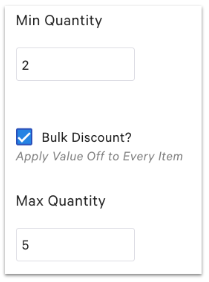
Bulk Discount
Fixed discounts with at least one required item on the check can use the Bulk discount setting to allow multiple qualified items on a check to be discounted at once. If your discount meets these requirements, the following settings appear in the Advanced Settings section:
- Min Quantity — the number of items required on the check to receive the bulk discount.
- Max Quantity — the greatest number of items that are eligible to receive the discount.
For example, if you are configuring a $3.00 off discount for nachos, a Min Quantity of 2 and a Max Quantity of 5 means the discount is offered if you buy at least 2 (but up to 5) nachos.
Note: Min Quantity and Max Quantity cannot be changed if there are hours available set in the discount's availability section.
Frequently Asked Questions
Why is the auto apply discount checkbox greyed out?
The Auto apply discount checkbox is grayed out (also written "greyed out") when at least one of three conditions is true. Auto apply only works for item-level fixed discounts with the Any User permission level and no promo code. The checkbox is grayed out if the discount is set to Entire check, if the Permissions Level is set to Manager, or if the discount has a promo code attached. To enable auto apply, change Applies to to one of the item-level options, set Permissions Level to Any User, and remove any attached promo codes.
Also asked as:
-
- why is auto apply discount greyed out
- auto apply discount is grayed out
How do I make a discount automatic?
To make a discount automatic, set up a fixed item-level discount and enable Auto apply discount in the Advanced Settings section. Auto apply requires the discount to be item-level (not Entire check), set to Any User permission level, and have no promo code attached. When the check meets the discount conditions, the discount applies on its own when the user selects Send, Stay, Hold, or Pay on the POS.
Also asked as:
-
- set automatic discount for every check
- automatic discount
- can i make an item automatically discount
- is there a way to automatically add a discount to a certain item when it gets rang in
How do I add a 15% discount (or any percentage discount) to the POS?
To add a percentage discount to the POS, create a new fixed discount, set the Discount Type to Fixed, then select percentage and enter the percentage value (for example, 15). Choose what the discount applies to (Specific item/group, Entire check, or Any item), then Save and Publish. The discount appears on the POS as a button that staff can select on a check.
Also asked as:
-
- How do i add 15% discount to POS
- how do i make employee discount %50 off any menu item
- How do I discount a single item by percentage
How do I create an employee discount?
To create an employee discount, create a new fixed discount, set the Discount Type to Fixed, and enter the dollar amount or percentage. Choose what the discount applies to (most commonly Entire check for a percentage off the check, or Specific item/group for staff-meal items). In Advanced Settings, you can set the Permissions Level to Any User so any employee can apply it, or Manager if a manager passcode is required. If you want to exclude items like alcohol on a check-level discount, configure them as item exceptions under Entire check. The source article notes that item exceptions are most commonly seen when configuring employee discounts to exclude alcoholic beverages.
Also asked as:
-
- how do i make employee discount %50 off any menu item
- How do I make the Employee discount 50% off food up to $7.50
- How can I set up an employee discount that covers 100% of the order, up to $15
- how to create employee discount
How do I require a manager passcode to apply a discount?
To require a manager passcode to apply a discount, open the discount in Toast Web, expand the Advanced Settings section, and set the Permissions Level to Manager. With this setting, the POS prompts for a manager passcode whenever an employee tries to apply the discount. The manager must have the 3.1 Discounts permission granted to them in order for their passcode to be valid.
Also asked as:
-
- We have a discount button that requires manager access to override. How do we remove the required override?
- i need to hide manager comp discount button for everyone except the owners
Why is my bulk discount only applying to one item when I want it to apply to all?
A bulk discount applies to multiple qualified items only when the Bulk discount setting is enabled and the Min Quantity and Max Quantity are configured correctly. Open the discount in Toast Web, expand the Advanced Settings section, select the Bulk discount checkbox, set the Min Quantity to the number of items required on the check, and set the Max Quantity to the greatest number of items eligible. Bulk discount only appears on fixed discounts that have at least one required item on the check. If the discount still applies to only one item, double-check that the items meet the discount's Specific item/group requirement and that the Bulk discount checkbox is selected.
Also asked as:
-
- WHy is my bulk discount not applying to the check
- we have a discount on certain items, but if they ring in more than one, it only gives the discount to one of the items
Can I set up a discount for specific days or times (like happy hour)?
Yes — discount availability is configured in the Availability section of the discount details page. Expand the Availability settings to set a date range, days of the week, and time of day. Each discount can be assigned to only one date range, but you can configure multiple time-of-day windows on the same days (for example, every Tuesday from 10 a.m. to 12 p.m. and again from 5 p.m. to 8 p.m.). Time-based availability is documented in detail in Get Started With Discounts → Discount Availability section. If a time-based discount is not appearing on the POS as expected, see "Troubleshoot Discount Availability".
Also asked as:
-
- how to add a automatic happy hour discount
- I want to run a promotion on a select handful of drinks between 6p-9p 50 % off
- i need to fix my draft beer happy hour discount
- is there a way To do a price discount on a whole menu category? and put it on a timer
Why isn't my discount showing on the POS?
A discount may not appear on the POS for several reasons documented in Troubleshoot Discount Availability. The most common reasons are: the discount is set to inactive on the Discounts page (the Active toggle is not enabled), the current date is outside the configured availability dates, the current day is outside the configured days of the week, or the current time is outside the configured time availability. For the full troubleshooting steps, see Troubleshoot Discount Availability.
Also asked as:
-
- My employee is saying they cannot see one of the discount buttons. Please help me resolve this.
- discount not appearing
How do I apply a discount on the POS once I've created it?
After you create and publish the discount in Toast Web, the discount appears as a button on the POS. To apply it to a check, select the item you want to discount and then select Discount Item, or select the overflow menu (three vertical dots) in the top right corner of the check and select Discount. Select the discount you want to apply. Full POS application steps are in Discount Items and Checks.
Also asked as:
-
- how can add discount button to the order screen instead to go to the 3 dots and select discount
- I'm trying to make a discount button
Related Articles
- Get Started With Discounts
- Discount Items and Checks
- Troubleshoot Discount Availability
- Create an Open Discount
- Create a BOGO (Buy One Get One) Discount