Set Up and Print Item Labels
Last updated: Jun 22, 2026, 9:05 AM
- Before You Begin
- Choose How You'll Print Item Labels
- Set Up Your Label Printer
- Print Item Labels by Routing Items to Prep Stations (No KDS Required)
- Print Item Labels From a KDS
- Print Multiple Items on a Label
- Related Articles
Note: The printers described here are kitchen label printers. They cannot print barcodes. For barcode labels in Toast Retail, see the Generate and Print Barcodes section of Get Started With Toast Retail.
Before You Begin
Applies to: Toast POS, Toast Web
Permissions needed:
- 7.1, 6.10, 6.4, 6.2, 4.5, 4.26, 4.27
What you'll accomplish: Print an individual item label for each item in an order, showing the item name, modifiers, guest name, due date and time, and dining option.
Choose How You'll Print Item Labels
Individual item labels can be printed from an Epson L90, an Epson L100, or a Toast TLP400 printer. After you set up the printer, choose the printing method that matches your setup:
- If you do not use a Kitchen Display System (KDS), route items to a prep station that is linked to your label printer.
- If you use a KDS, set the label printer as the device's receipt printer and print selected items directly from the KDS.
Note: By default, the label printer prints one label per item. A large order of several items produces one label for each item.
Set Up Your Label Printer
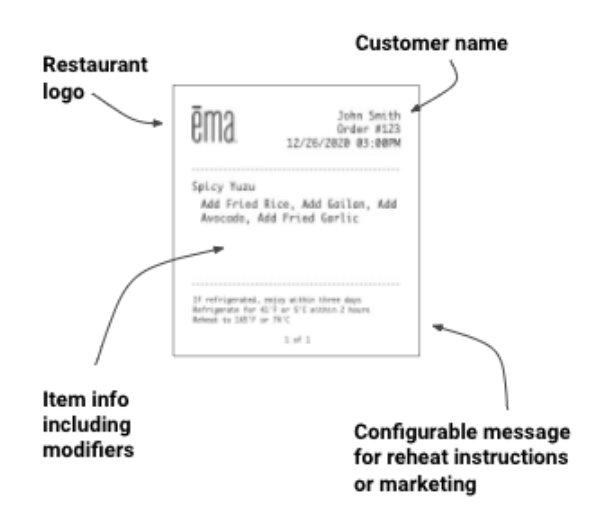
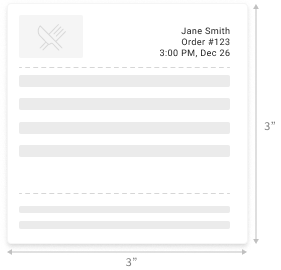
Every item label shows the guest-facing item name and all modifiers, the guest name, the due date and time, and the dining option. Large labels also include your restaurant logo and a configurable footer.
Note: Installing a Toast TLP400? See Toast Item Label Printer Quick Start Guide. Setting up an Epson L90 or L100? See Set up Your Epson L100 or L90 Label Printer With Toast.
To set up your label printer:
- Plug in your new printer, power it on, and navigate to Setup > Printer Setup in the main Setup menu of your POS device. Follow the prompts to set up the printer, including the label configuration options below.
- Label Size: After choosing the Item Labels setup for this printer, select your size. Make sure the size matches the paper loaded in your printer. Label printers are compatible with the Wide (76-80 mm) paper width setting only; the Narrow setting is not compatible with item label paper. For paper guidance, see Printer Paper Rolls and Ink Ribbons.
- Label Format: For the Small and Medium sizes, select a format that emphasizes either the guest name or the ticket number. If an order has a table or ticket number, that number always displays instead of the dining option.
- Confirm the settings in Toast Web by navigating to Finance > Related > Settings > Printers & cash drawers.
- Select the printer you just added. On the printer's detail page, confirm the Model is set to Epson L90, Epson L100, or Toast TLP400.
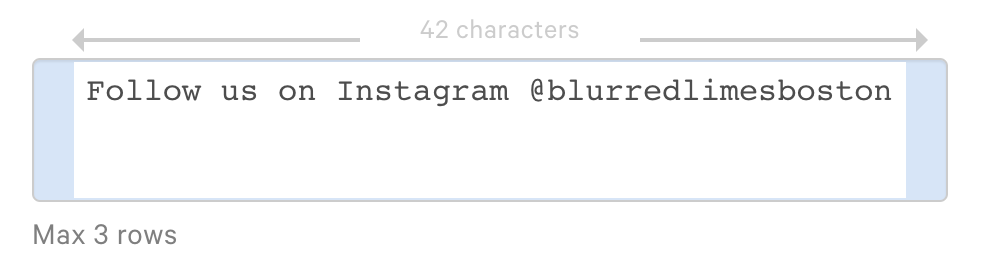
- If you selected the Large - Square size, add a Custom footer such as prep instructions or a social media callout. This field also supports standard emojis.
- Select Save and Publish.
Expected outcome: Your label printer is configured in Toast Web with the correct model and label size, and a test print produces a label.
Note: To print the dining option on the label, navigate to Kitchen > Printers, tickets, & KDS devices > Kitchen and select Yes for Always Print and Show Dining Option.
The Small, Medium, and Large sizes display differently:
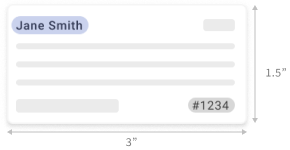
- Small - Vertical (1.5" x 3") and Small - Horizontal (3" x 1.5") support the Guest Name on top format. The Small - Vertical size adjusts the font size to fit all modifiers on the label.
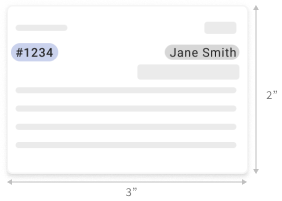
- Medium - Horizontal (3" x 2") supports the Ticket Number format.
- Large - Square (3" x 3") has no additional format options. Both the guest name and ticket number appear in the header, along with your restaurant logo (uploaded on the Restaurant Info page in Toast Web).

Print Item Labels by Routing Items to Prep Stations (No KDS Required)
If you do not use a KDS, print individual labels by routing items to a prep station that is linked to your label printer. First configure the prep station, then route your menu items to it.
To configure a prep station for item label printing:
- In Toast Web, navigate to Kitchen > Kitchen stations > Prep stations.
- Select +Add to create a new prep station, or select an existing prep station to edit it.
- Complete the prep station fields:
- Station Name: A simple name such as Grill.
- Send to Expediter: When selected, items routed to this prep station also appear on expediter screens or tickets. To learn more, see the Expediter section of Get Started With Kitchen Configuration.
- Other Stations: Set additional prep stations here if items should route to more than one station.
- Ticket Printer: Select your label printer from the drop-down menu to link it to this prep station.
- Always Print Tickets: Toast recommends selecting this for item label printing. If it is not selected, tickets print only in offline mode.
- Select Save and Publish.
Note: If you do not need items sent to a kitchen printer or to multiple prep stations at the same time, select Nothing Selected for Other Stations. For example, a coffee shop that wants an item label but no kitchen ticket can create a dedicated prep station for the label printer, such as Coffee Takeout Station.
To route your menu items to the prep station:
- In Toast Web, navigate to Menus > Bulk management > Advanced properties.
- Using the Show/Hide drop-down menu at the top right, select Prep Stations.
- In the new Prep Stations column, select the prep station for each menu, group, or item you want to route to the label printer. To learn more, see Configure and Assign Prep Stations.
- Select Save and Publish.

Expected outcome: Items routed to the linked prep station print as individual labels on your label printer.
Note: To stop certain orders or items from printing at the label printer (for example, keeping dine-in orders off a takeout label printer), use item routing and the Non-Printing Prep Stations setting. See Configure and Assign Prep Stations and How do I stop bar orders from printing at the bar printer?. If labels are not printing as expected, see Get Help With Your Toast Item Label Printer TLP400.
Print Item Labels From a KDS
If you use a KDS, set your label printer as the device's receipt printer and print selected items directly from the KDS.
- On the device you primarily use for takeout orders, open the main menu of the Toast POS app and navigate to Setup > Device Setup.
- For Receipt Printer, select the label printer you set up.
- Select Save.
- On your KDS device, select the individual items on a ticket, then select Print.
- Select Expediter/Food Runner Ticket if you use your KDS as an expediter, or Station Ticket if you use your KDS as a prep station.
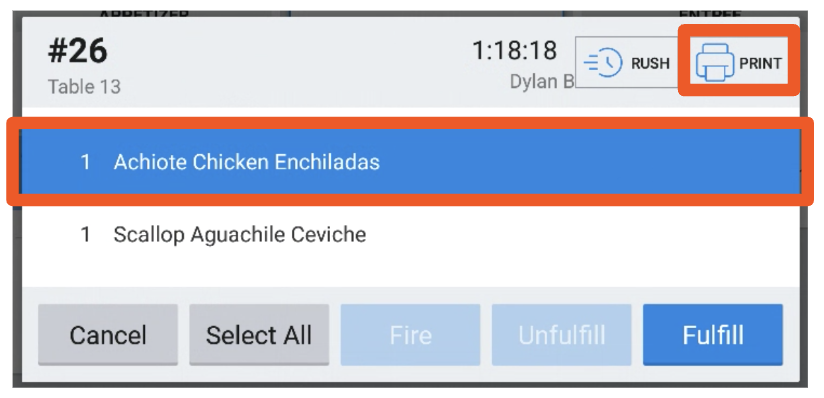
Expected outcome: The selected items print as individual labels on your label printer.
Note: To print individual drink tickets with modifiers as separate line items, assign the label printer to that drink prep station using the prep station steps above.
Print Multiple Items on a Label
Item Labels print one item per label. If more than one item is preferred, the printer should be set up to print Kitchen Tickets, instead of Item Labels. This can only be done with Epson L90 and Epson L100 printers.
- In Toast Web, navigate to Payments > Checks & receipt setup > Printers and cash drawers.
- Select the Label Printer you would like to print Kitchen Tickets.
- Under Printer Configuration, change the Ticket Type to Kitchen Ticket.
- Select Save and Publish.
For help setting prep stations for this printer, go to Configure and Assign Prep Stations.
Related Articles
- Toast Item Label Printer Quick Start Guide
- Set up Your Epson L100 or L90 Label Printer With Toast
- Configure and Assign Prep Stations
- Get Help With Your Toast Item Label Printer TLP400
- Printer Paper Rolls and Ink Ribbons