Set Up Your P630 Card Reader
Last updated: Feb 10, 2026, 6:52 AM
This article provides step by step instructions on how to Set Up the P630 Card Reader.
In this Article:
- P630 Card Reader Components
- P630 Hardware Installation
- P630 Device Setup
- P630 Device Information
- P630 Network Settings
P630 Card Reader Components
Note: You'll need an Ethernet cable for installation. This is not provided.
- P630 Plus Card Reader
- Ethernet dongle
- USB cable and region-specific power plug for charging
P630 Hardware Installation
To install your P630 card reader follow the steps outlined below:
- Begin by unboxing your new device and removing the P630 Plus reader, power supply, and power cable dongle.
- To get started, slide the panel towards the top of the card reader. Plug the Ethernet dongle into its slot and slide the panel back on. Do this gently as the pins are very delicate and can easily get damaged. Make sure the cable feeds through the hole in the panel.
- Plug one end of the Ethernet cable into the end of the port on the dongle labeled ETH. Plug the other end into the Ethernet port on your router.
- Plug the power cable into the electrical port on the Ethernet dongle. It is recommended to secure this with a cable tie as it can become loose easily. Plug the other end of the power cable into a wall outlet, and the card reader will automatically power on. This process can take a few minutes.
- Once you have connected your card reader to the network, you’ll need to pair the card reader to your Toast device. If the network cable is connected correctly to both the card reader and the router, an Ethernet connection symbol (<>) will display in the top right corner of the screen. Once this is available, you will be ready to move on.
- Select Board Terminal at the bottom of the card reader screen. Your store location will appear on the device. Select your location and select Confirm. If you are unsure that the correct store location is displayed, please contact Toast Support. The card reader will update and may restart several times. This entire process can take up to 30 minutes to complete.
- Once the device has completed the setup process, it will show a screen with the Toast logo and an Ethernet connection in the top right. That means your card reader is ready.
P630 Device Setup
We can now begin to pair your card reader with a Toast Device.
- Sign in to the Toast app on your Toast device and navigate to Setup > Device Setup.
- Scroll down to the Card Readers section and select + Add New Card Reader.
- From the Card Reader Model options, select Adyen (Network).
- Select Scan QR Code. Please be aware that the card reader cannot be set up in the Toast App if the restaurant is still in Test Mode.
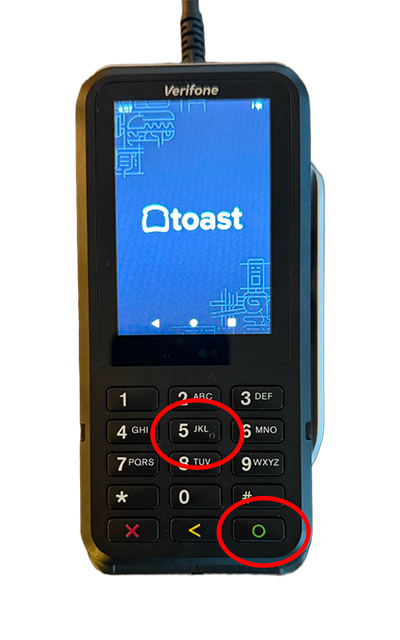
- On the card reader screen, select Option 5 (Device Info) and then the green circle button on the keypad.
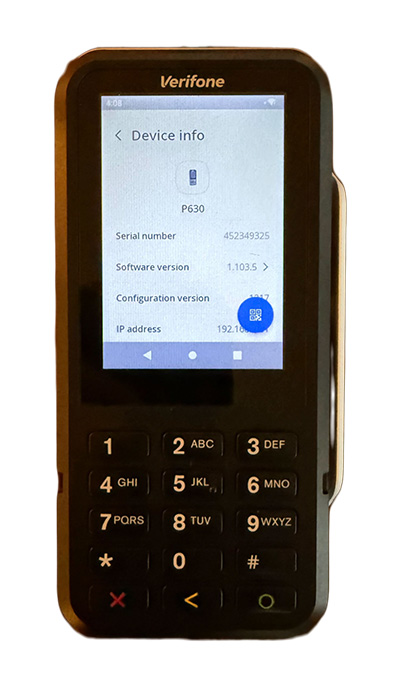
- The Device Info screen will display a QR code logo in the bottom right of the screen. Select the blue circle on the screen with the QR Symbol.
- Hold the card reader up to the camera on the Toast device you are pairing the card reader with and wait for the code to be read. (Tip: Turn up the screen brightness on the card reader)
- Select Complete Setup at the bottom of the screen on your Toast device. The device has been successfully paired!
- To test that everything works, navigate back to the homepage on the card reader by selecting the red X.
- From here, you can just navigate to the payment screen on your Toast device to test the card reader.
- After selecting Credit on the payment screen, the workflow will then move over to the card reader.
- Select the tip amount. If tipping hasn't been enabled on your device, the card reader will display the payment screen, looking for the card to be produced.
- Swipe, dip, or tap the payment card on the P630 Plus card reader.
- The payment will be processed and indicate a complete payment on the card reader display screen. The workflow will switch back to the Toast device.
- You are now set up to take payments with your P630 Plus card reader. If you need more information or troubleshooting, please contact Toast Support.
P630 Device Information
On the home screen of the card reader, select the 5 button and then the green circle button.
On the next page, you’ll see device information such as
- Model
- Serial Number
- Software Version
- Config Version
- IP Address
- Merchant Account
- Store ID
P630 Network Settings
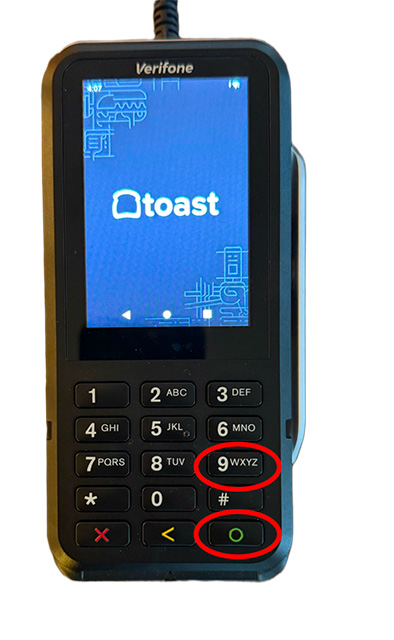
- On the home screen of the card reader, select the 9 button and then the green circle button.
- You may be prompted for a password; if so, enter 8678 (TOST).
- The next page will prompt you with a list of options; for network settings, select Network.
- Network - Network information for both Ethernet and Wi-Fi
- Software - Update device software
- Config - View current, Update, and Remove config (requires reboarding)
- Transactions - Recent Transactions page
- Power Options - Reboot and power off options
- Within Network, you’ll see the following options.
- Select Ethernet to adjust settings to network or IP information.
- Select Wi-Fi to connect or adjust network settings for wireless networks
- Overview - Connected Network Information
- Ethernet - Ethernet details and settings
- USB gadget - NOT USED
- USB Ethernet - NOT USED
- Wi-Fi - Wifi settings, default off, but can be used
- Diagnostics - Connection testing
- In the Ethernet section, you’ll see the DHCP information listed out. If the device is using/requires a static IP to be assigned, the DHCP check box will be unchecked, and you can manually fill in static IP information. If adjusting IP information, the following information is required:
- IP address
- Subnet Mask
- Router IP
- DNS - preferred
- DNS - secondary
- Select Save when complete.
- In the Wi-Fi section, you’ll see a list of available networks. If you need to connect to an SSID, select the + Add Network button in the bottom right of the screen. Then select the correct SSID and enter the password.