Toast Tables™: Ticketed Events Overview
Last updated: Oct 2, 2026, 2:13 PM
Learn how Toast Tables™ Ticketed Events lets you sell tickets for classes, performances, and activities without assigning tables.
- About Toast Tables™ Ticketed Events
- Common Uses
- Create Your First Ticketed Event
- Manage a Ticketed Event
- Sales Tab
- Guests Tab
- Ticket Rules
- Payments & Fees
- Frequently Asked Questions
- Related Articles
| Toast Tables™ Ticketed Events is currently in open beta, so some features may not be available to all restaurants yet. To learn more or join the beta, visit the Test Kitchen. |
About Toast Tables™ Ticketed Events
Ticketed events use ticket capacity rather than table availability, so they're a good fit for classes, performances, or activities where guests don't need an assigned seat. An event can have one or more showings, which are specific dates and times the event runs. Guests book by purchasing tickets for a showing rather than reserving a table.
Note: Ticketed Events are part of a gradual rollout and require Toast Tables™ Plus with ticketing enabled. If you don't see the Ticketed Events tab yet, it may not be available for your restaurant. The Add-ons, Sales, and Guests tabs described below are rolling out separately, so you may have ticketed events without them.
Ticketed Events operate independently from Schedules and Experiences. If you want to run an event instead of your regular service, see Toast Tables™: Schedules to learn how to set a special schedule.
Common Uses
You can use ticketed events to:
- Sell a fixed number of prepaid or free tickets to a class, performance, or activity
- Run the same event on several dates, with tickets sold for each date
- Offer more than one ticket option, such as general admission and VIP
- Sell add-ons alongside tickets, such as merchandise, a drink package, or a bottle of wine
- Host an event at your restaurant or at another location
- Share a private event with guests by direct link
Create Your First Ticketed Event
To create a ticketed event:
- Navigate to Waitlist and Reservations in the left menu bar.
- Select Ticketed Events. Your existing events live on the left, and the details of the selected event appear on the right.
- Select Create ticketed event.
- Work through the six steps of the New ticketed event flow, which are Details, Images, Schedule, Event space, Tickets, and Confirm, described below.
- On the last step, select Confirm and create.
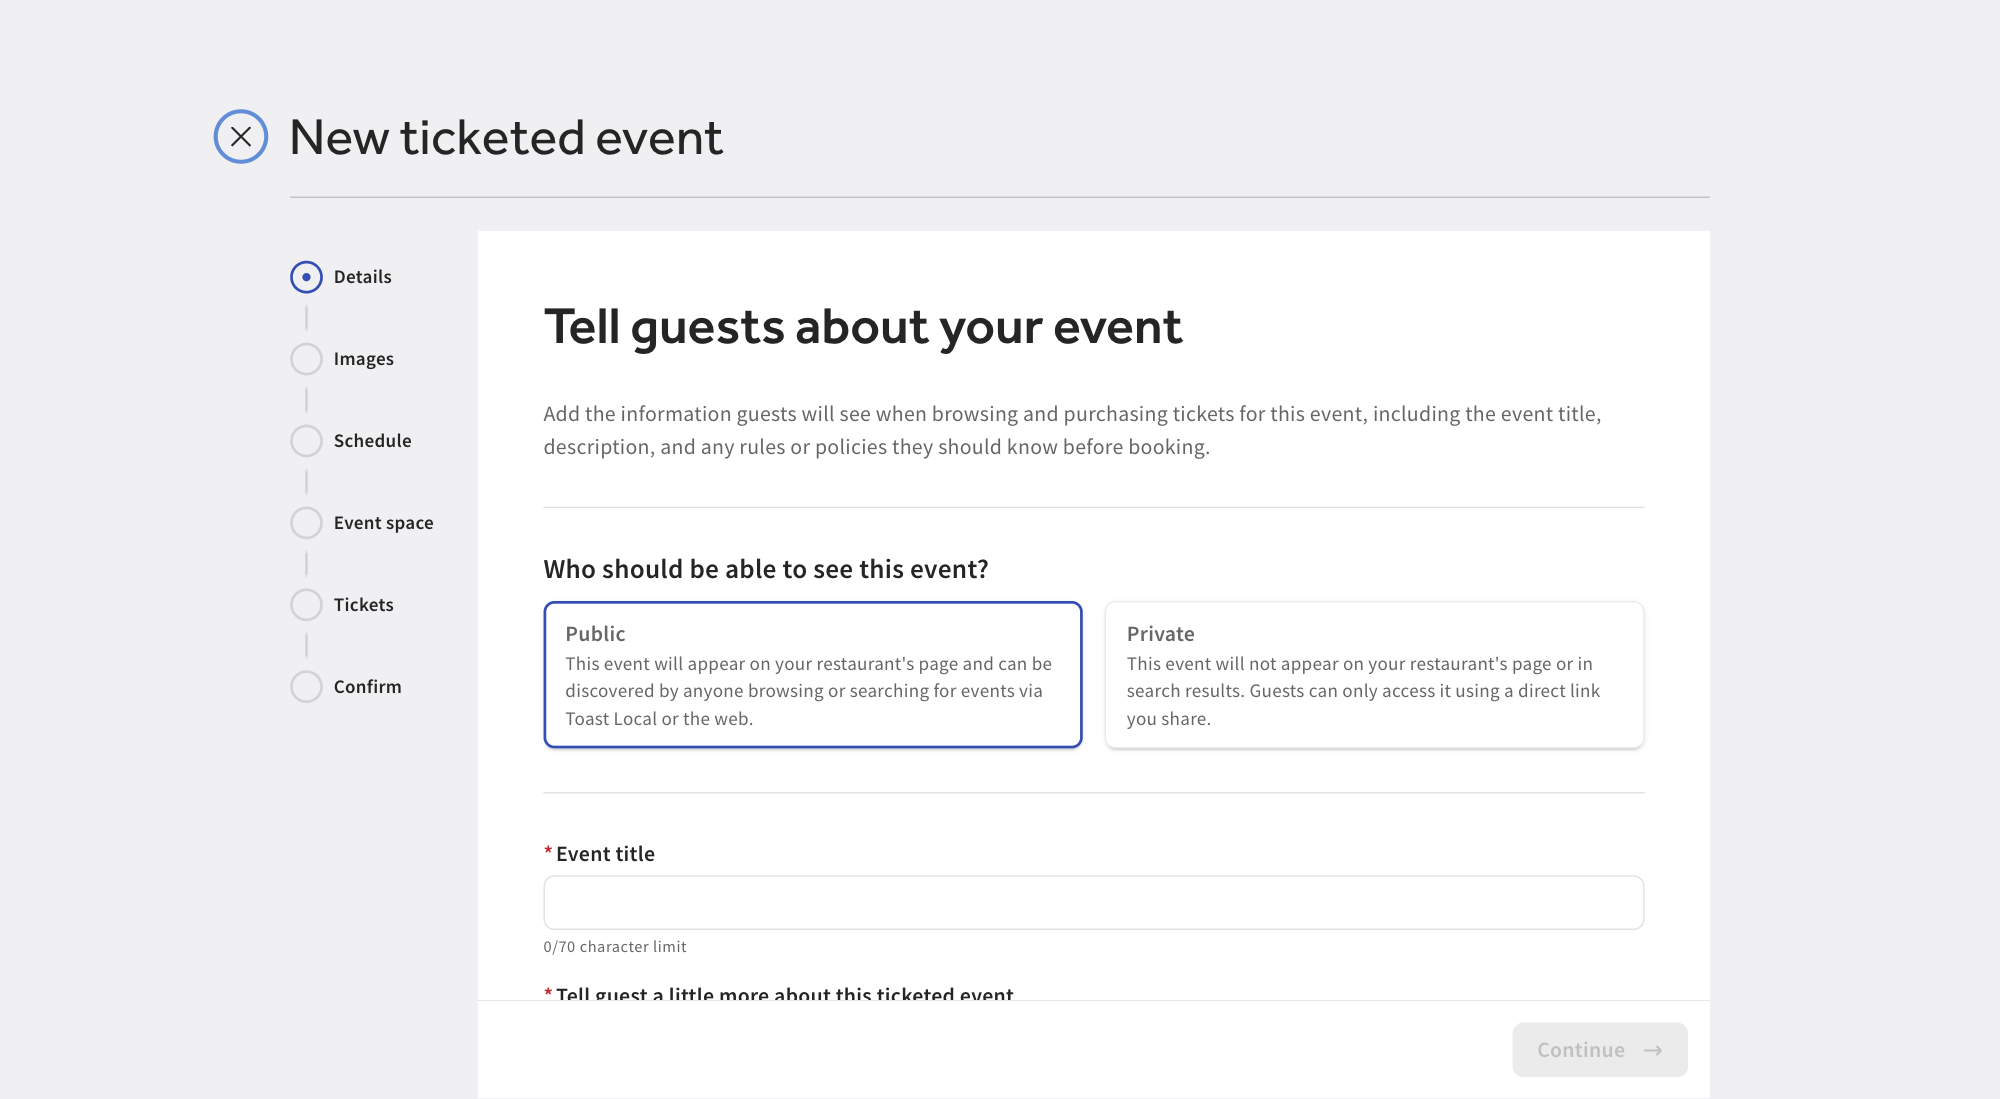
Note: The event is created disabled, so you have time to review your settings before guests can buy tickets. Use the switch in the upper right of the event to enable it when you're ready.
Note: Your progress isn't saved until you finish the flow. If you leave the page or close the flow before selecting Confirm and create, the event won't be created, and your entries will be discarded.
Details
The Details step covers what guests see when they browse and buy tickets:
- Who should be able to see this event? Public events appear on your restaurant's page and can be found by anyone browsing or searching on Toast Local or the web. Private events don't appear on your page or in search results, and guests can only reach them with a direct link you share
- Event title is required, up to 70 characters. Titles must be unique across your experiences and ticketed events
- The guest-facing description is required and may be up to 1000 characters. Describe the ambiance, unique features, amenities, and any time limits
- Events rules and policy are optional, up to 1000 characters. For example, add age requirements, entry requirements, a dress code, or that tickets are non-refundable
- Memo is optional, up to 1000 characters. It's an internal message to your host, and guests don't see it
Each field shows a running character count against its limit.
Images
Images help guests understand what makes an event special as they browse. Drag and drop an image onto the upload area, or select Add an image to browse for one. JPG, PNG, and WEBP files up to 2 MB are supported.
Because the same image is shown at different shapes, you crop it twice, once for Mobile and once for Desktop, using the tabs above the cropper. Select Remove to clear the image and upload a different one.
An image isn't required to create an event, and you can add or change it later on the event's Details tab.
Schedule
Add the dates and times the event runs. Each date and time you add is a showing, and guests buy tickets for a specific showing.
- Select Add date & time to add your first showing, then set its date, start time, and end time. The start and end times must be different
- Select Add showing to add more showings to the same event
- Use the edit and delete actions on a showing row to change or remove it before you create the event
At least one showing is required. Nothing is saved until the event is created, so you can add, edit, and remove showings freely on this step.
Note: Guests purchase tickets for a specific date and time. To avoid disrupting existing ticket holders, an event's date and time can't be changed once tickets have been purchased.
Event Space
Choose where the event takes place:
- On-site: the event is held at your restaurant
- Off-site: the event is held somewhere else. A location name and address are required so guests know where to go
Tickets
Every event needs at least one ticket. On this step, you can create a new ticket or reuse one you've already set up:
- Create a new ticket build a ticket from scratch
- Add existing ticket picks from tickets already created for other events. Tickets already for this event aren't listed
An event can have more than one ticket, for example, a general admission ticket and a VIP ticket. For each ticket, set:
- Ticket type: Free admission or Paid tickets
- Ticket name is required. Select Description to add an optional guest-facing description
- Quantity is required and must be greater than zero. This is the number of tickets available per event slot
- Price is required for paid tickets and must be greater than $0
- Limit per order is the most a guest can buy in one order. Enable No limit to remove the cap
- Online tickets and In-house tickets: enable or disable each sales channel, and set when sales Start and End relative to the event, in hours or days in advance. Sales must start before they end
The Ticket policy card applies to all paid ticket orders for the event, and to paid add-ons on a free ticket:
- Tickets are refundable until: Never refundable, Always refundable, 24, 48, or 72 hours before the event, or one week before the event
- Automatically cancel unpaid in-house ticket orders: when staff issue tickets in person or over the phone, guests get a payment link by email or SMS. If payment isn't completed within the time frame you choose (24, 48, or 72 hours), the order is canceled automatically. Orders placed within that window of the event aren't auto-canceled
Note: Tickets are reusable rules shared across events. Editing a ticket that other events use changes it for those events too, and a warning names them when you open it for editing. See Ticket Rules below.
Confirm
The last step lists Event details, Schedule, Event space (badged On-site or Off-site), and Tickets for review. Use the edit action on any section to jump back to that step. Select Confirm and create to create the event.
Manage a Ticketed Event
Select an event in the Ticketed Events list to open it. From the header, you can:
- Enable or disable the event. Disabling it means guests can't purchase tickets, and you'll be asked to confirm either way
- Select Preview to view the event as a guest would. Previews are unavailable until the event is enabled
- Select Copy link to copy the event's direct link, which is useful for private events, your website, or social posts
- Select Duplicate to copy the event. The copy opens in the create flow with " COPY" appended to the name and is always created disabled
- Select Delete event. Deleting removes all of the event's settings, so if you might run it again, disable it instead
- Rename the event using the edit icon next to its name
Event Performance
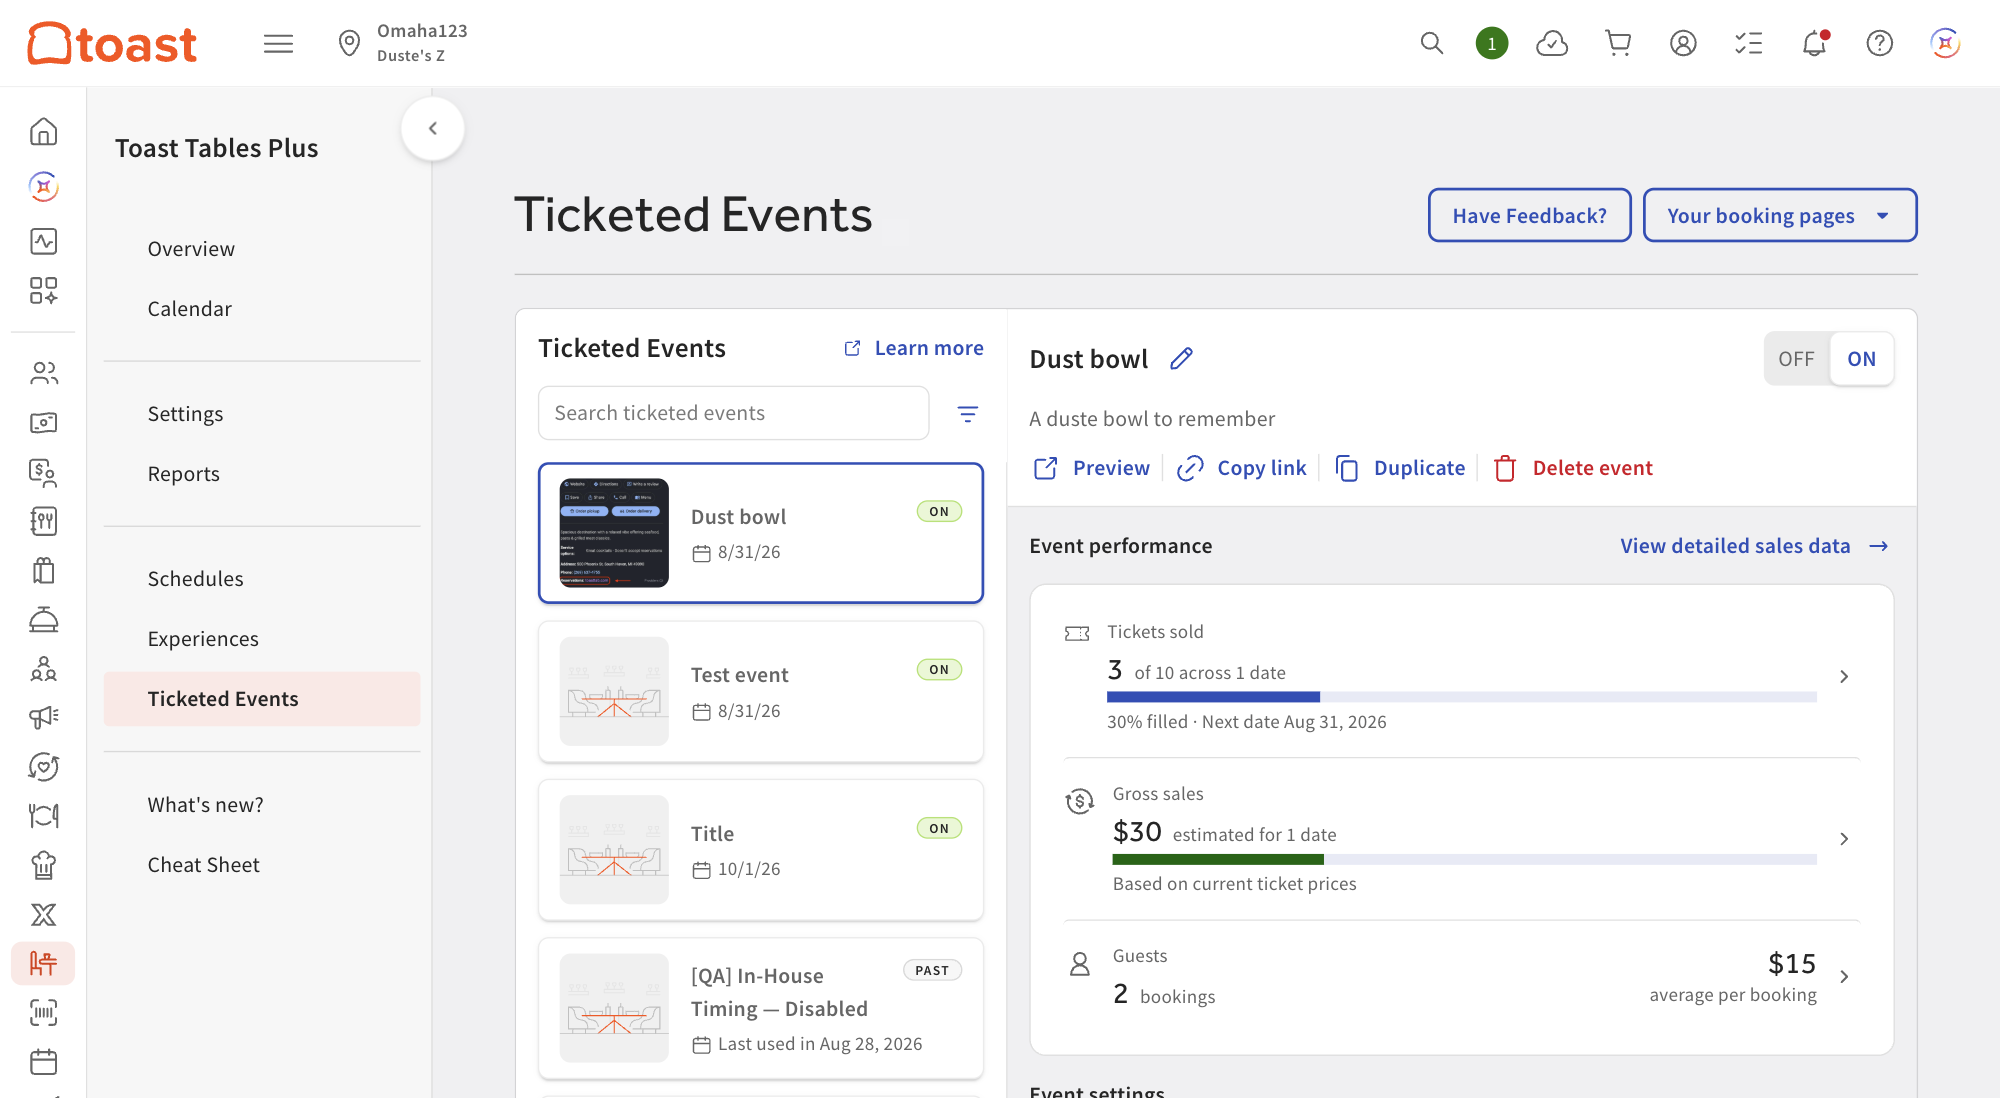
Above the event's settings, the Event performance card gives you an at-a-glance read on the event without opening the Sales or Guests tab:
- Tickets sold is the event's lifetime total, shown as sold "of X across N dates" with the percent filled. The line beneath names the next date still to come, or the latest date if the event has already finished
- Gross sales is an estimate of what the event has taken across all of its dates, with the percentage of a sell-out it represents
- Guests is the number of live bookings across all dates, with the average value per booking alongside it. This row appears once bookings have loaded for every date, so a partial count is never shown as a final one
Select any row to open the tab holding its details. The Tickets sold and Gross sales rows open the Sales tab, and the Guests row opens the Guests tab. View detailed sales data also opens the Sales tab. The card is hidden until the event has at least one date scheduled.
Note: Gross sales figures on this card are estimates based on current ticket prices, and ticket counts include tickets held without payment. Treat them as a read on how the event is doing, not as an accounting record.
Each event's settings are organized into tabs. Save your changes on a tab before moving to the next one.
Details Tab
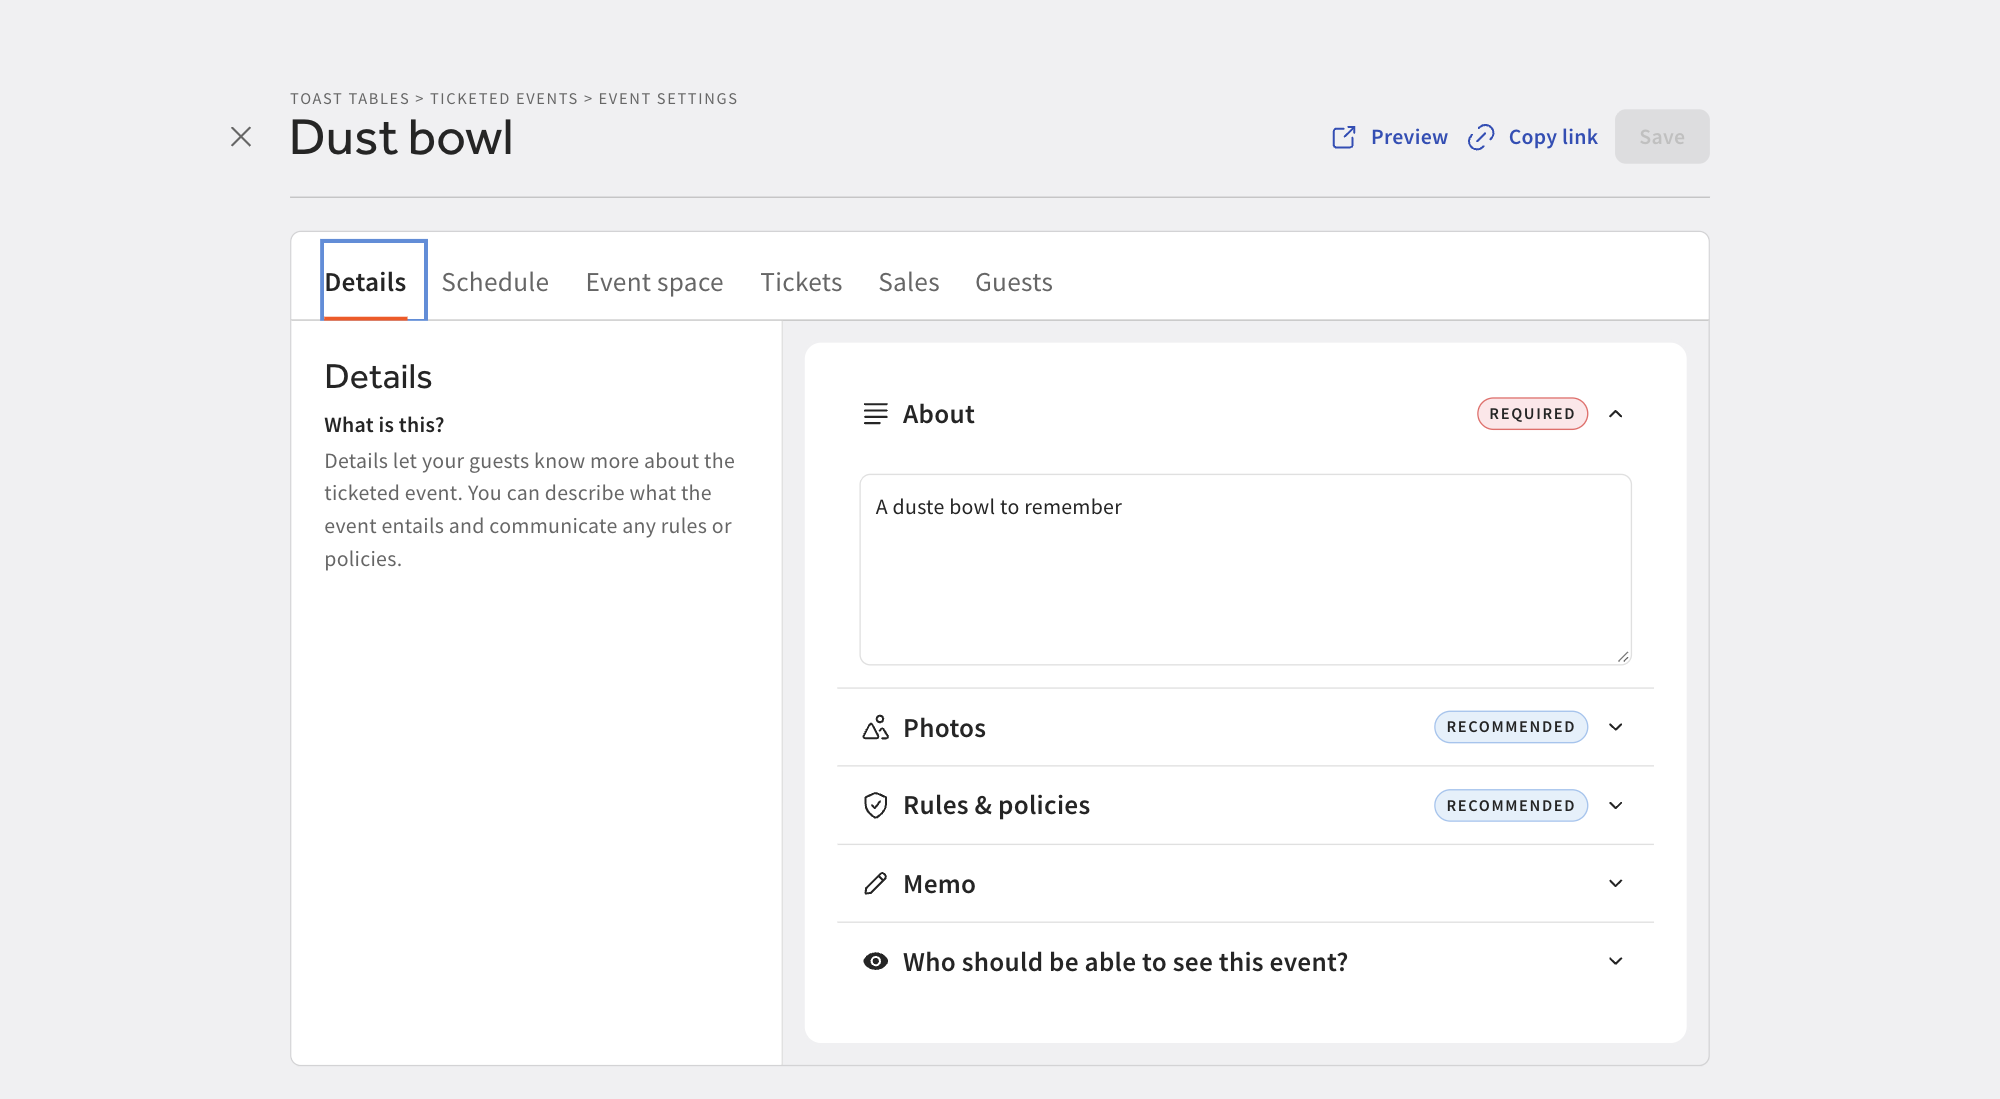
The Details tab holds the guest-facing content you set when creating the event, plus a few things you can only manage here:
- About (required) is the guest-facing description
- Photos (recommended): select Replace to change the image, adjust the crop and select Save Crop, or select Remove
- Rules & policies (recommended) is the event's rules and policy text
- Memo is the internal message to your host
- Who should be able to see this event? switches the event between Public and Private
Schedule Tab
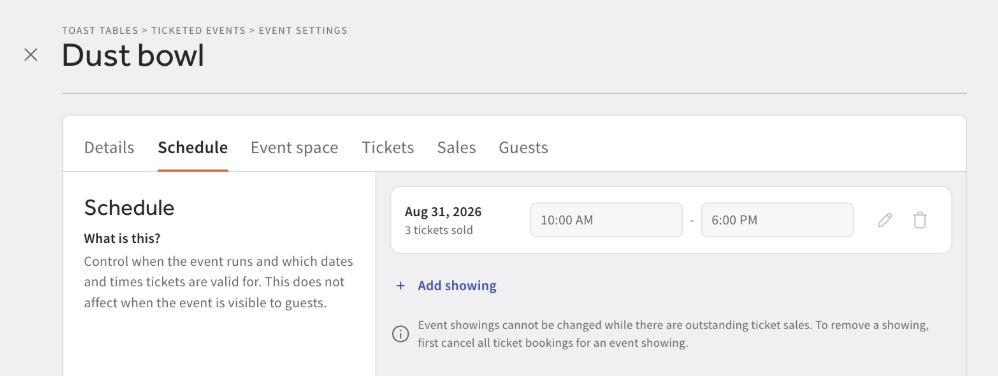
The Schedule tab controls when the event runs and which dates and times tickets are valid for. It doesn't affect when the event is visible to guests.
Each showing is listed with its date, time, and how many tickets have sold. Select Add showing to add a date, or use the edit and delete actions on a row. Deleting the last showing leaves the event with nothing to sell, and the confirmation says so.
Note: Showings can't be changed while there are outstanding ticket sales. To remove a showing, first cancel all ticket bookings for it.
Event Space Tab
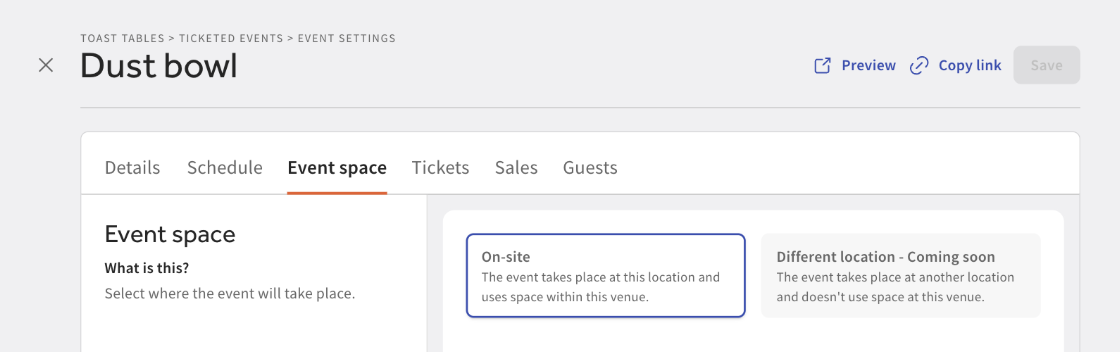
Switch the event between On-site and Off-site, and update the location name and address for off-site events.
Tickets Tab
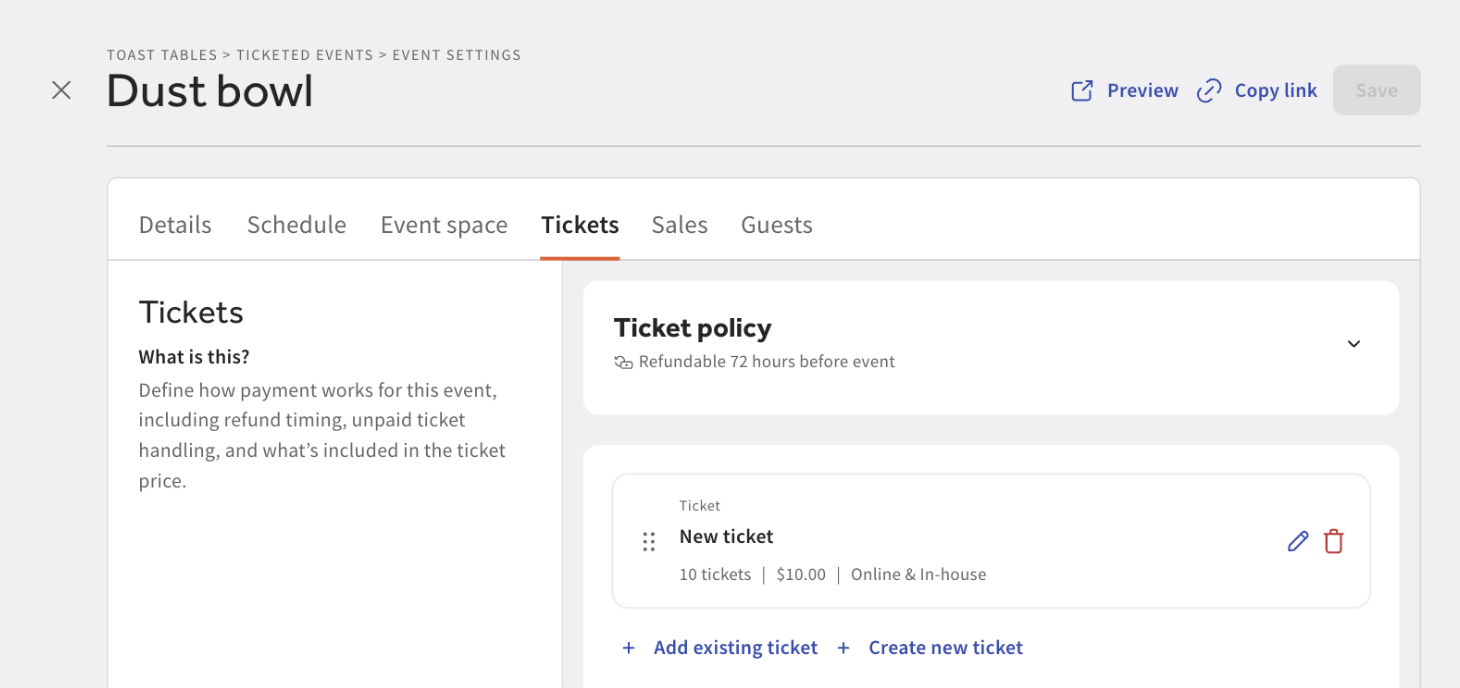
The Tickets tab is where you manage the event's tickets and its ticket policy after creation. It offers the same Add existing ticket and Create new ticket options and the same Ticket policy card as the create flow. Removing a ticket here detaches it from this event.
Add-ons Tab
Add-ons are optional items guests can buy alongside their tickets, such as merchandise, a drink package, or a bottle of wine. On the Add-ons tab, select Add add-on and set:
- Add-on name (visible to guests) is required
- Add-on description (optional) is what guests see when booking
- The menu item the add-on sells
- Max per ticket (optional): leave empty for no limit
- Applies to these tickets is required. Choose which of the event's tickets this add-on sells with
Add-ons are configured per event. You need at least one ticket on the event before you can add one. Until then, the tab tells you to add a ticket first.
Note: Add-ons for regular reservations and experiences are set up separately. To learn more, see Toast Tables Deposits, Prepayments, Add-Ons and Cancellation Fees.
Sales Tab
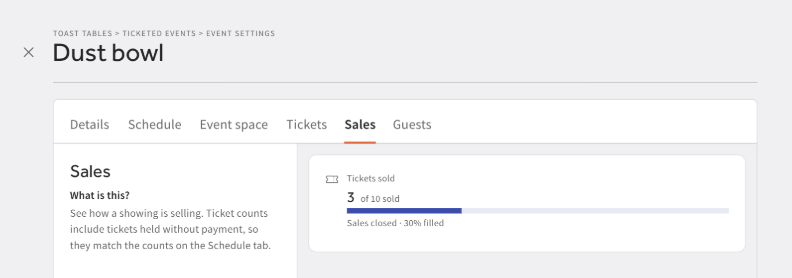
Each ticketed event has a Sales tab that shows how a showing is selling. Ticket counts on this tab include tickets that are held without payment yet, so they match the counts you'll see on the event's Schedule tab.
If an event has multiple showings, a Showing selector lets you choose which one you're looking at. It lists All N showings first, then each date and time with its own sold count and capacity, so you can tell whether a slow date is a one-off or the whole event is underselling. Events with a single date have nothing to choose between, so the selector isn't shown.
The Tickets sold card reports, for whatever you've selected:
- The number of tickets sold against capacity
- The percent filled
- The current sale state: On sale now, Not yet on sale, Sales closed, or Sold out
The sale state describes a single day's sale window, so it appears when you've selected a single showing. Under All N showings, the card reports the combined count and percent filled instead.
If the event has no dates scheduled yet, the Sales tab shows an empty state prompting you to add dates on the Schedule tab.
Guests Tab
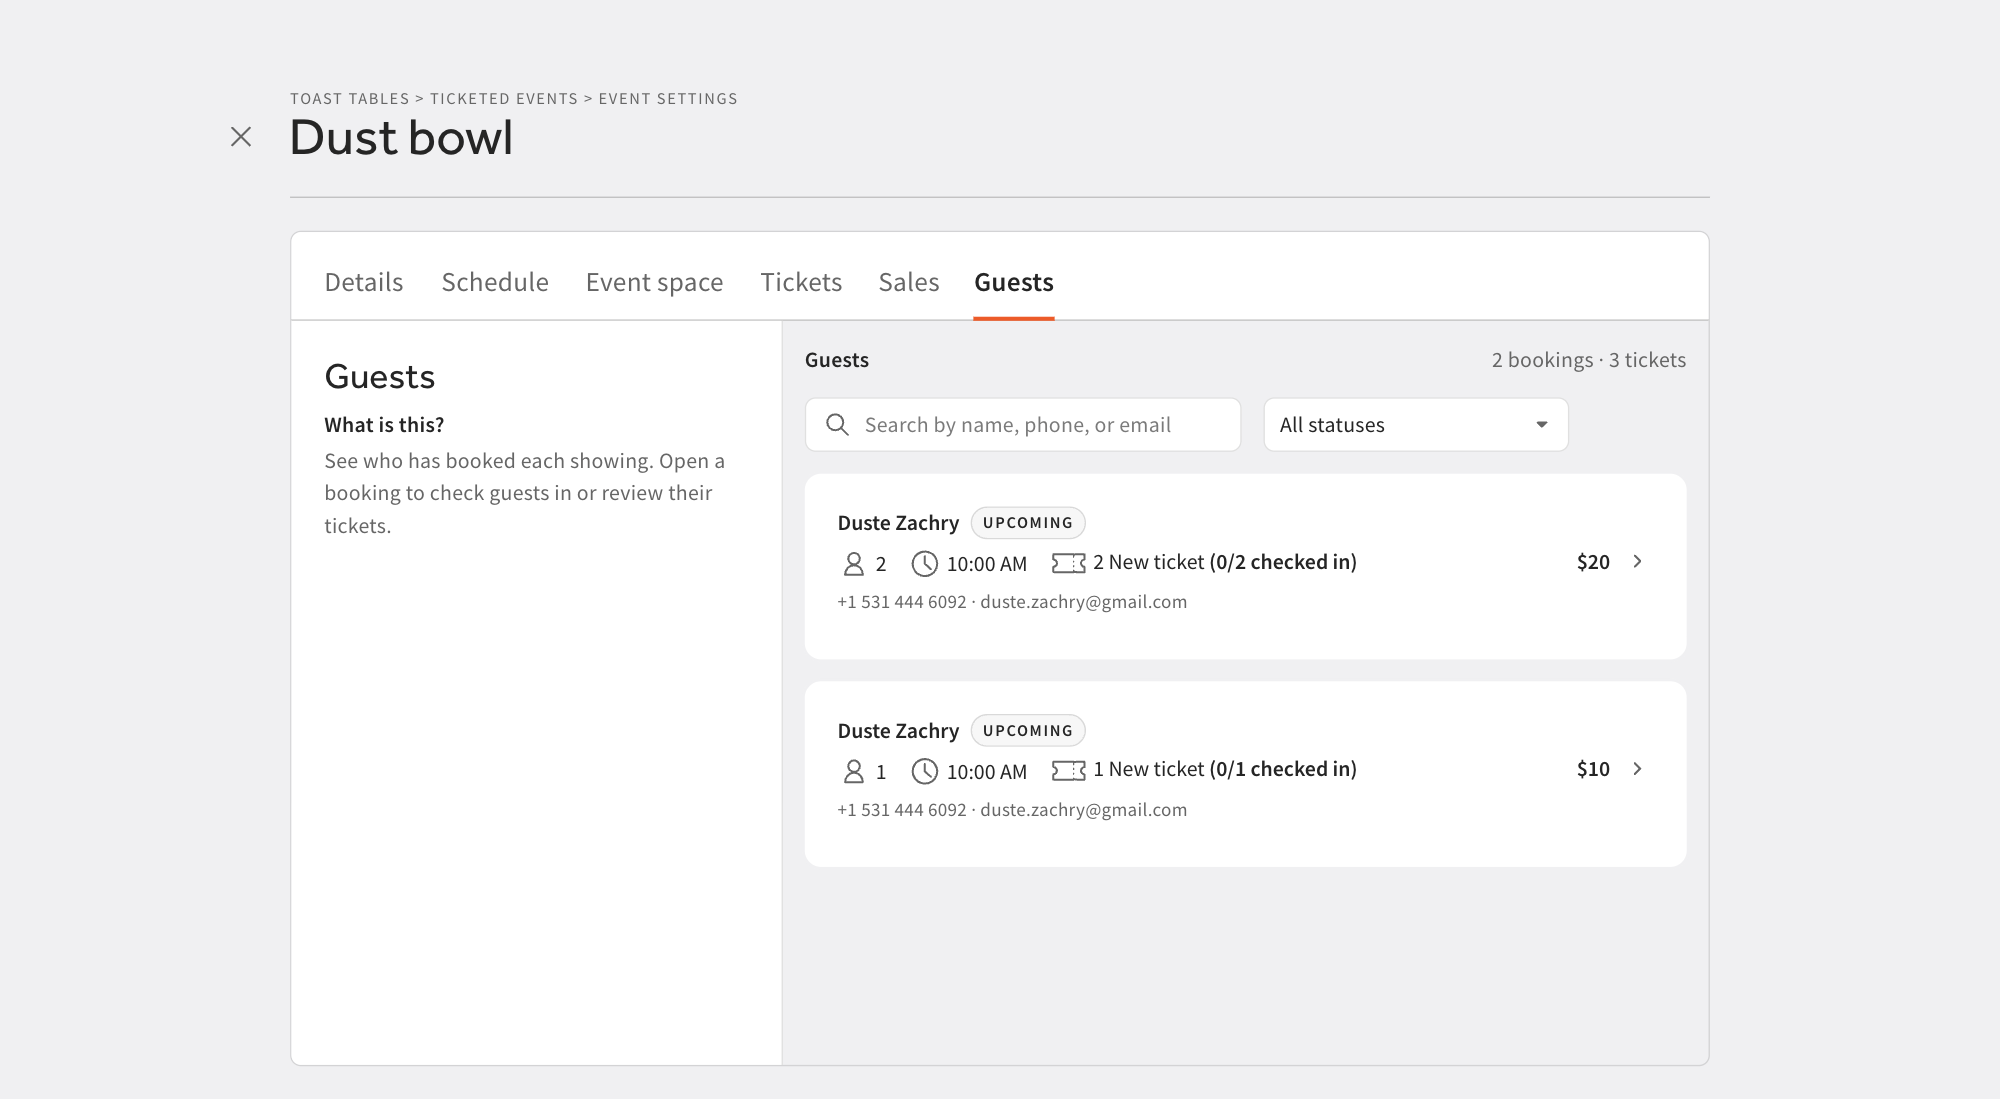
The Guests tab shows who has booked, so you can work the door from a list of names rather than a count. It uses the same Showing selector as the Sales tab. Narrow to one date for a door list for that date, or choose All N showings to see the whole event.
Each booking is listed with:
- Guest name, which falls back to "Guest" if the booking has no name on file
- Status badge showing the booking's current status, for example confirmed, seated, or cancelled
- Party size, when set on the booking
- Expected start time, shown in the restaurant's local time zone. If the restaurant's time zone isn't known, the time is hidden rather than risk showing the wrong hour. In the all-showings view, the date is shown alongside the time
- Ticket lines, one per ticket type on the booking, each with its own checked-in count (for example "2/4 checked in")
- Contact info, which is the phone number (formatted for international dialing) and email, when available
- Estimated value, which is what the booking's tickets come to at current prices. Nothing is shown for a free event
Above the list, a summary line gives the number of live bookings, the tickets checked in against the total, and a separate tally of any cancellations.
To find one guest, search by name, phone, or email, and narrow by Status. The status list only offers statuses that are present in the bookings you're looking at, so no choice empties the list. Search and filters narrow the rows only, and the summary line above keeps describing the whole showing. Longer lists are paged, with a Per page choice of 10, 25, or 50.
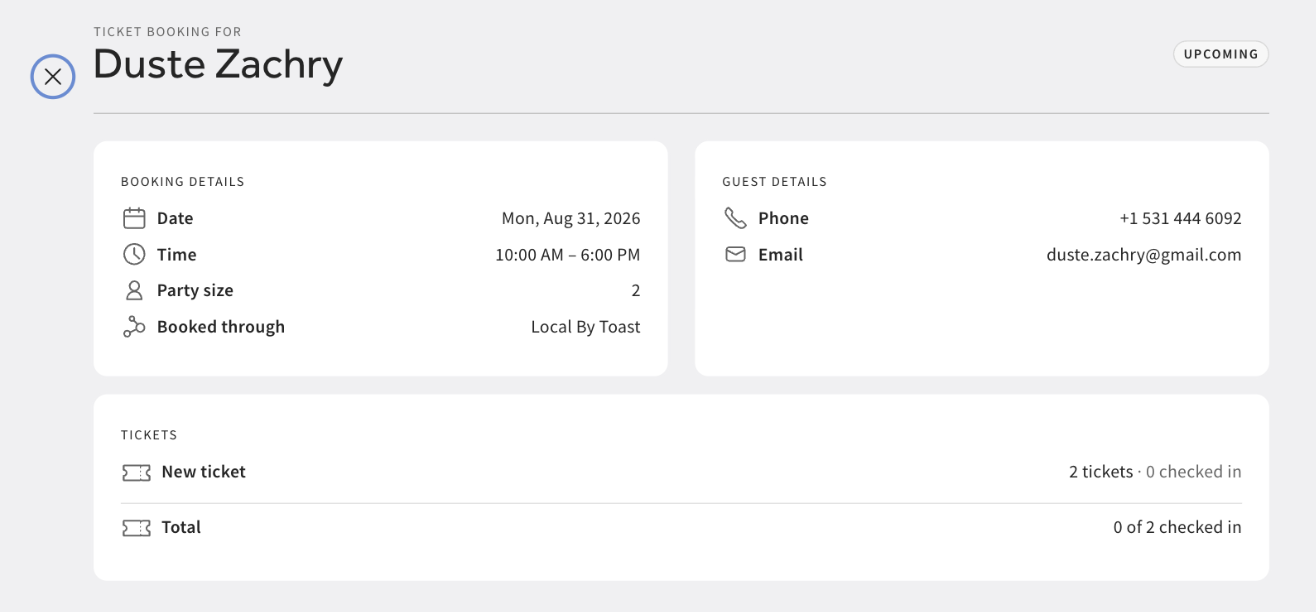
Select a booking to open it in full. The detail view shows the booking's date, time, party size, and what it was booked through (Host app or Online), alongside the guest's phone and email, and a breakdown of the tickets with the checked-in count for each type and a total.
Bookings are listed regardless of status, including canceled ones, so a guest who says they booked can still be found here. Canceled bookings are dimmed and sorted to the bottom rather than hidden. They aren't counted in the booking, ticket, or checked-in totals, and get their own "X canceled" tally in the summary line instead. When you've selected a single showing, live bookings are sorted alphabetically by guest surname. Across all showings, they're sorted by start time, then by name.
If no one has booked yet, the tab shows an empty-state message. If the event has no dates scheduled, it prompts you to add them on the Schedule tab.
Ticket Rules
Tickets are reusable, so the same ticket can sell for more than one event. To manage your whole ticket library in one place, navigate to Settings > Payments & fees > Ticket rules. Here you can create, edit, duplicate, and delete tickets, and see at a glance which are In use and which are Not applied.
Because a ticket can be shared, editing one changes it everywhere it's used. When you open a shared ticket for editing, a warning names the other events that use it.
Payments & Fees
Prepayments, deposits, and cancellation fees for reservations and experiences are set up separately from ticket pricing. To learn more, see Toast Tables Deposits, Prepayments, Add-Ons and Cancellation Fees.
Frequently Asked Questions
Can one event have more than one date?
Yes, one event can have more than one date. Add a showing for each date and time the event runs, either while creating the event or later on its Schedule tab. Guests buy tickets for a specific showing.
Why can't I change my event's date or time?
You can't change an event's date or time because showings can't be changed while there are outstanding ticket sales. Changing them would disrupt guests who already hold tickets. Cancel the ticket bookings for that showing first.
Why is the Preview link greyed out?
The Preview link is greyed out because previews are unavailable until the event is enabled. Enable the event using the switch in its header, then preview it.
Do I have to add an image?
No, you don't have to add an image. An image is recommended but not required, and you can add or replace one at any time on the event's Details tab.
Can I offer more than one type of ticket for the same event?
Yes, you can offer more than one type of ticket for the same event. Select Create new ticket or Add existing ticket on the Tickets tab to add as many as you need, for example, general admission and VIP.
I edited a ticket and it changed another event. Why?
Editing a ticket changed another event because tickets are reusable rules shared across events. An edit applies everywhere the ticket is used, and a warning names the affected events when you open a shared ticket for editing. To change only one event, create a separate ticket for it instead.
Why can't I add add-ons to my event?
You can't add add-ons yet because add-ons sell alongside tickets, so the event needs at least one ticket before you can configure them. Add a ticket on the Tickets tab first.
Where do I manage all my tickets at once?
You manage all your tickets at once in Ticket Rules. Navigate to Settings > Payments & fees > Ticket rules.
I don't see the Add-ons, Sales, or Guests tab on my event.
You may not see the Add-ons, Sales, or Guests tab because those tabs are part of a gradual rollout and may not be enabled for your restaurant yet. The Sales and Guests tabs are enabled together, since the guest list is the detail behind the sales figures.
Are the gross sales figures exact?
No, the gross sales figures are not exact, so treat them as estimates. Gross sales are calculated from your current ticket prices, so editing a price changes the figure for tickets that were already sold. Ticket counts also include tickets held without payment. Use these figures to see how an event is doing, not as an accounting record.
Can I reuse an event I've already set up?
Yes, you can reuse an event you've already set up. Open the event and select Duplicate. The copy opens in the create flow with " COPY" added to the name, and is always created disabled so you can adjust it before selling tickets.
Should I delete an event or disable it?
You should disable an event if you might run it again, because deleting an event removes all of its settings.
If you have a question about ticketed events that this article doesn't answer, contact Toast Customer Care.
Related Articles
- Toast Tables™: Schedules
- Toast Tables™: Experiences
- Toast Tables Deposits, Prepayments, Add-Ons and Cancellation Fees
- Difference Between Toast Tables™ and Toast Tables™ Plus
- Get Started With Toast Tables