Configure Cash Rounding During U.S. Penny Phase Out
Last updated: Jul 2, 2026, 1:51 PM
Learn how to use cash rounding on your Toast POS.
| This content is provided for informational purposes only and is not intended as legal, accounting, tax, HR, or other professional advice. You are responsible for your own compliance with laws and regulations, including any applicable to cash adjustment practices. You should contact your attorney or other relevant advisors for advice specific to your circumstances. The development, release and timing of any products, features or functionality remain at the sole discretion of Toast, and are subject to change. You are also solely responsible for informing your customers about any cash adjustment or related business practices. |
- Cash Rounding Overview and Setup
- Examples of Cash Rounding on Your Devices
- Cash Rounding in Your Reporting
- Cash Rounding for Tip Payouts
Cash Rounding Overview and Setup
Note: To configure cash rounding, you must have the 6.3 Payments Setup permission.
- Always round down in the guest’s favor: The total amount is rounded down to the nearest nickel so the guest pays less. For example, if the total due is $3.97, the guest is charged $3.95. The cash rounding service charge adjustment is always negative.
- Always round up in the location’s favor: The total amount is rounded up to the nearest nickel so the guest pays more. For example, if the total due $3.97, the guest is charged $4.00. The cash rounding service charge adjustment is always positive.
- Round to the nearest nickel: The total amount is always rounded to the nearest nickel and fluctuates based on the total. For example, if the total due is $3.98, the guest is charged $4.00 (positive adjustment), but if the total due is $3.96, the guest is charged $3.95 (negative adjustment). The rounding rules are as follows:
- .01 and .02 round down to .00
- .03 and .04 round up to .05
- .06 and .07 round down to .05
- .08 and .09 round up to .10
Cash Rounding Overview
Examples of Cash Rounding on Your Devices
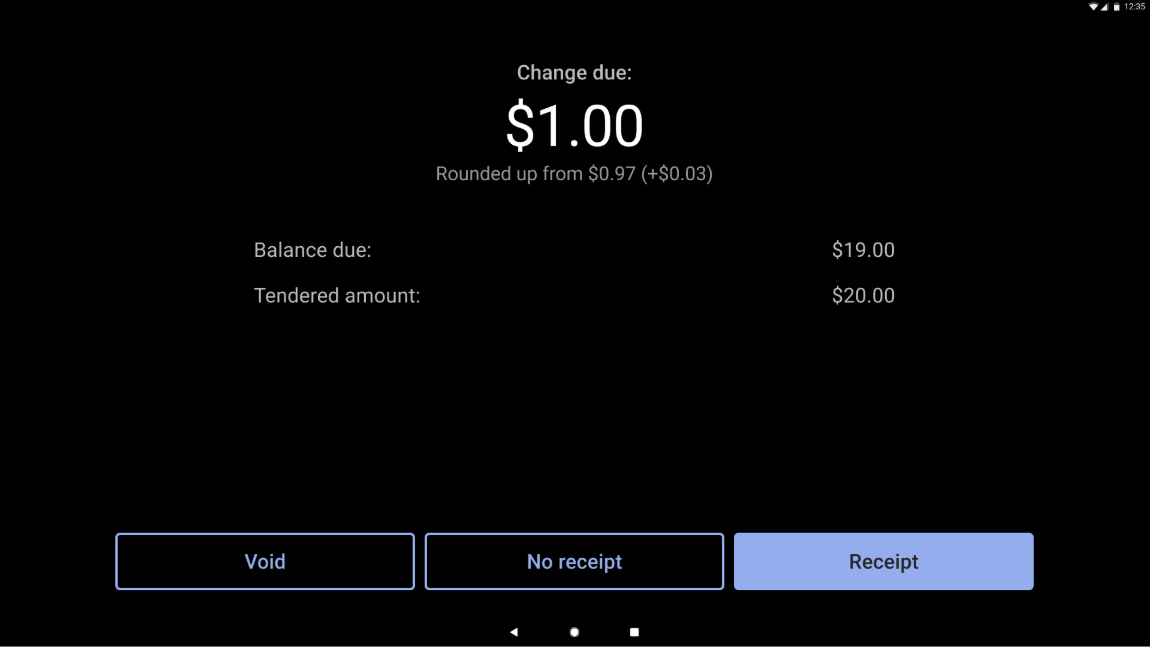
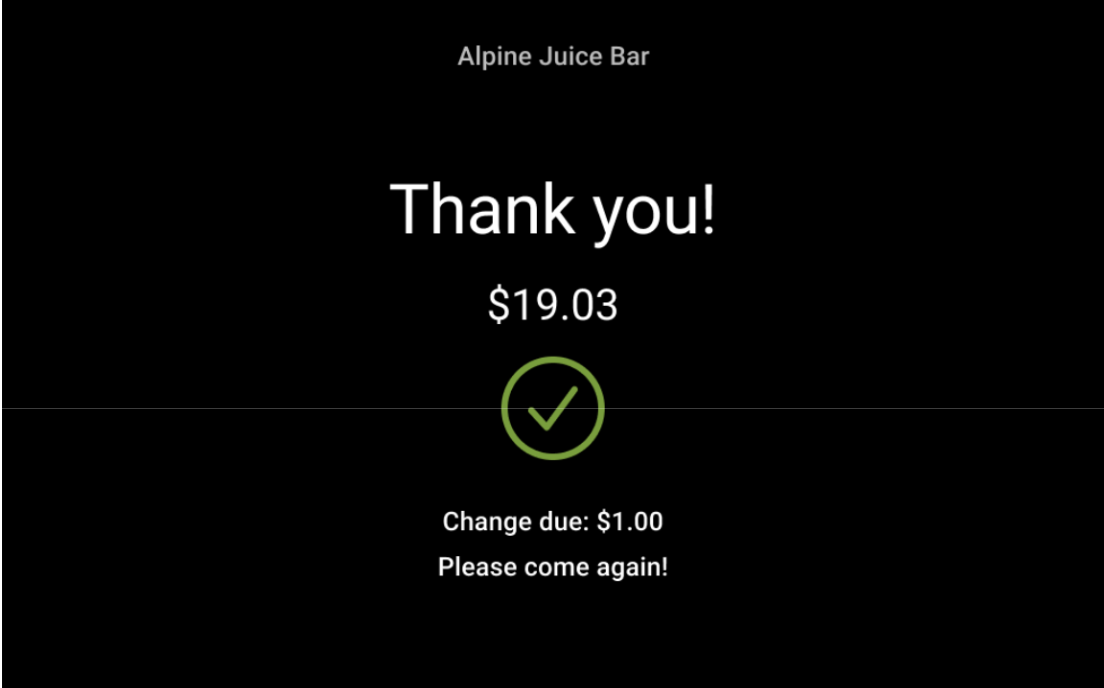
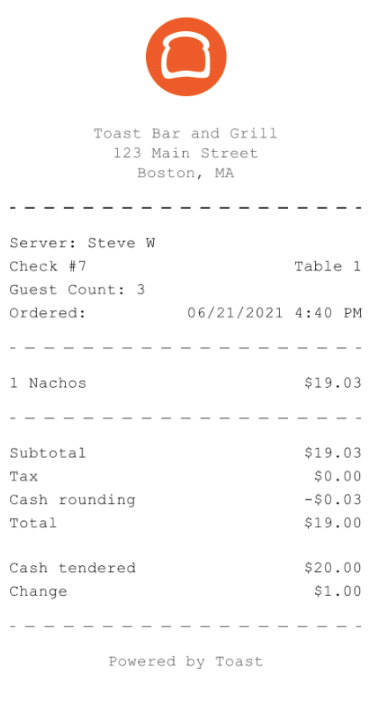
Below are examples of cash rounding in action on the POS. In the images below, the balance due is $19.03, and the guest is paying with $20 in cash.
This is the server-facing POS screen detailing the change due using the Always Round Down in the Guest’s Favor option:
This is the guest-facing display screen detailing the change due using the Always Round Down in the Guest’s Favor option:
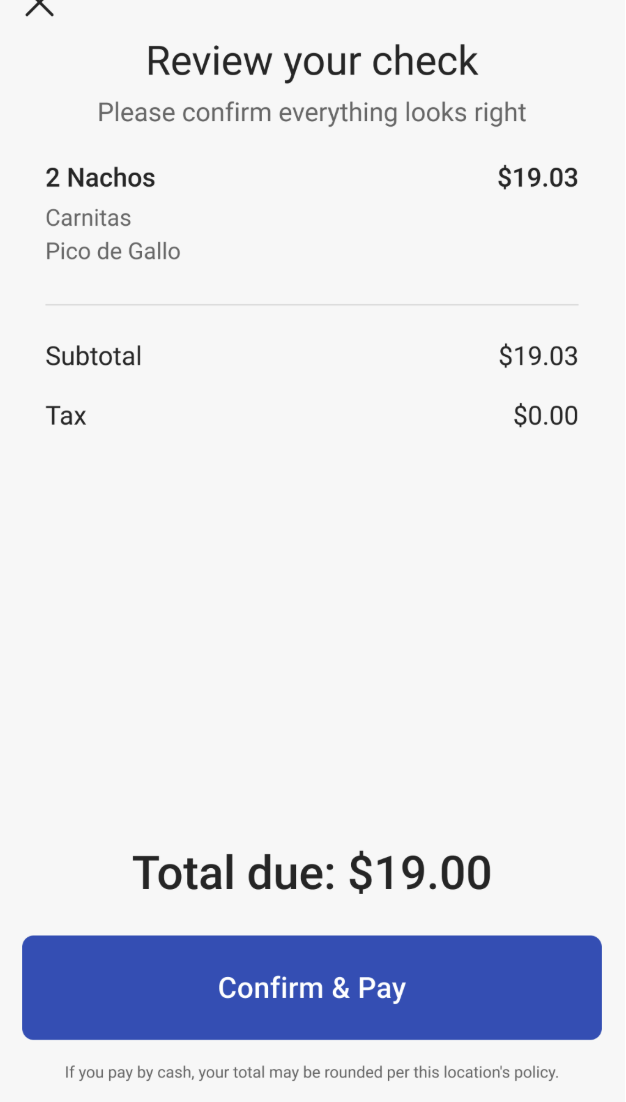
On your guest-facing screens, you will also see a disclaimer on the bottom of the screen stating: “If you pay with cash, your total may be rounded per this location’s policy”. You can see this in the images below.
Guest Facing Display

Toast Go Handheld
Kiosk

This disclaimer will also be visible on printed receipts as seen in the image below.
Pre-payment receipt
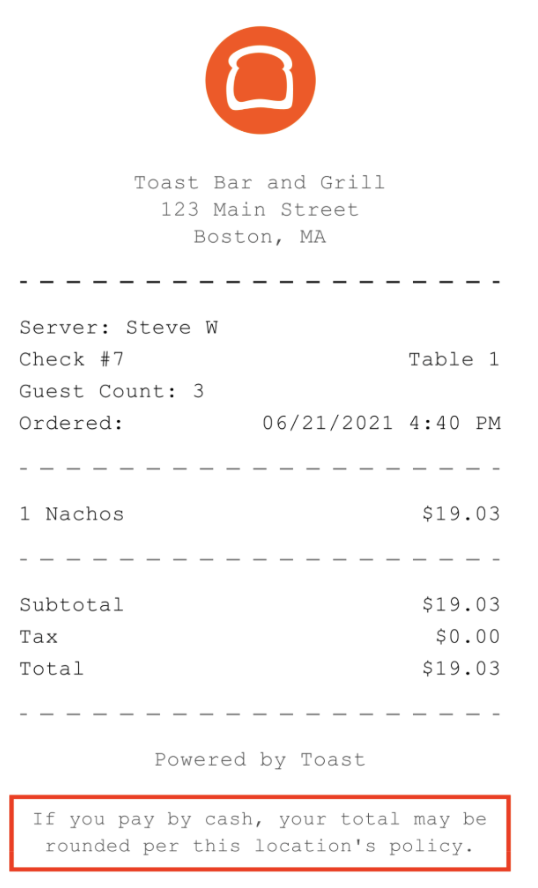
If a guest chooses to pay for their bill with cash, they will see a line for cash rounding on their receipt that differs based on the policy you have selected for your restaurant as described in the Cash Rounding Overview and Setup section.
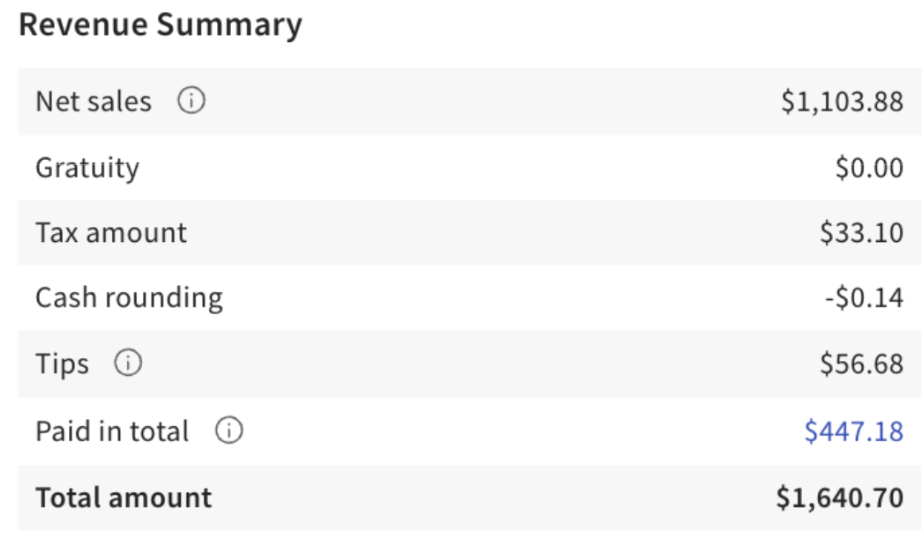
Cash Rounding in Your Reporting
When reviewing your Sales Summary Report, you will see a line for Cash rounding in your Revenue Summary listed with either a positive or negative amount listed depending on the cash rounding selection you made for your business.
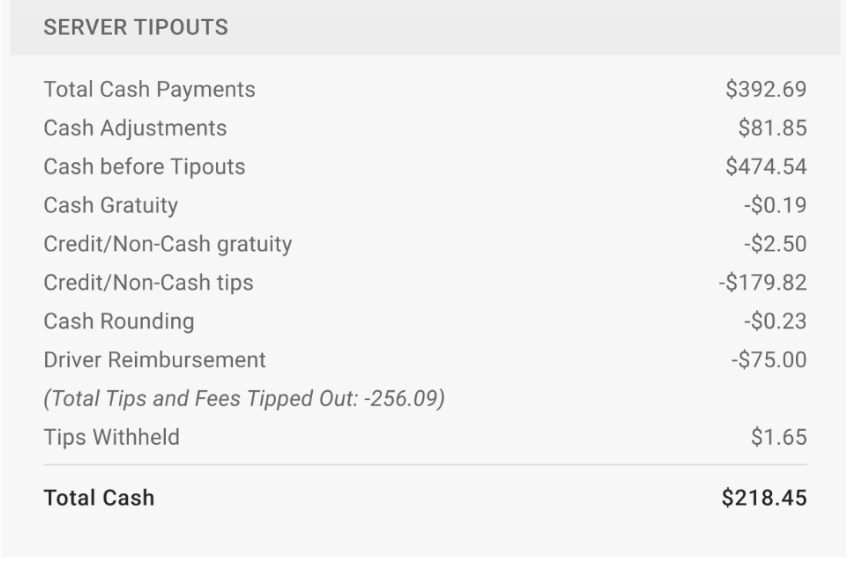
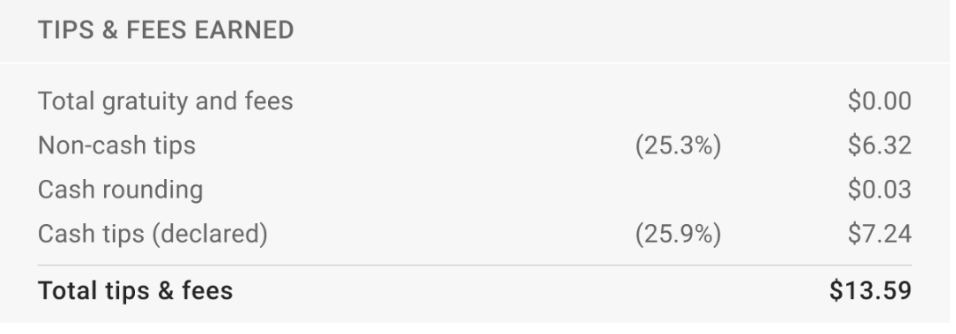
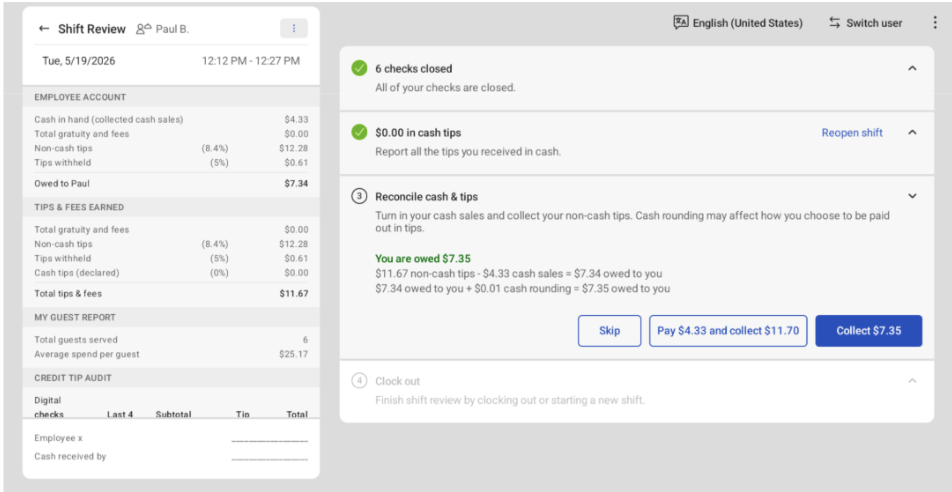
Cash Rounding for Tip Payouts
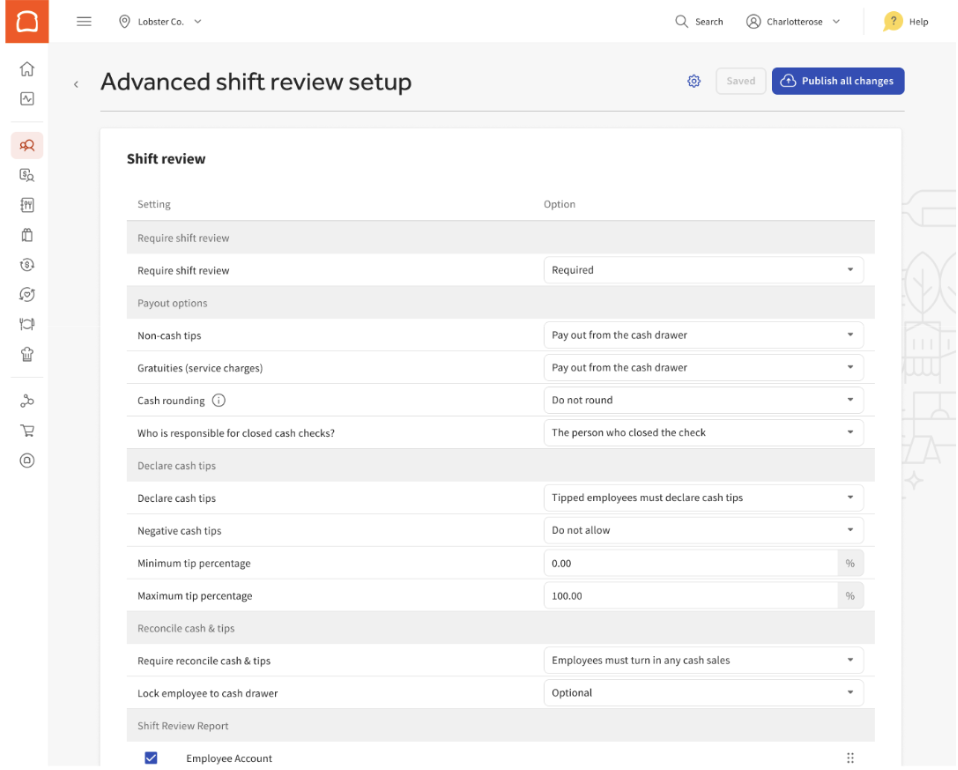
To configure cash rounding in your shift review, navigate to Employees > Shift Review > Advanced Shift Review Setup > Cash Rounding. Here you can select either Do not round or Always round up to the nearest $.05 (in the employee’s favor).
In your shift review, you will see a line item for Cash Rounding.
This cash rounding calculation is also added to the Reconcile cash & tips step of your employee’s shift reviews.
This can also be found under the SERVER TIPOUTS section of your Z-Report.