Use a Bump Bar With Toast KDS
Last updated: Apr 8, 2026, 10:16 AM
- Bump Bar Overview
- Order a Bump Bar
- Set up and Use a Bump Bar With Your KDS
- Frequently Asked Questions
Bump Bar Overview
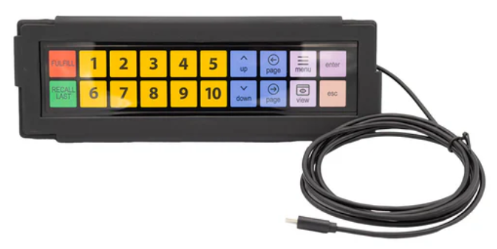
A bump bar is a device used to manage and organize orders in a kitchen. It usually consists of a series of buttons representing different orders or actions. When an order is ready to be served, kitchen staff “bump” or press the corresponding button to fulfill the order, signaling that the order is ready. This helps streamline communication and ensures that orders are prepared and delivered promptly.
Toast’s Kitchen Display System (KDS) devices support a specific third-party bump bar: KRS Bumpbar (external link). This article will cover how to order bump bars for your restaurant, and how to use them with your KDS devices.
A few things to note:
- Bump bars only work with New Grid View on the KDS (KDS Grid View Overview).
- A single bump bar is designed to integrate with one KDS device.
- You can still use the KDS device touchscreen while the bump bar is connected.
- At this time, only the KRS Bump Bar is supported for the Toast KDS.
Note: You do not need access to Toast Partner Integrations to use the bump bar hardware with your KDS.
Back to top
Order a Bump Bar
You can order a bump bar on the KRS website here (external link). You can place a single order for multiple bump bars if needed - instructions for shipping items to multiple locations can be found here (external link). Toast does not sell this product directly. Orders can take 1-2 weeks to arrive.
Your bump bar will include a custom, laminated Toast insert layout; pre-assembled USB cable to connect to KDS devices (unless you are using the wireless version); and a bump bar face protector.
- The bump bar is available as a wired or wireless option. The wired option comes with a choice of 6 ft or 15 ft of cable. A shorter cable is ideal if you plan to mount the bump bar next to your KDS station.
- The bump bar will be shipped to your restaurant directly from KRS (usually via UPS).
- Since this hardware is sold by a third party, any Toast MSA hardware discount rates do not apply.
Set up and Use a Bump Bar With Your KDS
For the wired bump bar:
When you first connect the bump bar into your KDS device, a setup workflow will appear on the screen where you can select the orientation of your bump bar. You can use your bump bar vertically or horizontally to meet the needs of your kitchen – the insert layout is double-sided so you can choose the best orientation for your restaurant setup. If you need to change the orientation in the future, you can do so by navigating to Setup > Device Setup > Bump Bar from the main menu of your KDS device.
For the wireless bump bar:
Note: If the wireless bump bar was previously connected to a different device, you'll first need to clear any previously paired information from the wireless bump bar. select and hold the following buttons on the wireless bump bar at the same time before beginning these steps:
- For horizontal orientation, press and hold the RECALL LAST, 6, and esc buttons.
- For vertical orientation, press and hold the RECALL LAST, menu, and enter buttons.
If the bump bar plays a chime, and the light indicator above the FULFILL button blinks red, the action is successful. If it does not, release all buttons and try again.
- On your KDS device, drag downwards from the top of the screen.
- In the dropdown menu, verify that the Bluetooth setting is set to ON.
- Select and hold the Bluetooth button to open the Connected Devices screen.
- On the KDS device, select Pair new device on the Connected Devices screen.
- On the bump bar, select and hold the FULFILL button until the light indicator above the button begins flashing purple, and then release the button. The flashing purple light indicates that the device is ready to pair.
- On the KDS, look for a device with the name KRS- followed by a sequence of numbers and letters on the Pair new device screen.
- Select the KSR bump bar name. The Pair with dialog opens.
- Select Pair. The KRS bump bar name should appear in the list of connected devices on the Connected Devices screen.
- On the KDS, a window that says Bump Bar Connected will open with the next steps in the setup workflow.
Note:
- If the pairing is not successful, select the device from the Available devices list on the Connected devices screen. If it does not succeed after three attempts, restart from step one.
No additional Toast Web configuration is needed. After you plug in your bump bar and choose your orientation, you’re ready to start using it with your KDS device! The first 10 tickets on your KDS device will have a number in the bottom right corner, which you can use for bump bar actions.
Once configured, the bump bar will be saved on the KDS device. If the bump bar is disconnected, you’ll see a notification message that allows you to remove the bump bar if you no longer wish to use it. If you connect and configure a new bump bar to your KDS device, it will replace the old bump bar configuration.
Check out our platform guide for more information on how to use the bump bar on your KDS device:
Frequently Asked Questions - Bump Bar Integration
Will Toast install the bump bar when setting up my kitchen and KDS devices?
No, Toast technicians will not be able to install or set up bump bars in your kitchen. You are responsible for installation and setup of bump bars.
How do I mount my bump bar?
For instructions on how to mount your bump bar, see the KRS installation guide (external link). All supported mounts can be found on the KRS site here.
How do I check the status of my bump bar order?
To check the status of your bump bar order, please contact KRS at sales@krscorporation.com. Toast Customer Care cannot inquire about your order status on your behalf.
My bump bar isn’t working! What do I do?
If your bump bar isn’t working, try these basic hardware troubleshooting steps:
- Check for loose cables
- Check for a light on the device
- Blinking red: The device is connecting.
- Solid red: The device is connected.
You can also attempt the bump bar troubleshooting steps outlined by KRS here (external link).
For support questions related to the bump bar keypads themselves, please contact support@krscorporation.com.
How do I request a replacement for my bump bar?
If you need to request a replacement for your bump bar, you can do so through the KRS website.