xtraCHEF: Get Started With QuickBooks Desktop Integration
Last updated: Apr 13, 2026, 5:36 PM
xtraCHEF allows you to transfer bills and journal entries to QuickBooks Desktop, simplifying your accounts payable (AP) workflow and saving you valuable time.
| Third-party products like QuickBooks Desktop are provided solely according to the warranty and other terms specified by the third-party provider, who is solely responsible for service and support for its product. |
- QuickBooks Desktop Integration Summary
- Set Up Your Web Connector
- Next Steps
- Import Vendors From QuickBooks Desktop to xtraCHEF
- IIF File Sync
QuickBooks Desktop Integration Summary
If you are an xtraCHEF customer using QuickBooks Desktop for your accounting, xtraCHEF allows you to transfer bills and journal entries to your QuickBooks Desktop account upon running a sync through Intuit's Web Connector, simplifying your Accounts payable workflow and saving you valuable time.
To get started, connect with your xtraCHEF Onboarding Consultant. They will configure your account's extract to support a QuickBooks Desktop connection. Be sure to note your computer's operating system (Mac or PC) to ensure your configuration is set up properly.
Note: Intuit's Web Connector is not supported on Mac OS computers. For relevant information on QuickBooks Desktop extracts for Mac Users, please skip to our IIF File Uploads section.
Note: QuickBooks Desktop Authentication failure errors can occur while connecting the web connector. This can be avoided by ensuring account setup steps are followed and that the .QWC file has been downloaded. This error can also be avoided by ensuring the individual who downloaded the .QWC file is the one to execute the Web Connector setup process.
Back to top

Set Up Your Web Connector
With the QuickBooks Desktop extract enabled in your account, you're all set to begin configuration steps with your account. For PC users, this integration utilizes Intuit's Web Connector.
The Web Connector establishes a connection between your desktop-based accounting system and xtraCHEF's online platform. This creates an automated way to transfer data between web applications and QuickBooks. Once your integration is complete, you'll be able to:
- Import your Chart of Accounts/General Ledger (GL) Codes to xtraCHEF
- Import vendors to xtraCHEF
- Sync your xtraCHEF invoices as Bills in QuickBooks Desktop
- Sync deposits and returns as Vendor Credits in QuickBooks Desktop
- Sync pre-configured Chart of Accounts/GL Codes for Freights, Credits, Other Charges, Discounts, and Taxes
- Post your Toast Sales data as a Journal Entry in QuickBooks Desktop
- Sync your customer information in QuickBooks to xtraCHEF
Note: Transferring the data listed above requires syncing via Intuit's Web Connector. To initiate a sync, run your Web Connector.
Back to top
Extract Configuration
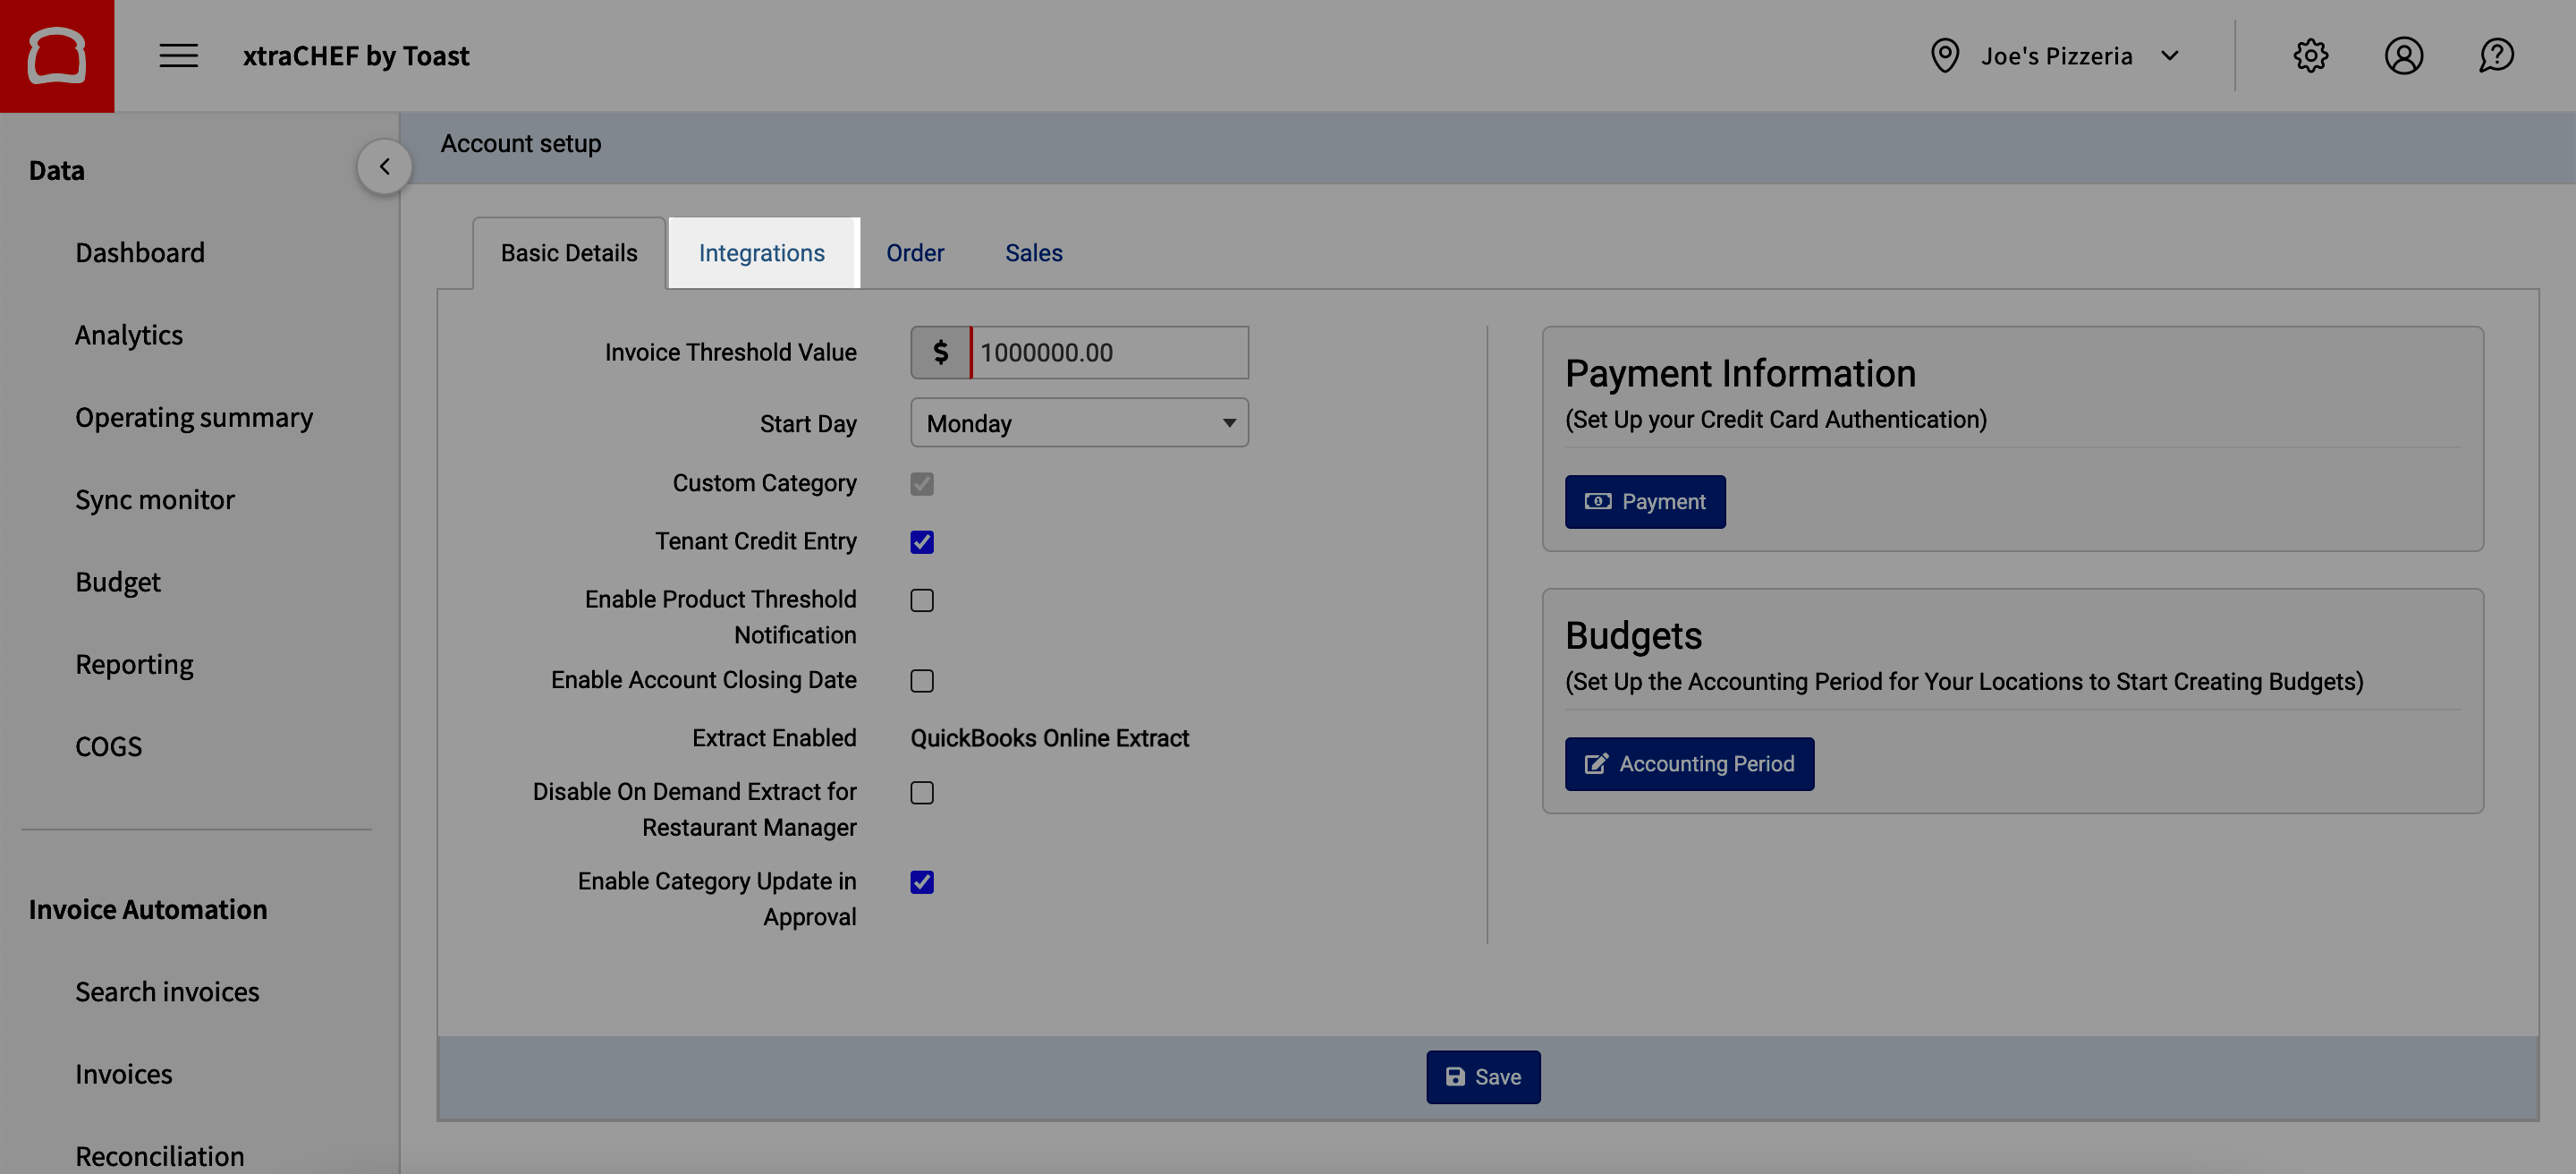
To begin configuring your extract setting in xtraCHEF, navigate to the gear icon in the top-right corner of your xtraCHEF app and select Account setup from the drop-down menu.
This will bring you to the Account Setup page. Next, select the Integrations tab to view the settings related to the QuickBooks Web Connector:
Here you can define how frequently you would like to sync with your QuickBooks Desktop account.
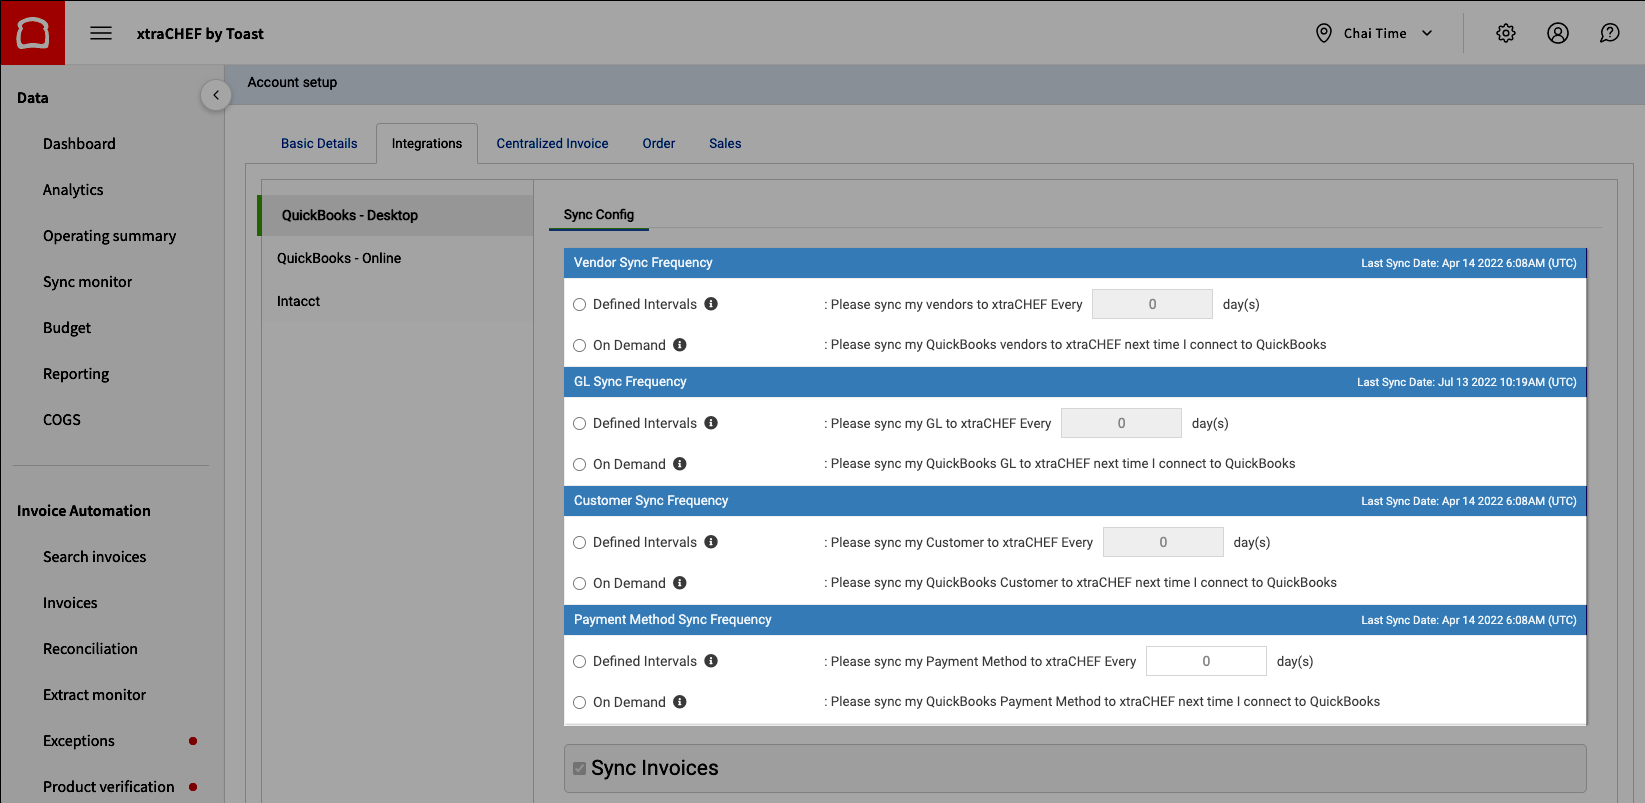
Applicable sync categories are:
- Vendor: When synced, xtraCHEF captures updates to your vendor information such as vendor name, vendor code, addresses, and more.
- GL: When synced, xtraCHEF captures updates to your Chart of Accounts and General Ledger codes.
- Customer: This allows you to sync or update Customer Information.
- Payment Method: This will enable you to sync your Payment Methods and any changes.
You can establish a sync frequency for each of these categories depending on your preference and how often you intend to run extracts. By choosing to sync At Defined Intervals, you're setting the frequency in which xtraCHEF can sync with your QuickBooks Desktop file. In comparison, Syncing On-Demand would require you to initiate a sync in xtraCHEF manually.
Back to top
Web Connector Configuration
On your Integrations page, you will also find a step-by-step guide for setting up xtraCHEF syncs with your QuickBooks Desktop account via Intuit's Web Connector.
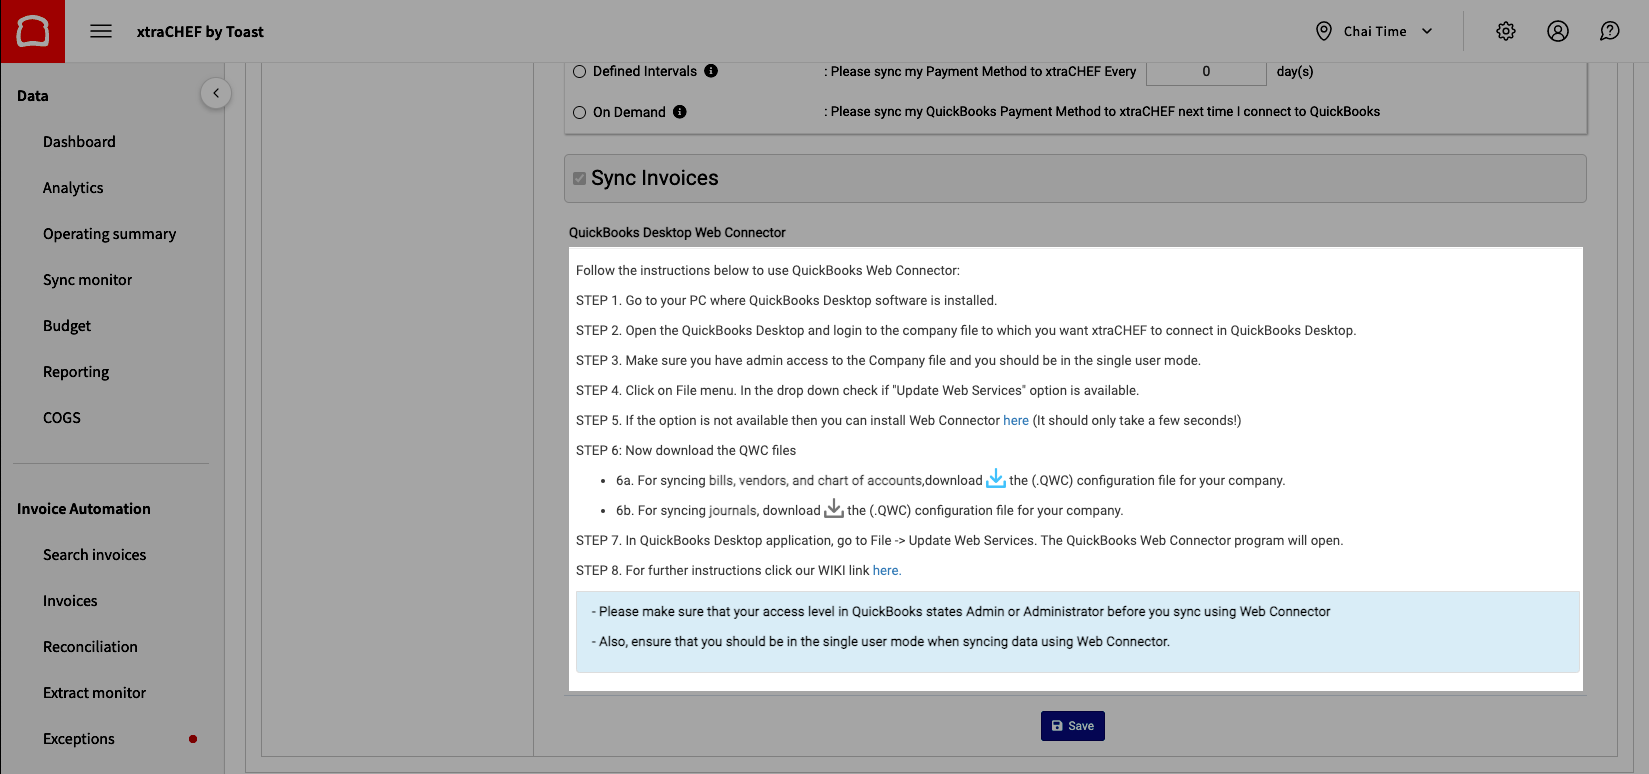
You can also see these steps below.
Note: Before you begin, ensure that your access level in QuickBooks states Admin or Administrator and that you are in the single-user mode when syncing data using the Web Connector.
- Open QuickBooks Desktop and log in to the company file to which you want xtraCHEF to connect in QuickBooks Desktop.
- Make sure you have admin access to the Company file, and you should be in the single-user mode.
- Select the File menu. In the drop-down, check if "Update Web Services" option is available.
- If the option is not available, then you can install Web Connector here (It should only take a few seconds!).
- Now download the QWC files. These files are specific to your unique accounts and can be downloaded via your Integrations page.
- For syncing bills, vendors, and chart of accounts, download the .QWC configuration file for your company. (The downloadable QWC File is found under step 6 in your xtraCHEF account)
- For syncing journals, download the .QWC configuration file for your company. (The downloadable QWC File is found under step 6 in your xtraCHEF account)
- In the QuickBooks Desktop application, go to file -> Update Web Services. The QuickBooks Web Connector program will open.
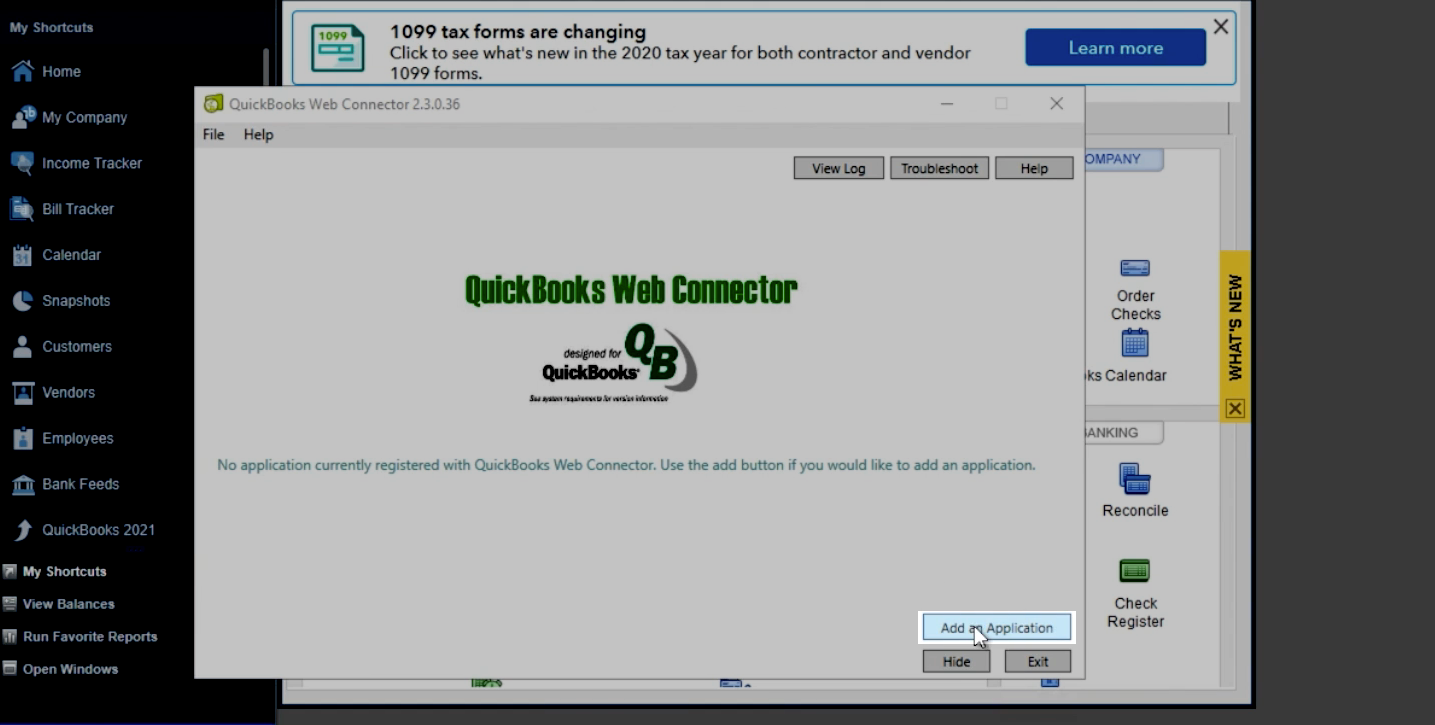
Now, you will be able to begin the configuration of your QuickBooks Web Connector! To start, open QuickBooks and your Web Connector. Then, select Add an application.
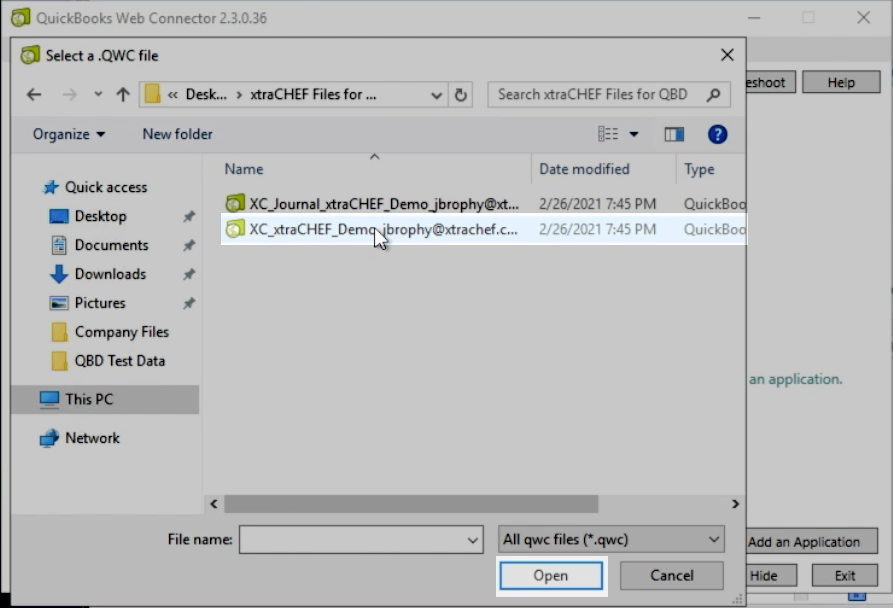
This will prompt you to select and upload the QWC file(s) you downloaded in step 6. Select the file, then select Open.
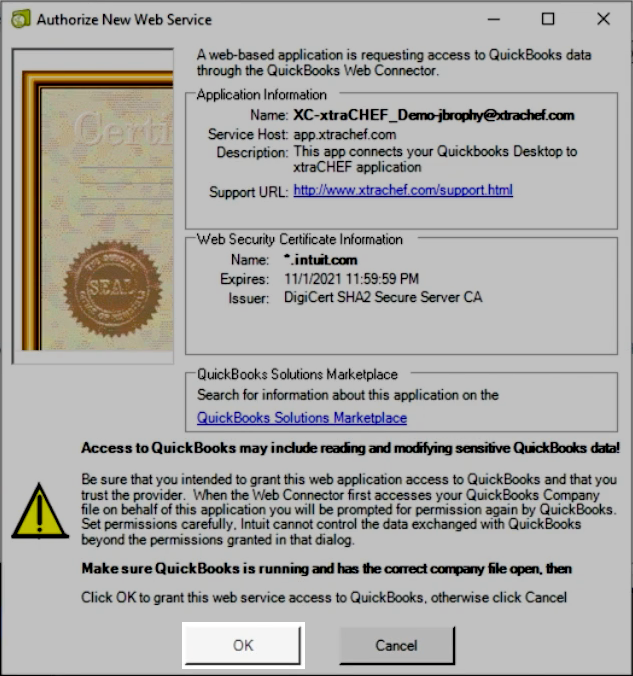
Next, you will see a pop-up asking for your permission to allow access xtraCHEF access to your QuickBooks data. To proceed, select OK.
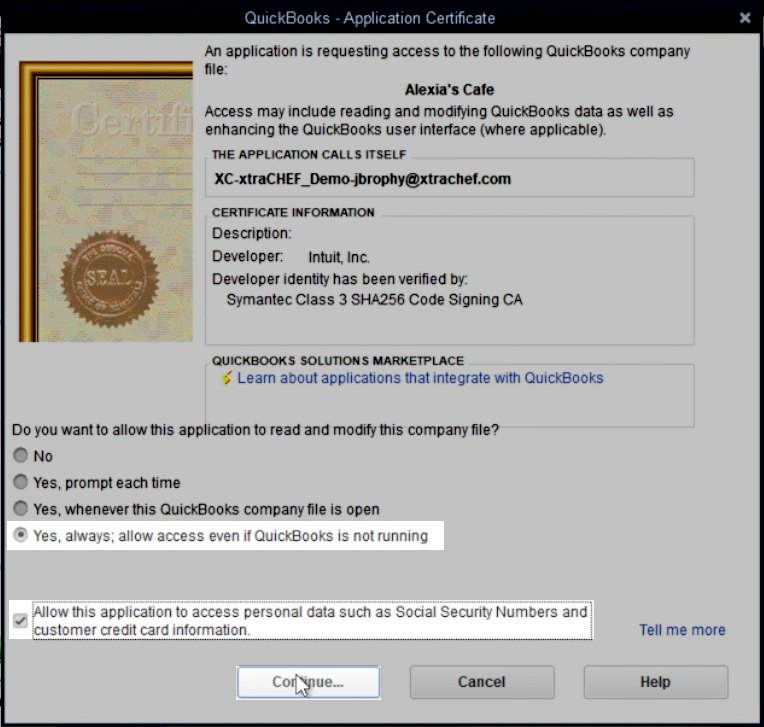
Upon selecting OK, another pop-up will appear. You can choose from any of the last three options based on your preference. However, we typically recommend choosing the last option: Yes, always; allow access even if QuickBooks is not running. Next, verify that you would like to allow this application access to your QuickBooks data. Select Continue once you have made a selection.
Upon selecting Continue, another confirmation pop-up will appear to verify your selection. Select Done to continue.
Back to top
Passwords and Syncing
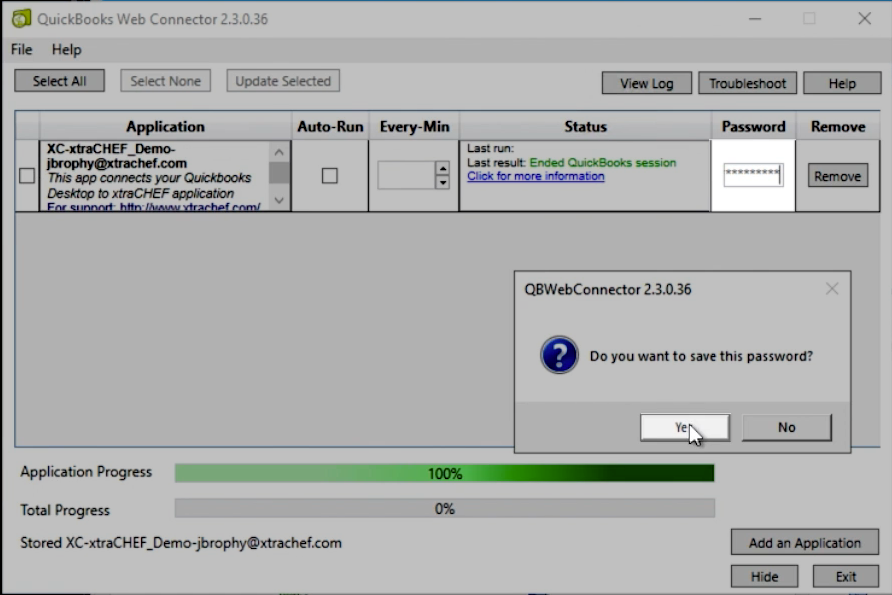
The next step is to provide your password and connect with xtraCHEF's online service. In your Web Connector window, enter the password for your xtraCHEF login. You will then be prompted to save your password. Choose Yes.
If you want the Web Connector to automatically sync at regular intervals, select the checkbox in the Auto-Run column and enter the frequency in minutes.
Note: The Auto-Run feature is only active when Intuit's Web Connector is running. When the connector is closed or the computer hosting the connector is shut off, the Auto-Run feature will not work until the connector is reopened.
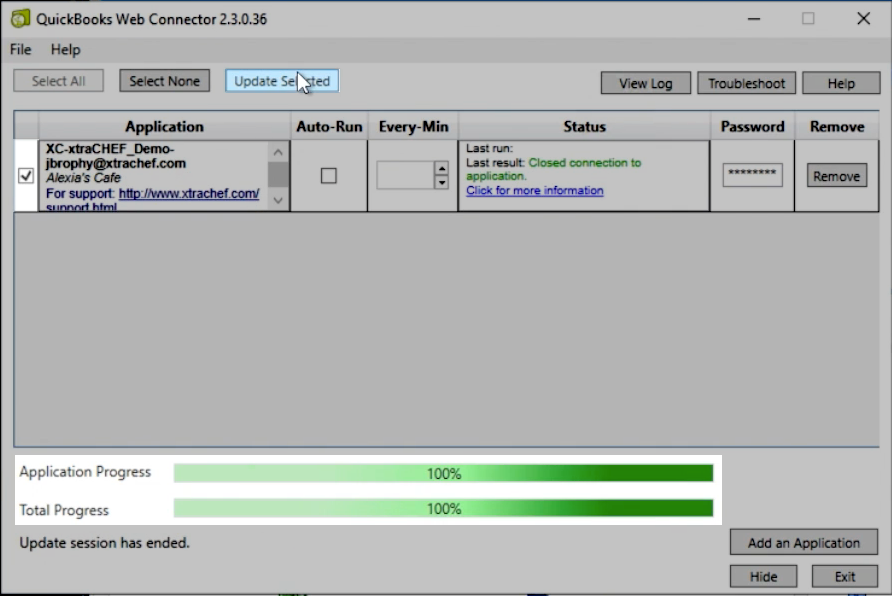
For a manual sync, select the checkbox at the beginning of the row and select Update Selected at the top. This will begin syncing the data from xtraCHEF to your QuickBooks Desktop company. Upon taking those actions, you will see the real-time syncing progress on your screen.
xtraCHEF will capture your Chart of Accounts, General Ledger Codes, and Vendors upon Updating Selected for the first time.
Note: Unless an IIF extract has been enabled in your account, your sales and invoice syncs will be separate QWC Files. To ensure both syncs are enabled, repeat these steps accordingly.
Back to top
Next Steps
With QuickBooks and Toast integrated with your xtraCHEF account, it's now time to begin Sales Setup. Sales Setup creates the framework for xtraCHEF to automatically break out your sales data in more advanced reporting and push daily sales journal entries to your company file.
For more on this next step, check out xtraCHEF Sales Setup.
Import Vendors from QuickBooks Desktop to xtraCHEF
To import vendors from QuickBooks Desktop to xtraCHEF:
- Select the gear icon > Account Setup > Integrations.
- Under Vendor Sync Frequency, there are two options:
- Defined Intervals: Allows you to set the frequency in which xtraCHEF can sync with your QuickBooks Desktop file.
- On-Demand: Vendors will sync to xtraCHEF the next time you connect to QuickBooks.
- After a selection is made, select Save at the bottom of the page.
- You must run the Web Connector in QuickBooks Desktop to sync the vendors to xtraCHEF. This includes selecting the invoice .QWC file in the Web Connector and selecting the Update Selected button.
IIF File Sync
Note: In order to use IIF File Syncs, the Customer Care team must first configure your extract. This can be initiated by reaching out to support@xtrachef.com.
In some cases, your computer operating system may require journal entries to be uploaded as an IIF File. This is typically the case if your QuickBooks desktop account is hosted on a Mac OS
Download the IIF File for Sales Journal Entries
Once your extract has been re-configured and Sales Setup has been completed, you can download Journal Entries via your Sync Monitor tab.
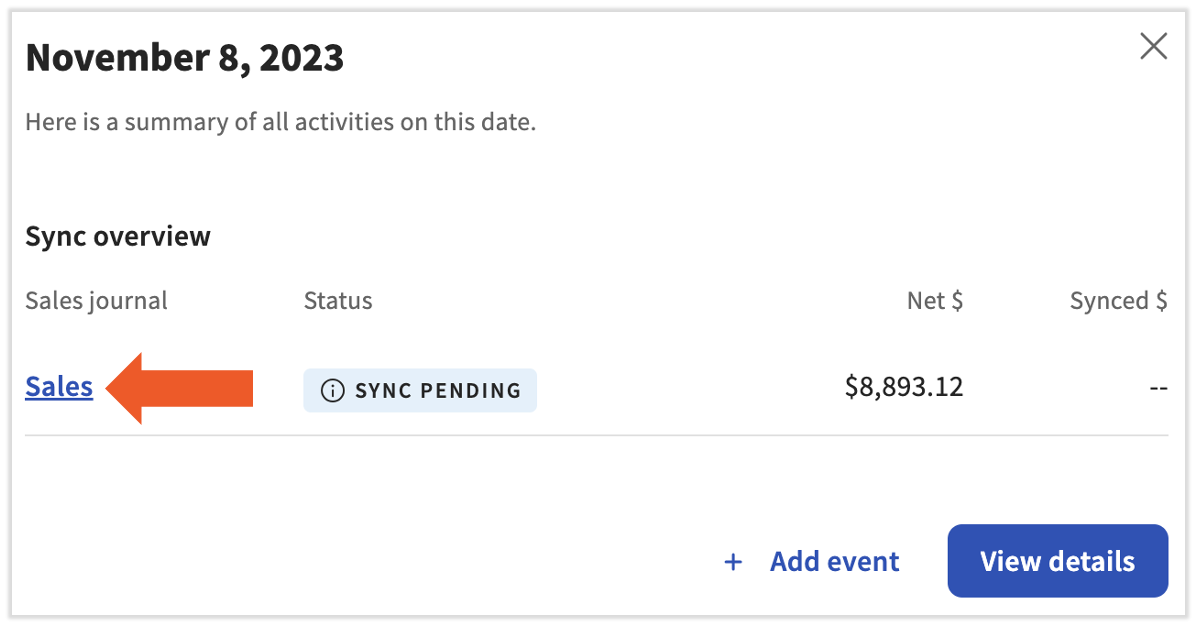
- To do this, select Sync Monitor on your navigation bar.
- Your Sync Monitor will display all of your sales in a calendar view. To download a journal entry for IIF upload, select a date on your calendar. Then, select the Sales link.
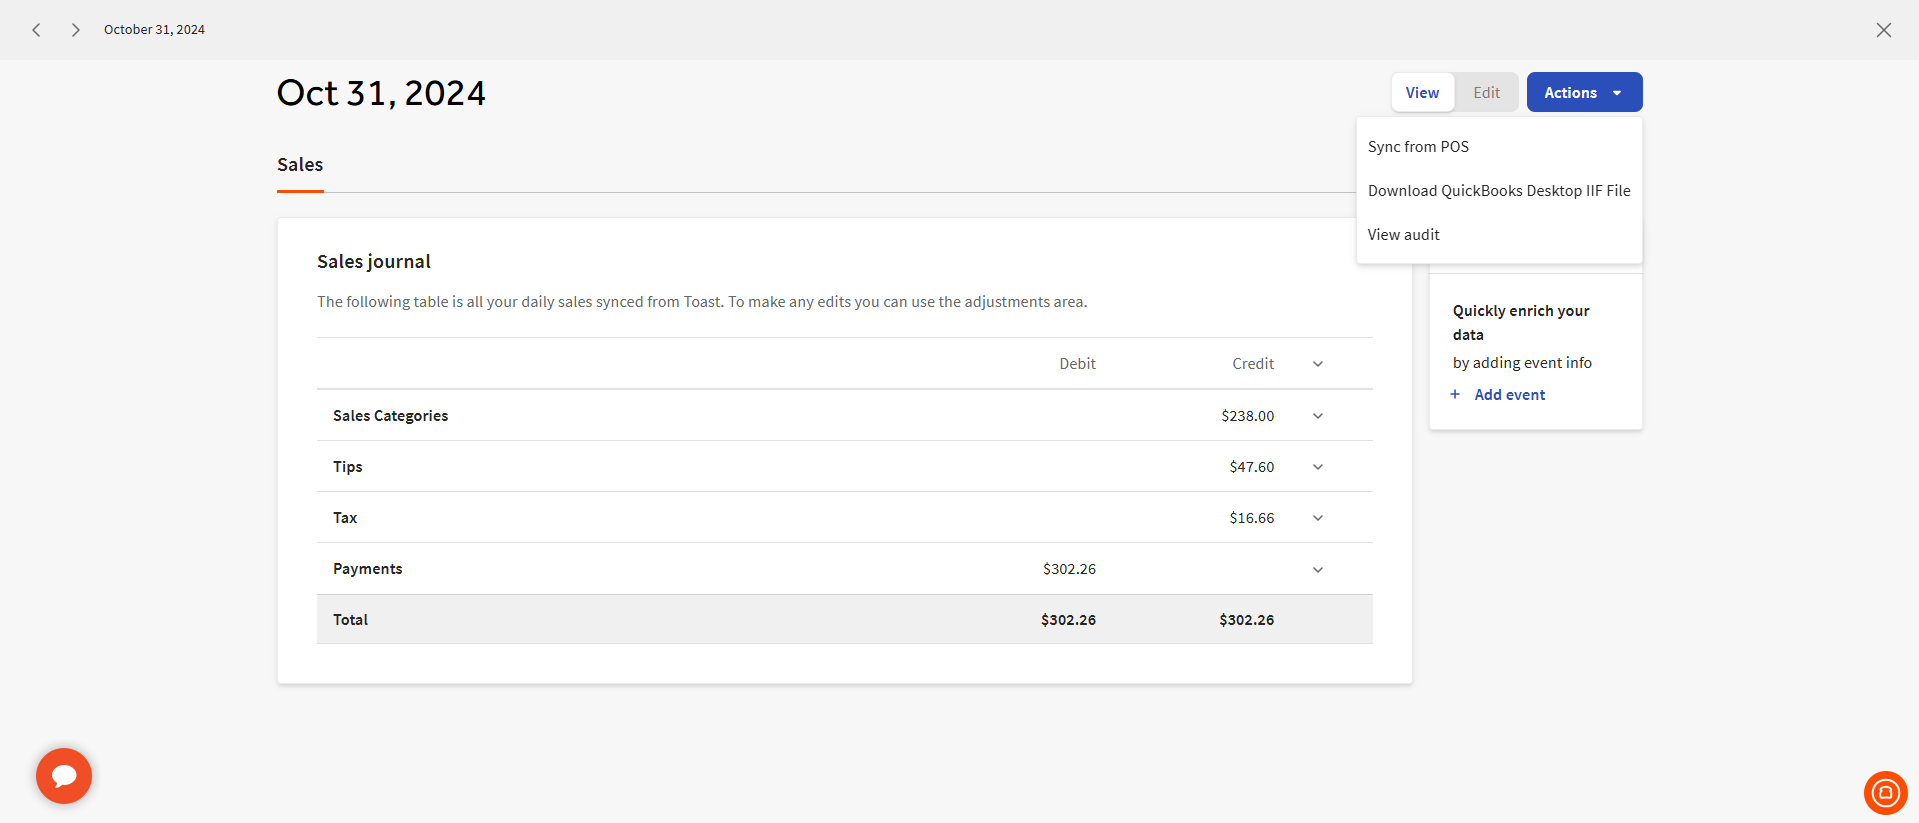
- This will allow you to preview the journal entry in xtraCHEF. To download an IIF file of this journal entry, select Action > Download QuickBooks Desktop IIF File.
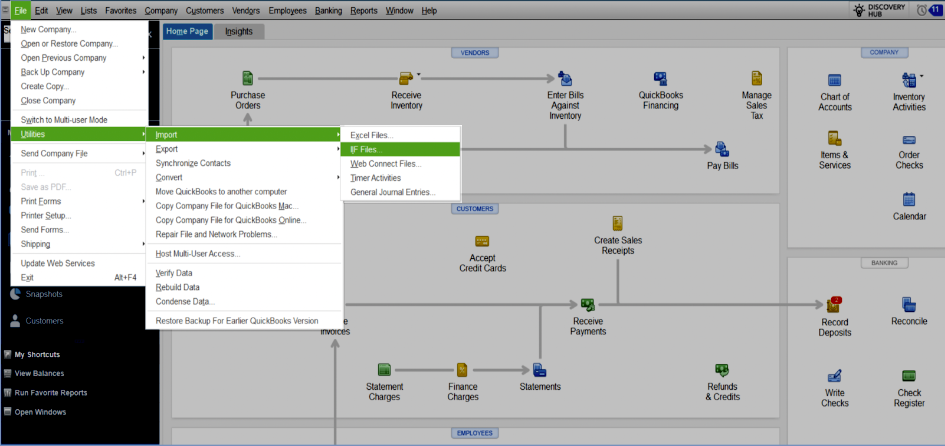
- Once downloaded, this file can then be uploaded directly into your QuickBooks Desktop account. To do this, open your QuickBooks Desktop application. Next, select File > Utilities > Import > IIF Files.
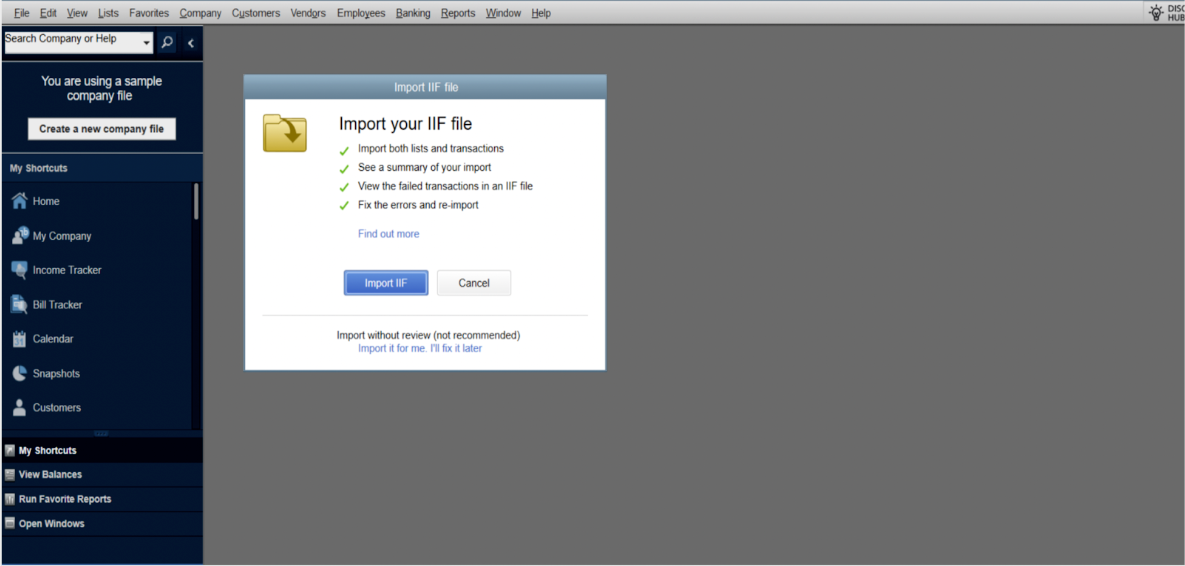
- This will open your Import IIF File window. Select Import IIF and choose the IIF File that was just extracted from your xtraCHEF Sync Monitor.
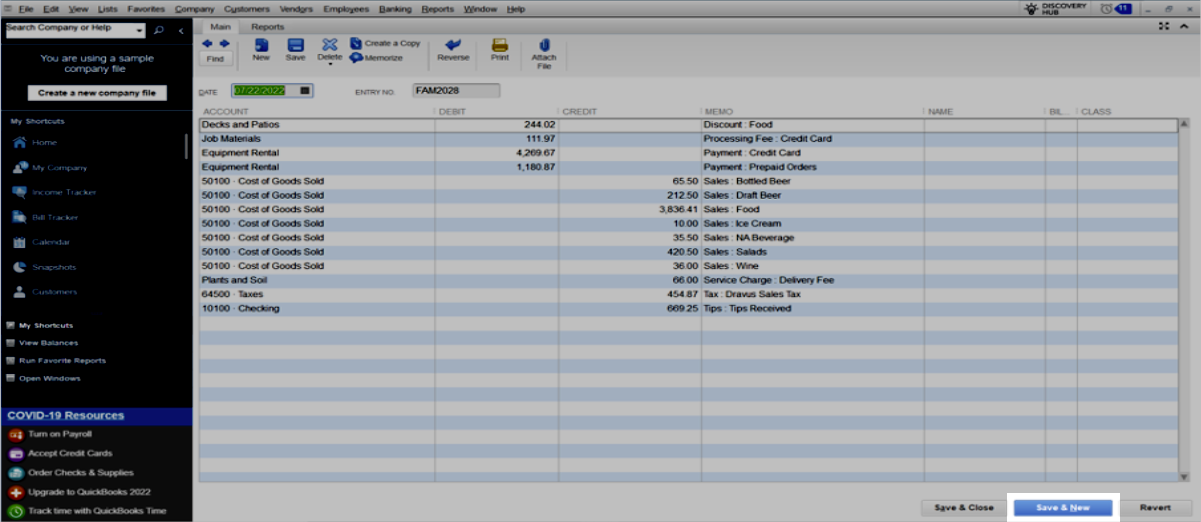
- Finally, preview the Journal Entry in QuickBooks Desktop and select Save & New.
- This will complete your IIF Import and add the Journal Entry to your QuickBooks company file.
Download the IIF File for Payroll Journal Entries
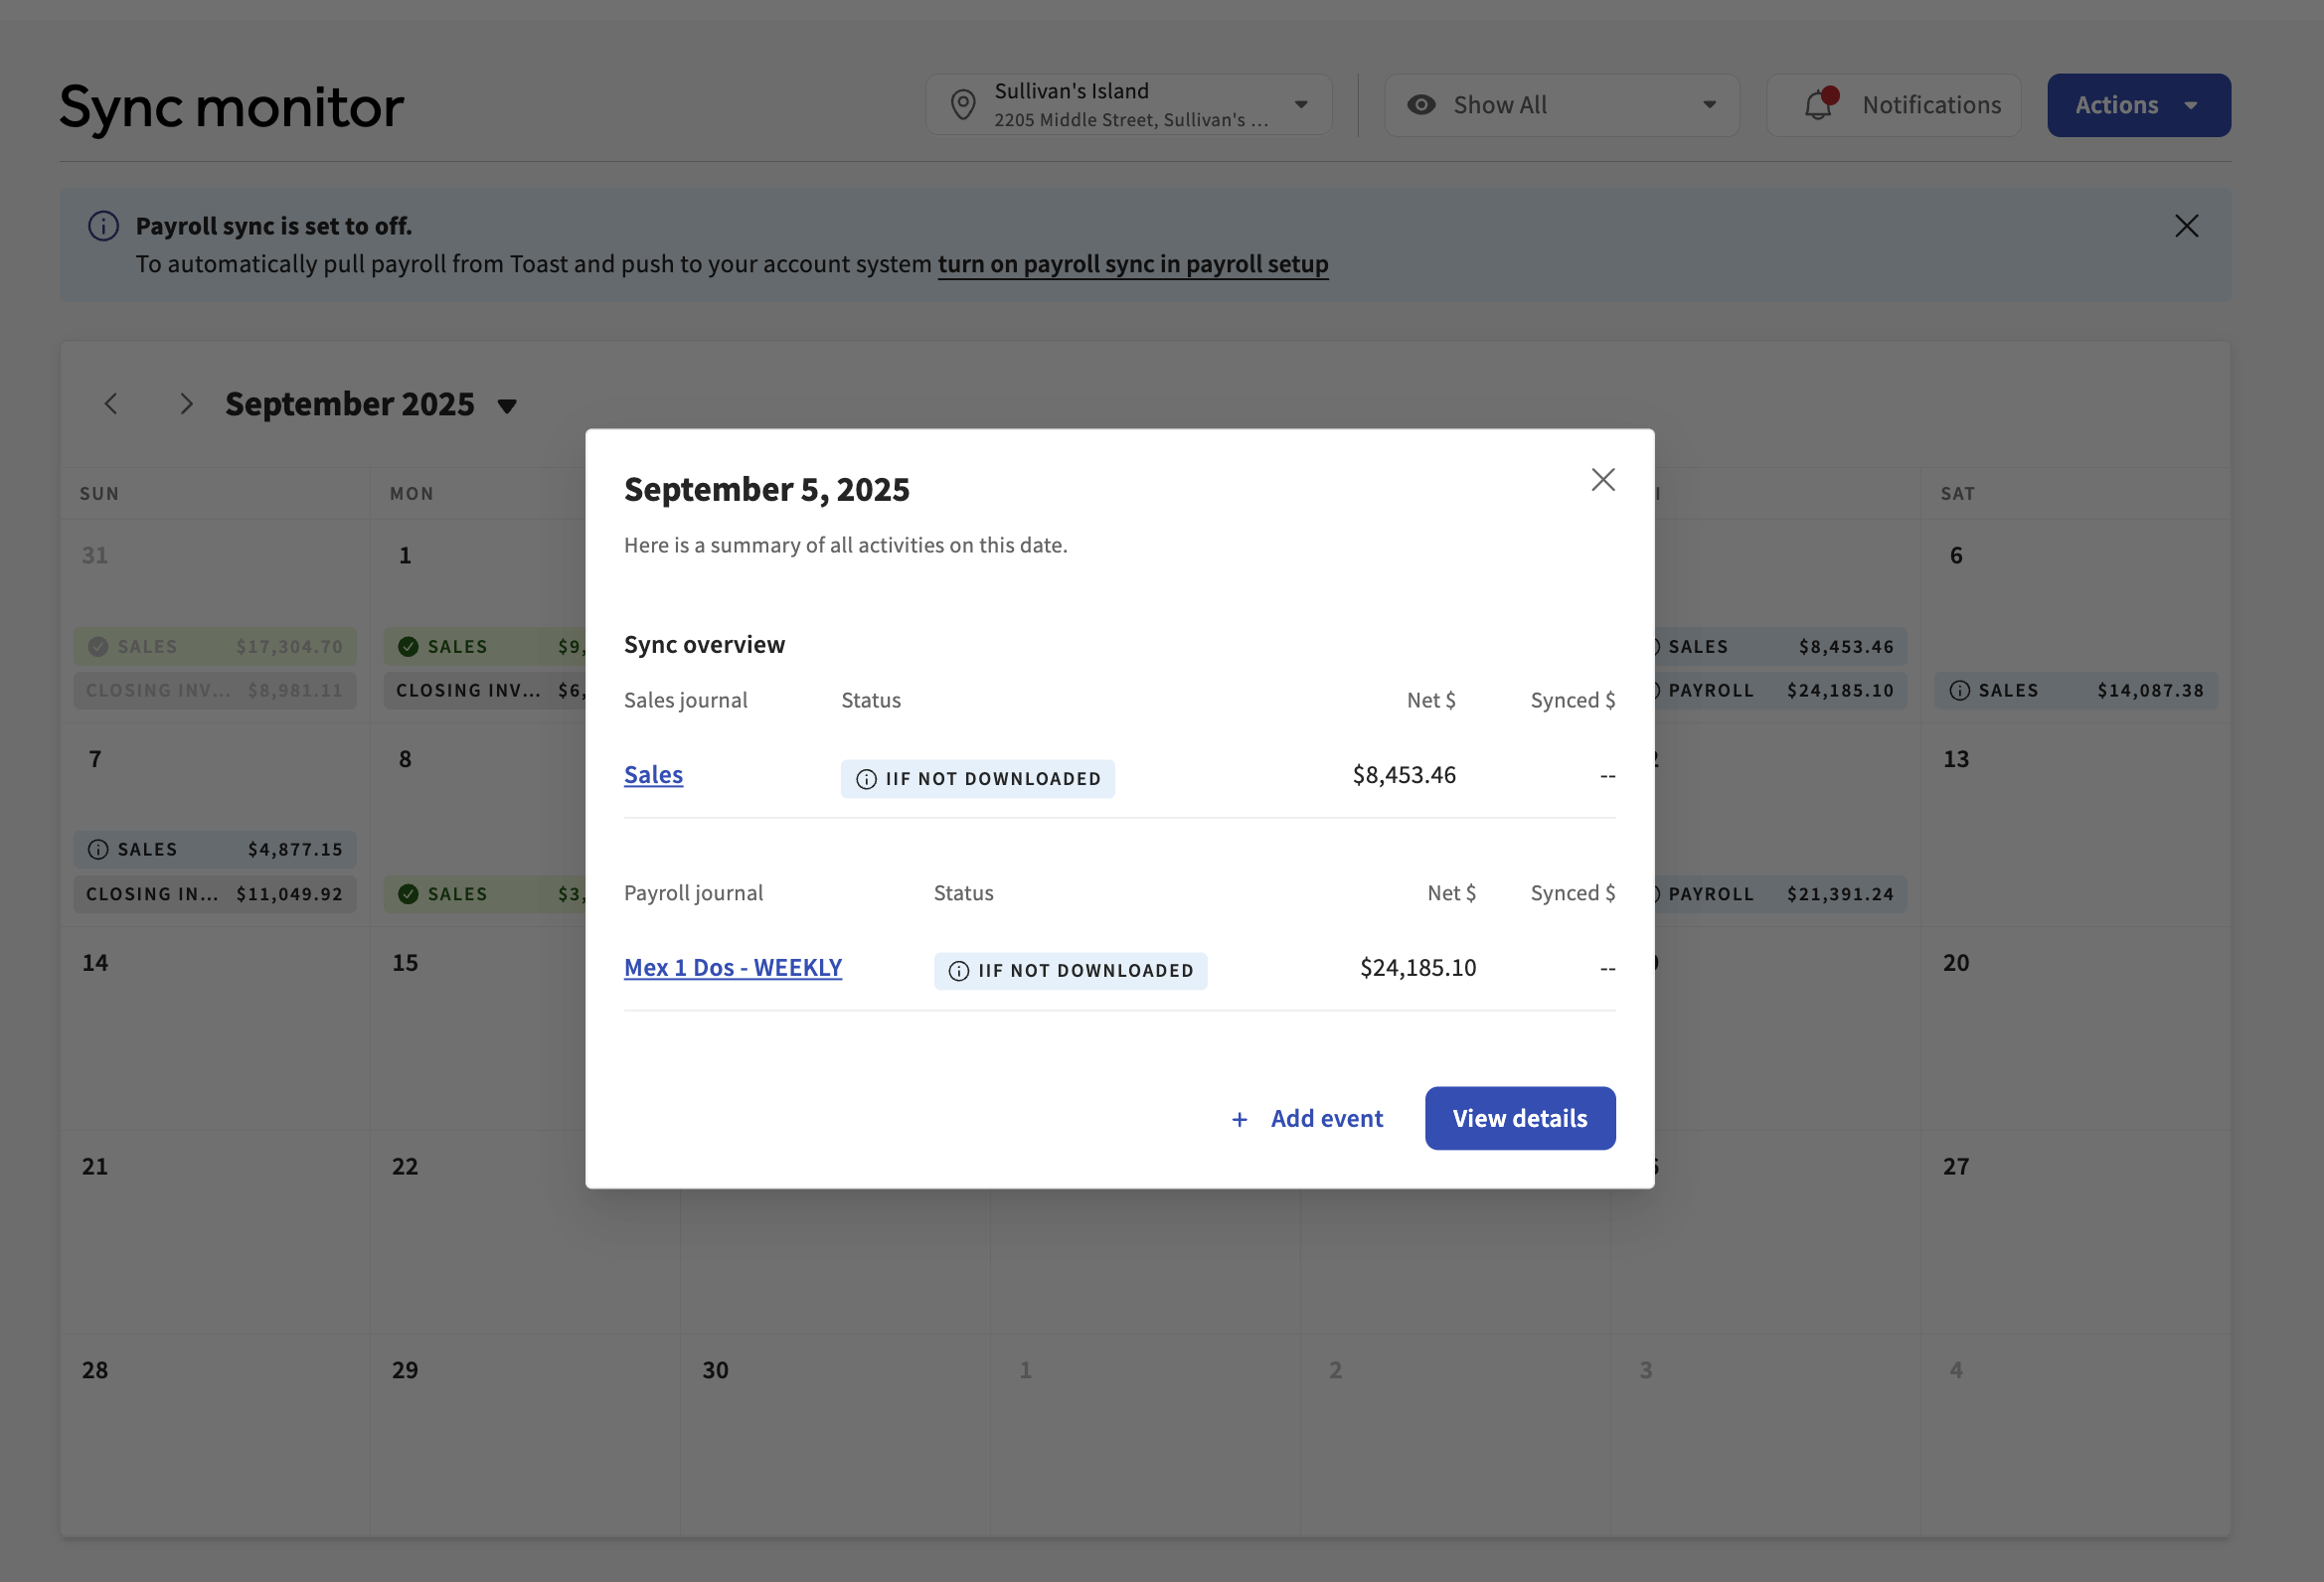
To download payroll journal entries, navigate to the Sync Monitor and select the day with the payroll entry. If you see a message that the IIF has not been downloaded, don't worry. As long as all your payroll categories are mapped to a GL code, you can select the entry to download the IIF file. Once downloaded, you will be able to upload the QuickBooks Desktop IIF File directly into your QuickBooks Desktop account and sync payroll data with your accounting.
Download the IIF File for Invoices
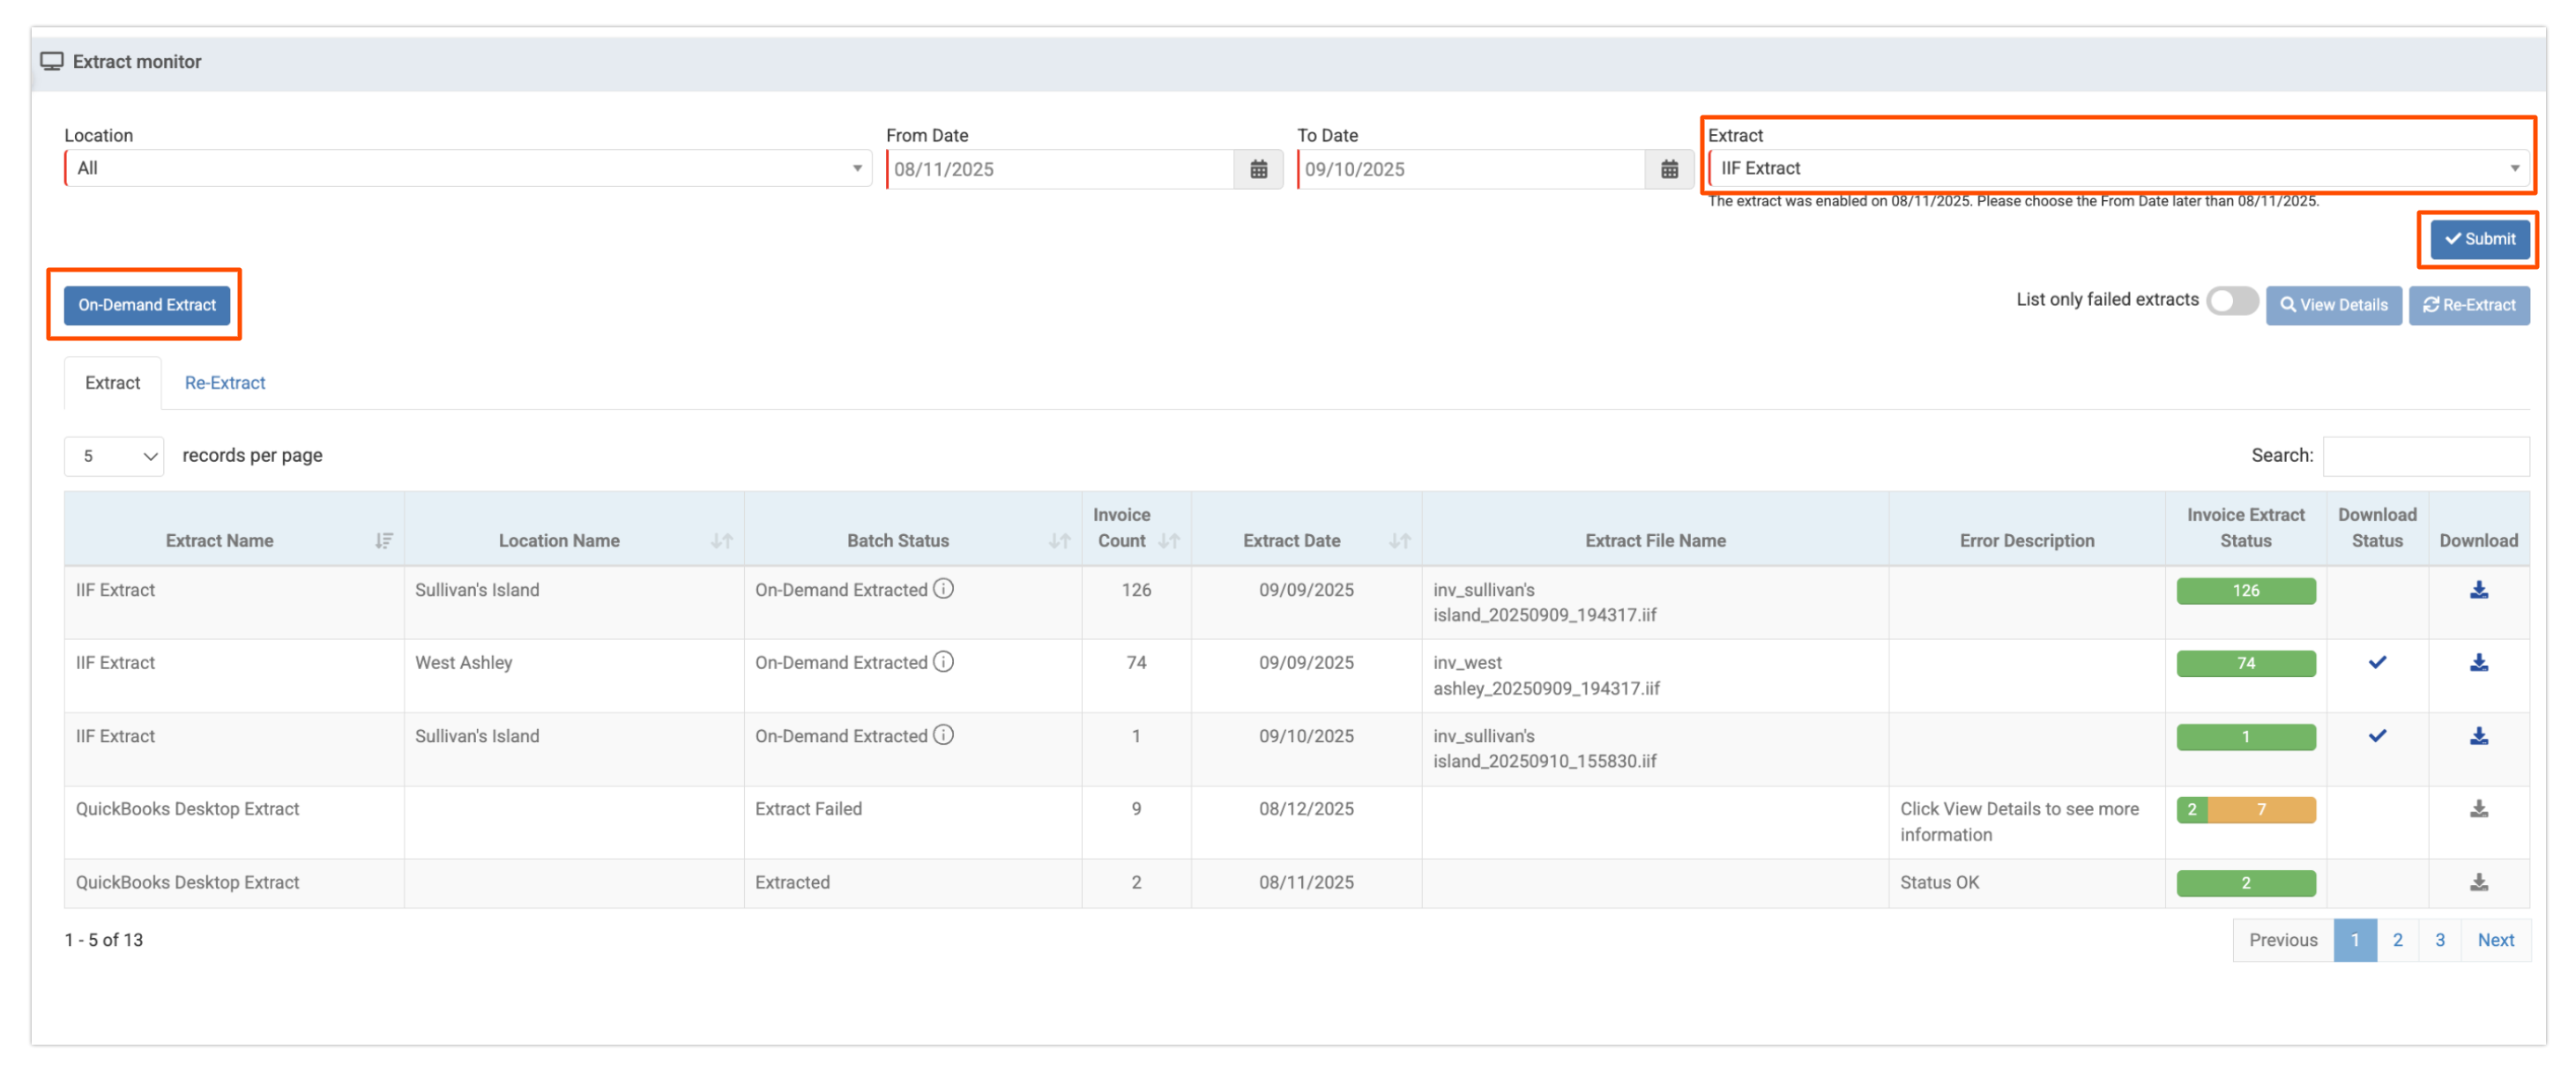
To extract your invoices, look for the ones marked as ready to extract. Select an invoice, and you'll be taken to the Extract Monitor.
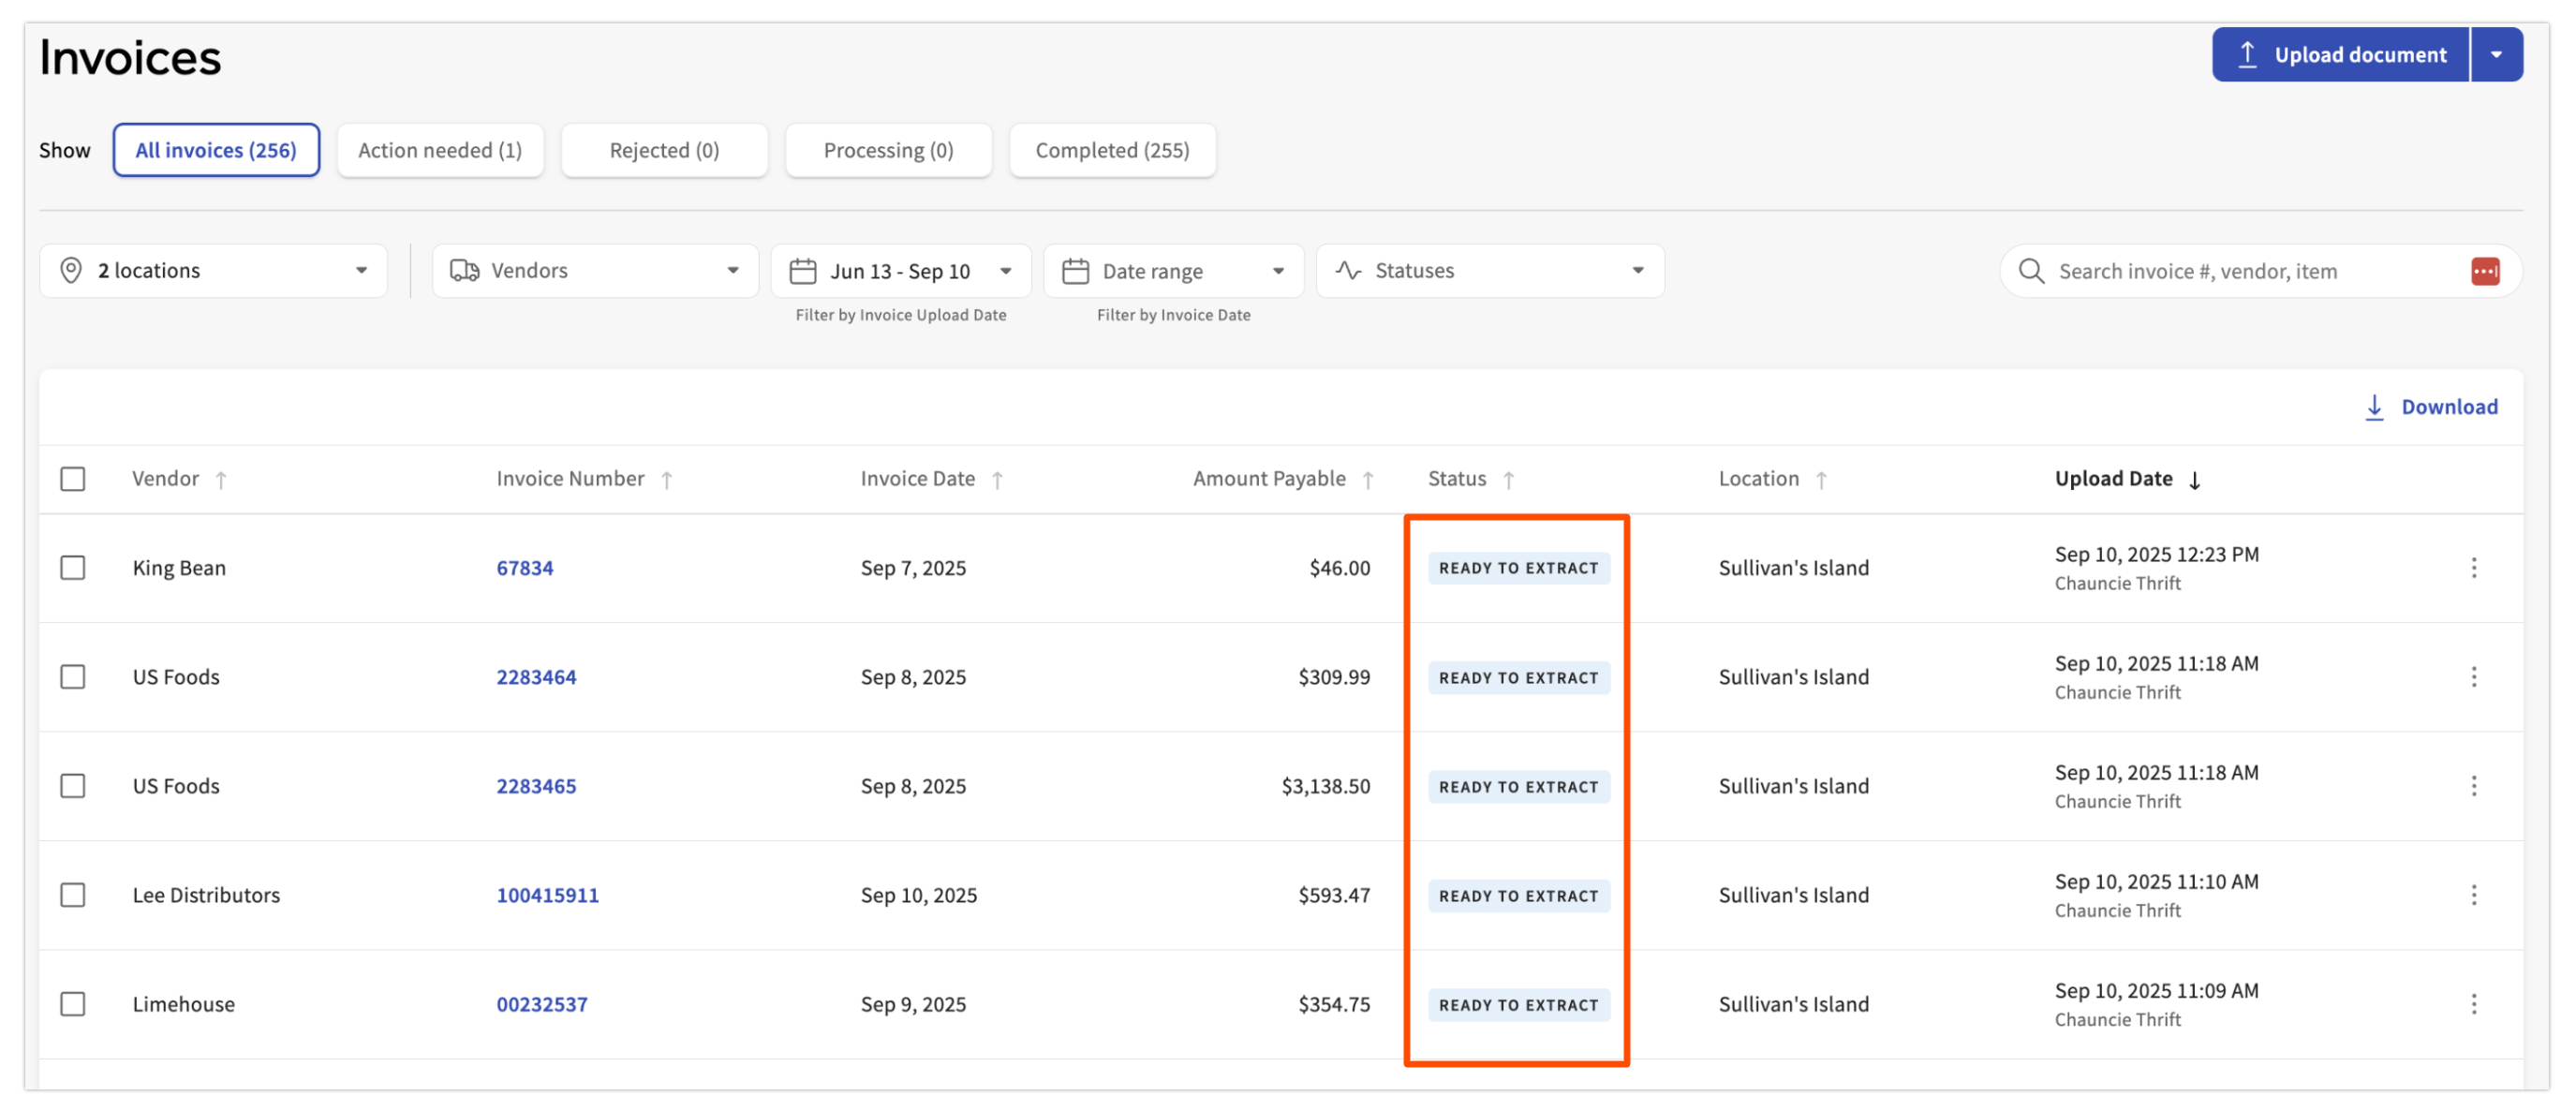
Once there, follow these steps:
- In the dropdown menu, select IIF Extract.
- Select Submit.
- Select On Demand Extract to get the IIF files for the invoices that are ready.