Nómina Toast: Comience con los gastos
Última actualización: 23 jul 2026, 5:10 p.m.
| Este módulo solo está disponible para clientes que ya lo tienen. El módulo de gastos de nómina de Toast ya no está disponible para cuentas que no lo tienen. |
- Crear un informe de gastos
- Aprobar un informe de gastos a través de To Do
- Panel de informes de gastos
- Aprobar informes de gastos pendientes a través del panel
- Filtrar resumen
- Informes de gastos en nómina
Crear un informe de gastos
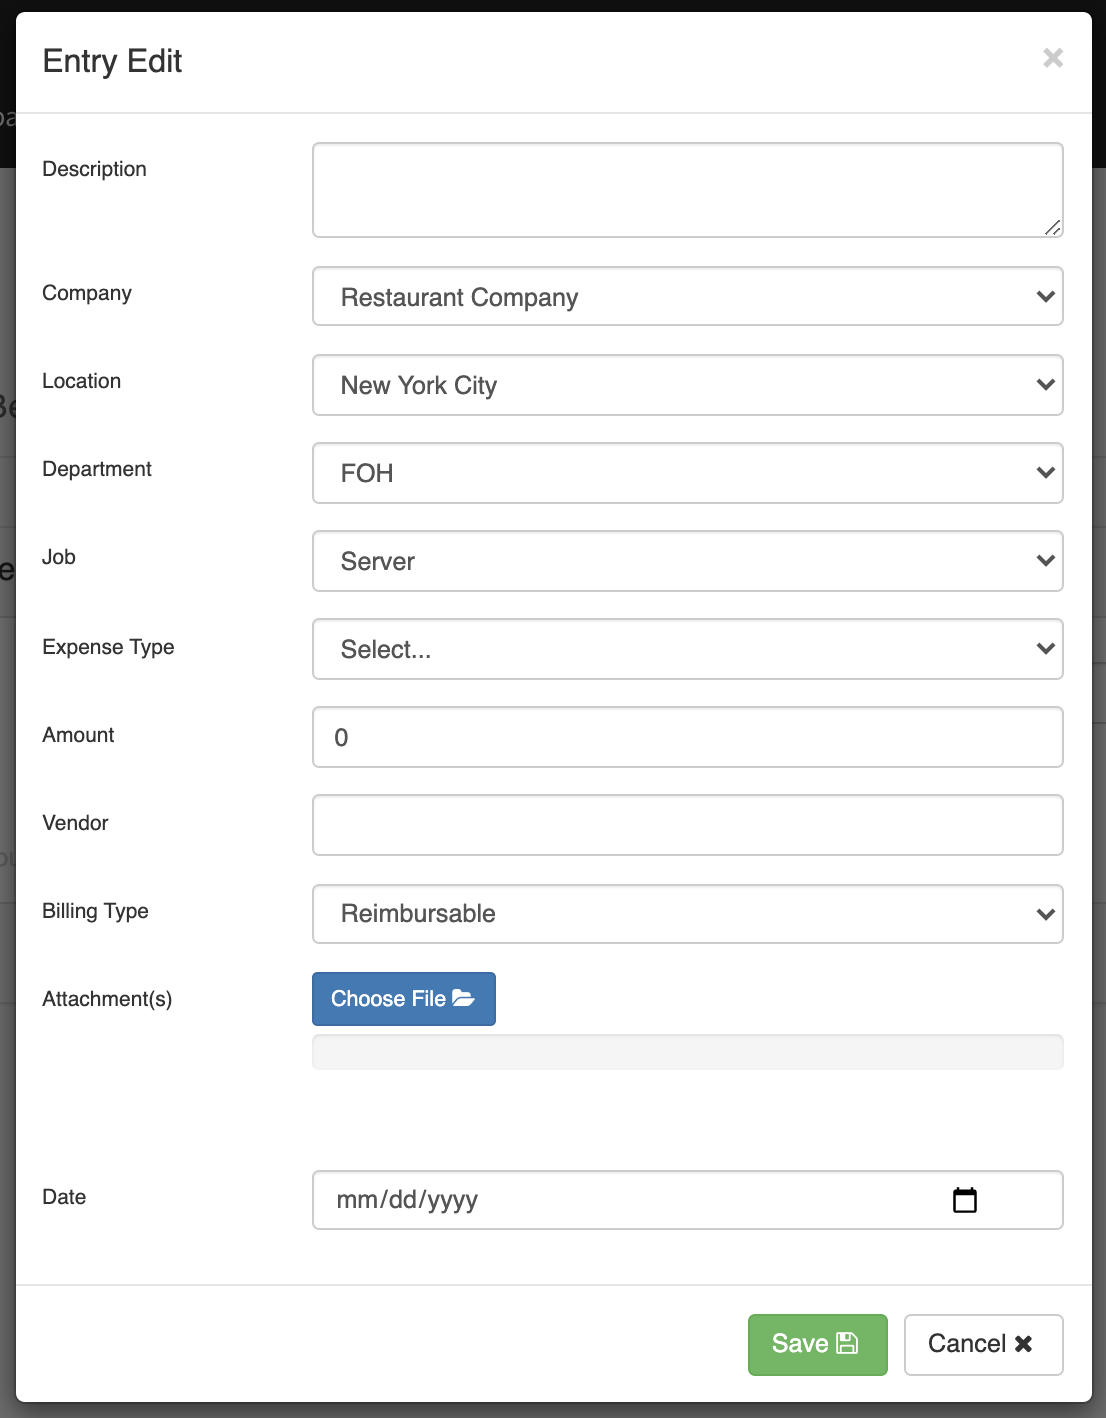
- Los empleados pueden crear informes de gastos iniciando sesión en Toast Payroll y navegando a Mi perfil > Activos y gastos > Informe de gastos.
- Seleccione Agregar+ en la esquina superior derecha.
- Comience nombrando el informe. Junto a Entradas, seleccione Agregar+ nuevamente para ingresar un gasto a su informe de gastos.
- Registre una descripción del gasto y verifique el Empresa, Ubicación, Departamento (si corresponde), y Trabajo.
- Seleccione un Tipo de gasto que categorice su gasto. Se pueden agregar más tipos de gastos si su equipo de gestión se comunica con Toast Payroll.
- Ingrese el Monto y Proveedor de este gasto. Ahora elige un Tipo de Facturación para este gasto. Nota el texto rojo cuando se elige Débito del Empleado o Pagado por la Empresa.
- Por último, Adjuntar un recibo o documento similar si es necesario y elige la Fecha de este gasto.
- Selecciona Guardar.
- Se pueden agregar más gastos al mismo informe seleccionando Agregar+ nuevamente. Los empleados también pueden seleccionar Guardar para Más Tarde si el informe no está terminado o pueden Enviar o Cancelar el informe. Una vez enviado, los informes de gastos deberán ser aprobados por la empresa antes de ser procesados.

Aprobar un Informe de Gastos a través de To Do
Una vez que un empleado ha enviado un Informe de Gastos para que lo veas, los empleadores recibirán una notificación de To Do en el panel de control de Toast Payroll. Selecciona para continuar.
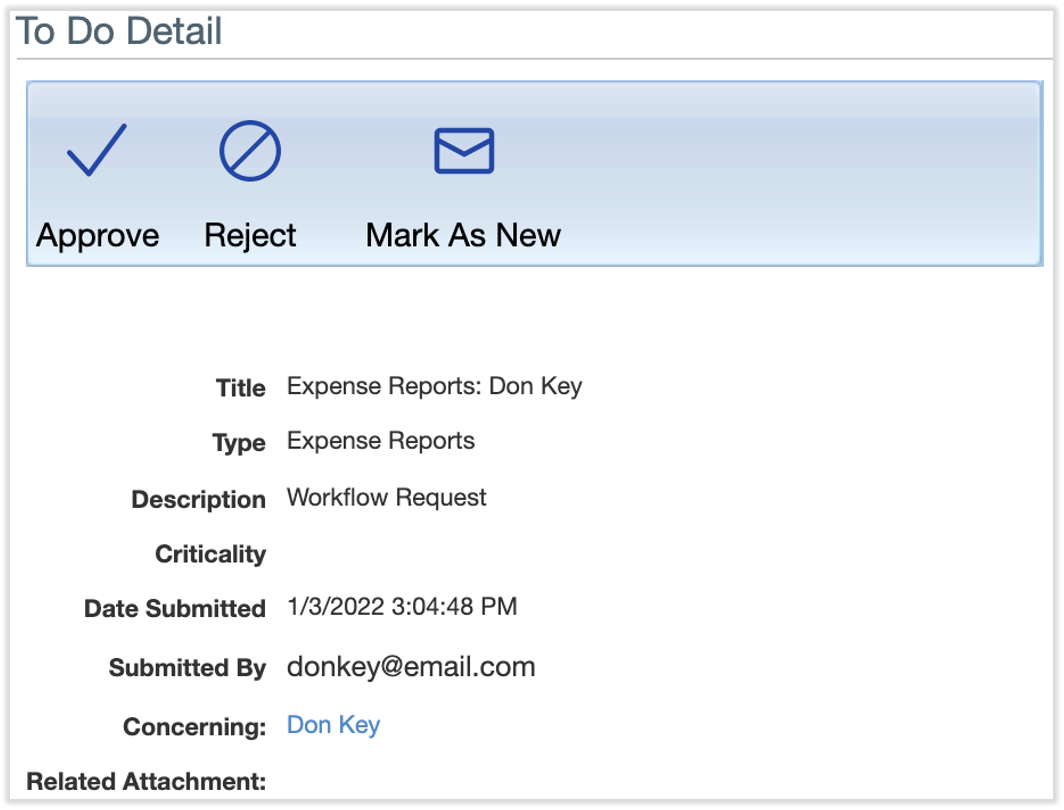
Aquí, los empleadores pueden Aprobar, Rechazar o Marcar como Nuevo.
- Si se selecciona Marcar como Nuevo, la notificación aparecerá como Nuevo en el Panel.
- Aprobar aprobará el informe de gastos.
- Rechazar rechazará el informe de gastos para el empleado.
- Agrega una nota antes de aprobar o rechazar el informe de gastos en la parte inferior de la lista de tareas.
Seleccionar Ver Datos ofrecerá un resumen de la información dentro del informe de gastos que ha sido enviado para aprobación. Esto también te permitirá ver una copia de los recibos que han sido adjuntados. Puedes descargar esta información como un archivo PDF o XLS.
Panel de Informes de Gastos
Los empleadores también pueden ver y aprobar los informes de gastos de todos los empleados a los que gestionan accediendo a nnavegando a Nómina > Gastos (en el menú de Acciones Rápidas).

En el panel de control, puedes ver el total de gastos Pendientes y Abiertos en el lado derecho de la página. Para ver un informe de gastos de un empleado en particular, utiliza las herramientas de filtro o escribe el nombre del empleado en la barra gris.
Esta página mostrará por defecto los informes de gastos que están Abiertos y Pendientes de Aprobación. Los informes de gastos pueden estar en uno de cuatro estados diferentes:
- Abierto: Estos son hojas de tiempo que aún no han sido enviadas para aprobación por el empleado (pueden estar aún en proceso por el empleado).
- Pendiente de aprobación: Estos son informes de gastos que los empleados han enviado para aprobación. Estos están listos para que el gerente los vea.
- Aprobado: Estos son informes de gastos que han sido aprobados por el gerente y están listos para ser importados a la nómina.
- Pagado: Estos son informes de gastos que han sido importados y pagados a los empleados. Estos empleados han sido reembolsados o los gastos han sido registrados en la nómina (en casos donde el empleador no está reembolsando al empleado)
Verás hasta seis botones diferentes en esta página. Diferentes botones aparecerán para los informes de gastos dependiendo del estado en el que se encuentren.
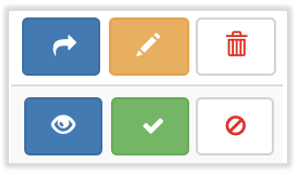
Con los informes de gastos en estado Abierto, selecciona el flecha azul para enviar el informe en nombre del creador. Selecciona el icono de lápiz amarillo para editar el informe o elige el icono de papelera para eliminar el informe de gastos por completo.
Con los informes de gastos en estado de Aprobación Pendiente, selecciona el icono de ojo azul para ver más detalles sobre cada informe de gastos. De lo contrario, elige el marca de verificación verde o el icono de cancelar rojo para aprobar o negar el informe de gastos.
Los informes de gastos Aprobados y Negados solo se pueden ver. Para ver estos informes, selecciona el 2 de 4 seleccionados menú desplegable y marca estos estados. Luego selecciona el icono de embudo a la derecha de esta barra para filtrar la página e incluir informes de gastos aprobados y negados.
Aprobar Informes de Gastos Pendientes a través del Tablero
Para aprobar informes de gastos en el tablero que han sido completados y están listos para que los gerentes los vean, selecciona los gastos que están en estado de Aprobación Pendiente.
Verás tres opciones diferentes en el lado derecho de la página para los informes de gastos en Aprobación Pendiente.
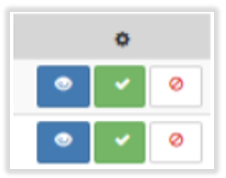
- Ver: Para ver las entradas dentro del informe de gastos, selecciona el icono azul.
- Aprobar: Para aprobar el informe de gastos, selecciona la marca de verificación verde junto al nombre del informe de gastos del empleado.
- Negar: Para negar el informe de gastos, selecciona el icono de cancelar en el lado derecho del nombre del empleado para devolverlo como no aprobado.
Por último, también puedes aprobar informes de gastos en el perfil del empleado navegando al perfil del empleado y seleccionando Activos y Gastos > Informe de Gastos. En esta página, también verás la marca de verificación verde y el botón de cancelar rojo para aprobar o negar informes de gastos.
Filtrar Resumen
En el tablero de Informes de Gastos que se encuentra bajo Nómina > Gastos (desde el menú de Acciones Rápidas), puedes filtrar los informes usando los menús desplegables en la barra gris.
- Nombre del empleado: Escriba el nombre del empleado para ver sus informes de gastos.
- Estado: Todos, Abierto, Pendiente de aprobación, Aprobado y Denegado
- Fecha de aprobación entre: Ingrese un rango de fechas que incluya lo que está buscando
- Fecha de presentación entre: Ingrese un rango de fechas que incluya lo que está buscando.
- Fecha de pago entre: Ingrese un rango de fechas que incluya lo que está buscando
Seleccione el icono de filtro (embudo) para activar los filtros. Para ver los detalles de un informe de gastos, seleccione el ícono azul junto al informe. Desde aquí, puede aprobar, denegar o devolver los informes de gastos utilizando los íconos apropiados.
Nota: Si está denegando un informe de gastos, agregue una nota antes de seleccionar el botón de denegar para que el empleado sepa por qué fue denegado. Una vez que un informe de gastos es aprobado, aparecerá bajo el paso de importación en la nómina para pagar al empleado.
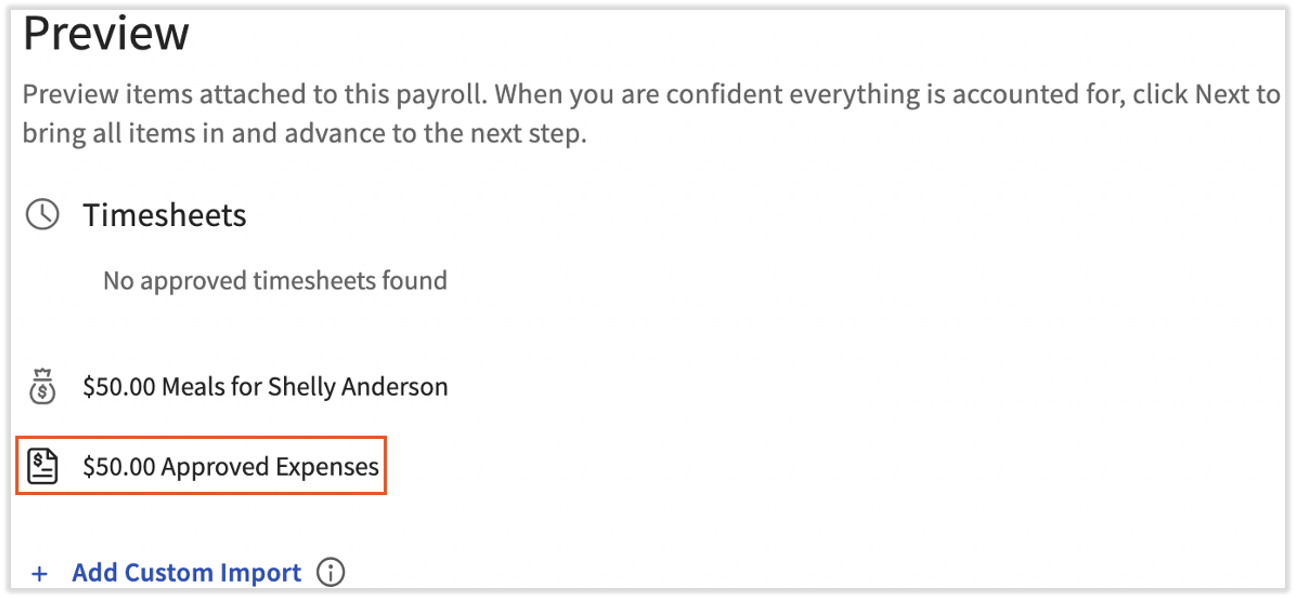
Informes de gastos en la nómina
Una vez que un informe de gastos ha sido aprobado, los reembolsos de gastos fluirán automáticamente a la próxima nómina que se abra después de que los gastos sean aprobados. Los informes de gastos aparecerán en el Paso de vista previa de la nómina.
Seleccionar Siguiente en el Paso de vista previa automáticamente extraerá cualquier cosa adjunta a esa nómina, incluidos los informes de gastos.
Una vez que los empleados hayan sido reembolsados por sus gastos, la fecha de pago aparecerá en el panel de informes de gastos en su perfil.
Este contenido se publica con fines informativos y no tiene como propósito brindar asesoramiento legal, fiscal ni referido a recursos humanos, ni constituye ningún otro tipo de recomendación profesional. Para recibir asesoramiento, comunícate con un abogado u otro profesional.