Sling by Toast:创建日程
上次更新时间:2026年6月11日 14:30
学习如何使用 Sling 的排程功能。
- 创建班次
- 使用班次模板
- 使用日程模板
- 使用时间块和日部分
- 使用开放式班次
- 添加班次备注
- 使用标签
- 使用日记备注
- 使用重复和复制功能
- 通过未分配班次优化人员配置
- 使用自动分配
- 批量编辑班次
- 发布和取消发布班次
- 查看班次申请
- 使用班次接受
- 使用花名册
- 自定义班次外观
- 打印日程表
- 导出日程表
- 了解日程过滤器
- 应用过滤器
- 分组日程表
- 自定义员工顺序
- 使用分组
- 使用横向视图
- 使用世界时钟
创建班次
您必须具有管理员或经理系统角色才能创建班次。
来自网络:
- 选择 创建班次 或在日历中选择空白区域。
- 输入班次详细信息,例如开始和结束时间、地点和职位。
- 可选地添加重复、休息、标签、任务或备注。
- 选择是否保存为已发布或未发布。
班次在添加到日历时会自动保存。
未发布的班次仅对管理员和经理可见。已发布的班次对员工可见。
来自移动应用程序:
- 前往班次标签。
- 选择右上角的三点选项,然后选择创建班次。
- 输入班次详情并选择保存。
使用班次模板
班次模板允许您重复使用常见的排班。
要创建模板:
- 在日程的右上角选择三点选项。
- 选择查看班次模板。
- 选择+ 创建班次模板。
- 输入详细信息并选择保存。
您可以:
- 在创建班次时选择模板
- 将模板拖放到日程中
- 复制并粘贴模板
使用日程模板
日程模板允许您保存并重复使用完整的日程。
要创建模板:
- 建立您的日程安排。
- 在日程安排的右上角选择 3-dot option。
- 选择 保存日程到模板。。
- 命名模板。
- 选择是否忽略分配人。
- 选择是否忽略未发布的班次。
- 选择 保存。
要应用模板:
- 选择日期范围。
- 选择 从模板加载日程。。
- 选择一个模板并选择 应用。
模板作为未发布的班次应用,因此您可以在发布之前进行编辑。
使用时间块和日部分。
时间块允许您快速应用预设的班次时间。
要创建时间块:
- 在日程安排的右上角选择 3-dot option 。
- 选择 编辑时间块和日部分。。
- 选择 + 创建时间块。。
- 输入详细信息并选择添加。
日部分允许您按一天中的时间对班次进行分组和过滤。
要创建时间块:
- 在日程的右上角选择 3点选项 。
- 选择 编辑时间块和日部分。。
- 选择 日部分选项卡。
- 选择 + 创建日部分。
- 输入详细信息并选择 添加。
使用开放式班次
您可以隐藏班次的结束时间,以便员工看不到明确的结束时间。
要启用此选项,请在班次中选择 结束 字段并启用 隐藏结束时间。
管理员和经理可以为班次添加备注以提供更多细节。
要添加备注,请打开一个班次并在备注字段中输入详细信息。
使用标签
标签为班次添加自定义标签,以便更好地组织。
它们可以用于指定以下信息:
- 班次的名称或标题
- 服务员的区域或区域
- 送货司机的车辆类型或ID
- 工作地点或项目
- 工作站或特定职责
- 该班次的津贴或奖金
- 在该班次期间发生的事件
使用日记
日记允许管理员和经理将某些日期标记为关闭,或在日程中添加重要提醒。
来自网络:
- 在日程页面上选择日视图或周视图。
- 在日视图中,选择靠近今天的+图标。在周视图中,选择靠近星期几的 +图标。
- 输入详细信息并选择保存。
来自移动应用程序:
- 前往班次标签。
- 选择日期,然后选择日期选项。
- 输入详细信息并选择保存。
您可以创建重复的班次或在不同日期复制现有班次。 重复的班次可以持续最多一年。
要创建重复班次,请在创建或编辑班次时选择重复选项,然后选择星期几和结束日期。
复制选项包括:
- 完整日程复制
- 选定班次复制
- 拖放复制
要复制完整日程:
- 选择日程右上角的复制图标。
- 选择您想要复制的起始日期和目标日期。
- 选择是否将所有班次恢复为未分配班次,是否复制未发布的班次,以及是否跳过冲突和劳动成本检查。
- 选择复制。
复制选定的班次:
- 选择您想要复制的班次中的复选框。
- 选择出现在日程表左上角附近的复制图标。
- 选择要复制班次的周。
- 选择是否忽略员工。
- 选择是否跳过所有冲突和劳动检查。
- 选择复制。
优化未分配班次的人员配置
未分配的班次有助于在分配员工之前定义人员配置需求。
您可以:
- 在未分配部分创建班次
- 设置时段以指示人员配置需求
- 稍后分配员工
注意: 未分配的班次仅对管理人员可见。它们提醒您当天或本周需要覆盖的班次,并需要分配或使其在员工的日程表上可见。 可用班次虽然也是未分配的,但对员工可见,并且可以被抢占。它们作为填补当前开放班次的工具。员工可以申请这些班次,帮助您使日程表完全人员配置。
自动分配根据员工的可用性、职位和地点自动分配未分配的班次。
要使用自动分配:
- 选择一个日期范围。
- 选择自动。
- 选择 自动分配未分配的班次。如果您更愿意让员工申请可用班次,而不是将其分配给员工,您也可以选择使未分配的班次可用。
班次在您选择发布之前保持未发布状态。
批量编辑班次
批量编辑允许您一次更新多个班次。
要批量编辑班次:
- 选择您想要编辑的班次。
- 选择出现在日程表左上角附近的编辑图标。
- 选择要编辑的内容。
- 选择 保存。
您可以批量编辑:
- 开始时间
- 结束时间
- 休息
- 地点
- 职位
- 受派人
- 标签
- 可用性(如适用)
- 老虎机(如适用)
- 备注
- 发布状态
发布和取消发布班次
您可以单独或批量发布班次。 未发布的班次对员工隐藏。
要发布单个班次:
- 选择班次。
- 选择编辑班次。
- 启用 发布班次。
要发布多个班次:
- 选择日期范围。
- 在日程的右上角选择 发布。
要取消发布单个班次:
- 选择班次。
- 选择 编辑班次。
- 禁用 发布班次。
要取消发布多个班次:
- 选择班次。
- 选择出现在日程表左上角附近的编辑图标。
- 选择 发布状态,然后选择 取消发布所有。
查看班次申请
员工
当您申请一个可用的班次时,该班次会显示您已申请,但在经理或管理员决定将其分配给谁之前,它仍然会在日程的可用班次部分中。
您申请的班次没有汇总页面,但您可以在Sling的网页和移动版本的日程中找到它们,直到它们被分配。
申请后,该班次不再显示可用图标。在网页版本中,您的姓名首字母会出现在班次上。
当您打开班次详情时,您会看到关于您申请的说明。
在移动应用中,该班次同样不再显示可用图标,您也可以在班次详情中查看说明。
如果您在申请后没有看到这些变化,请刷新应用以确保详情正确显示。
管理员和经理
管理员和经理可以在Sling网页版本的日程标签下查看已申请的班次,位于待批准部分。
使用此标签查看任何仍在等待回复的班次申请。
选择班次以查看其详情并回复申请。
返回顶部
使用班次接受功能
班次接受功能适用于商业订阅,并提供一种自动确认员工已查看并确认新发布班次的方式。
该功能会在班次发布时自动发送通知,并要求员工进行回复。管理层随后会被通知班次是否已被接受或拒绝。
注意:拥有经理或管理员系统角色的用户也会收到班次接受通知。
要启用班次接受功能:
- 访问Sling的网页版本。
- 导航到设置。
- 选择日程选项卡。
- 启用班次接受。
在您创建并发布班次后,班次右上角会出现一个带有[?]的小白色区域。 班次详情还表明该班次正在等待员工的回复。
在员工端,会出现新班次的通知。员工可以从他们的仪表板接受班次。员工还可以选择通知以打开完整的班次详情,并选择拒绝该班次。
循环班次的接受方式不同。如果员工从循环班次通知中回复,所有循环中的班次都会受到影响。如果员工想单独回复班次,他们可以前往日程页面,逐个回复每个班次。
当员工接受班次时,状态会变为已确认,[?]会消失。 当员工拒绝班次时,他们可以向经理发送说明拒绝原因的备注。 如果员工拒绝班次,该班次仍然分配给他们,右上角会变为[!]。弹出窗口还解释了该班次在进一步通知之前仍然属于他们。
经理和管理员会看到被拒绝班次的仪表板更新。接受的班次会简单地变为最终状态,[?]会被移除。 被拒绝的班次在经理和管理员的日程中也会显示[!]图标。经理可以决定如何处理该班次,例如重新分配、提供、使其可用或进行小调整。
如果班次被编辑,员工会收到更新版本的新通知,并可以再次接受或拒绝。 如果班次可用或被提供,它将继续分配给员工,并保持[!]状态,直到其他人接手。
员工对新班次的回应一旦提交就无法更改。 如果员工拒绝一个班次,后来决定可以工作,经理或管理员必须编辑并重新发布该班次,以便可以接受。 如果员工接受了一个班次,后来无法工作,他们必须将其设为可用或提供。该班次在其他人接手之前仍然是他们的责任。
返回顶部
使用排班表
Sling的排班功能让您可以查看当前日期的概览,快速了解您当天的排班情况。它可以帮助您了解人员配置水平,并识别冲突或空缺。
来自网络:
- 访问仪表板。
- 在通知标签旁选择排班表。
- 使用前进和后退箭头查看不同日期。
高级和商业订阅者还可以查看员工的打卡状态,允许经理和管理员跟踪谁迟到、已打卡、在休息或已结束工作。
还可以直接从排班表编辑时间表或标记病假和缺勤。
您可以按员工姓名、职位或地点对列表进行排序。如果账户上设置了组,您可能还有其他选项。
您可以使用每个列标题旁边的图标进一步对信息进行排序。例如,您可以按职位对排班表进行排序,并按开始时间列出员工,以便较早的班次优先显示。
您还可以根据最重要的细节调整显示的列。
您可以导出或打印排班表以便于共享。
来自移动应用程序:
- 访问仪表板标签。
- 选择今天的排班表。
这将打开当前日期所有排班的列表。
注意:您只能在Sling的网页版中选择不同的日期。
您可以通过颜色编码识别班次状态:
- 红色:迟到
- 绿色:已打卡
- 黄色:休息中
- 灰色:已打卡、标记为缺席或请病假,或安排在稍后时间
您还可以在移动应用中应用过滤器,以关注特定的班次。当前的过滤器包括地点、职位和标签。
要查看排班表上班次的更多详细信息,请选择它。在详细信息屏幕中,您可以选择右上角的3点选项来编辑时间表,将班次标记为请病假或缺席,或从日程中删除该班次。
返回顶部
自定义班次外观
付费订阅允许您自定义班次在网页日历上的显示方式。这些设置不影响移动应用,仅适用于进行更改的用户。
自定义班次外观:
- 访问Sling的网页版本。
- 导航到 仪表板 > 设置 > 偏好 并找到标记为 日历上的班次外观。 的部分。
- 左侧的标签是您可以通过拖放添加、删除或重新排列的信息。
- 紫色区域显示信息在您的日历上班次中的外观。
- 选择 保存。
不同的视图有不同的选项,您可以通过选择每个视图单独自定义日视图、周视图和月视图。
如果您想恢复默认视图,请选择圆形箭头图标。
Sling 使员工可以轻松在线和在应用程序中查看他们的日程表,但有时您可能仍然需要打印的副本或 PDF。
要打印日程表:
- 访问Sling的网页版本。
- 使用过滤器删除您不希望包含在打印或 PDF 中的任何信息。您可能想要隐藏工资、销售预测或空行。
- 确保您处于要打印的日视图、周视图或月视图中。
- 在右上角选择 打印 按钮。
- 将打开一个新窗口,提供多个选项。
- 您可以选择日程表是以彩色还是黑白显示,您首选的页面大小、页面方向,是否希望隐藏具有隐藏结束时间的班次的计划结束时间,以及是否希望缩放 PDF 以在一页上适合更多数据。
- 选择 下载 PDF 以生成文件。
下载完成后,您可以打开文件查看和打印,或在下载文件夹中访问它以将其附加到电子邮件或在线发布。
即使缩放,文件也会使用所需的页面数量。要获得更多灵活性,您可以尝试将下载的日程数据导出为 CSV 或 XLS。
返回顶部
导出日程表
使用日程导出选项时,班次数据包含在同一个单元格中,因此开始时间、结束时间、地点和职位不会出现在单独的列中。如果您需要将数据放在单独的列中,请导出工时表。
导出日程的方法:
- 访问 Sling 的网页版
- 设置您想要导出的范围和日期。
- 日程可以按天、周或月导出,包括日历视图和横向月份视图。
- 高级和商业订阅者还可以一次导出最多 124 天的自定义范围。
- 调整过滤器,以便仅显示您想要的信息。
- 您可能希望排除未分配的班次、可用班次、不可用性或空行。
- 当日程显示为所需时,选择右上角的 导出按钮,然后选择 CSV 或 XLS。
- 选择是否包括班次备注以及是否显示结束时间。做出您的选择,
- 选择 导出。
文件会立即下载,并应出现在您的下载文件夹中。
当您第一次打开文件时,某些信息可能会显得缺失,因为单元格被压缩了。自动调整列和行的大小可以使所有信息可见。
返回顶部
了解日程过滤器
日程页面显示了大量信息。过滤器帮助您专注于相关细节。 您可以按天、周或月查看日程。高级和商务计划也可以使用自定义范围,最长可达120天。要更改视图,请使用日程页面左上角的菜单。 您还可以根据所选视图按员工、职位、地点、事件、组、标签、开始时间或日部分对日程数据进行分组。
页面顶部附近的过滤器允许您显示或隐藏特定信息。选择复选框或标签以调整可见性。选择一个选项可以自动取消选择其他选项,以便更快地过滤。 过滤器可以表示部门、团队、客户、课程或班次类型,具体取决于您的设置。
事件过滤器有助于细化班次类型,这对于打印日程非常有用。
附加选项过滤器有助于从视图中移除敏感或不必要的信息。
应用过滤器
您可以在查看日程、报告和时间表详细信息时应用过滤器,以专注于特定信息。
来自网络:
- 选择过滤器按钮以显示选项。
- 在过滤器下拉菜单中,选择项目的中心以取消选择所有其他选项,并快速专注于特定结果。
当过滤器处于活动状态时,其标签会显示为蓝色。当不活动时,它会显示为灰色。 附加选项过滤器标签始终显示为灰色,即使应用了过滤器。如果日程页面缺少员工,请检查附加选项过滤器以确保空行可见。
在日程页面上,选择单个过滤器以清除它。 在报告和时间表页面上,选择清除过滤器以移除所有应用的过滤器。
如果班次或员工缺失,请检查活动过滤器,如地点、职位、组、员工和附加选项。
注意:在网页版本中应用的过滤器不会转移到移动应用程序中。
来自移动应用程序:
- 选择屏幕左上角的过滤器图标。
- 按日期备注、事件、状态、位置、职位或标签进行过滤。
注意:在Sling移动应用程序中,过滤器可在班次和时间表屏幕中使用。
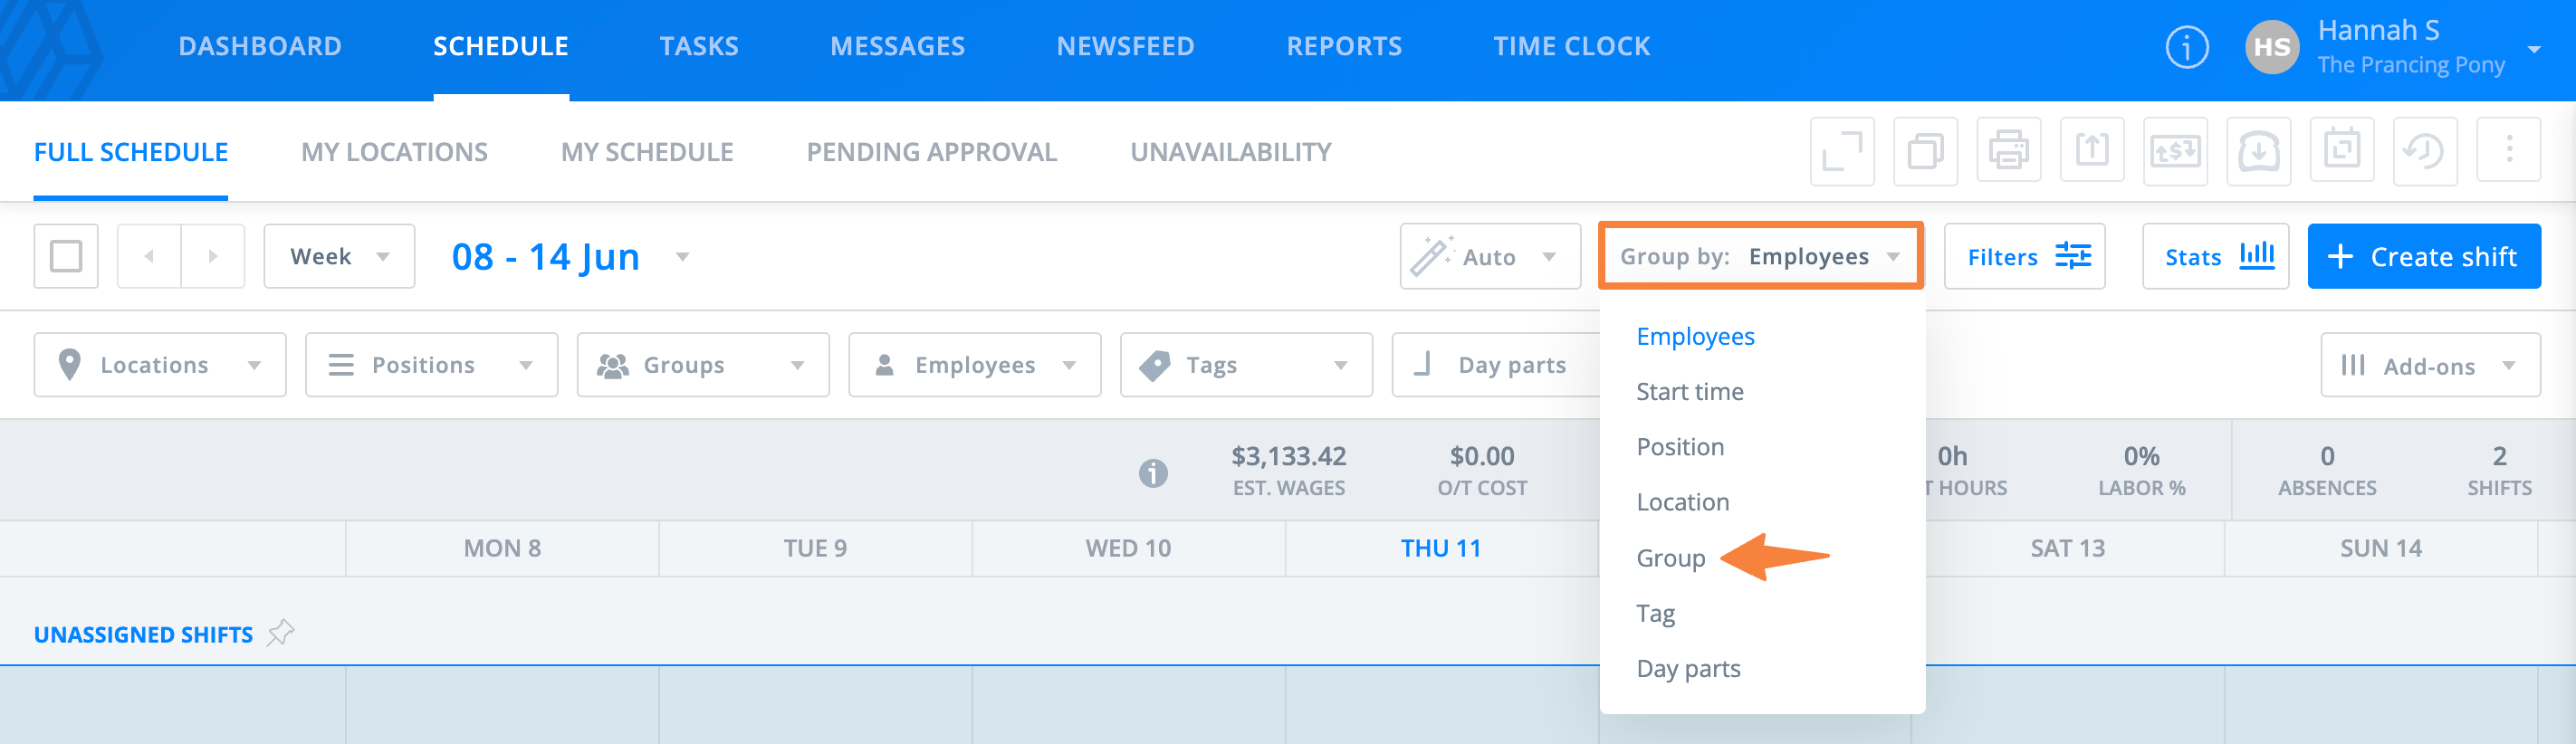
小组日程
您可以在任何视图(天、周或月)中使用网页版本按时间顺序对日程进行排序。
要对日程进行分组:
- 选择页面右上角的按下拉菜单。
- 选择一个分组选项。
一次只能应用一种分组方法。您仍然可以根据需要应用其他过滤器。
自定义员工顺序
在日程的天或周视图中使用按员工分组选项时,您可以自定义员工的顺序。
要重新排序员工:
- 将鼠标悬停在员工姓名的左侧,直到出现拖动手柄。
- 选择并拖动员工到新位置。
在其他日程视图中仍然保持字母顺序。
要重置自定义顺序,请选择列表顶部的重置图标。
使用小组
您可以创建小组以指定部门、团队、项目等。小组对于将沟通目标定位于员工的正确部分以及按部门或团队对日程进行排序和过滤非常有用。
- 访问Sling的网页版本。
- 选择 小组 瓦片。
- 选择 添加小组 +。
- 为小组命名并添加员工。
小组可以在日程上用于按小组分组。您还可以按小组对报告和时间表进行分组。
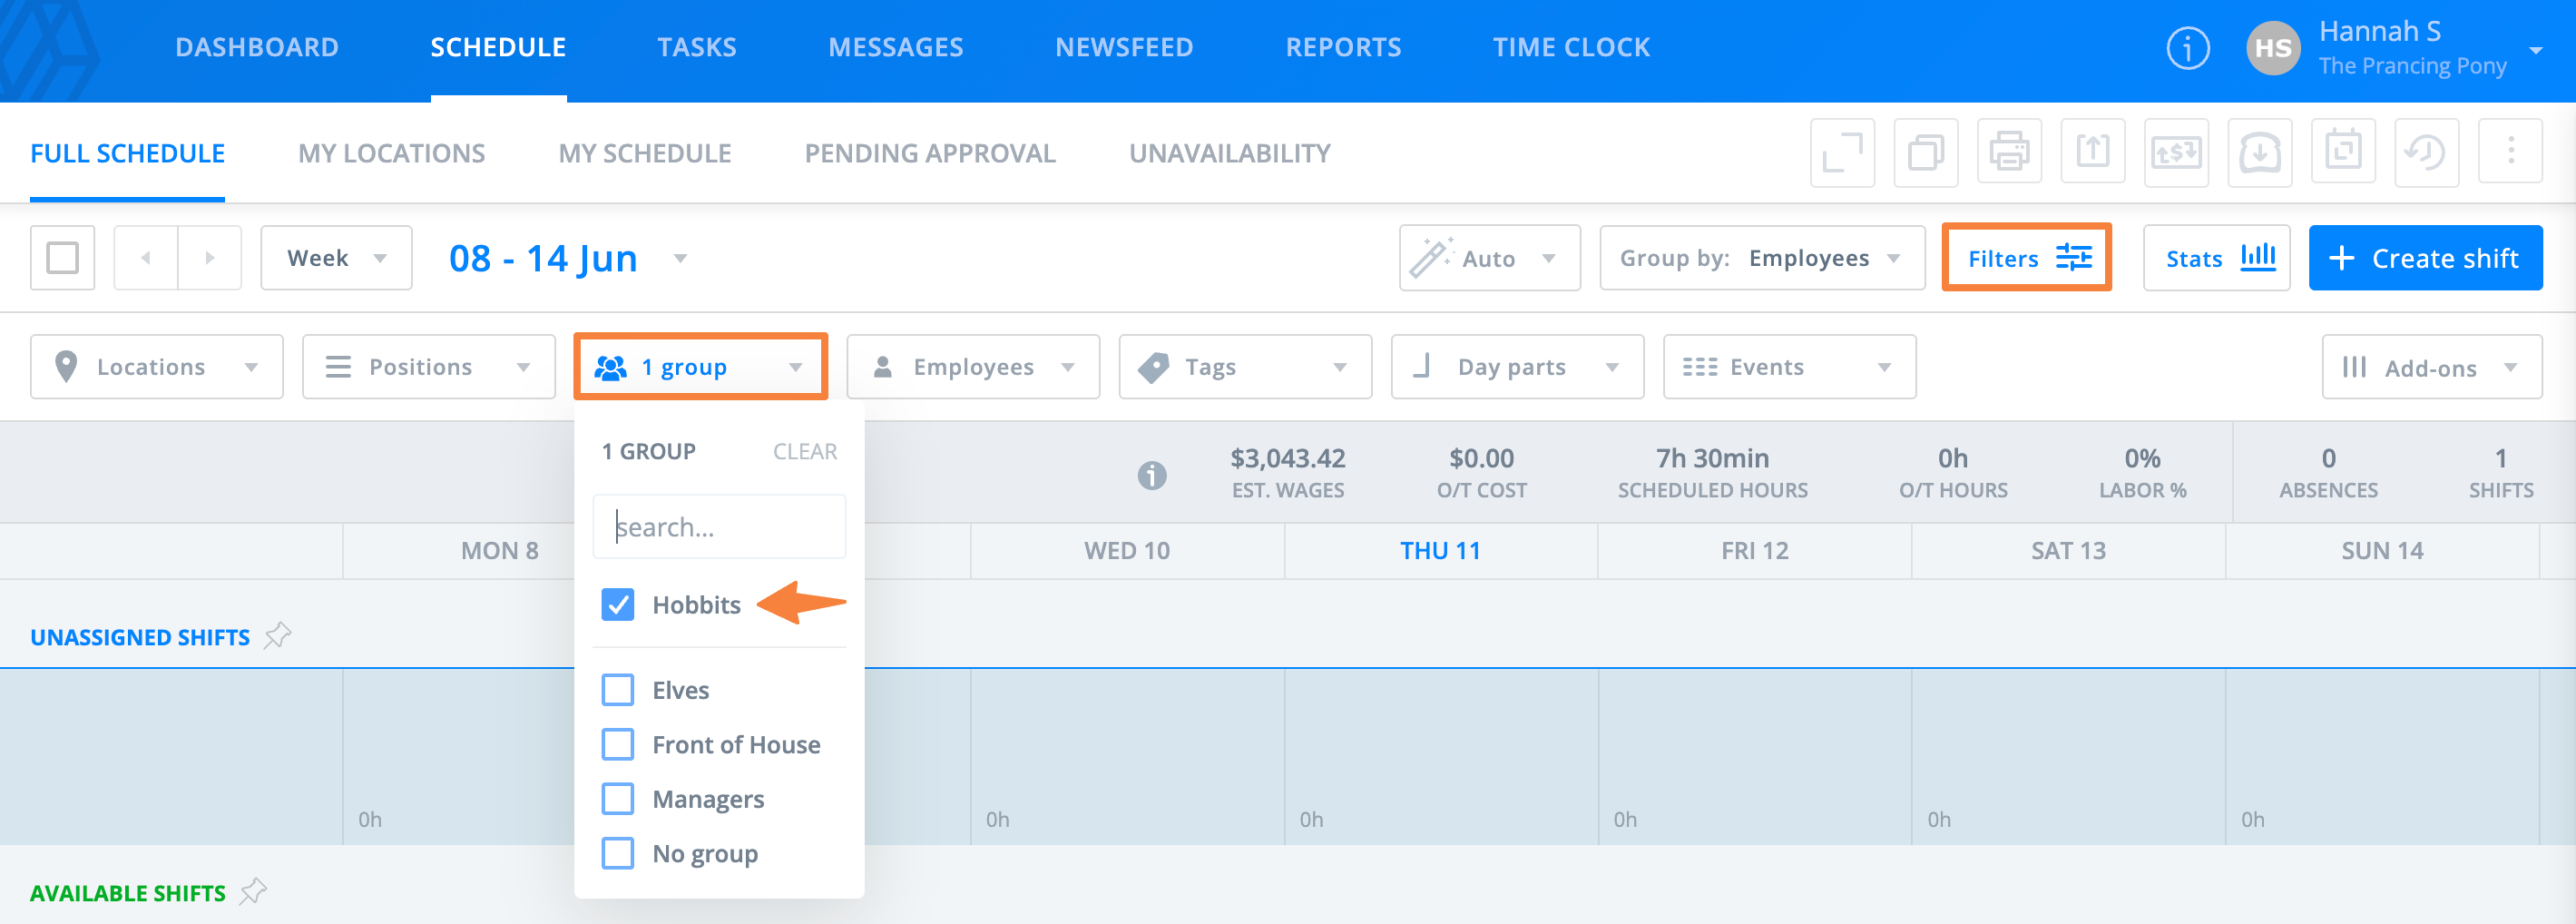
您还可以过滤以仅显示一个小组。这可以在日程、报告和时间表上完成。
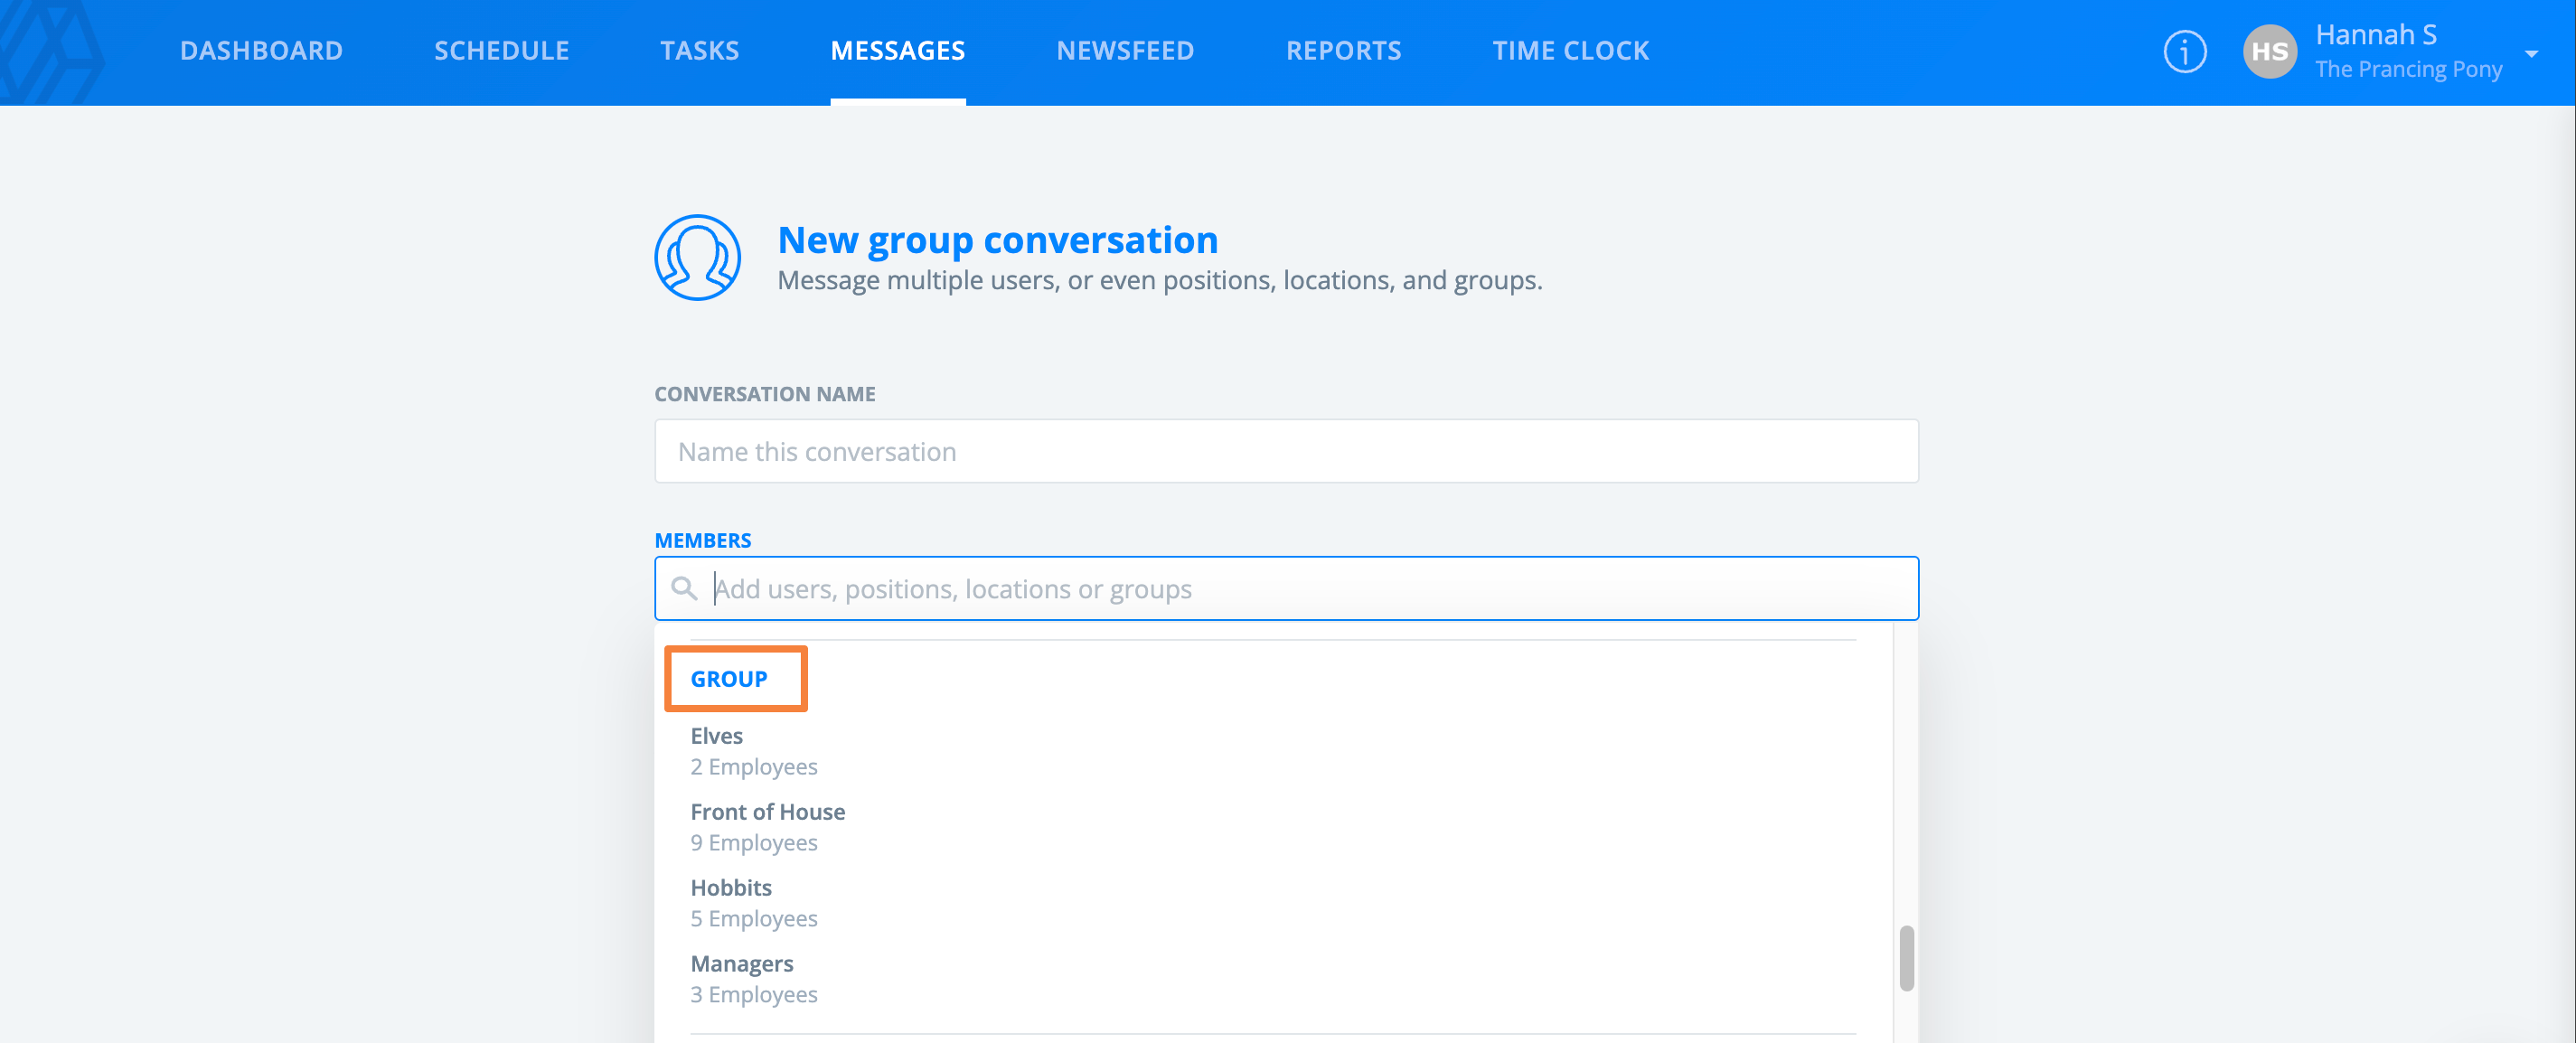
小组还可以用于向特定小组发送群组消息。
使用横向视图
Sling包括日程的横向视图选项。
要启用横向视图:
- 从 日程 选项卡中,选择日期范围下拉菜单。
- 选择 月份 或 自定义。
- 选择 横向视图图标。

横向视图以单行显示日期。
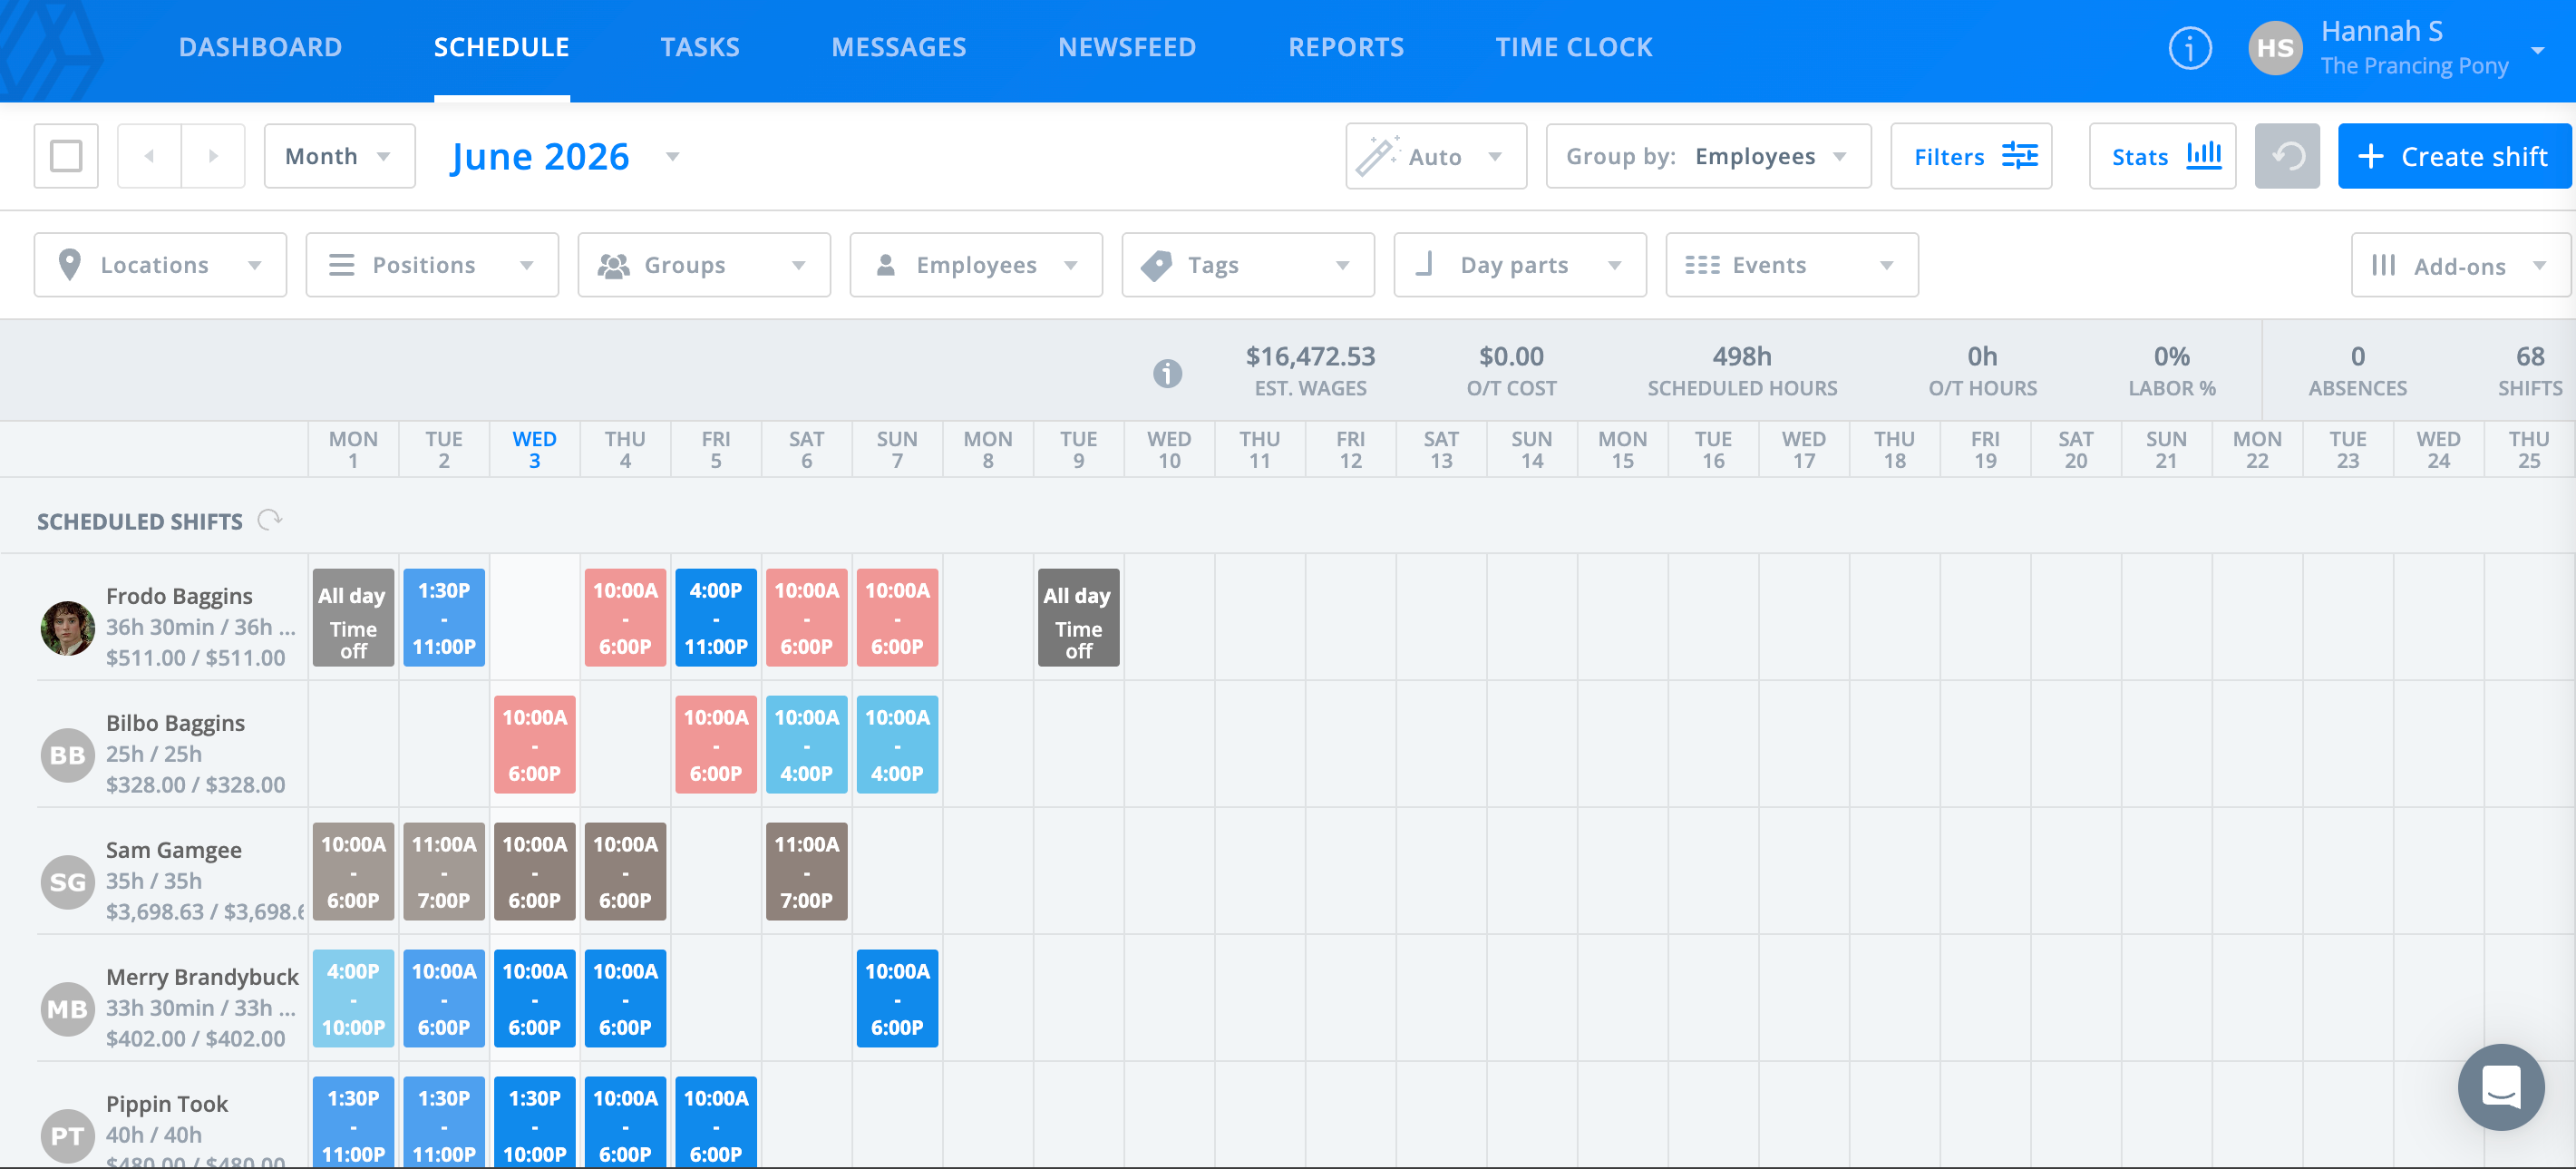
要查看较短的范围,请选择自定义并定义特定的日期范围。
使用世界时钟
世界时钟设置允许跨多个时区的组织准确查看日程安排。
注意:此设置只能在网页上启用。
管理员和经理
要启用或禁用世界时钟:
- 前往设置 > 偏好设置。
- 切换该设置的开或关。
- 选择 保存。
您还可以通过日程中的三点选项访问此设置,位于右上角。
所选设置决定班次时间的输入和显示方式。
如果在与位置不同的时区工作,您可以:
- 禁用世界时钟以使用位置的时区进行调度。
- 启用世界时钟以使用您的本地时区进行调度。
在不同时间区的员工应启用世界时钟以在其本地时间查看班次。
注意:在复制班次或日程时禁用世界时钟。
员工
员工可以选择班次的显示方式:
- 前往设置 > 偏好设置。
- 启用或禁用世界时钟。
- 选择 保存。
启用时,班次以您的本地时区显示。禁用时,班次以位置的时区显示。 这有助于您理解不同地点的班次时间安排。