Manage Payments With Toast POS
Last updated: Jun 11, 2026, 10:58 AM
Get familiar with the payment terminal and selection screens to help staff efficiently manage all guest payments on your POS.
Get familiar with the payment screens, the Payment Terminal, and the tip and receipt screens so your staff can take payments, find checks, split checks, and close orders quickly on your Toast POS. This article explains what each button and screen does across Toast Flex, Toast Go 2, and Toast Go 3 devices.
- Payment screen features
- Payment Terminal features
- Table View features
- Type icon legend
- Source icon legend
- Payment Terminal on Toast Go handhelds
- Split checks
- Tip selection screen
- Receipt selection screen
- Related articles
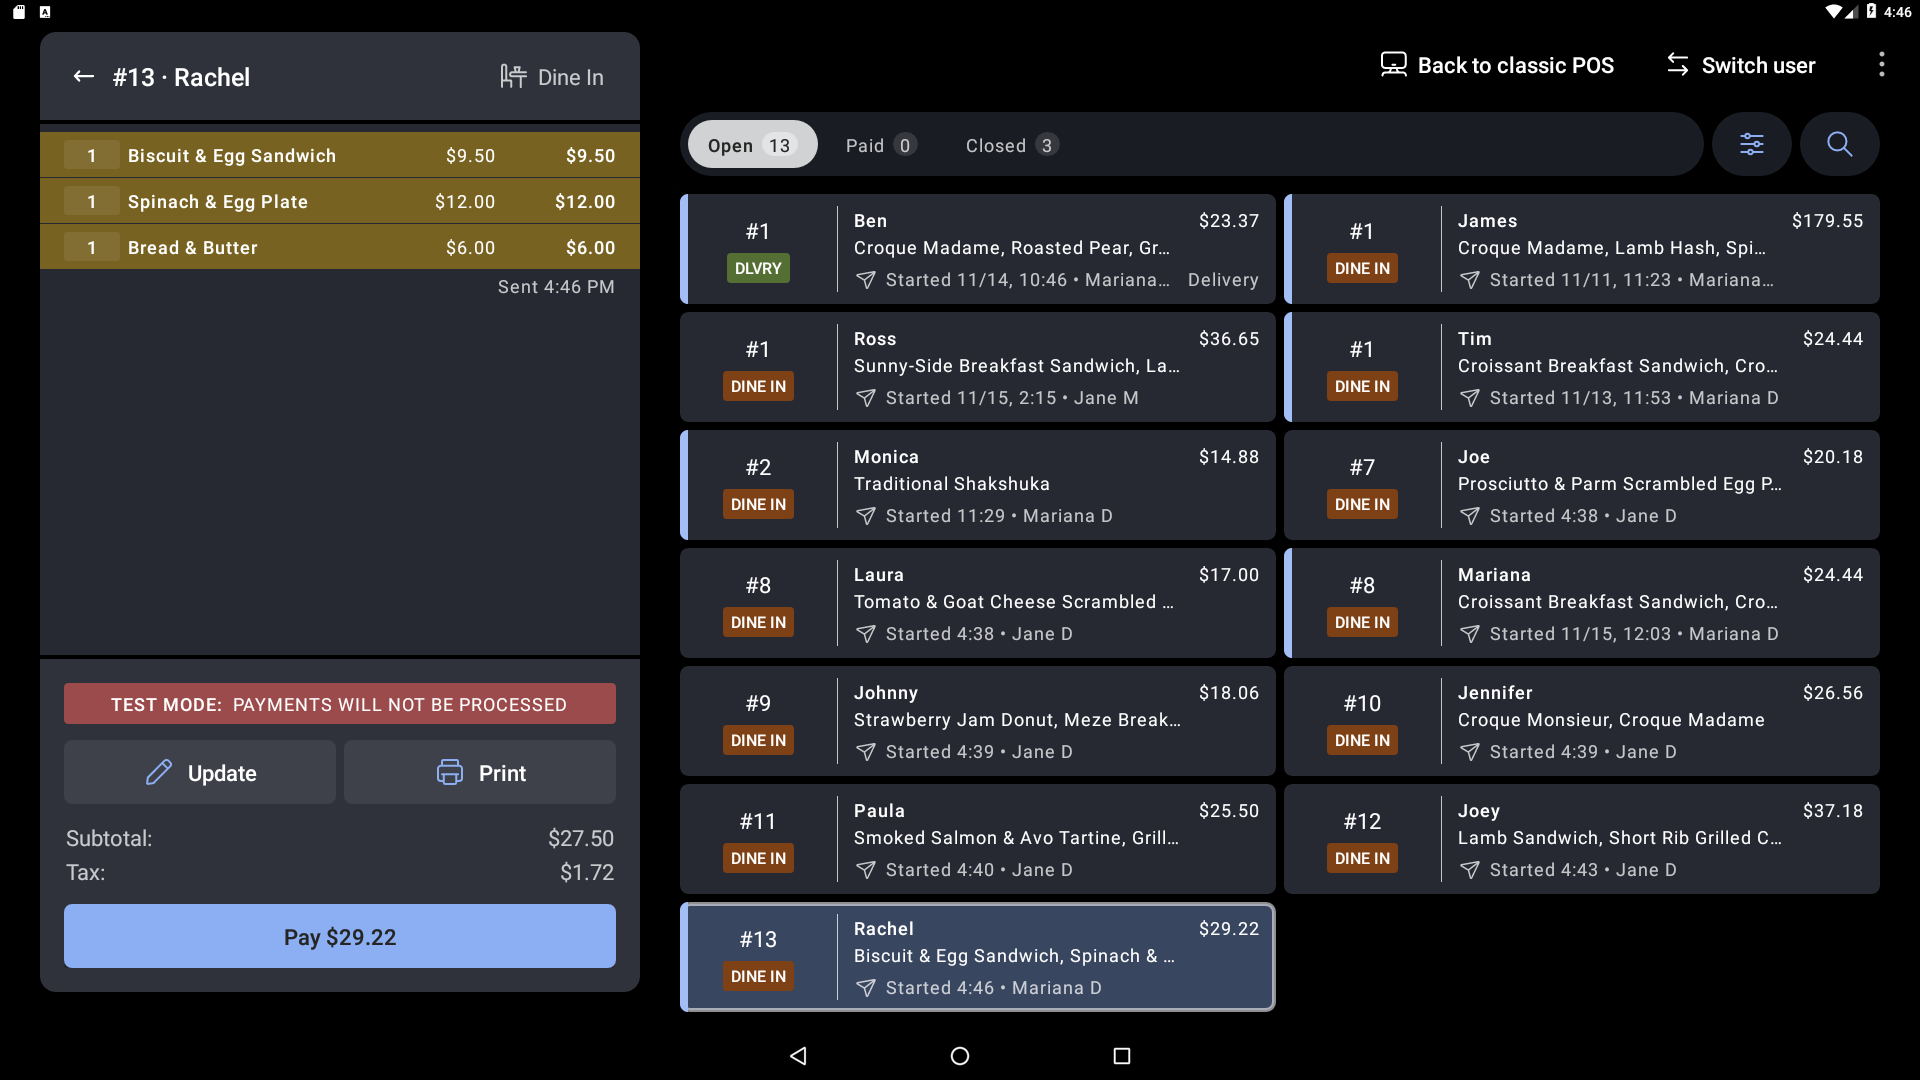
Payment Screen Features
The payment screen (also called the payment selection screen) is where you collect a payment and close an active order. The example below is shown in dark mode.
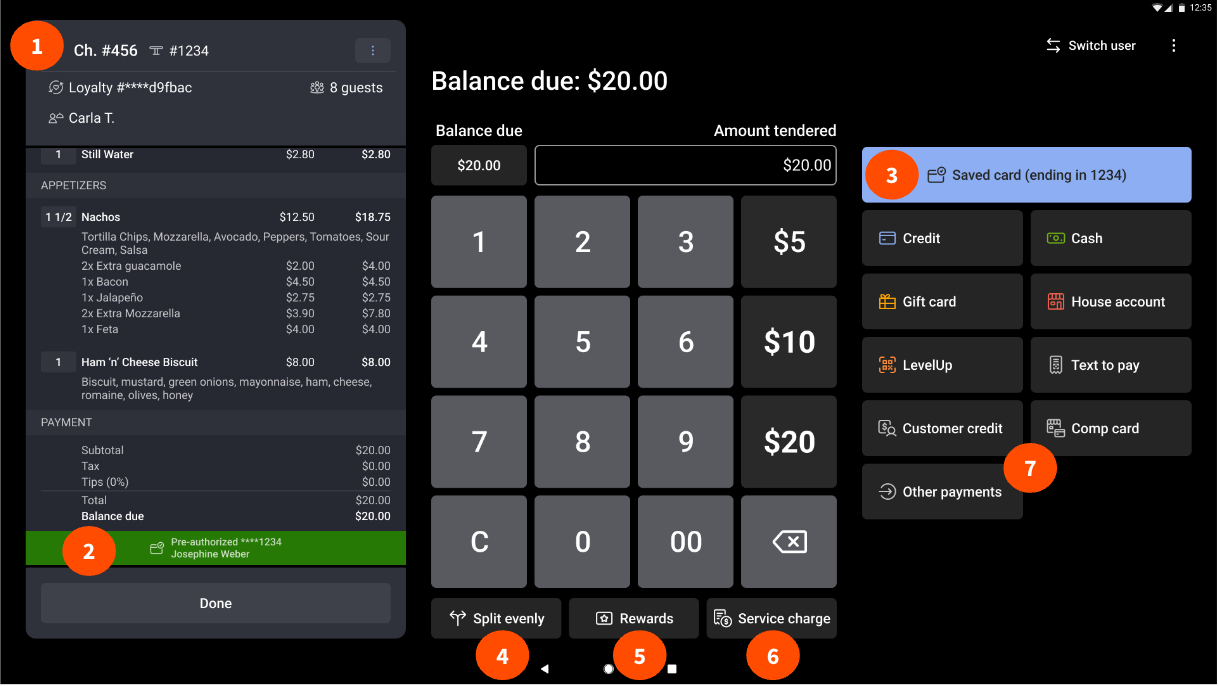
The payment screen includes the following features:
- Check details appear in the left pane, listing each item with a quantity marker, item prices, and the price totals at the bottom.
- The pre-authorization banner appears on the payment selection screen when the location has pre-authorization turned on for card payments. It shows a green bar with the last four digits of the card number and the customer name, confirming the card is pre-authorized.
- The prioritized saved credit card is a large button at the top of the payment options on the right side of the screen. It shows the customer's pre-authorized debit or credit card for quick payment, and it appears only when a card has already been pre-authorized on the check.
- The Split evenly button, at the bottom of the screen, splits the check evenly in several ways. On Toast Go handhelds, this button is in the overflow menu (the three vertical dots).
- The Rewards button, at the bottom of the screen, opens the rewards screen, where you can scan or swipe a card.
- The Service charge button, at the bottom of the screen, opens a window to add configured service charges to the check. On Toast Go handhelds, this button is in the overflow menu (the three vertical dots).
- The Other payments button opens a list of additional payment options, such as gift card, house account, and comp card.
Note: For instructions on splitting a check by item, configuring service charges, or setting up rewards, see the related articles for Split Checks on the POS, Customize Service Charges and Mandatory Gratuity, and Get Started With Toast Loyalty at the end of this article.
Payment Terminal Features
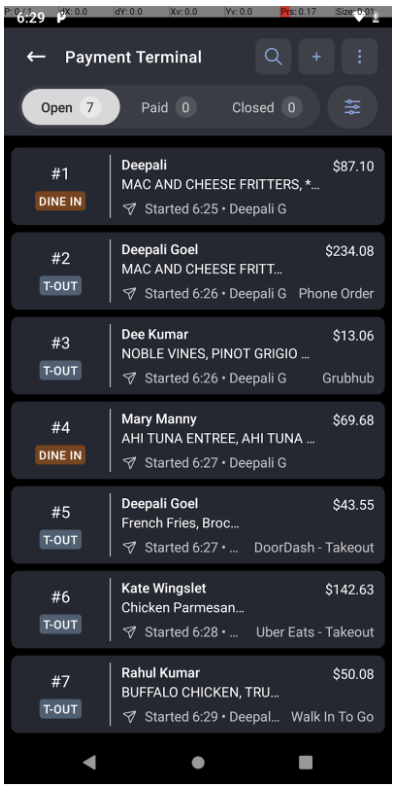
The Payment Terminal is the screen where you look up a check. It shows open, paid, and closed checks for a specific user or for all users, and it includes advanced filtering.
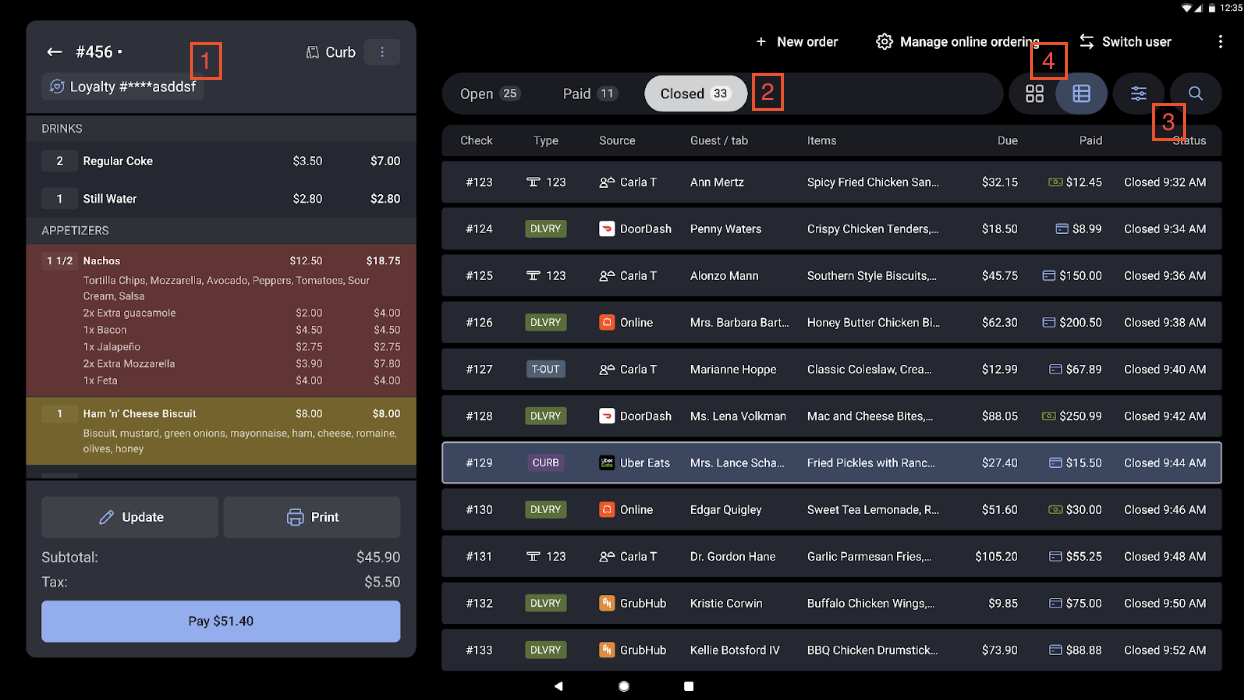
The Payment Terminal includes the following features:
- Check details appear on the left side of the screen, consistent with the other POS screens.
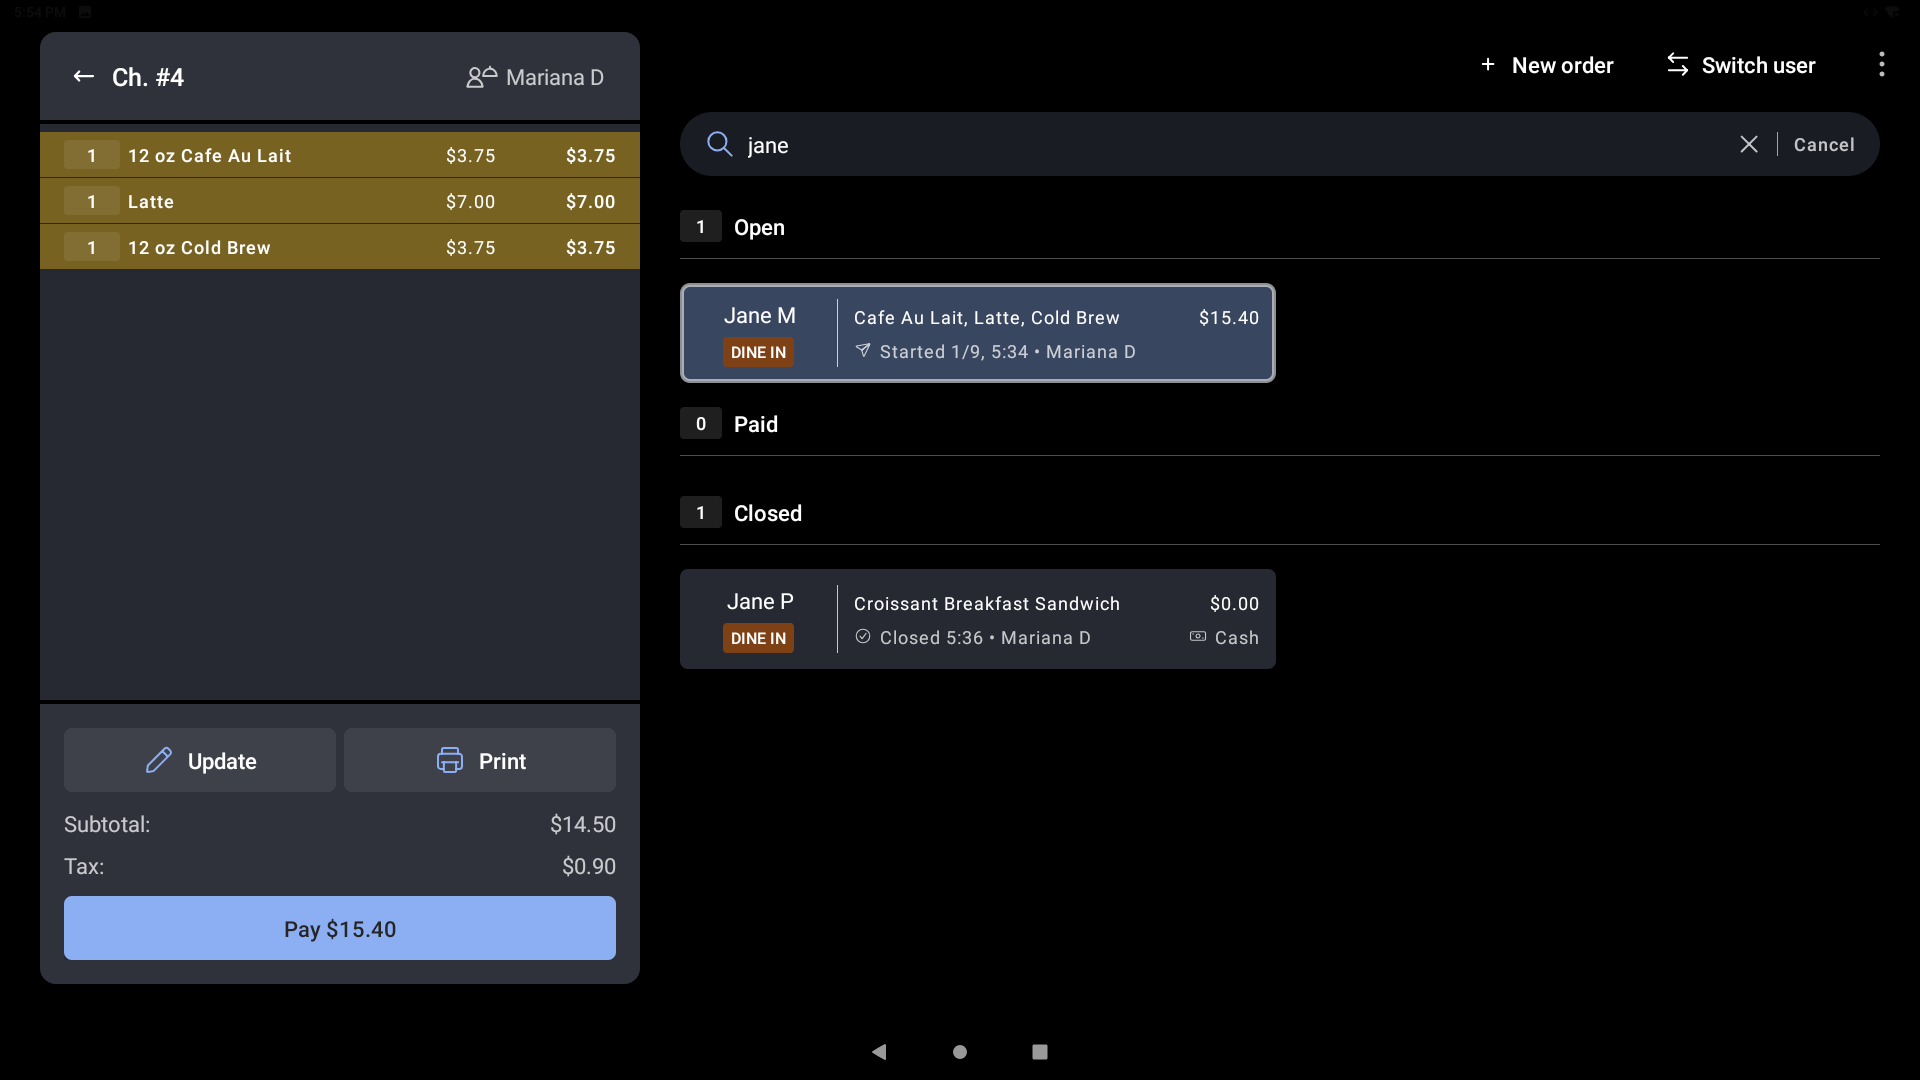
- The Tab bar at the top of the screen lets you switch between Open, Paid, and Closed checks, and shows a check count next to each check type. Each check displays a check item preview so servers and bartenders can see which items are on the check, the total spend, and when the check was started. The preview also shows the check number, table number, and tab name when one exists. (If there aren't enough items to fill two rows, the middle row is blank.)
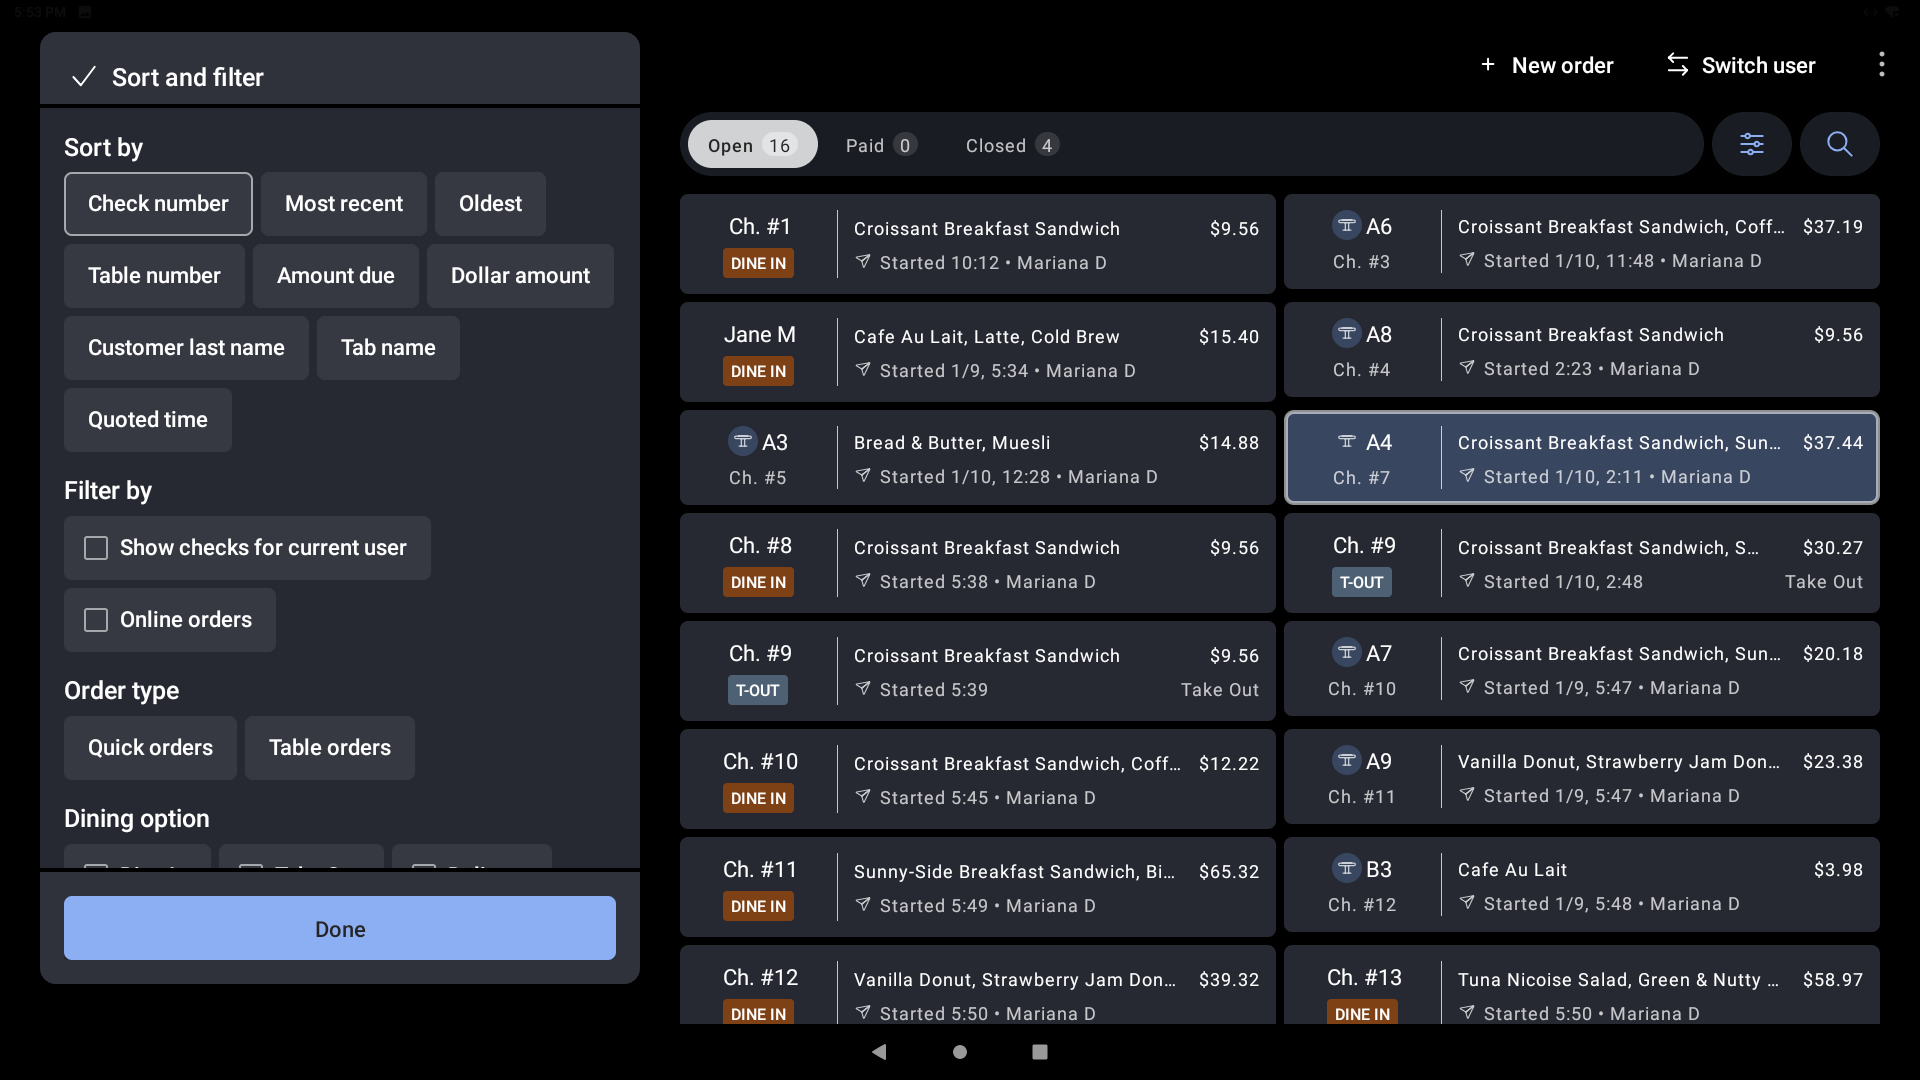
- The sort and filter button is at the top right of the screen, next to the search option. You can sort by Most recent, Oldest, Check number, Table number, Amount due, Dollar amount, Customer last name, Tab name, and Quoted time. You can also filter by checks for the current user and by online orders.
- The Table View toggle switches between the traditional two-column view and Table View, an easy-to-scan order list. Your view choice is unique to your passcode and saves automatically each time you log in.
Note: Table View is not available on Toast Go handheld devices. In Table View, you can also filter by Type, Source, and Status; these filters are not available in the two-column view.
- With improved search, you can search across all tabs and see results grouped by status (Open, Paid, and Closed). For example, you can search by tab name and see every matching check by status.
- The Load all checks button fetches older closed checks during a server's shift. The button is hidden when the server scrolls down and reappears when the server is at the top of the check list. Load all checks is available on Toast Go 2 and Toast Flex.
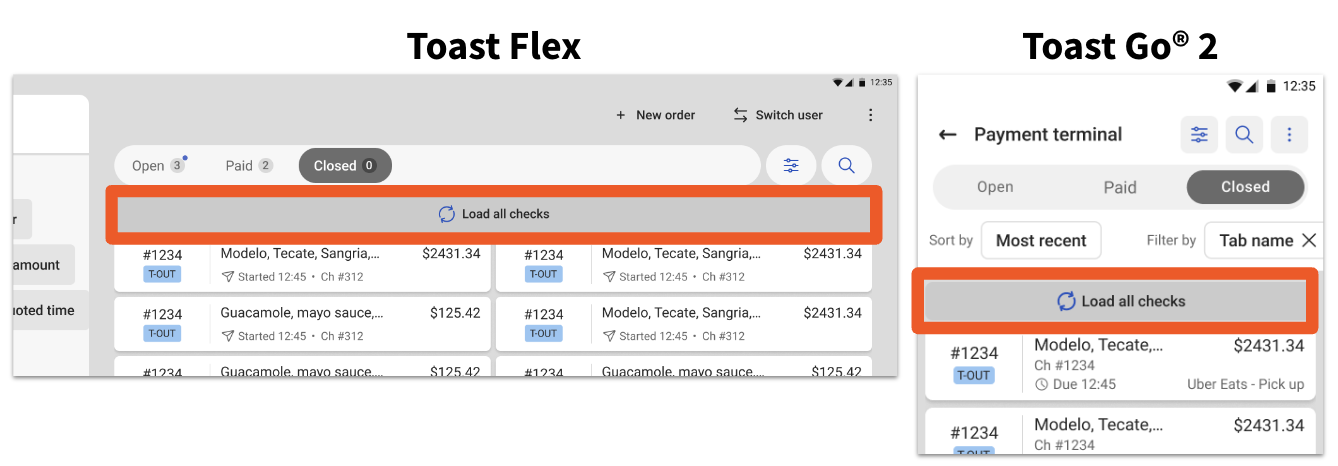
- A blue stripe on the All checks screen marks checks owned by the logged-in server, making it easy to tell them apart from checks owned by other employees. The stripe appears on the left side of each check the current server owns.
- On the All checks screen, the Check Details pane is always visible, and servers can double-tap any check to open it.
Table View Features
Table View organizes checks into eight columns:
- Check number: The auto-generated number assigned to each new order.
- Type: The dining behavior for the order. See the Type icon legend below.
- Source: The origin of the order, determined by how the order entered the POS. See the Source icon legend below.
- Guest/Tab: The tab name or customer name, depending on which is populated. Tab name always takes priority over guest name. If neither exists, the column is empty.
- Items: A truncated preview of the items on the order.
- Due: The amount still due on the order.
- Paid: The amount paid on the order, with a cash or card icon indicating the payment method.
- Status: Whether the order is scheduled, started, paid, or closed.
Type Icon Legend
The Type column shows an icon for each order's dining behavior:
| Icon | Meaning |
|---|---|
| A table order with a table assigned (for example, 123). | |
| A Dine In order that is not assigned to a table. | |
| A Delivery order. | |
| A Take Out order. | |
| A Curbside order. | |
| A Drive-Thru order. |
A blank Type column means no dining option is configured, or the dining option doesn't match a supported type above.
Source Icon Legend
The Source column shows an icon for each order's origin:
| Icon | Meaning |
|---|---|
| An order entered on the POS, in-store, for any dining option. | |
 | An online order through a Toast online ordering channel (Google, Toast Local, Toast Pickup App, or branded online ordering and mobile apps). |
| An order through an integration with a third-party service (API). | |
 | An order through your Uber Eats integration. |
 | An order through your DoorDash integration. |
| An order through your Grubhub integration. | |
| An order placed at a kiosk. | |
| An order placed from a guest's phone after scanning a QR code at the table. | |
| An order submitted through online ordering or the catering marketplace. | |
| An order that originated through Toast Tables. | |
| A purchase made through eCommerce channels. | |
| An invoice. |
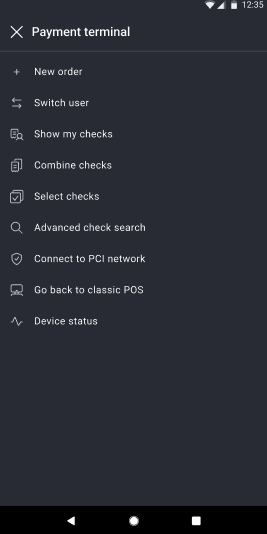
Payment Terminal on Toast Go Handhelds
On Toast Go handhelds, the Payment Terminal works the same way but is laid out for the smaller screen. The first image below shows the Payment Terminal, and the second shows the check overflow menu. Quick-action buttons such as Search and New order appear at the top right.
Note: For setup steps and other payment options on handhelds, see Set Up Your Toast Go 2 Handheld, Set Up Your Toast Go 3 Handheld, and Set Up Other Payment Options in the related articles below.
Split Checks
When you split a check, you'll see these buttons in the top-right corner of the Split checks screen:
- Split evenly: Calculates costs and splits the check evenly into the number of checks you select.
- Split by seat: Splits costs by the orders assigned to each seat at the table. This applies to table orders only.
- Done: Finishes the split.
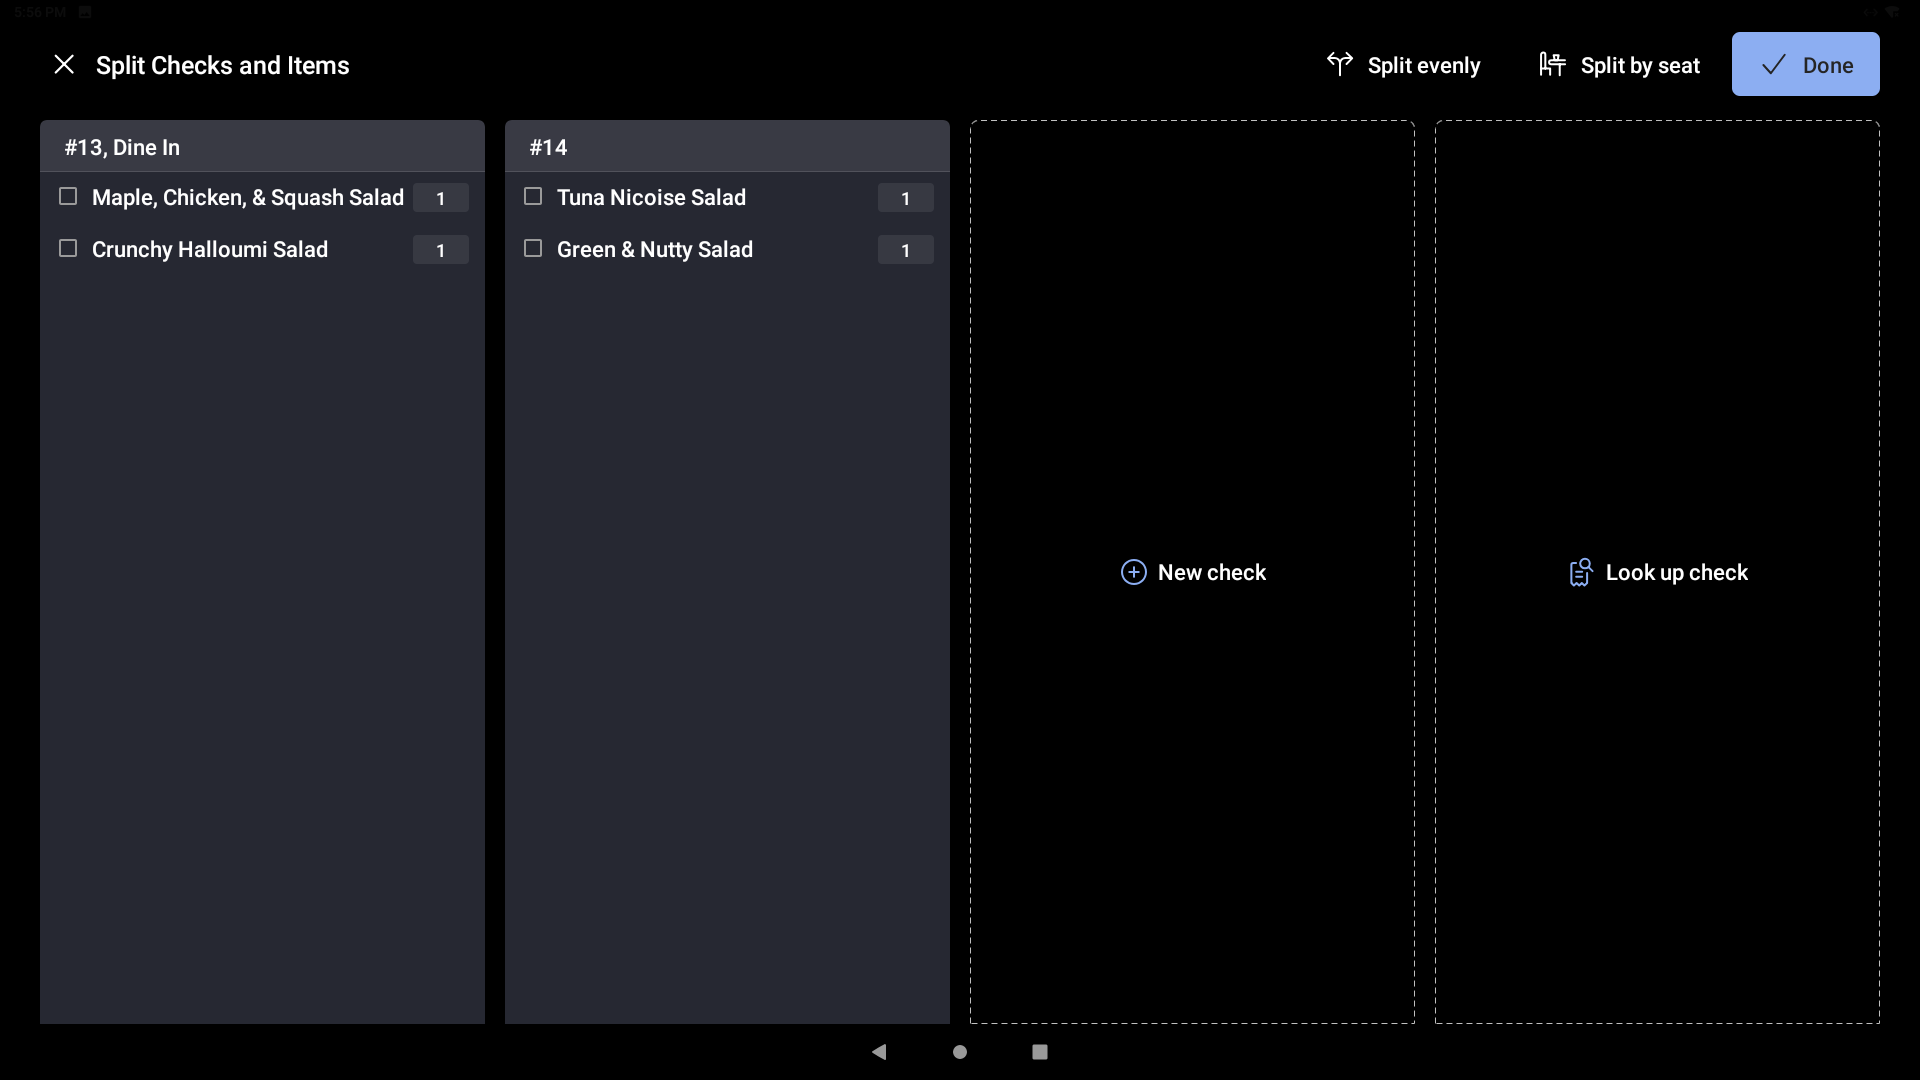
For more on splitting checks, see Manage Tables with Toast POS in the related articles below.
Tip Selection Screen
The tip selection screen shows guests what they are tipping and the total they will be charged. The highest tip suggestion is prioritized, and the Custom tip and No tip buttons appear below the tip suggestions.
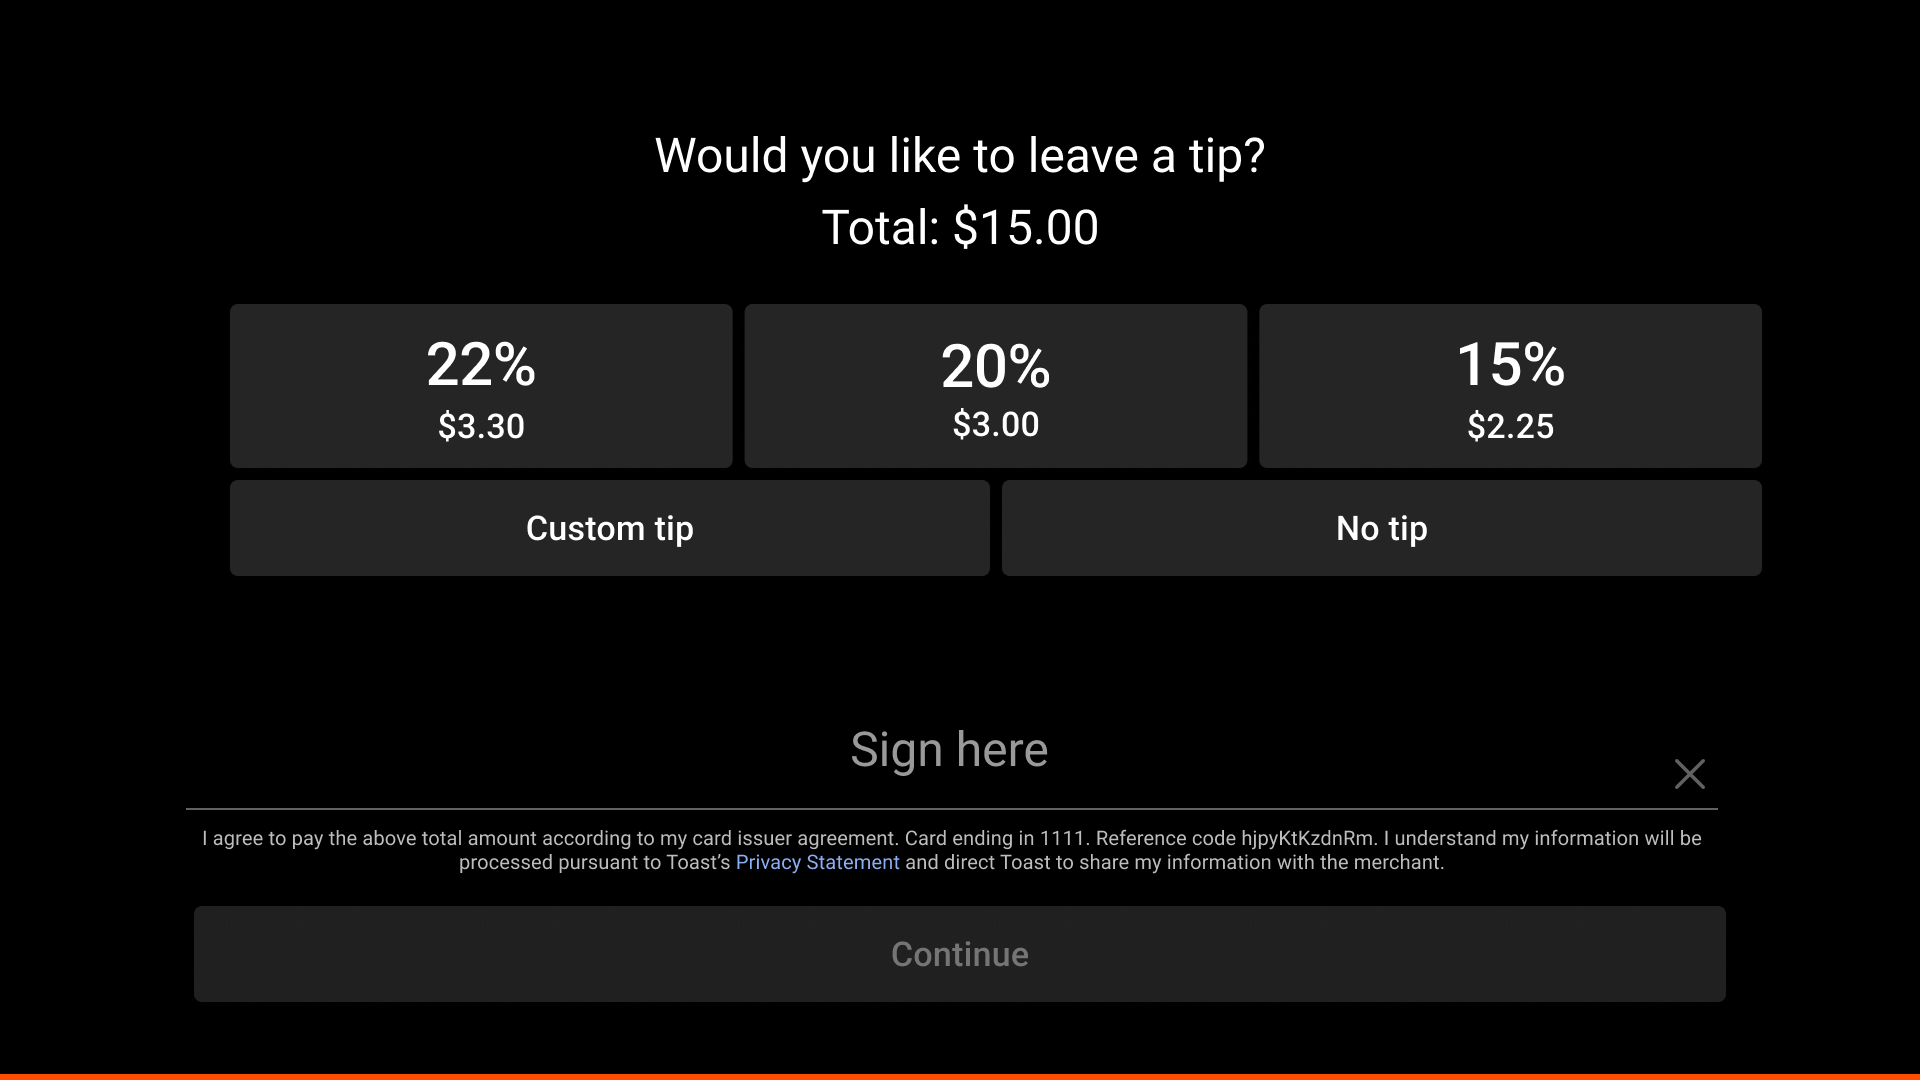
Note: Whether the tip prompt appears before or after the guest pays, and which screen appears after a payment, depends on your device's payment settings. If guests are completing payment without seeing the tip prompt, or you want to change the screen that appears after a payment, contact Toast Customer Care.
Receipt Selection Screen
The receipt selection screen lets guests choose how to receive a receipt. The No receipt option is prioritized, since most guests opt out. Guests who want a receipt can choose Print, Text, or Email.

Note: To stop the receipt screen from appearing for every order, a manager can adjust the receipt settings in Device Setup on the POS. Set Digital Receipts to Yes, Always Print Receipt to No, and Skip Receipt Screen to Yes, then save.
Related Articles
- Manage Tables with Toast POS
- Manage Orders with Toast POS
- Split Checks on the POS
- Customize Service Charges and Mandatory Gratuity
- Get Started With Toast Loyalty
- Set Up Other Payment Options
- Check Statuses and Filter Checks on POS
- Find Checks by Server's Name and Role on the POS
- POS Payment Status Tags
- Reprint and Resend Receipts
- Shift Review Overview