Set Up Your S1 Handheld POS
Last updated: Dec 10, 2025, 10:15 AM
- What's in the Box
- Get to Know Your S1 Handheld POS
- Set Up Your S1 Handheld POS
- Set Up the Toast App on Your S1 Handheld POS
- Additional Accessories
What's in the Box
When unboxing your handheld for the first time, you'll find the following items in the box:
- One S1 Handheld
- One USB C to USB A cable
- One USB A Charger block (specific to your country/region)
Note: The S1 Handheld needs to be charged before setup. Use the included charging equipment and the USB-C port found on the side of the handheld. We recommend 30+ minutes charging before first use.
Get to Know Your S1 Handheld POS
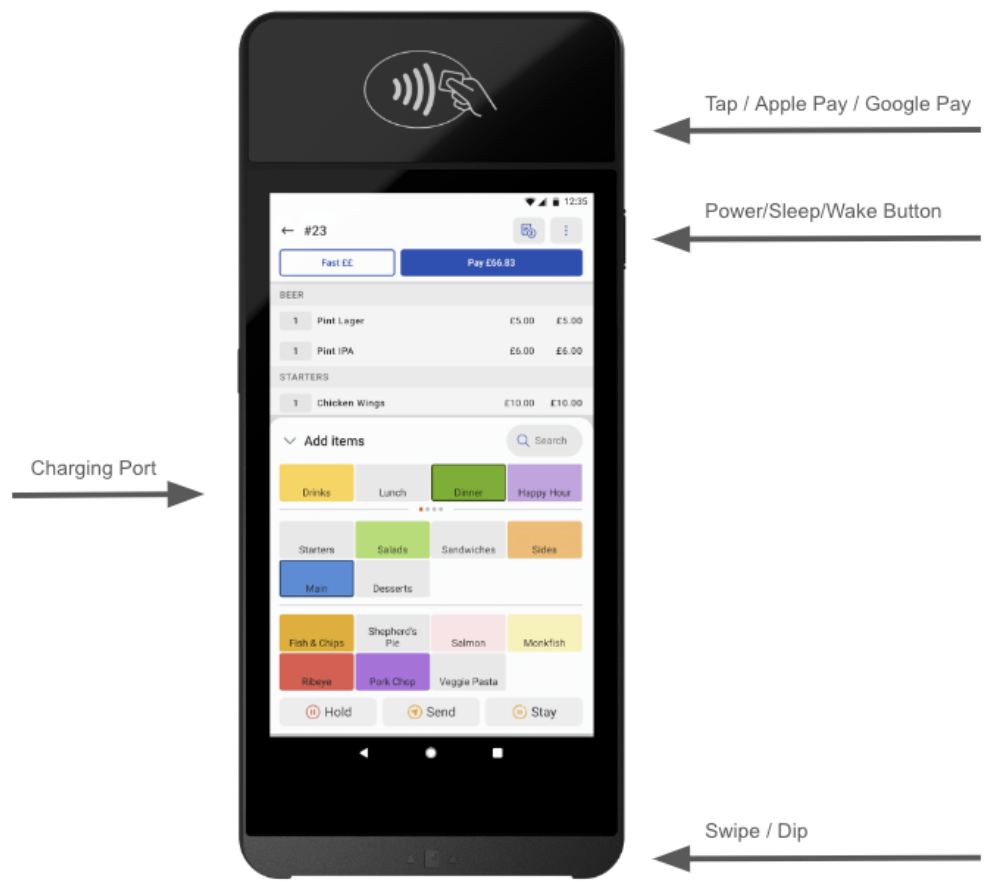
Set Up Your S1 Handheld POS
This seven minute video will cover how to setup your S1 Handheld POS, connect it to your network and download the Toast App onto your device. Learn how to customise your POS to suit your restaurant’s needs as well as how to adjust the display, sound settings and more.
Note: The password for your device is 8678 in case you get asked.
- When powered on for the first time, your device will automatically try to connect to the cellular network in your store. Select "Skip" and proceed with the device setup before setting up Wi-Fi.
- You will need to board the device to your store location. You will be asked to confirm that the assigned store appearing is correct. To confirm, select the Blue Tick on the screen.
- Note: If you are unsure of your store location or the location displayed is not correct, please contact the Care Team.
- Wi-Fi: When the device has boarded, you will need to setup your Wi-Fi connection.
- If using a Toast Managed Network, go to Settings → Network → Wi-Fi and toggle on the Wi-Fi button. The device will automatically connect to the _TOAST network in your restaurant. You do not need to enter a password.
- If you are not on a Toast Managed Network you will need to connect to your store Wi-Fi. To do this, go to Settings → Network → Wi-Fi→ Add Wi-Fi and select your network. You will need to enter your password to connect to your Wi-Fi.
- The Toast App will automatically download to the device. If the app does not automatically download, go to Settings → App → Enter 8678 → The app will begin to download; this can take up to 1 hour in the background.
- If the above step does not trigger the app, go to Settings→ Configuration→ Enter 8678 → The app will begin to download.
Set Up the Toast App on Your S1 Handheld POS
- When the Toast app has been installed on the device, you are now ready to set up Toast.
- Select the Toast POS app on the home screen.
- Login using your Toast username and password (the same one as used for the Toast backend) and select your restaurant from the pick-list.
- Follow device setup instructions to set the Toast app to your preferences.
- Important Note: You will be presented with three different permissions dialogs during the setup process. You must grant the permissions as outlined below:
- Allow Toast POS to make and manage Phone Calls: Select ALLOW
- Allow Toast POS to access this device's location: Select ALLOW ALL THE TIME
- Allow Toast POS display over other Apps: Select On
- During set up, the device may go through a firmware update phase which can take up to 40 minutes to complete. You cannot perform any functions on the device during this update.
- Display Settings: Within the Toast app you can customise the device display settings to suit your preferences. To change these settings, navigate to Setup→ Open Device Settings →Display and adjust your settings.
- Sound Settings: Within the Toast app you can customise the volume for notifications, alarms and more to suit your preferences. To change these settings, navigate to Setup→ Open Device Settings → Sound and adjust your settings.
- Open a check and test a $/£/€0.01 payment. If your card reader does not start the payment reader the first time around, please restart the device.
- If you do not want your device to allow cash payments, restrict user permissions to access device setup and set Allow Cash Payments to No.
- Additionally if you'd like to use an S1 handheld with a cash drawer, you'll need to set up the default receipt printer with an attached cash drawer. Otherwise, all cash payments will report as Cash in Hand. If you utilize this option, employees will need to complete the shift review process and a manager or cash drawer user will need to perform a Collect Cash from employees with cash in hand to balance drawers for reporting at end of day.
- For more information on taking payments, please read Take Card Payments (Canada, Ireland, and the U.K.). For troubleshooting advice for your S1 handheld, visit Get Help With S1 Handheld.
Additional Accessories
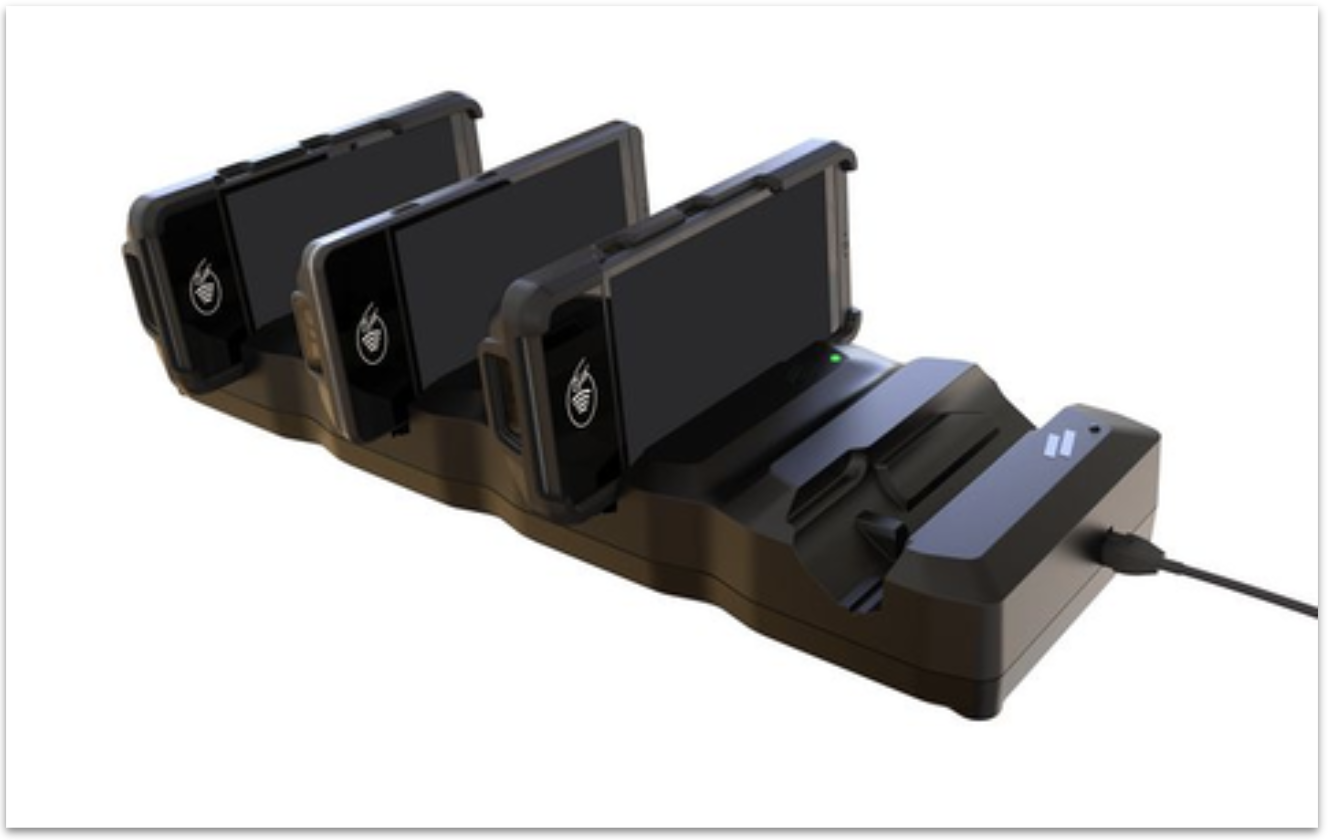
Enhance your Toast S1 Handheld POS device with several add-on products, such as a protective case and the S1 Handheld Charging Dock. All add-on products are available for purchase in the accessories section of Toast Shop.
To Charge Your S1 Handheld POS Using the S1 Handheld Charging Dock:
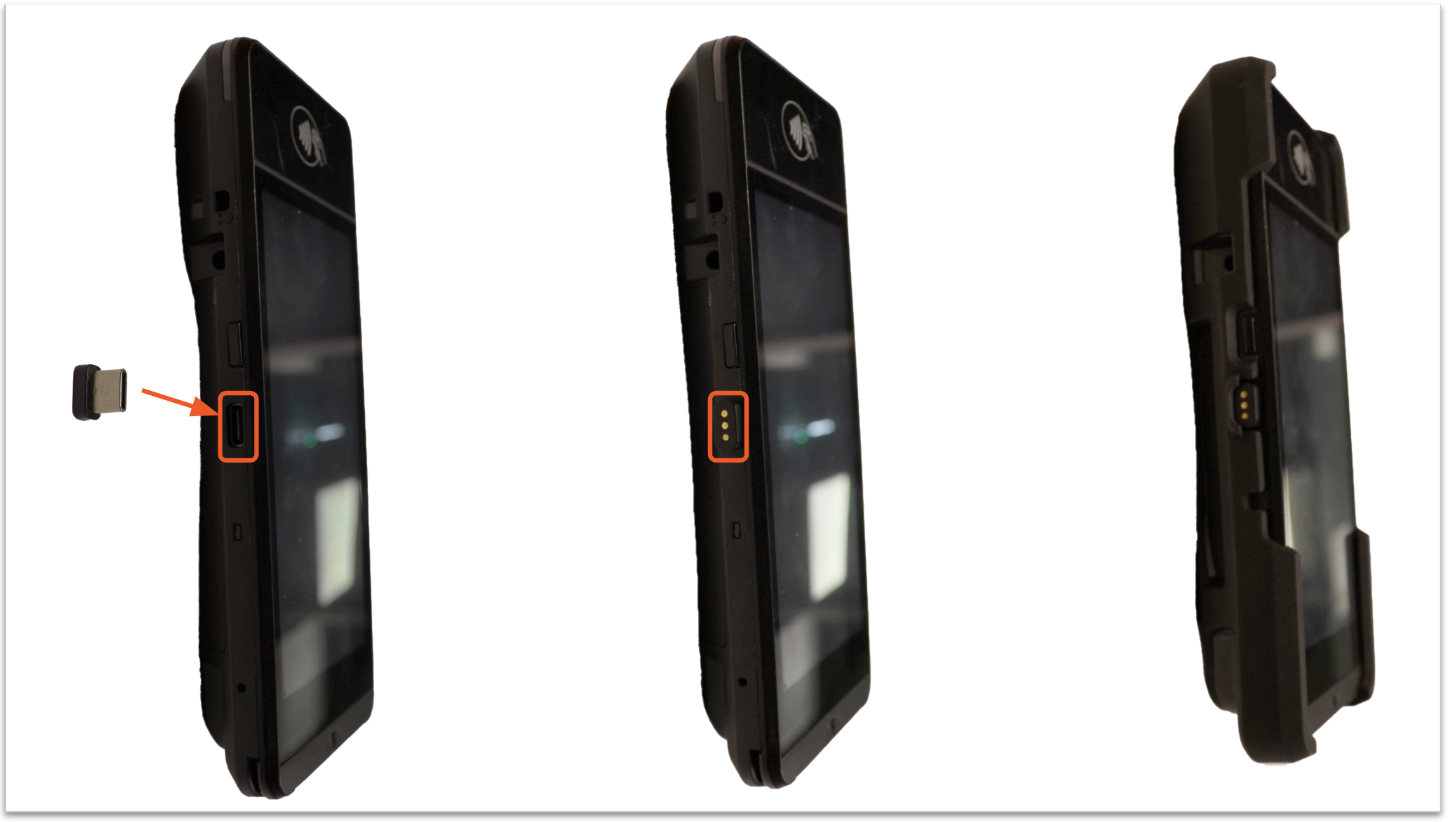
- Remove the Case: If your S1 device has a protective case, remove it before charging.
- Connect the Adapter: Your charging dock comes equipped with 4 USB-C adapters. Insert one of these adapters into the USB-C port on your S1 device.
- Attach the Case (Optional): If you removed the case in step 1, reattach it to your device now.
- Dock the Device: Place your S1 device into the S1 Handheld Charging Dock, ensuring the USB-C adapter aligns with the dock's connector.
- Wait for Charging: Your S1 device will take approximately 4 hours to fully charge.
In case of loss or damage, extra USB-C adapters can be purchased separately from Toast Shop.
Important Note: The S1 Handheld charging dock is compatible with or without the protective case; however, the individual USB-C adaptor for each device must be inserted into the device before attaching the case.