Toast Item Label Printer Quick Start Guide
Last updated: Dec 10, 2025, 10:14 AM
The Toast TLP400 Item Label Printer prints peel-and-stick item labels that can be used individually or for large orders. This is commonly used for pizza boxes and coffee cups.
- Toast Item Label Printer Components
- Toast Item Label Printer Specifications
- Toast Item Label Printer Overview
- Install and Configure Your Printer
- Frequently Asked Questions
Toast Item Label Printer Components
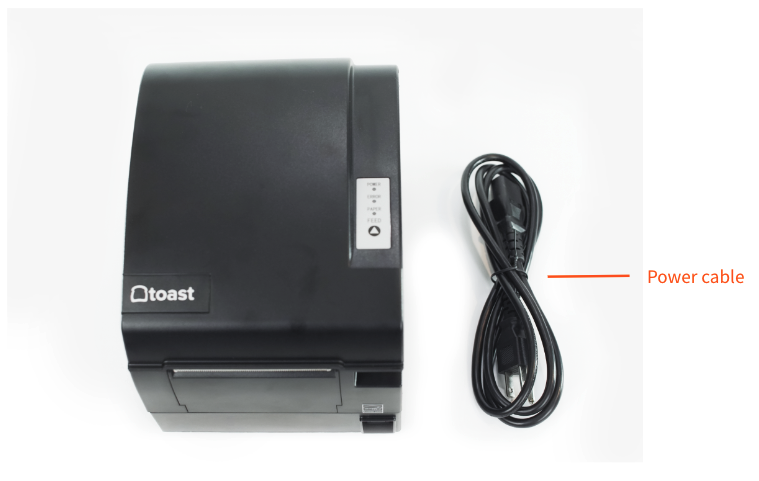
- Printer
- 3 ft Ethernet cable
- Power cable
- Roll of label paper
Toast Item Label Printer Specifications
Compatibility
- Network Support: RJ-45
- Printer Method: Thermal
- Printing Color Options: Black
- Paper Type / Size: 76-80 mm die-cut liner “peel and stick” paper
- Label sizes: 3” x 3”, 3" x 2", 3" x 1.5" or 1.5" x 3"
- Label sizes other than the default 3" x 3" size will need additional configuration described below.
- Cutting option: Full cut, partial cut, manual tear
Printer Specifications
- Includes: Printer, 3ft ethernet cable, power cable, roll of label paper
- Dimensions (Length x Width x Height in inches): 8.06” L x 6.13” W x 6.31” H
Paper Specifications
- Backing paper thickness: 0.041mm-0.071mm (0.0016in - 0.0027in)
- Thermal paper (label) thickness: 0.070mm-0.092mm (0.0016in - 0.0036in)
- Thermal paper (label) spacing: 3mm-10mm (.12in - .40in)
- OD Max : 100mm (~4in)
- ID Min: 25mm (~1in)
Toast Item Label Printer Overview
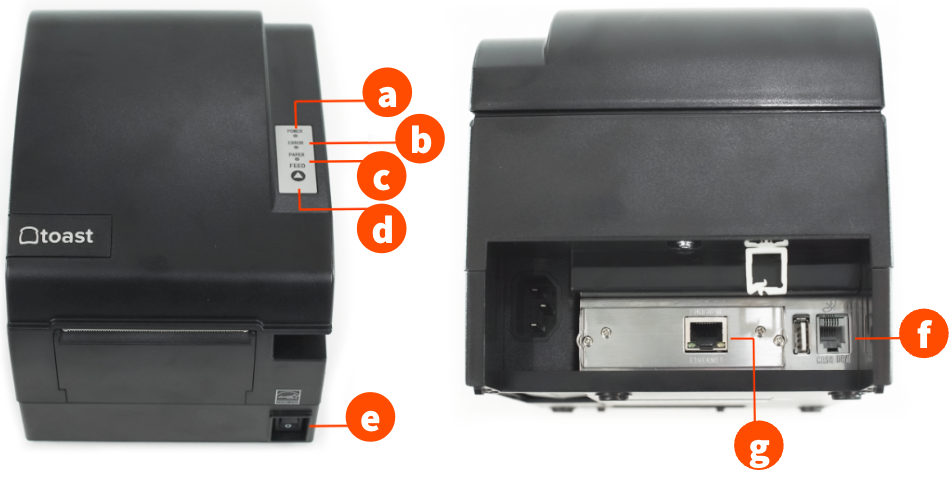
- Power indicator light
- Error indicator light
- Paper error indicator light
- Feed button
- Power button
- Cash drawer port
- Ethernet port
The Toast Label printer will buzz and use lights to alert the user of errors. Check out these tables for common errors and light indicators:
|
|
|
|
| Green |
|
|
| Green |
|
|
| |
|
|
| |
|
|
| Red |
|
|
| Red |
|
|
| Red |
|
|
|
|
|
|
|
|
|
|
|
|
|
|
|
|
|
|
|
|
|
|
|
|
|
|
|
|
|
|
|
|
|
|
|
| N/A |
Install and Configure Your Printer
To install your printer and set it up, follow the steps below:
Note: You need to make sure that your POS app is running on 2.69.6 or above.
- Begin by unboxing your printer and everything that is in the box.
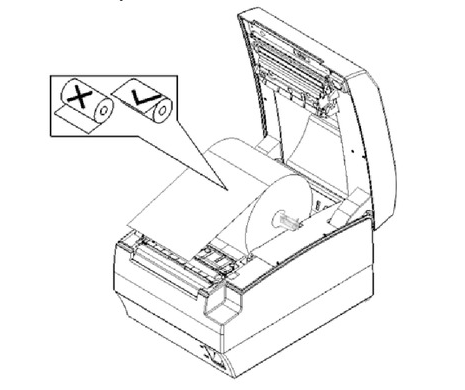
- Next, install the paper roll so the paper feeds from the top of the roll as shown in the image below:
- Once your paper has been added, navigate to the Toast app main menu and select Printer Setup from the Setup section to configure your printer.
- Select + Add or replace printer.
- Select Install a new printer or Install a replacement printer depending on your setup needs.
- Next, select Wired when asked if you are setting up a wireless or wired printer. Select Next.
- Follow the steps in the printer setup workflow. Plug in and turn on your printer. Connect the Ethernet and power cables. Your power cable should connect directly to an outlet and the Ethernet cable should connect directly to your network switch or router.
- Select Find my printer on the POS screen. It can take about 20 seconds for it to find your printer. Toast TLP400 should appear on the screen. Once it does, select Continue.
- Next, select whether you'd like to apply an existing printer setting (recommended if you are replacing a label printer) or select Use different settings if you're setting up a new printer.
- If using different settings, select Item Labels on the next screen. Select Continue.
- Next, select your preferred Label Size from Small - Vertical, Small - Horizontal, Medium - Horizontal, or Large - Square. Select Continue.
- If you selected the Large label size, there are no additional formatting options at this stage and you'll skip ahead to the next step. If you selected any of the Small or Medium label sizes, the app will prompt you to select a Label Format that will change what information is emphasized in the label header (either Guest Name or Ticket Number). Select Continue.
- Next, the app will prompt you to select a prep station. If you're replacing a label printer at an existing prep station, select that same prep station. If you're setting up a label printer at a new prep station, select I'll select one later. Note: To set up a new prep station, check out the steps outlined in the Configure and Assign Prep Stations article. You'll need to assign the appropriate printer to the prep station.
- Select Print test to test your printer. A label will print. On the POS, select either Looks good, Nothing printed, or Wrong printer. If Nothing printed or Wrong printer is selected, the app will walk you through some troubleshooting steps.
- Once Looks good is selected, select Finish on the next screen.
Need help setting up or printing your labels? Read more in our Set Up and Print Item Labels article.
Additional Configuration for Non-Default Label Sizes
If your restaurant uses label sizes different from the 3" x 3" default size and you've only completed the steps above, your printer will probably print blank labels. To set up the printer for labels of different sizes (i.e. 3" x 2", 3" x 1.5" or 1.5" x 3"), follow these steps:
- Power off the printer.
- Power the printer on while holding the Feed button down.
- The printer should feed two labels and stop. The printer should print MAIN MENU.
- If it does not stop, check out Toast Label Printer Isn't Printing.
- Calibration is number 3, so press the Feed button three times, then push and hold Feed one time.
- The printer should print SELECT CALIBRATION MODE.
- Now press the Feed button two times and then push and hold Feed one more time.
- The printer will feed several labels and stop. There should be some calibration data printed on the last label.
- Press the Feed button once and then push and hold Feed one more time.
- The printer should feed one or two labels and stop.
- Now press the Feed button and one label should feed out.
Frequently Asked Questions
What kind of labels does the Toast Item Label printer use and where can I purchase them?
The Toast Item Label printer uses lined (peel and stick) labels (76-80mm width). Example paper rolls that meet these specifications are:
- Epson 3" x 3" TM-L90 Thermal Labels for the Large label size.
- 3" x 2" Thermal Roll Labels - 1" Core / 4" Outer Diameter for the Medium label size.
- 3" x 1.5" Thermal Roll Labels - 1" Core / 4" Outer Diameter for vertical and horizontal orientations of the Small label size.
Additional paper specifications
- Backing paper thickness: 0.041mm-0.071mm (0.0016in - 0.0027in)
- Thermal paper (label) thickness: 0.070mm-0.092mm (0.0016in - 0.0036in)
- Thermal paper (label) spacing: 3mm-10mm (.12in - .40in)
- OD Max : 100mm (~4in)
- ID Min: 25mm (~1in)
Note: Using paper that does not match these specifications can damage the auto-cutter and void your warranty.
Can I use this printer in my kitchen?
Yes, you can, but note that the temperature of the print head is detected by a thermal resistor. If the print head is overheating, the protective circuit will shut off the power and force the printer to stop printing; the temperature of print head when printing is stopped is 65℃.
How do I set up and print the sticky labels?
Follow the steps in our Set Up and Print Item Labels article.
What if I want to change to a different label size?
You can manage your existing printers in Toast Web. Navigate to Payments > Checks & receipt setup > Printers and cash drawers and select the label printer you'd like to adjust. On the printer's detail page, you can make changes to label size, format, font size, and more. Make sure to use a paper roll size that is compatible with the label size you choose. Note: Label printers are compatible with the Wide (76-80 mm) paper width setting only. The Narrow paper width setting is not compatible with item label paper. Learn more about paper recommendations for each printer type that Toast supports.
Conduct a test print any time you install new paper or select a new label size. The first print might display alignment issues, such as a split chit, particularly if manual adjustments were made when installing the roll. A second test print should resolve any alignment issues caused by the change in paper size, ensuring that subsequent prints are properly aligned and free of errors.
Note: The printer is designed to automatically adjust to a new roll size, so manual realignment is not required. Only proceed with manual adjustments if you encounter persistent alignment issues after the second test print.