Create Menus, Groups, Subgroups, and Items in the Menu Builder
Last updated: Jun 11, 2026, 4:31 PM
| Menu Builder will be retired on September 1, 2026. To continue managing your menus, start using Menu Manager today. Menu Manager includes all the functionality available in Menu Builder, along with new tools that make menu updates easier. Learn more about Menu Manager. |
- Before You Begin
- Menu Hierarchy Overview
- Menu Builder vs. Menu Manager
- Create a Menu in the Menu Builder
- Edit, Reorder, or Remove a Menu
- Create a Menu Group in the Menu Builder
- Edit or Remove a Menu Group
- Create a Menu Subgroup in the Menu Builder
- Manage Existing Subgroups
- Create a Menu Item in the Menu Builder
- Edit, Move, Update Stock, or Remove a Menu Item
- Set the Cost of a Menu Item
- Frequently Asked Questions
- What Is a Subgroup?
- What's the Difference Between a Subgroup and a Modifier Group?
- How Do I Add a Subgroup to a Menu?
- How Do I Move an Item to a Different Subgroup or Menu Group?
- Where Do I Find the Menu Builder?
- If I Delete an Item or Group From One Menu, Will It Be Deleted From Other Menus?
- Can I Set a Kitchen Nickname for a Menu Item?
- What's the Difference Between the Menu Builder and the Menu Manager?
- Related Articles
Before You Begin
Applies to: Toast Web — menu builder tool
Permissions needed:
- 6.4 Publishing — required to publish any saved menu changes
What you'll accomplish: Create menus, menu groups, subgroups, and menu items in the menu builder, set their POS names, button colors, tax rates, prep stations, sales categories, modifier groups, availability, and visibility, then save and publish your changes.
When to use this article: When you are building or expanding your menu structure in the menu builder — creating a new menu, organizing menu groups and subgroups, or adding new items to an existing group.
When not to use this article:
- If your restaurant uses Toast Multilocation Management (MLM), the menu builder lets you edit menus and menu items but does not support creating menus, menu groups, modifier groups, or modifiers for multi-location restaurants. Create those entities first in Toast Web > Menus > Bulk management > Advanced properties, then return to the menu builder to edit them.
- If your account does not have access to the menu builder, see Create and Manage Menus, Menu Groups, and Subgroups and Create and Manage Menu Items for the menu manager equivalents.
Menu Hierarchy Overview
Toast organizes your menu offerings using a four-level hierarchy. Each level fits inside the level above it:
- Menus — the top level. Menus typically map to the categories of offerings you serve, such as Food, Drinks, Lunch, Dinner, Happy Hour, or Bar.
- Menu groups — the second level, organized inside menus. Menu groups typically fit categories within a menu, such as Appetizers, Salads, Sandwiches, or Desserts.
- Subgroups — smaller groups nested inside a menu group, used to break things down further. For example, a Red Wine menu group could have By the Glass and By the Bottle subgroups.
- Items — the individual products that fall into menu groups or subgroups, such as a Caesar Salad item inside the Appetizers menu group.
Another way to think about it: menus are like filing cabinets, menu groups are the folders inside each filing cabinet, and items are the individual documents within each folder.
You can also create modifier groups that contain modifier options for a menu item, menu group, or subgroup (for example, dressing options for a Side Salad item). See Add Modifier Groups and Modifiers in the Menu Builder for steps.
Overview of the Toast menu hierarchy.
Menu Builder vs. Menu Manager
Toast Web has two menu editing tools that overlap. Choose based on what you want to do:
- Menu builder — the modern menu editing tool. Use it to create and edit menus, groups, subgroups, and items with a streamlined interface that shows menus and groups on the left and items on the right. The menu builder is the tool described in this article.
- Menu manager — the original menu editing tool. Use it if your account does not have the menu builder, or if you need to perform actions the menu builder does not yet support (such as creating menu groups, modifier groups, or modifiers in Toast Multilocation Management environments). For menu manager steps, see Create and Manage Menus, Menu Groups, and Subgroups and Create and Manage Menu Items.
- Advanced properties — a bulk editing surface inside Toast Web. Use it when you need to add menus or items for Toast Multilocation Management restaurants, or to edit many menu items at once. See Use Advanced Properties to Edit Your Menus in Bulk.
To open the menu builder, navigate to Toast Web > Menus > Menu management > Menu builder, or select Menu builder from the Quick actions section of your Toast Web homepage.
Create a Menu in the Menu Builder
Use this when you are adding a new top-level menu (for example, a Drinks menu separate from your Food menu).
- Navigate to the menu builder at Toast Web > Menus > Menu management > Menu builder, or select Menu builder from the Quick actions section of your Toast Web homepage.
- Select + Create menu.
- On the new menu page, fill in the following fields to set up the menu:
- Menu name — name your new menu (for example, Food or Drinks).
- POS nickname — customize the button label that employees will see on the POS.
- POS button color — set a button color so staff can easily distinguish between menus on the POS.
- Tax rates — set the tax rates for the menu. See Assign Tax Rates in the Menu Builder.
- Prep stations — assign prep stations so items from this menu get routed to the correct station or stations. See Assign Prep Stations in the Menu Builder.
- Sales category — select a sales category for the menu. See Assign Sales Categories in the Menu Builder.
- Availability — set the days and times the menu is available. For example, a Breakfast menu can be set to appear Monday through Friday from 6 a.m. to 11 a.m. See Set Menu Availability in the Menu Builder.
- Visibility — select which ordering channels the menu will appear in. See Set Ordering Visibility in the Menu Builder.
- Select Save to keep your changes as a draft.
- Select Publish all changes when you are completely finished to send the menu to the POS and your ordering channels.
Expected outcome: The new menu appears in the menu list on the left side of the menu builder page, with the name, POS nickname, and color you set. After publishing, the menu is live on the POS and any ordering channels you enabled.
Edit, Reorder, or Remove a Menu
To edit a menu after you create it:
- In the menu builder, select the menu name on the left side of the page.
- Select the three dot (⋮) overflow menu icon to the right of the menu's name.
- Select one of the options:
- Edit — change the menu's settings (name, POS nickname, color, tax rates, prep stations, sales category, availability, or visibility).
- Remove — remove the menu from the menu builder.
- Advanced edit — open the full advanced settings page for the menu.
Expected outcome: The selected action applies to the menu. If you removed the menu, it no longer appears in the menu builder.
To change the order menus display on the page:
- In the menu builder, select Set menu display order (below + Create menu).
- Drag and drop menus into the order you want.
- Select Save when you are finished.
Expected outcome: Menus appear in the new order on the menu builder page and on the POS the next time the menu loads.
To preview how your menus will look on the POS, select View POS layout at the top of the menu builder. See Can I Preview How My Menus Will Look on My POS? for details.
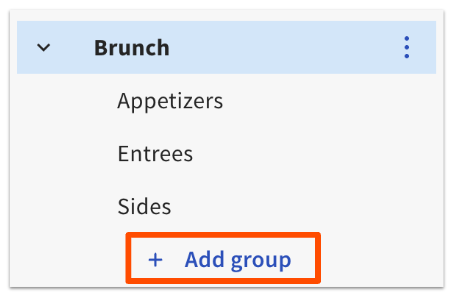
Create a Menu Group in the Menu Builder
Use this when you are organizing menu items into categories inside a menu (for example, an Appetizers menu group inside a Food menu).
- Navigate to the menu builder at Toast Web > Menus > Menu management > Menu builder, or select Menu builder from the Quick actions section of your Toast Web homepage.
- Select the name of the menu you want to add a group to, then select + Add group.
- On the new group page, fill in the following fields to set up the menu group:
- Group name — name your new menu group (for example, Appetizers or Lunch).
- POS nickname — customize the button label that employees will see on the POS.
- POS button color — set a button color so staff can easily distinguish between groups on the POS.
- Tax rates — set the tax rates for the group if they differ from the menu default. See Assign Tax Rates in the Menu Builder.
- Subgroups — create subgroups for this menu group. See the Create a Menu Subgroup in the Menu Builder section below.
- Modifier groups — add modifier groups at the menu group level. See Add Modifier Groups and Modifiers in the Menu Builder.
- Prep stations — assign prep stations so items from this group get routed to the correct station or stations. See Assign Prep Stations in the Menu Builder.
- Sales category — select a sales category for this group. See Assign Sales Categories in the Menu Builder.
- Visibility — select which ordering channels this group will appear in. See Set Ordering Visibility in the Menu Builder.
- Select Save to keep your changes as a draft.
- Continue to the next sections to create subgroups or add menu items, or select Publish all changes if you are finished.
Expected outcome: The new menu group appears under the parent menu on the left side of the menu builder page. After publishing, the group is live on the POS and any ordering channels you enabled.
Edit or Remove a Menu Group
To edit a menu group after you create it:
- In the menu builder, select the group name on the left side of the page.
- Select the three dot (⋮) overflow menu icon to the right of the group's name.
- Select one of the options:
- Edit — change the group's settings.
- Remove — remove the group from this menu.
- Advanced edit — open the full advanced settings page for the group.
Expected outcome: The selected action applies to the menu group.
Create a Menu Subgroup in the Menu Builder
Use a subgroup when you want to break a menu group down further. For example, a Red Wine menu group could have By the Glass and By the Bottle subgroups so guests and staff can scan a focused list. Subgroups are created from inside the menu group's details page.
Note: Subgroups behave differently on different ordering channels. They appear on the POS but are not currently supported within Toast Online Ordering. See Create and Manage Menus, Menu Groups, and Subgroups for details on subgroup behavior across channels.
- Navigate to the menu builder at Toast Web > Menus > Menu management > Menu builder, or select Menu builder from the Quick actions section of your Toast Web homepage.
- Next to the name of the menu group you want to create a subgroup for, select the three dot (⋮) overflow menu icon to the right of the group's name, then select Edit.
- Scroll down to the Subgroups section.
- Select + Add new.
- Enter the subgroup details (Subgroup name, POS nickname, POS button color, prep stations, sales category, and visibility) just as you would for a menu group.
- Select Save to keep your changes as a draft.
- Select Publish all changes when you are completely finished.
Expected outcome: The new subgroup appears under the parent menu group on the left side of the menu builder page. After publishing, the subgroup is live on the POS and any ordering channels you enabled.
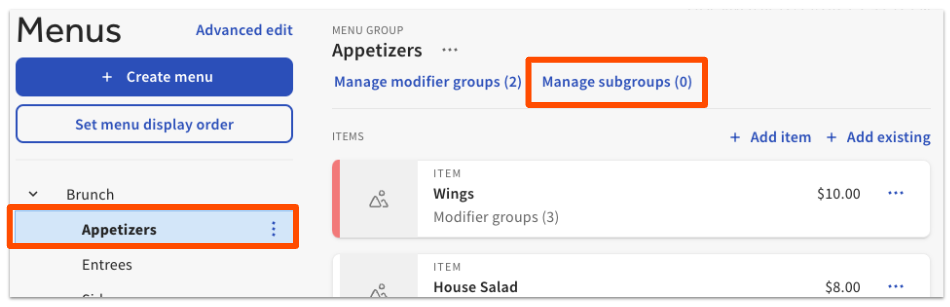
Manage Existing Subgroups
When you select a menu group's name in the menu builder, a Manage subgroups button appears above the list of menu items. Select it to manage existing subgroups for that menu group — including renaming, removing, or reordering them.
Create a Menu Item in the Menu Builder
Use this when you are adding a new menu item to a menu group or subgroup (for example, adding a Caesar Salad item to the Appetizers menu group).
- Navigate to the menu builder at Toast Web > Menus > Menu management > Menu builder, or select Menu builder from the Quick actions section of your Toast Web homepage.
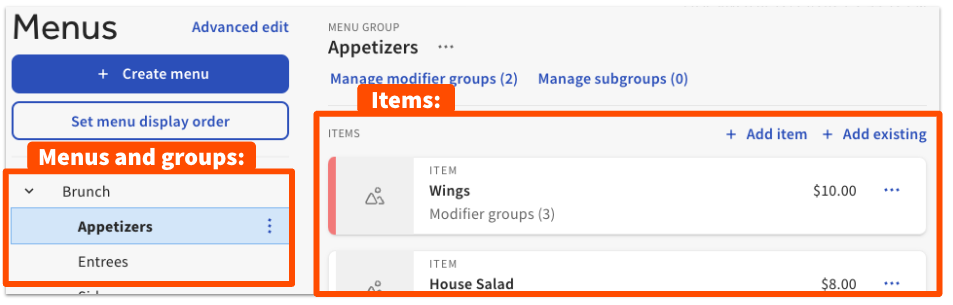
- Select the name of the menu group (or subgroup) you want to add a menu item to. The menu group's items display on the right side of the screen.
- Select one of the two add options:
- + Add Item (at the bottom of the item list) — create a brand-new item.
- + Add existing (at the top right of the item list) — add an item that already exists elsewhere in your menus. Reusing existing items keeps reporting consolidated and reduces menu maintenance. See Reuse or Copy Menu Groups, Items, and Modifiers.
- When you create a new item, the item details page appears. Fill in the following fields:
- Item name — name your new item.
- POS nickname — customize the button label that employees will see on the POS.
- POS button color — set a button color so staff can easily distinguish between items on the POS.
- Upload an image — add an image to this item so guests can see what they are ordering. The image appears in multiple ordering channels such as your Online Ordering page. See Add Images to Menu Items in the Menu Builder.
- Add a description — describe your item with a few sentences. The description appears in multiple ordering channels such as your Online Ordering page.
- Add calories — add the number of calories specifically for this item.
- Add PLU/SKU — assign each menu item's SKU, a 5-digit item identification number (often referred to as a PLU). See Use Barcodes With Toast.
- Set a price strategy — select how this item will be priced. See Configure Pricing Strategies in the Menu Builder.
- Tax rates — set the tax rates for the item if they differ from the default. See Assign Tax Rates in the Menu Builder.
- Modifier groups — add new or existing modifier groups to this item. See Add Modifier Groups and Modifiers in the Menu Builder.
- Prep stations — assign prep stations so this item gets routed to the correct station or stations. See Assign Prep Stations in the Menu Builder.
- Kitchen name — add a different name for the menu item on kitchen tickets and KDS devices.
- KDS color — customize the color your kitchen staff sees for this item on a KDS device.
- Sales category — select a sales category for this item if it differs from the group's. See Assign Sales Categories in the Menu Builder.
- Visibility — select which ordering channels this item will appear in if different from the group's. For example, if you have an item that cannot be ordered online (such as bananas foster made table-side), uncheck the channels you want to remove the item from. See Set Ordering Visibility in the Menu Builder.
- Repeat as needed to create more menu items, then select Save and Publish all changes when you are done.
Expected outcome: The new item appears in the item list on the right side of the menu builder for that menu group. After publishing, the item is live on the POS and any ordering channels you enabled.
Edit, Move, Update Stock, or Remove a Menu Item
To edit or manage an item after you create it:
- In the menu builder, select the group name on the left side of the page.
- When the items appear on the right, select the three dot (⋮) overflow menu icon next to the item.
- Select one of the options:
- Edit — open the item's page in the menu builder to change settings.
- Update Stock — quickly update the stock count for the item.
- Move — move the item into another menu group.
- Remove — remove the item. The item is removed from this menu group but remains in the items database and can be re-added through the menu manager page.
- Advanced edit — open the advanced settings page for the item.
Expected outcome: The selected action applies to the menu item.
You can also view and manage items from menu group and subgroup detail pages in the menu builder. From those pages you can:
- View all menu items contained in a menu group or subgroup.
- Add new and existing items to a menu group or subgroup.
- Remove items from a menu group or subgroup.
- Reorder items in a menu group or subgroup.
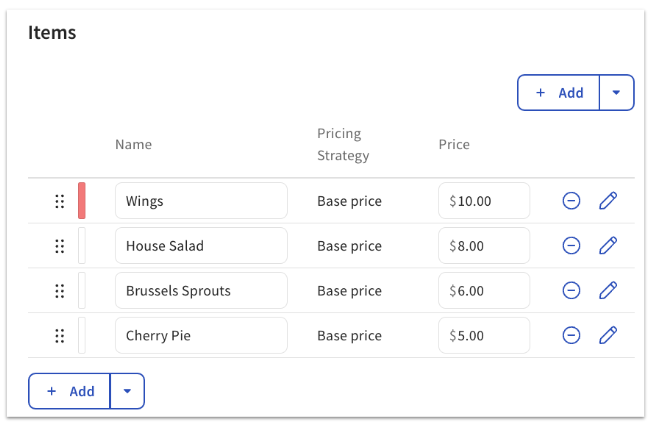
- Update the price of items in a menu group or subgroup (only for items that use a base price pricing strategy).
- Navigate directly to a menu item detail page.
Set the Cost of a Menu Item
The Cost field records what it costs you to produce a menu item. Cost is typically the total value of the ingredients used to make the item, but it can also include labor or packaging costs. Cost values are used to calculate cost of goods sold (COGS), gross profit, and gross margin on the Product Mix (PMIX) report.
Note: Setting cost on a menu item is not available to customers using Toast Retail, Toast Multilocation Management (MLM), or xtraCHEF.
- Navigate to the menu builder at Toast Web > Menus > Menu management > Menu builder.
- Select the item you want to add a cost to.
- Scroll down to the Reporting section.
- Enter the item Cost. The cost must be calculated manually and entered into this field.
- Select Save to keep your changes as a draft, then Publish all changes when you are finished.
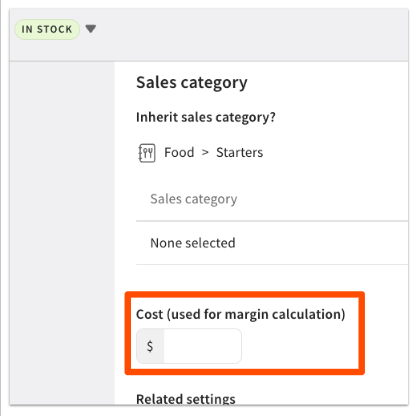
Expected outcome: The cost value is saved on the item and is used to calculate COGS, gross profit, and gross margin on the Product Mix (PMIX) report.
Frequently Asked Questions
What Is a Subgroup?
A subgroup is a smaller group of menu items nested inside a menu group. Use a subgroup when you want to break a large menu group down into smaller categories that guests or staff can scan quickly. For example, a Red Wine menu group can have By the Glass and By the Bottle subgroups, each containing a different list of wines.
What's the Difference Between a Subgroup and a Modifier Group?
A subgroup is a smaller group of menu items nested inside a menu group. It is used for organizing items into categories. A modifier group contains modifier options that change or customize an item (for example, dressing choices for a salad). Use a subgroup to organize items; use a modifier group to let guests customize an item. For modifier setup, see Add Modifier Groups and Modifiers in the Menu Builder.
How Do I Add a Subgroup to a Menu?
To add a subgroup to a menu, follow the Create a Menu Subgroup in the Menu Builder steps above. Subgroups are created from inside the parent menu group's details page using the + Add new button in the Subgroups section.
How Do I Move an Item to a Different Subgroup or Menu Group?
To move a menu item between groups or subgroups, select the three dot (⋮) overflow menu icon next to the item and select Move. The menu builder will prompt you to choose the destination menu group or subgroup. Save and publish your changes when finished.
Where Do I Find the Menu Builder?
To open the menu builder, log in to Toast Web and navigate to Menus > Menu management > Menu builder. You can also select Menu builder from the Quick actions section of your Toast Web homepage. If the menu builder option is not visible, see the Menu Builder vs. Menu Manager section above — your account may not have access to the menu builder, or you may need additional permissions.
If I Delete an Item or Group From One Menu, Will It Be Deleted From Other Menus?
If the item is reused across multiple menus, removing it from one menu only removes it from that menu — the item remains active in the other menus and in the items database. If the item is unique to one menu, removing it removes it from that menu, but the item itself stays in the items database and can be re-added later. See Reuse or Copy Menu Groups, Items, and Modifiers for how reused items behave across menus.
Can I Set a Kitchen Nickname for a Menu Item?
Yes. On the item details page in the menu builder, fill in the Kitchen name field with the name you want to appear on kitchen tickets and KDS devices. You can also set a KDS color to make the item stand out on the KDS screen. The Kitchen name is independent of the menu item's Item name (what guests see on the menu) and POS nickname (what staff see on the POS button).
What's the Difference Between the Menu Builder and the Menu Manager?
The menu builder is the modern menu editing tool with a streamlined interface. The menu manager is the original menu editing tool and supports some actions the menu builder does not (such as creating menus and groups for Toast Multilocation Management restaurants). For most menu work, the menu builder is the recommended tool. See Menu Builder vs. Menu Manager above for a side-by-side comparison.
Related Articles
- Create and Manage Menus, Menu Groups, and Subgroups
- Create and Manage Menu Items
- Add Modifier Groups and Modifiers in the Menu Builder
- Reuse or Copy Menu Groups, Items, and Modifiers
- Manage Menus With the Menu Builder