Add Modifier Groups and Modifiers in the Menu Builder
Last updated: Jun 11, 2026, 4:27 PM
| Menu Builder will be retired on September 1, 2026. To continue managing your menus, start using Menu Manager today. Menu Manager includes all the functionality available in Menu Builder, along with new tools that make menu updates easier. Learn more about Menu Manager. |
The menu builder lets you create modifier groups and modifiers to customize menu items in Toast Web. A modifier group is a set of options guests can choose from — for example, a Dressing modifier group with Ranch, Vinaigrette, and Caesar as modifiers.
- Before You Begin
- Create a New Modifier Group
- Add Modifiers to a Modifier Group
- View the Order of Your Modifier Groups
- Frequently Asked Questions
- Related Articles
Before You Begin
Applies to: Toast Web (menu builder)
Permissions needed: 6.4 Publishing and 4.5 Edit Full menu
What you'll accomplish: Create a modifier group, add modifiers to it, choose how it behaves on the POS and online ordering channels, and publish the changes so guests can use them.
Create a New Modifier Group
You can apply a modifier group to an entire menu group (so every item in the group inherits it) or to a specific item. Follow these steps for either setup.
- In Toast Web, navigate to Menus > Menu management > Menu builder. You can also select Menu builder from the Quick actions section of your Toast Web homepage.
- Navigate to where you want to add the modifier group.
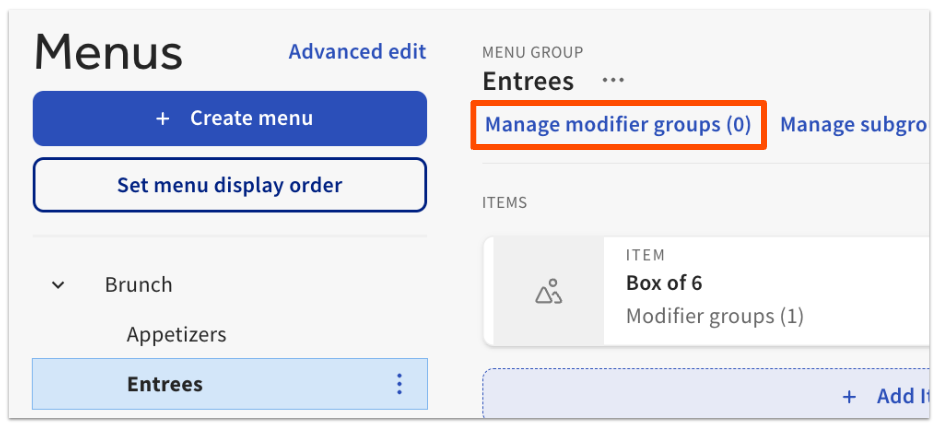
- To add it to a menu group: select the menu group name, then select Manage modifier groups at the top of the list of items in that menu group.
- To add it to a specific item: select the item name from the menu group, then scroll down to the Modifier groups section of the item details page.
- Select + Add new to create a new modifier group.
Note: If a similar modifier group already exists elsewhere in your menus, select + Add existing instead. Reusing modifier groups reduces the number of modifiers you have to manage and simplifies reporting. The remaining steps in this section apply to new modifier groups.
- On the modifier group details page, configure these settings:
- Modifier group name — the internal name for the group.
- "Point of Sale (POS)" nickname — a shorter name to display on the POS, if needed.
- "Point of Sale (POS)" button color — the color of the modifier group button on the POS.
- Pricing strategy — choose one:
- No charge: No price is added for any modifier in this group.
- Individual: Each modifier in the group has its own price. The modifiers table displays a Price column. To make a modifier reduce the item price, enter a minus (-) sign before the price (for example, -1.50).
- Group: All modifiers share the same price. A price field appears in the Pricing section.
- Modifiers — the individual options inside the group. See Add Modifiers to a Modifier Group.
- Modifier group settings — set the modifier behavior (Optional, Optional with a POS prompt, or Required) and choose whether guests can select more than one modifier from the group. If you allow more than one selection, you can set the maximum number of selections and whether a single modifier can be selected more than once. Required modifier groups that allow multiple selections also let you set a minimum number of selections. For more on multi-select and duplicate selections, see Set Up and Use Modifier Multi-Select.
- Channel visibility — choose which ordering channels (POS, Toast Online Ordering, online ordering partners like Uber Eats and DoorDash) the modifier group is visible on.
Important: Visibility affects whether a required modifier group is enforced.
- If a modifier group is not visible on a channel, no modifier selection is required when ordering through that channel, and the order will succeed without a selection.
- If a required modifier group is visible on a channel, a modifier selection is required, and the order will fail if no selection is made.
- For details on channel visibility, see Set Menu Visibility in the Menu Builder.
- Select Save, then publish your changes so they reach the POS and other ordering channels.
Expected outcome: The modifier group appears on the menu group or item you added it to. Once published, it appears on the POS and on any ordering channels you set to visible.
Note: Modifier groups created at the menu group level are automatically inherited by every item in that menu group. For example, a Salads menu group with a Dressing modifier group passes Dressing to every salad item. You can override this on a single item by opening the item details page, scrolling to the Modifier group settings, and selecting the link icon to unlink (remove) the inherited modifier group from that item.
Tip: At any time, you can preview how your menu will look on the POS by selecting View POS layout at the top of the menu builder page. For details, see Can I Preview How My Menus Will Look on My POS?
Add Modifiers to a Modifier Group
You can add new modifiers or reuse modifiers that already exist in your menus.
To add an existing modifier: in the Modifiers section, select the down arrow next to the + Add button and select Add existing. Reusing modifiers reduces the number of items you have to manage and simplifies reporting.
To add a new modifier:
- In the menu builder, navigate to the modifier group details page and scroll down to the Modifiers section.
- Enter a Name for the modifier. If the modifier group uses Individual pricing, also enter a Price.
Note: Enter a minus (-) sign before the price to deduct that amount from the menu item price. For example, set a "No Cheese" modifier to -1.00 to remove the cheese charge from a sandwich.
- To add another modifier, select + Add. A new row appears where you can enter the next modifier's details.
- To reorder modifiers, select the six-dots (⋮⋮) icon to the left of the modifier name and drag it up or down. To remove a modifier, select the minus (-) icon to the right of the modifier. To edit Calories or POS button color for a modifier, select the pencil icon.
- Save and publish your changes.
Expected outcome: The new modifier appears in the modifier group on the POS and any ordering channels the group is visible on.
View the Order of Your Modifier Groups
You can preview how modifier groups will appear on the POS for a specific menu item.
Modifier groups appear in a default order based on whether they are required and where they are applied. In general, required modifier groups appear first, then optional groups that use a POS prompt, then plain optional groups. Several other settings can also affect the order.
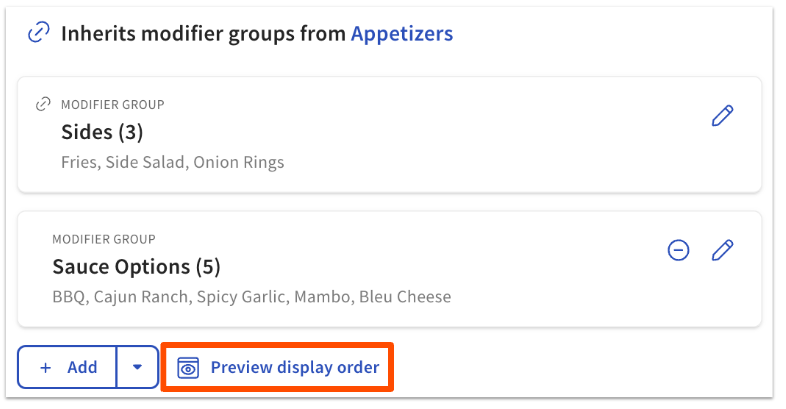
To preview the order:
- In the menu builder, navigate to the item details page.
- Scroll down to the Modifier groups section.
- Select Preview display order.
Expected outcome: A preview opens showing the modifier groups in the order they will display on the POS for this item.
For more on how the display order works and how to change it using the Display Ordering Priority setting, see Manage Modifier Group Display Order.
Frequently Asked Questions
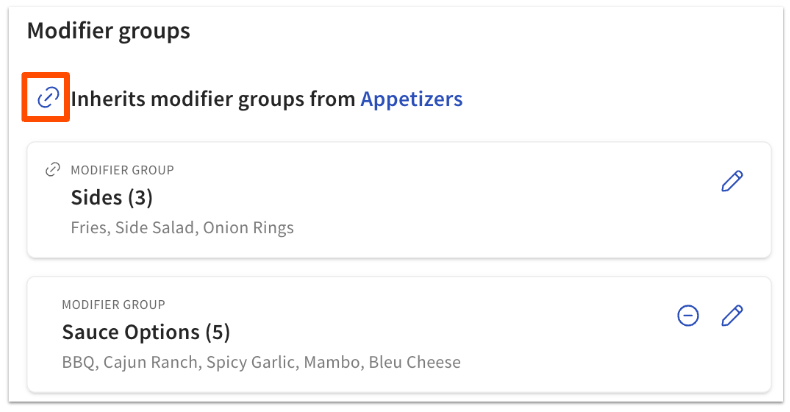
How Do I Remove an Inherited Modifier Group From One Item Only?
To remove an inherited modifier group from a single item without affecting the other items in the menu group:
- In the menu builder, navigate to the item details page.
- Scroll down to the Modifier groups section.
- Select the link icon next to the inherited modifier group to unlink it from this item.
- Save and publish your changes.
Expected outcome: The modifier group no longer appears on this item, but continues to appear on the other items in the menu group.
Why Is My Modifier Showing on Online Ordering or a Third-Party Channel When I Don't Want It To?
A modifier appears on a channel when the modifier group it belongs to has that channel turned on in Channel visibility. To hide a modifier from a specific channel (for example, Toast Online Ordering or Uber Eats), edit the channel visibility for the modifier group:
- In the menu builder, open the modifier group details page.
- Scroll to the Channel visibility section.
- Toggle off the channels where you do not want the modifier group to appear.
- Save and publish your changes.
Important: Channel visibility settings on a parent menu or menu group also apply to modifier groups inside them. If a menu or menu group is hidden from a channel, any modifier group it contains is also hidden. For full details on channel visibility, see Set Menu Visibility in the Menu Builder.
Can I Make a Modifier Reduce the Price of an Item?
Yes. When a modifier group uses Individual pricing, enter a minus (-) sign before the modifier's price to deduct that amount from the item. For example, set a "No Cheese" modifier to -1.00 to subtract one dollar from a sandwich that includes cheese by default. This works for any modifier in an individually priced group.
Can I Add the Same Modifier or Modifier Group to Multiple Items at Once?
Yes — use bulk add tools rather than editing each item individually. For step-by-step instructions, see Bulk Add Items, Modifier Groups, and Modifiers.
Tip: if you want every item in a menu group to inherit the same modifier group, add the modifier group at the menu group level instead of on each item.
How Do I Delete a Modifier or Modifier Group?
To remove a modifier group from an item or menu group, open the item or menu group in the menu builder, scroll to the Modifier groups section, and select the minus (-) icon to the right of the modifier group. Then save and publish.
To remove a single modifier from a group, open the modifier group details page, scroll to the Modifiers section, and select the minus (-) icon next to the modifier you want to delete. Then save and publish.
Can I Make a Modifier Group Display First, Before the Required Groups?
Yes — use the Display Ordering Priority setting on the modifier group, combined with the Modifier Ordering Priority setting in Toast Web. For step-by-step instructions, see Manage Modifier Group Display Order.
Related Articles
- Add Modifier Groups and Modifiers in the Menu Builder
- Manage Modifier Group Display Order
- Set Menu Visibility in the Menu Builder
- Set Up and Use Multiple Modifier Selection
- Bulk Add Items, Modifier Groups, and Modifiers