Create and Manage Menus, Menu Groups, and Subgroups
Last updated: Sep 17, 2026, 2:59 PM
Sign up for a live Toast Classroom session to help you set up and get started with Menu Basics! Select the button below to sign up.
| Add Existing Menu Groups is no longer an available function. Reusing menu groups across multiple menus creates incorrect references and causes incorrect data to be displayed. Read on to learn about creating new menu groups and more. |
Menu Hierarchy Overview
Toast uses a hierarchical system to organize your menu offerings. Menus are the highest level of the hierarchy and typically map out the different categories of offerings you serve (e.g., Food, Drink, Lunch, Dinner, Happy Hour, Bar). Groups are the second tier of the hierarchy and typically fall within menus (e.g., Appetizers, Salads, Sandwiches, Desserts). You may also create subgroups (smaller groups within a menu group) to help break things down further (e.g., Wines by the Glass, Wines by the Bottle). Lastly, items will fall into our groups and subgroups (e.g., Mozzarella Sticks may reside in the Appetizers group).
Another way to think about it is like this:
- Menus are like different filing cabinets in your office.
- Menu groups are the folders inside your filing cabinets that you use for organization.
- Items are the individual documents within each folder.
Note: Employees will need the 6.4 Publishing permission to publish any saved changes.
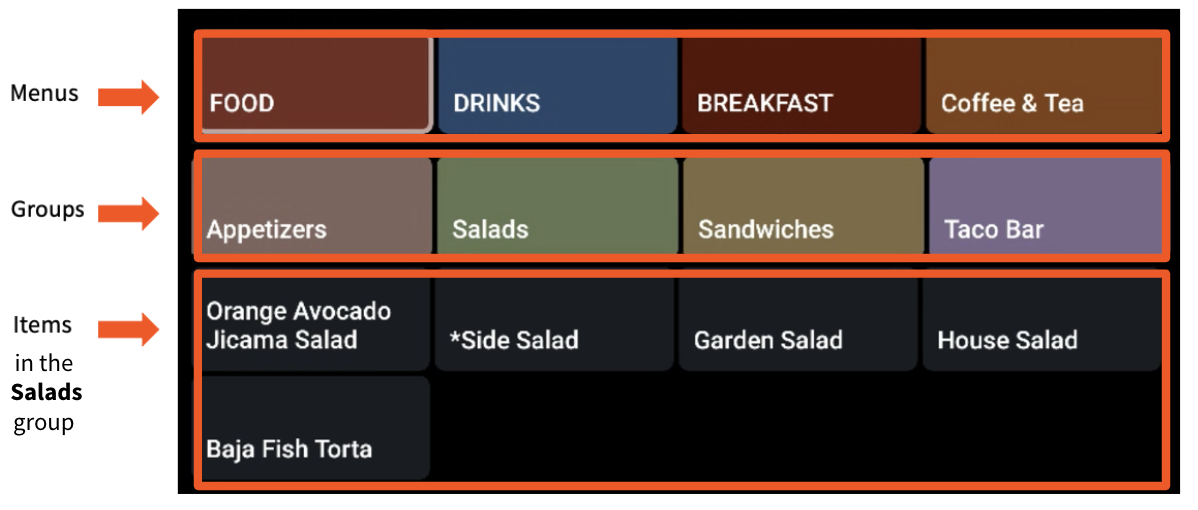
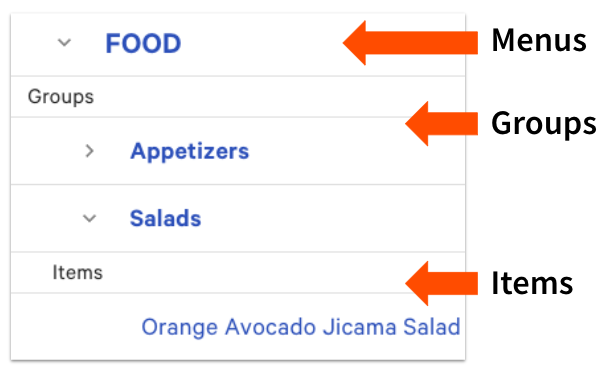
You can create modifier groups that contain a set of modifier options you wish to offer for a menu item or an entire group. Think of these like sticky notes that you can add to the entire filing cabinet, one of the folders, or one of the individual documents. For more information on modifier groups, check out Create and Manage Modifier Groups and Modifier Options.
See the video below to learn more about the menu hierarchy. Note that modifiers will also fall under this organizational structure.
Overview of Toast's menu hierarchy.
Create Your Menus
While creating your menus, it may be beneficial to learn about the different types of menu performers. Learn more by watching the video below.
This 10-minute video will cover your menu's four types of performers (dogs, puzzles, plowhorses, and stars) and why they’re important to understand. Learn how to leverage best practices to maximize value from each type of menu performer and discover how to analyze your menu's data to make informed decisions. Plus, hear real-time from Boston, MA restaurateurs Eventide Oyster Co. and Mecha Noodle Bar.
To create menus in Toast, navigate to the Menus > Menu management > Menu manager in Toast Web using the navigation on the left side of your screen. Select the + Add menu button at the bottom of the list of menus to enter the name of the new menu.
Arrange the Order of Menus
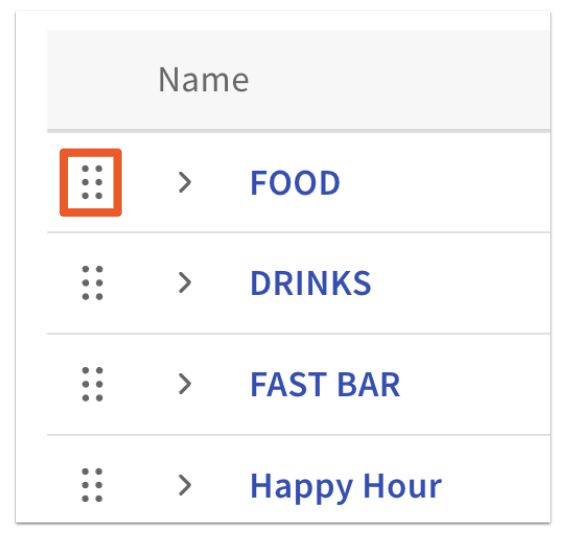
Toast allows you to arrange all of the components of the menu. To change the order of your menus, select the six-dot icon to the left of any menu name, and drag it up or down to reorder. Any changes you make to the menu order will automatically be saved. Select Publish all changes to finalize your configuration.
Archive/Remove Menus
Toast allows you to archive menus. For example, if you are no longer serving breakfast, you may like to remove the menu. However, Toast recommends doing so with caution. To archive a menu, select the ... icon to the right of the menu name and then select Archive. Select Save and Publish all changes when you're done.
Note:
- When you archive a menu, you will no longer see those items on your Menu manager page. If you'd like to keep your menu available in Toast Web for reference (for example, if you're building a new menu from scratch but want to reference your existing menu), you can change the visibility settings so that the old menus are not visible to any of your ordering channels. That way, you can still look at the menu in Toast Web until you are ready to archive.
- You will still be able to access archived menus by restoring them. For more information on archiving or restoring previously archived menus, groups, items, and modifiers: Use the Items Database to View and Manage Menus
Rename Menus
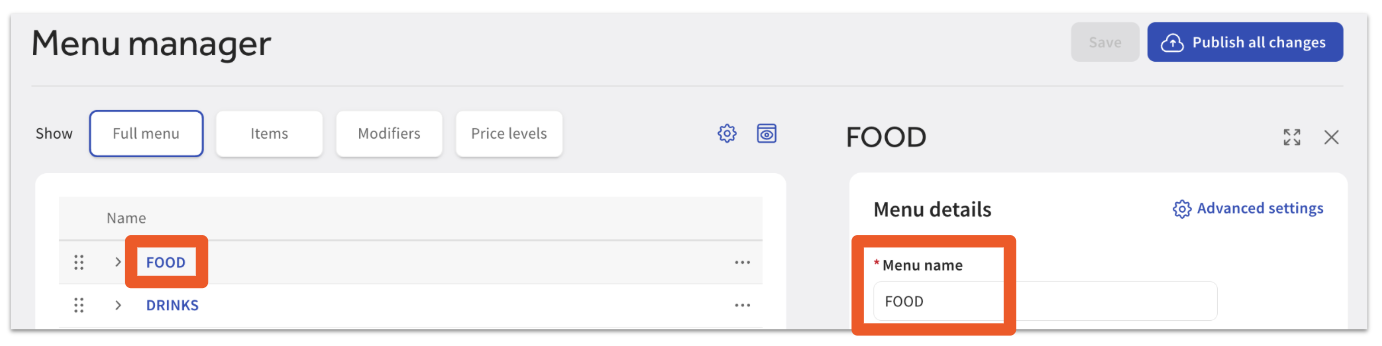
To rename a menu, select the name of the menu on the Menu manager page. A settings panel will appear on the right side of the screen, where you will see a field to edit the menu name as desired. Make sure to select Save and Publish all changes when you're done making changes.
Create Menu Groups
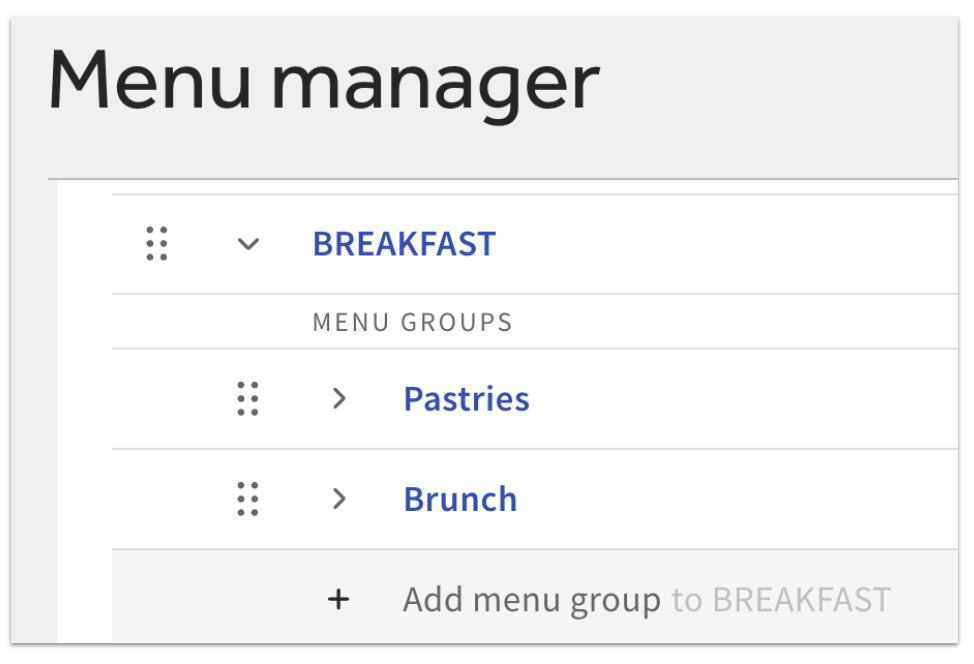
Groups and subgroups divide your menu further for easy navigation. They can be added, ordered, renamed, and deleted. In the example below, these groups are located within a "Breakfast" menu.
Create Subgroups
Groups can also be nested within groups (also known as subgroups). This is useful for large menus where further organization is required, but subgroups should be minimized to reduce the number of taps required by the server.
Note: Subgroups are not currently supported within Toast Online Ordering. If you use subgroups within your online menus, these groups will not appear anywhere on your Toast Online Ordering website.
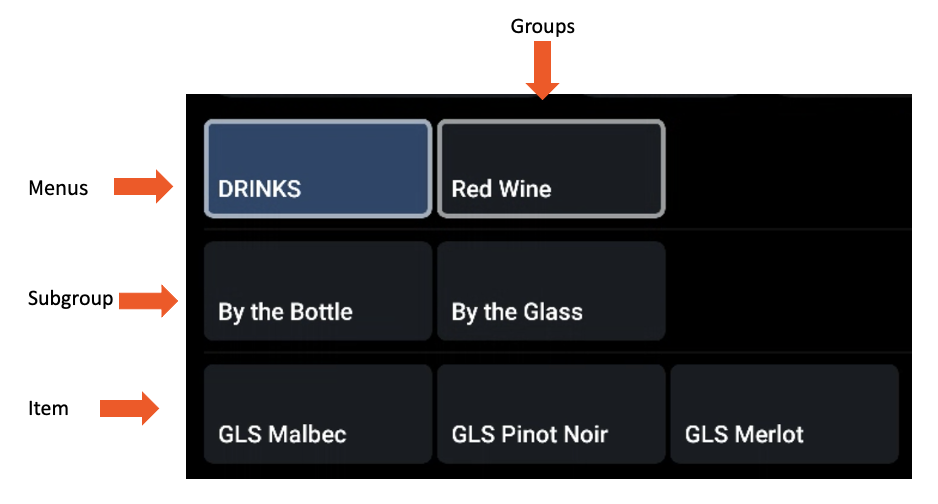
See an example of the following configuration setup in the order screen:
- Menu: Drinks
- Group: Red Wine
- Subgroups: By the Glass, By the Bottle
- Items: GLS Malbec, GLS Pinot Noir, GLS Merlot
Rename Groups and Subgroups
To rename a menu, select the name of the menu group or subgroup on the Menu manager page. A settings panel will appear on the right side of the screen, where you will see a field to edit the name as desired. Make sure to select Save and Publish all changes when you're done making changes.
Arrange the Order of Groups and Subgroups
Groups are ordered from the menu page while subgroups are ordered from the group page. To rearrange groups or subgroups, select the six-dot icon to the left of any group or subgroup name, and drag it up or down to reorder. Any changes you make to the menu order will automatically be saved. Select Publish all changes to finalize your configuration.
Delete Groups and Subgroups
There may come a time when you no longer need to use a certain menu group, for example, if you are no longer serving dessert. While you cannot fully delete a menu group or subgroup from Toast, you can archive them so that they no longer appear in your menu editors and are no longer visible on any ordering channels.
To archive a menu group or subgroup, select the ... icon to the right of its name and then select Archive. Select Save and Publish all changes when you're done.
Note: Even though the group has been archived, the items in that group still live in the Toast database and can be added to another group if needed.
Back to top
Additional Resources for Menus
Looking for more information on building your Toast menu? Consider reading similar articles:
- Get Started With Menus
- Build Your Menu Template
- Menu 101 (training videos)