Edit Employee Time Clock Entries
Last updated: Jul 24, 2026, 3:16 PM
Learn how to correct an employee's time entry in Toast — fix auto-clock outs, adjust missed punches, update declared cash tips, or change job assignments.
- Before you begin
- Edit a time entry from the POS terminal
- Edit a time entry inline on the Time entry management page
- Edit a time entry from Shift Details
- Edit a time entry from the legacy Time entry report
- Manage breaks when editing time entries
- FAQ
- Related articles
Before you begin
Use this article when you need to correct an employee's time entry — fix an auto-clock out, adjust a missed punch, update declared cash tips, or change a job assignment. You can edit clock-in times, clock-out times, break times, declared cash tips, and job assignments for worked shifts.
Required permissions:
- 3.14 Edit Time Entries (to edit time entries)
- 4.3 Labor Reporting (to view the Time entry management page)
Required products:
- Toast Web (for the Time entry management page and Shift Details)
- A Toast POS device (for on-floor edits)
When to use this article vs. other articles:
- To understand report features and filters, see Time entry management overview.
Note: If you use Toast Payroll, changes to time entries in Toast Web sync to Toast Payroll. See Toast Payroll: Manage Timesheets for how the integration works.
Edit a time entry from the POS terminal
Managers can update employee time entries for the current work week on the POS. Use this method for quick edits during or after a shift without leaving the terminal.
Note: Shifts created in Toast Web instead of on the POS will not appear in Review Employee Shifts on the POS.
- On the POS, navigate to the main menu and select Review Employee Shifts under the Manager Activities section.
- Select the shift you want to adjust.
- For active shifts: you can change the Clock in time, or select Clock out to clock the employee out. Shifts must be closed before employees can be clocked out, so selecting Clock out redirects to the shift review screen.
- For closed shifts: you can adjust the clock in or clock out time, declare cash tips, or remove the clock out time. If shift review has not been completed, the Declare cash tips button will not be available.
- To reopen a closed shift, select Remove next to the Clock out time, then select Save changes.
- Select Save changes.
- If the employee took a break during the shift, see Manage breaks when editing time entries below.
Note: You cannot remove the clock in or clock out time for your own shift.
Expected outcome: The updated time entry appears on the Time entry management page in Toast Web. If you edited a shift where the employee already completed shift review, the shift reopens and the employee must complete shift review again.

Edit a time entry inline on the Time entry management page
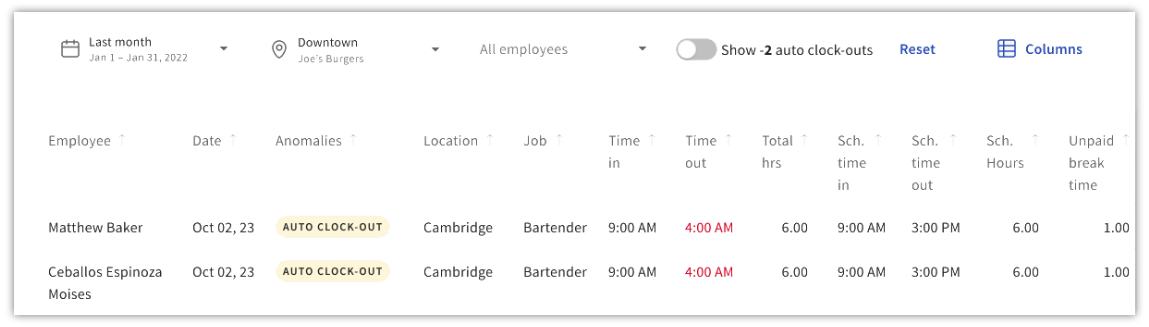
Inline editing on the Time entry management page is the fastest way to correct a clock in time, clock out time, or declared cash tips value.
- In Toast Web, navigate to Reports > Labor > Time entry management.
- Hover over the Time in, Time out, or Cash tips decl. field for the shift you want to edit.
- Select the field to make it editable. Enter the new value in 12-hour format (for example, 2:30 PM).
- Select the checkmark icon or press Enter on your keyboard to save.
Note: The Anomalies column shows irregularities detected in shift data. Review this column when auditing time entries.
Expected outcome: The updated value saves immediately and the report refreshes. If the employee already completed shift review, the shift reopens.
Add a time entry on the Time entry management page
- In Toast Web, navigate to Reports > Labor > Time entry management.
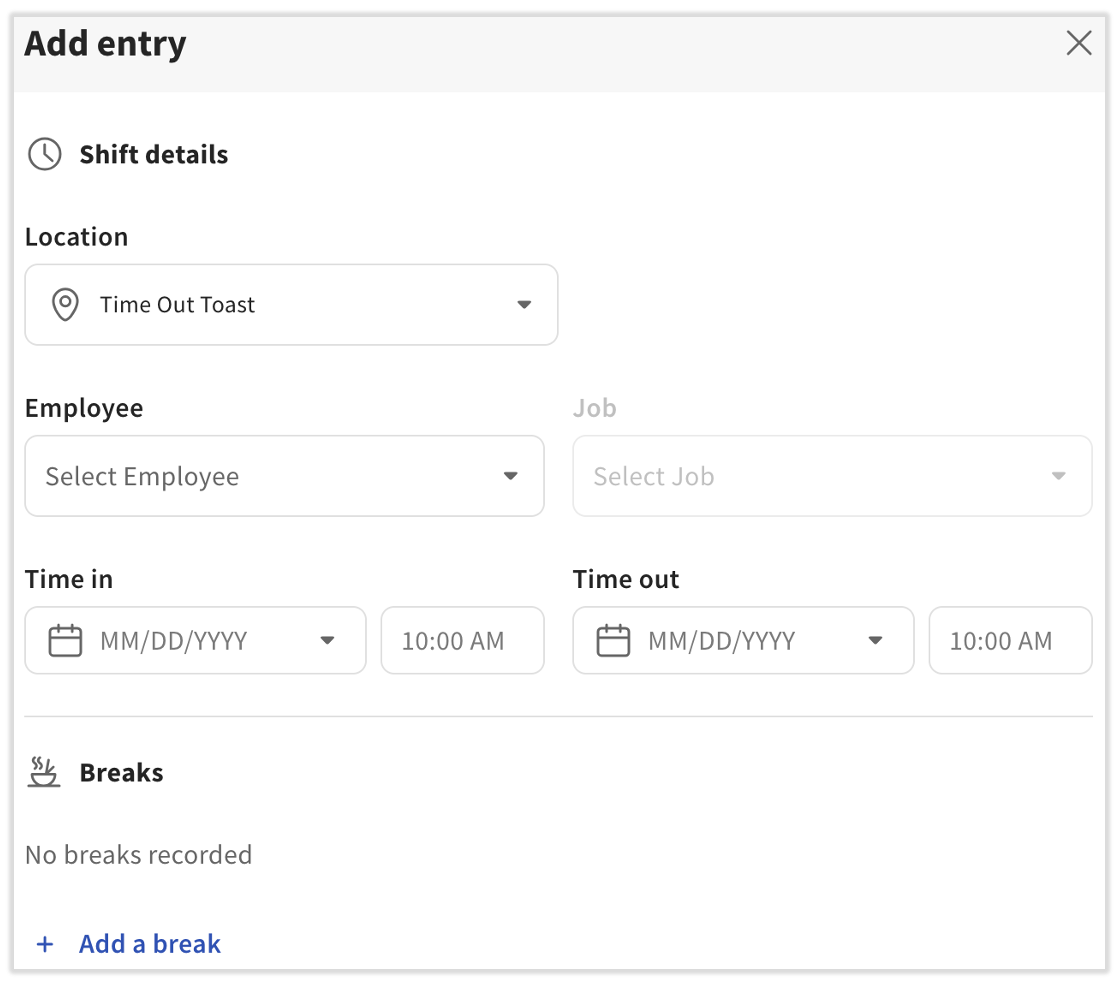
- Select + Add Entry in the upper-right corner of the screen.
- Select an Employee from the drop-down menu, then enter the Job, Time in, Time out, and Cash Tips Declared / Breaks (if applicable).
- Select Save entry.
Expected outcome: The new entry shows up on the report immediately. If you use Toast Payroll, it also syncs to Toast Payroll immediately. You may need to refresh your page.
Edit a time entry from Shift Details
Use Shift Details when you need to edit fields not available through inline editing, such as break times or job assignments.
- In Toast Web, navigate to Reports > Labor > Time entry management.
- Select the row of the shift (select anywhere outside the editable inline fields) to open the Shift Details panel.
- In the Shift Details panel, you can:
- Edit clock-in or clock-out times
- Add or edit break clock in and clock out times
- Add or edit declared cash tips
- Change the job assignment of the shift
- Delete the shift by selecting Delete in the lower-left corner
- Select Save changes.
Expected outcome: The updated shift details save and the report refreshes. Deleting a shift removes the shift from the report and also removes the employee's tip out and cash collected entries from the Drawer history report.
Edit a time entry from the legacy Time entry report
Note: The legacy Time entry report will be replaced by the Time entry management page. To access the legacy report, select the Time entry reporting link from Reports > Labor > Time entry management.
- In Toast Web, navigate to Reports > Labor > Time entry reporting.
- Select the time entry you want to update.
- Edit the In Date, Out Date, Job (if more than one is assigned), or Cash tips declared (if the employee collects tips).
- Select + Add Break to add a break to the time entry.
- Select Delete to delete the time entry entirely.
- Select Save changes.
Expected outcome: The updated time entry saves. If you deleted the entry, the entry is removed from both the Time entry report and the Time entry management page.
Manage breaks when editing time entries
When you edit an employee's time entry, break-specific behavior may apply depending on your restaurant's break configuration.
- If your restaurant has an advanced break configuration and you make changes to the shift (add or delete a break, update the shift length, or fix an auto-clock out), the employee's break status may update from Waived to Missed or vice versa. The system recalculates break eligibility based on the updated time intervals.
- If you manually adjust a time entry or break, the Toast platform recalculates missed breaks based on the new time intervals. Break acknowledgements cannot be recorded for manually entered breaks in Toast Web.
- If your restaurant experiences a system outage or disruption, time entries and break reporting may be affected. Review the Anomalies column of the Time entry management report after an outage — the system's classification and accuracy of reporting may be impacted.
For break configuration and setup, see Build Employee Breaks in Toast.
FAQ
How do I close a timesheet with open punches?
If an employee has an open shift (clocked in but not clocked out), you can close the open shift from the Time entry management page. Edit the Time out field inline, or open Shift Details and add a clock-out time. If the shift was left open from a previous day, see Close an Open Shift From Yesterday.
How do I delete a time entry?
To delete a time entry, open the shift in Shift Details by selecting the row on the Time entry management page, then select Delete in the lower-left corner. Deleting a time entry also removes the employee's tip out and cash-collected entries from the Drawer history report. If you receive an error when deleting, contact Customer Care.
Can I reopen a closed shift?
Yes, you can reopen a closed shift. On the POS, open the shift in Review Employee Shifts, select Remove next to the Clock out time, and select Save changes. In Toast Web, edit the shift in Shift Details and remove the clock-out time.
Why does my employee's shift show overtime?
The estimated overtime on the Time entry management report is calculated by Toast Web based on your work week start date and overtime rule settings. The estimated overtime value may differ from Toast Payroll's calculation. To understand or correct overtime, see Manage Overtime Rules and Hours Counted as Overtime Instead of Regular Hours.
Will changes to time entries in Toast Web sync to Toast Payroll?
Yes, time entry changes in Toast Web sync to Toast Payroll. However, if timesheets have already been approved or the pay period has already been submitted, the updates will not show up on a payroll. See Toast Payroll: Manage Timesheets for details.
I added a time entry for an employee who forgot to punch in. Will the entry appear in payroll?
Manually added time entries sync to Toast Payroll. Be aware of your pay period timing — if timesheets have already been approved or the pay period has already been submitted, the entry may need to be included in the next cycle or handled via a timesheet adjustment. See Toast Payroll: Adjust an Approved Timesheet.
Related articles
- Time entry management overview
- Adjust Time Entries of Shifts When They Run Over
- Close an Open Shift From Yesterday
- Locate Auto Clock Out Time Entries
- Build Employee Breaks in Toast
- Toast Payroll: Manage Timesheets
- Toast Payroll: Adjust an Approved Timesheet
- Manage Overtime Rules
- Hours Counted as Overtime Instead of Regular Hours