Get Started With Open View
Last updated: Apr 23, 2026, 2:47 PM
| The Open View feature is not available on Toast handheld devices. |
- What is Open View?
- Set Up Open View
- Use Open View on the POS
- Input Modifiers in Open View
- Optional Settings
- Open View Best Practices
- Additional Resources
What is Open View?
Take orders with Toast's open view ordering workflow.
Open view simplifies order-taking by displaying items and modifiers all at once, a critical innovation for establishments with a high volume of highly customizable menu items. Your staff taking complicated coffee orders, for example, can input a guest’s exact preferences in any order on a Toast POS terminal via the new layout which displays all the modifiers at once.
As a free feature included in your Toast subscription, anyone can use open view on POS devices. However, it is ideal and recommended for customers with small to medium-sized menus where speed and accuracy across numerous modifiers are key. It is perfect for you if you run a quick service, high-volume business like cafes, bars/breweries, food trucks, etc.
Back to top
Set Up Open View
| The Open View feature is not available on Toast handheld devices. |
You can toggle on open view directly on your POS device. Settings are device-specific and will need to be configured on each device you want to enable open view.
To enable open view, follow these steps:
- Navigate to the main menu of the Toast app on your POS device, and navigate to Setup > Device Setup.
- Then, scroll down and select the Order Screen Menu View setting under the Order Screen section.
- Select Open view as your order view.
- Select Save.
That's it! You've now enabled open view for your device! Now, all your order screens on that specific device will default to open view no matter where you access the order screen (table service, payment terminal, quick order, etc.).
Back to top
Use Open View on the POS
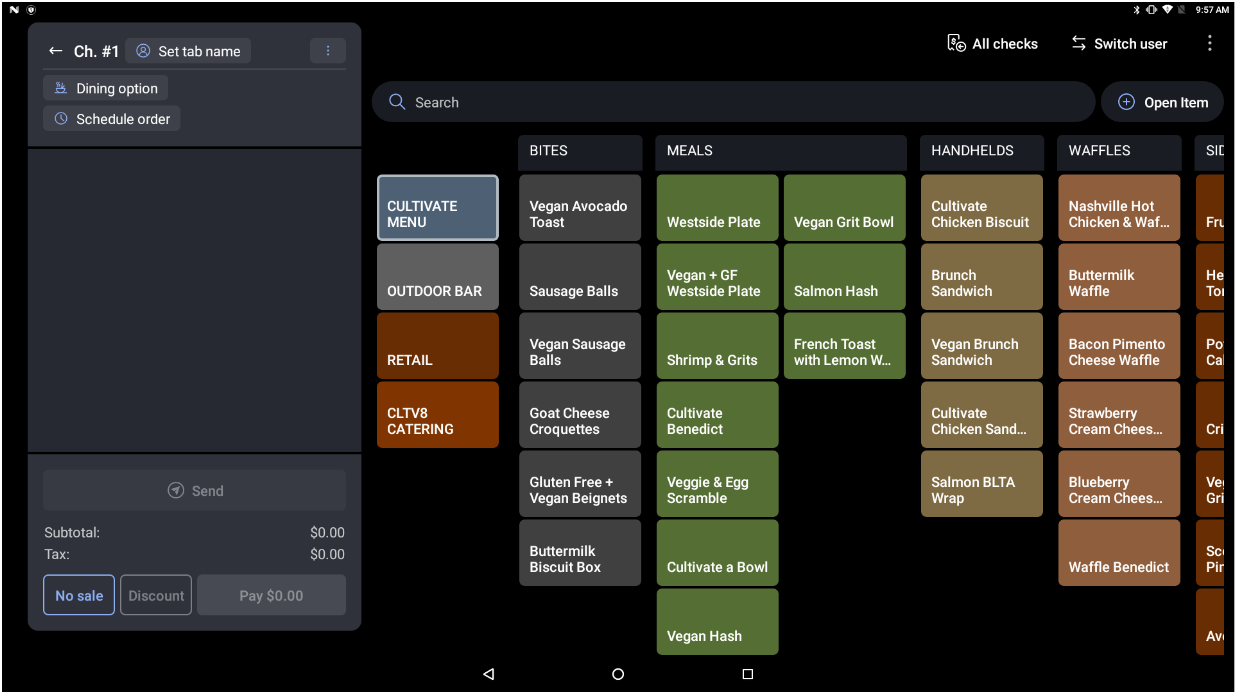
Once open view has been enabled, you'll see a flattened menu organized into color-coded columns with titles that allow staff to see more of the menu laid out at once, and quickly find what they’re looking for so they can input orders faster.
All modifiers for groups and items are displayed to allow staff to follow the natural flow of a conversation with a guest and input items and modifiers in any order, rather than in a sequential way.
The new layout is also designed for consistency with modifiers in the same place across different items in the menu groups for better muscle memory. You'll see that menus are on the left (Food, Drinks, Merchandise, Lunch) and menu groups are on the right on the vertical, scrollable bar (Breakfast, Lunch, Salad, Sides, and Extras).
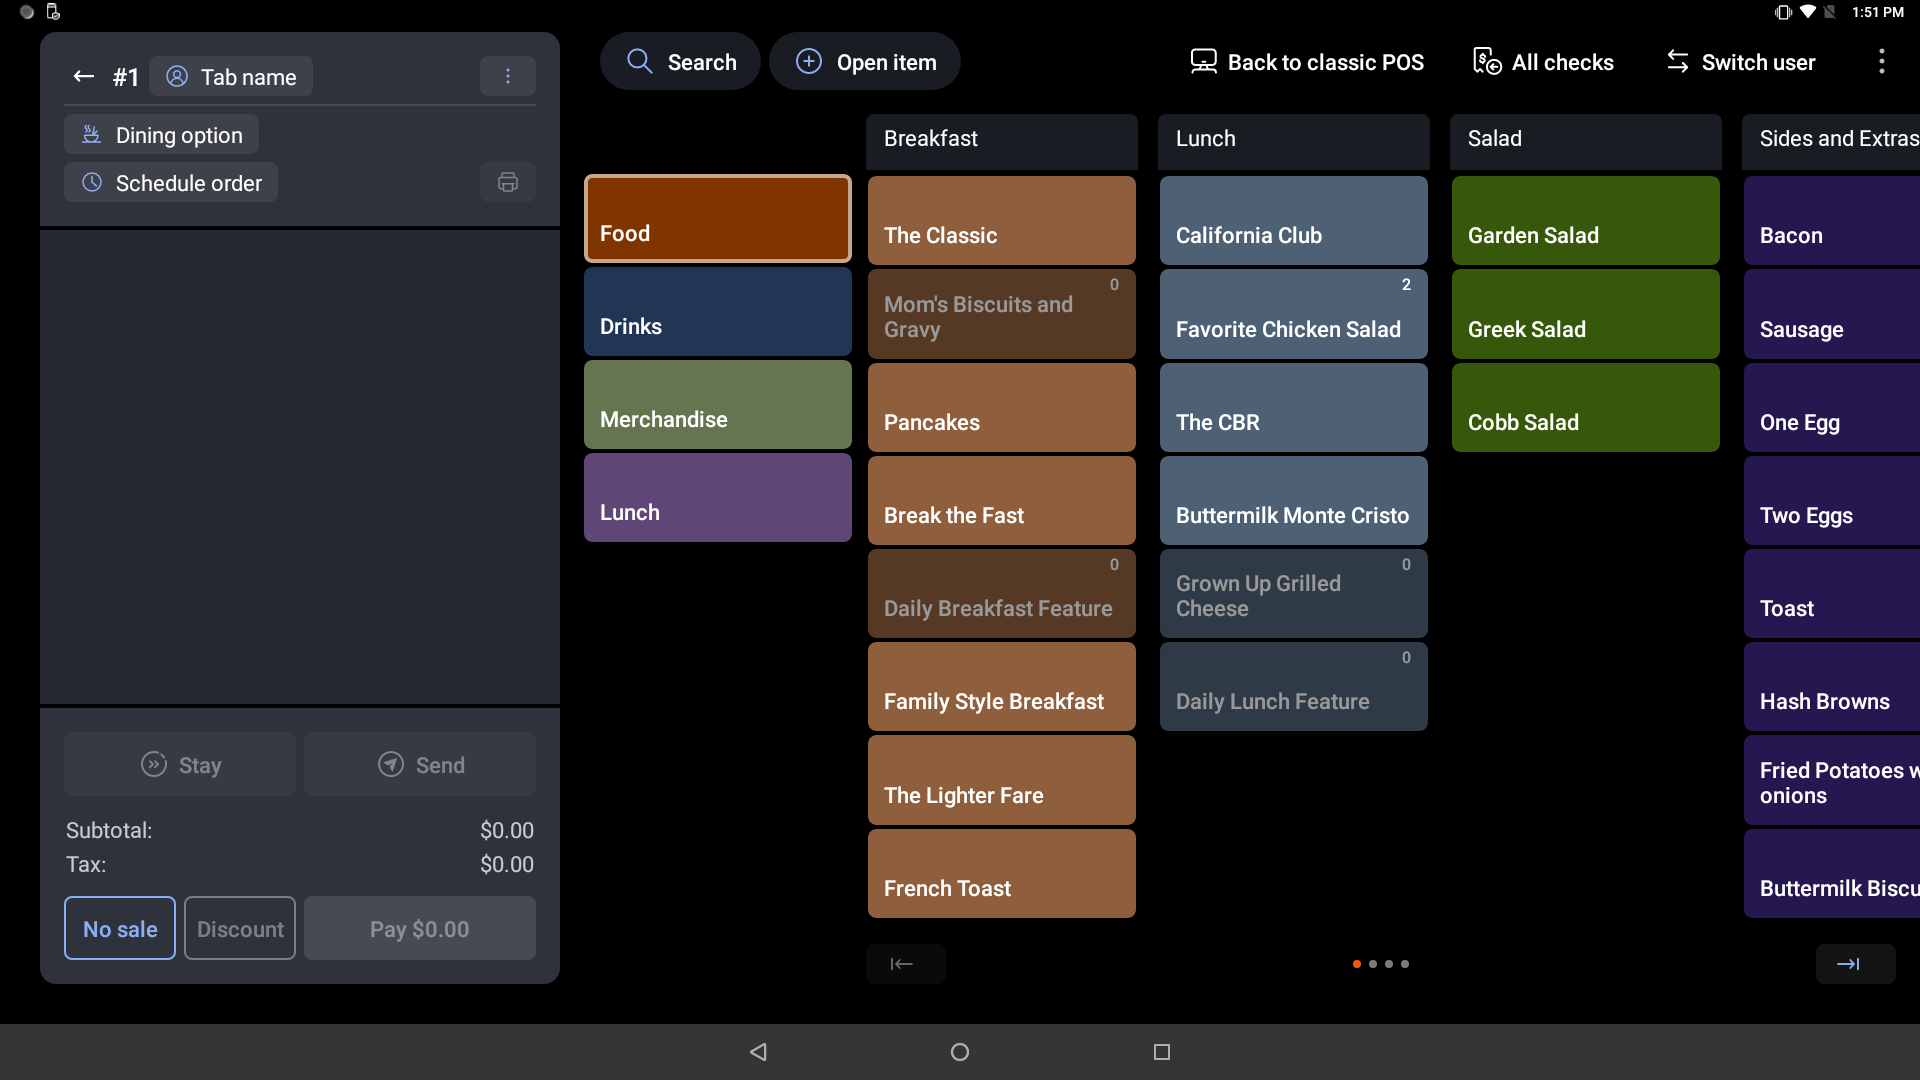
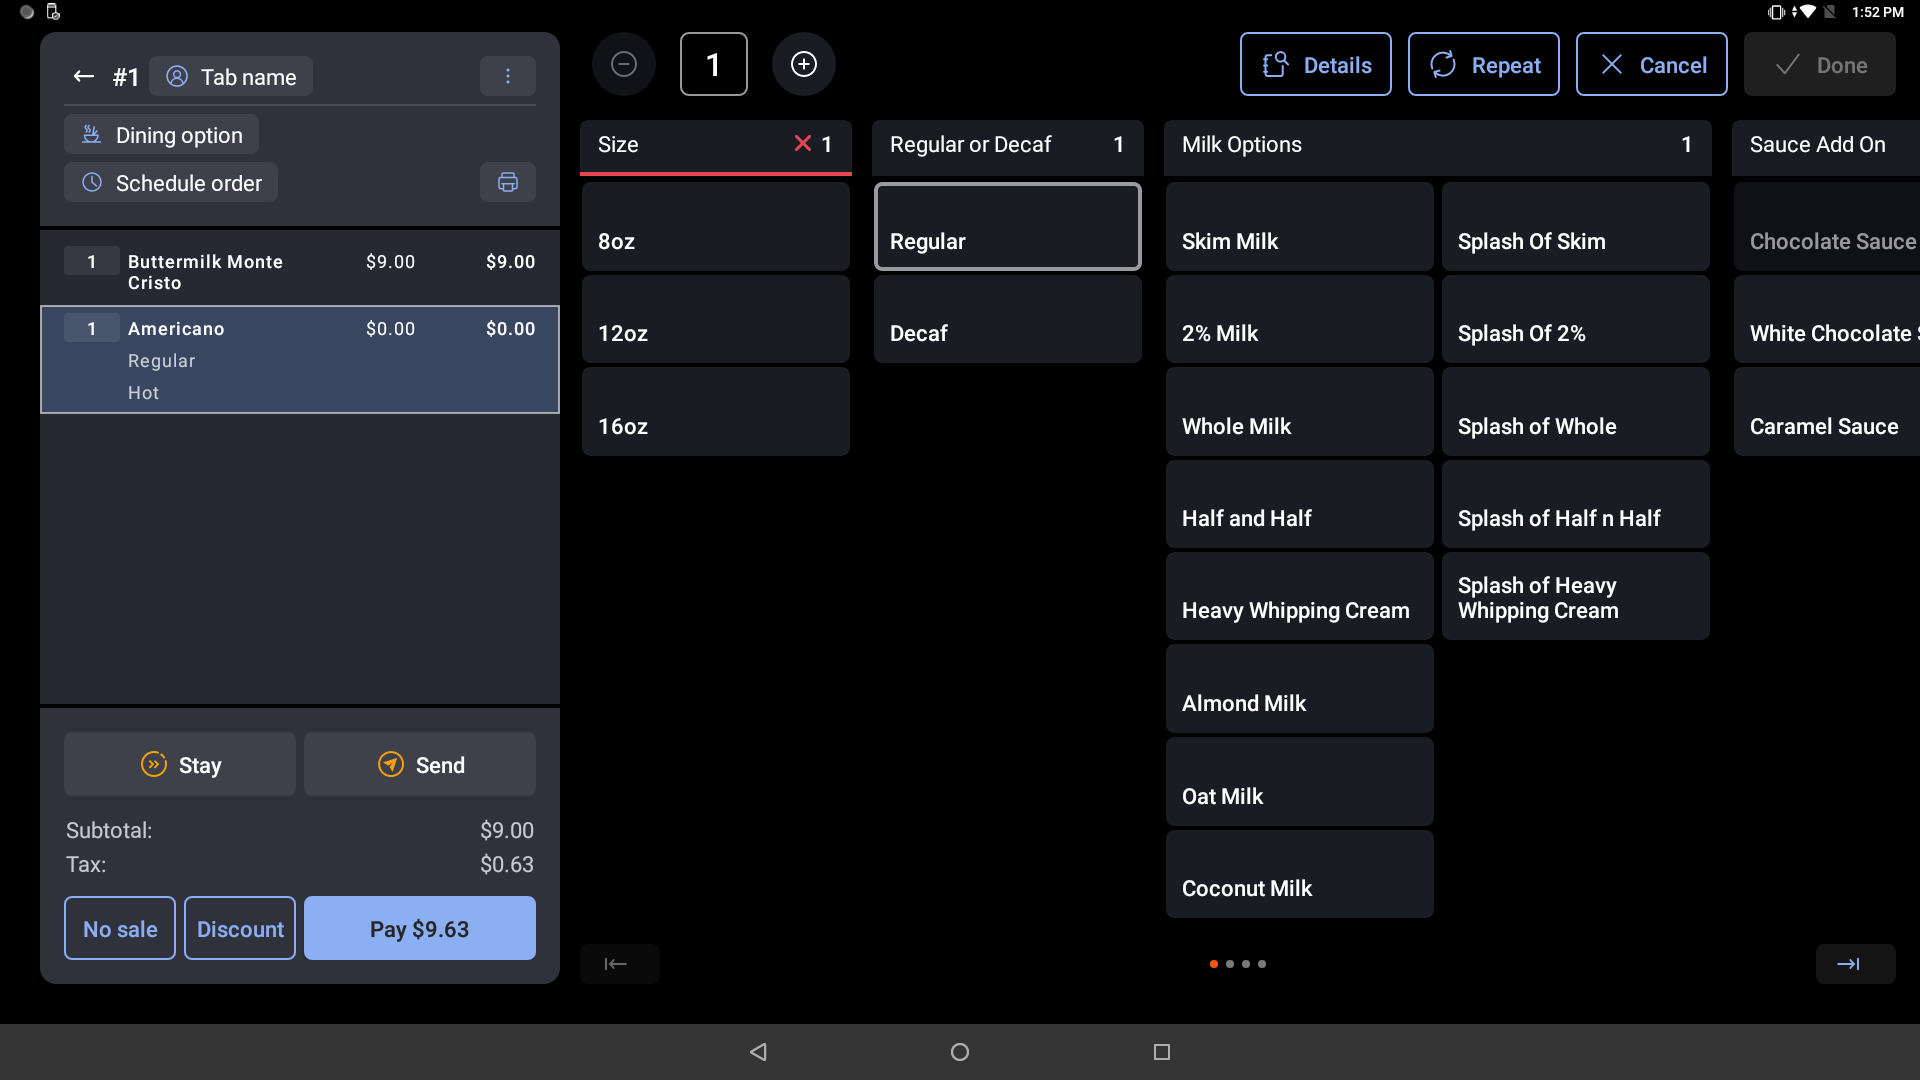
Let's say the guest wants to order a Buttermilk Monte Cristo. In the example above, the server would select the Lunch menu, then select the Buttermilk Monte Cristo button. The customer also wants a coffee, which contains a bunch of modifier options. The server/barista would select the Drinks menu and select Americano. The Americano menu item then opens the modifier screen (below), which shows the size, milk, and sauce options as well if the customer wants decaf or regular and any special requests.
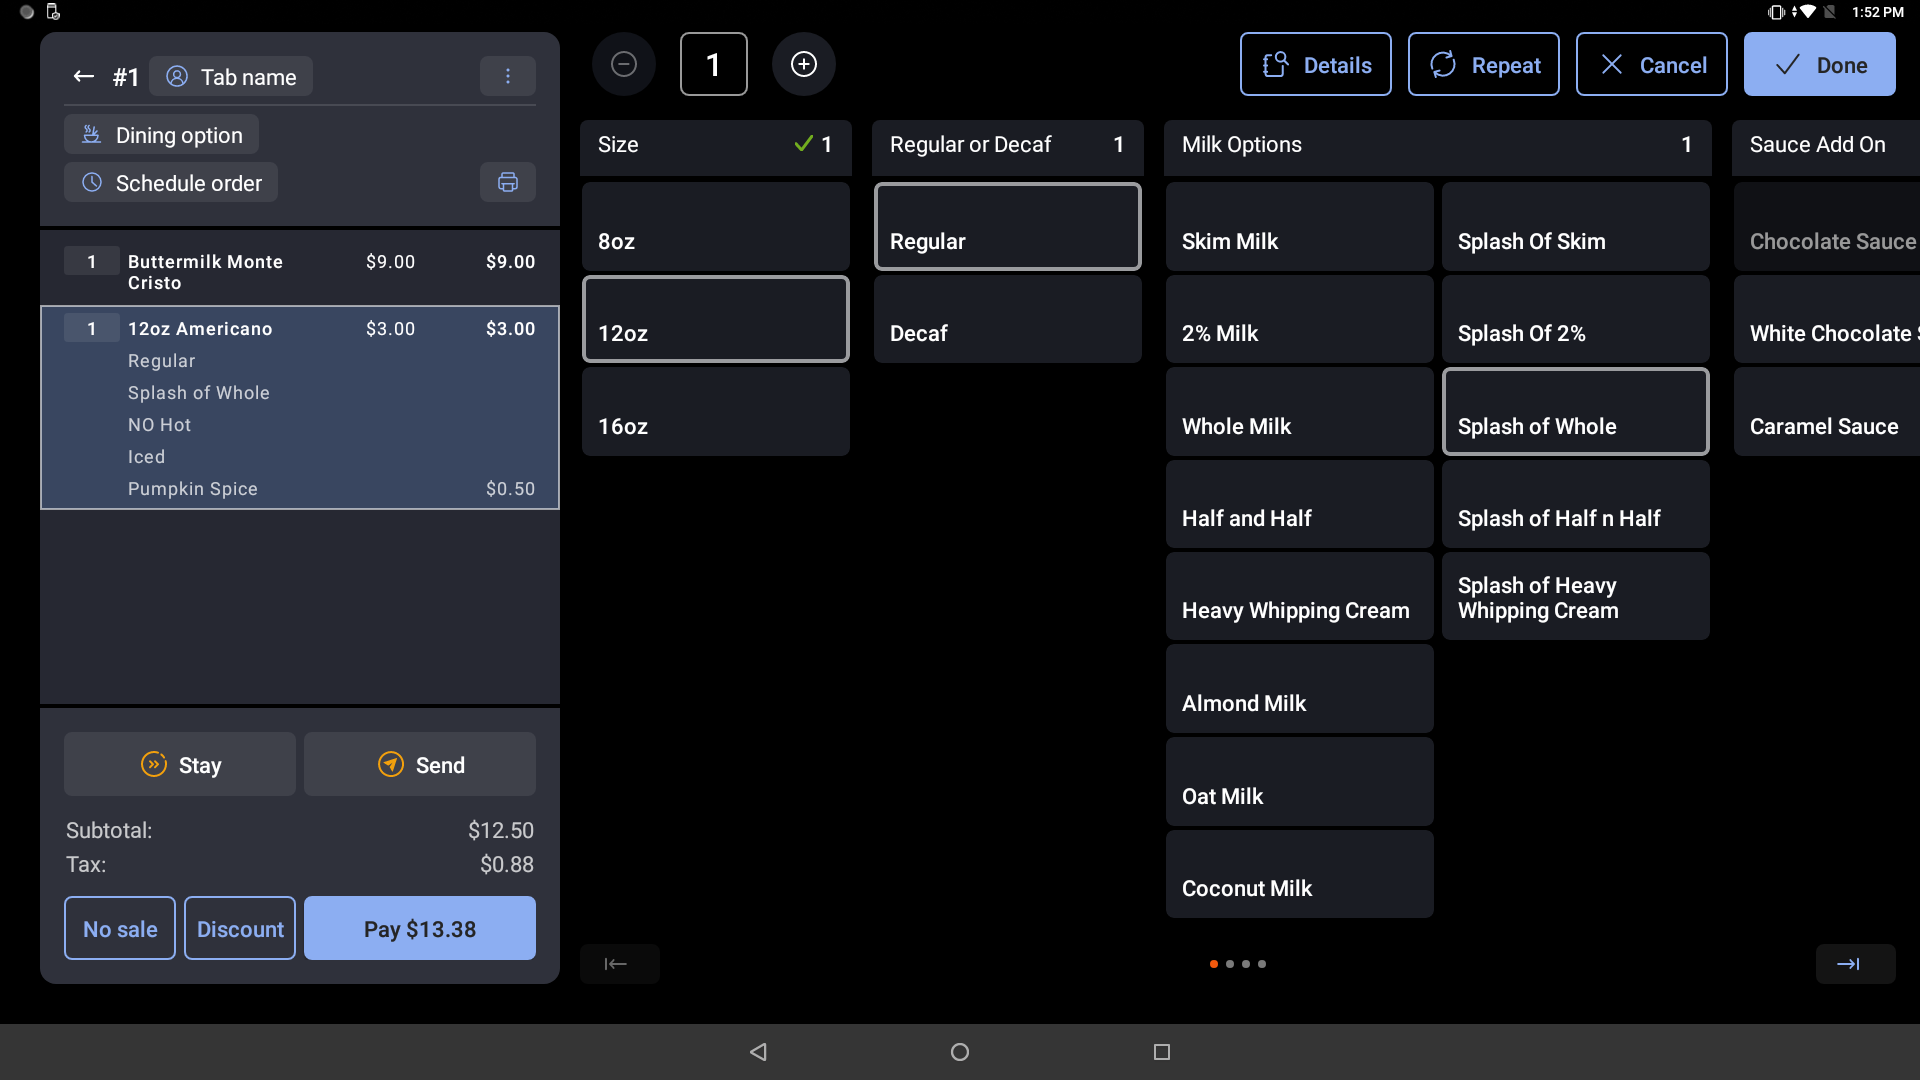
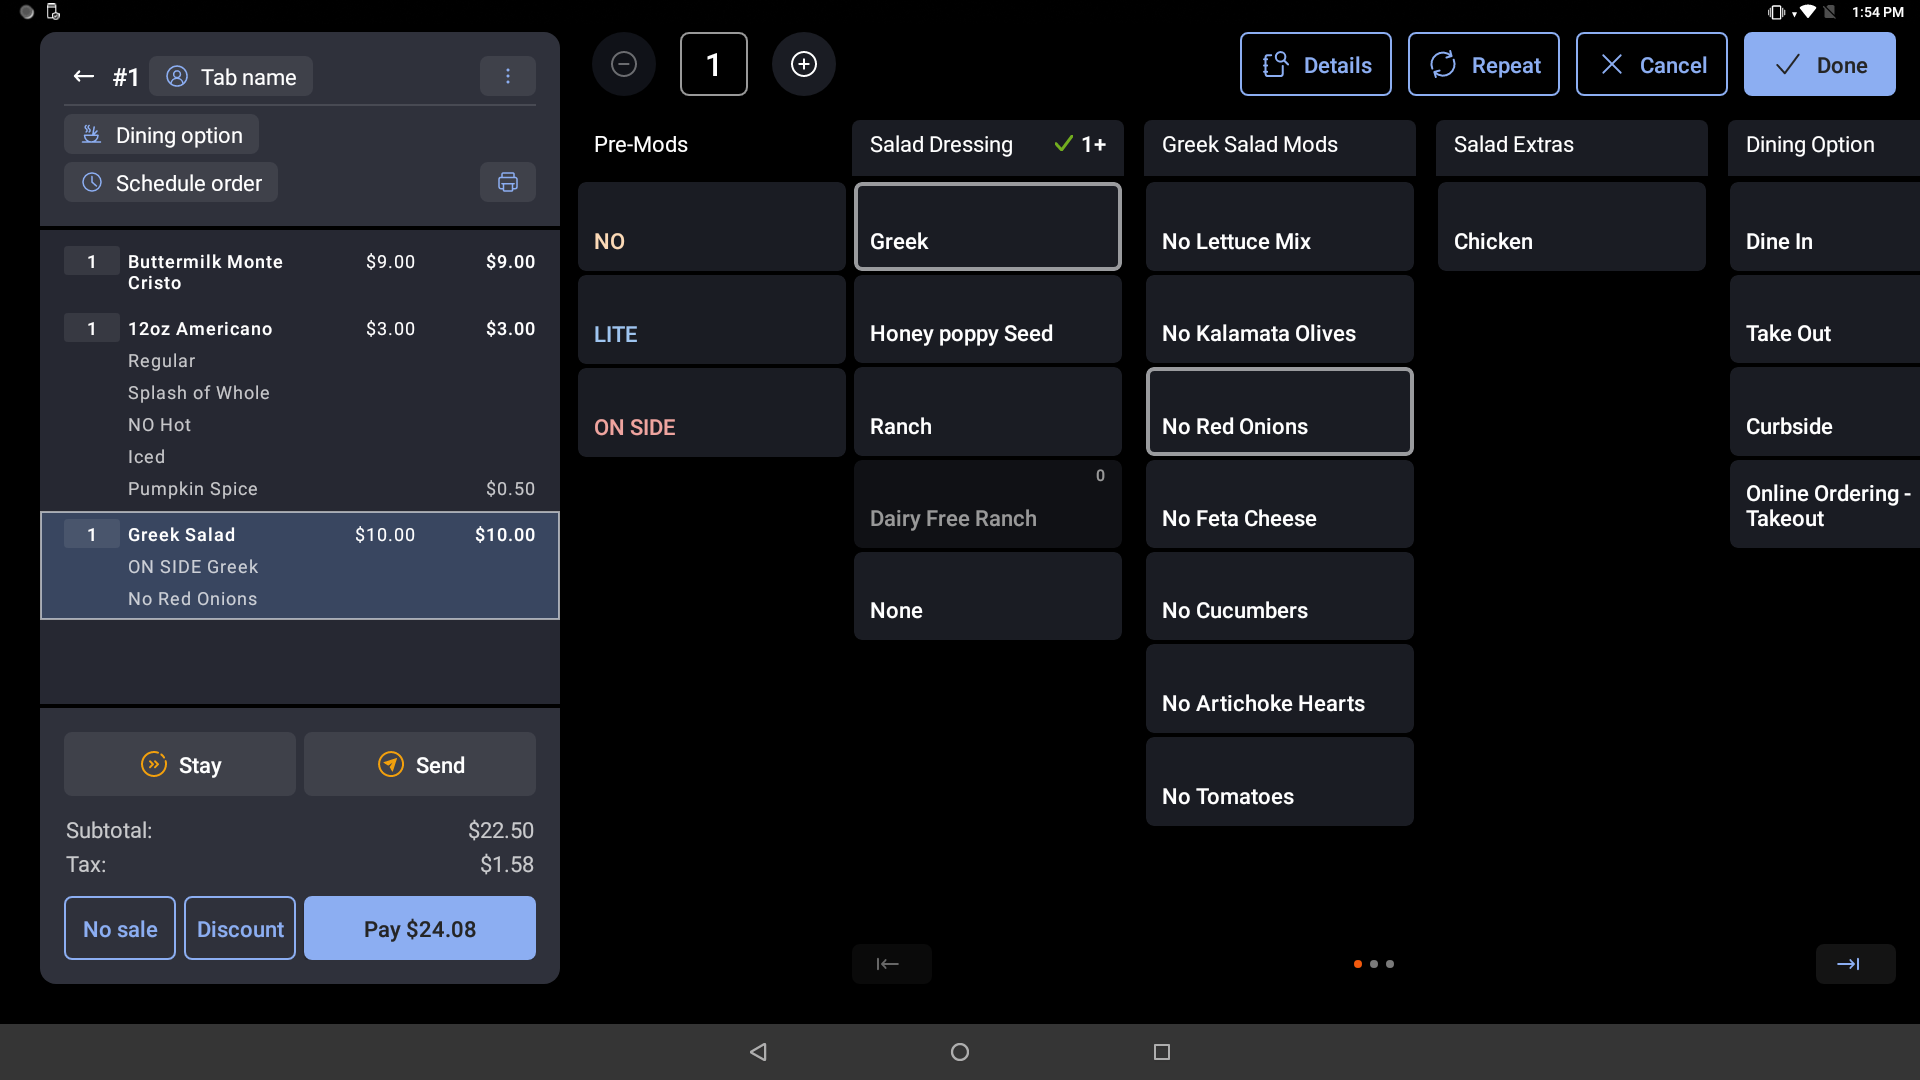
Once the server/barista has taken all the customer's special requests for the coffee order, the screen will look something like the example below once complete:
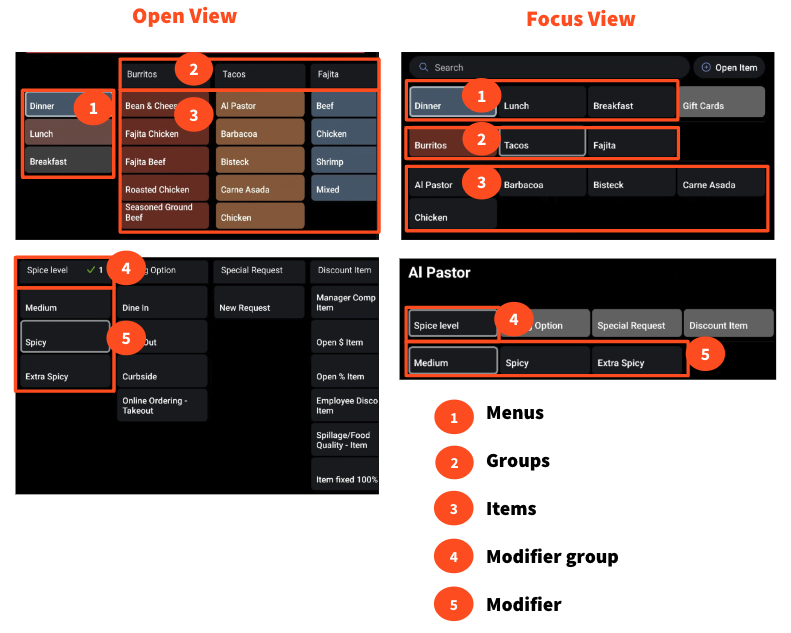
Open View vs. Focus View
Curious to know how open view differs from the classic focus view? Check out this comparison:
Input Modifiers in Open View
A new feature of open view is modifier rules and the way they are presented on your POS.
If a modifier has a requirement that is unfulfilled, there will be a red X and a red underline on that modifier group’s header. Once the requirement is fulfilled, the red X will change to a green check mark and the red underline will disappear. Here are some customizable modifier rules:
A red X with an underline means the item has a required modifier from that group and the number indicates the exact number of modifiers that must be chosen to satisfy the requirement.
In the example below, it is required to make a selection from Bread, and only 1 selection can be made. Red means nothing has been selected yet, and green means the option has been fulfilled.

A red X with an underline means the item has a required modifier from that group and the number range indicates that a number of modifiers within that range must be chosen to satisfy the requirement.
In the example below, at least 1 modifier from Extras must be chosen and no more than 3 modifiers can be chosen from Extras.

A red X with an underline means the item has a required modifier from that group, the number indicates the minimum number of modifiers that must be chosen to satisfy the requirement, and the plus sign indicates that there is no upper limit to the number of modifiers that can be chosen.
In the example below, at least 1 modifier from Veggies must be chosen but there is no limit on the number of modifiers in the Veggies group that can be selected.

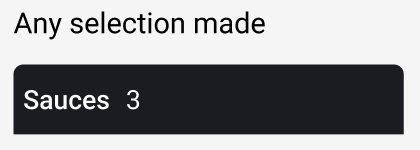
A number with no X or red underline indicates that modifiers in this group are optional. The number indicates the upper limit of modifiers that can be chosen.
In the example below, up to 3 modifiers from Sauces can be chosen but it is not required to make a selection from Sauces.
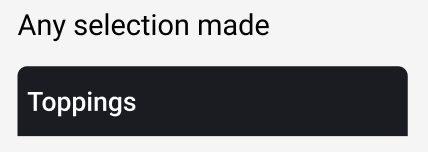
No red X or red underline or number indicates that modifiers in this group are optional and there is no limit on how many can be selected.
In the example below, any number of modifiers from the Toppings group can be selected and it is not required to make a selection from Toppings.
You can also configure pre-modifiers in open view on the POS to give your kitchen more guidance or text before or after a modifier. In the example below, the pre-configured pre-modifiers are for salad dressing and the options are No, LITE, and ON SIDE.
Note: The pre-modifiers column is a stagnant column, so even as you scroll to the right, that column will stay on the screen.
Optional Settings for Open View
Adjust Buttons in Open View
Menu button sizes can be adjusted by changing the default number of rows and columns in the device settings. Note: The default setting is eight rows and five columns.
To adjust menu button sizes:
- Navigate to the main menu on the POS.
- Under Setup, navigate to Device Setup.
- Select Menu Grid Dimensions.
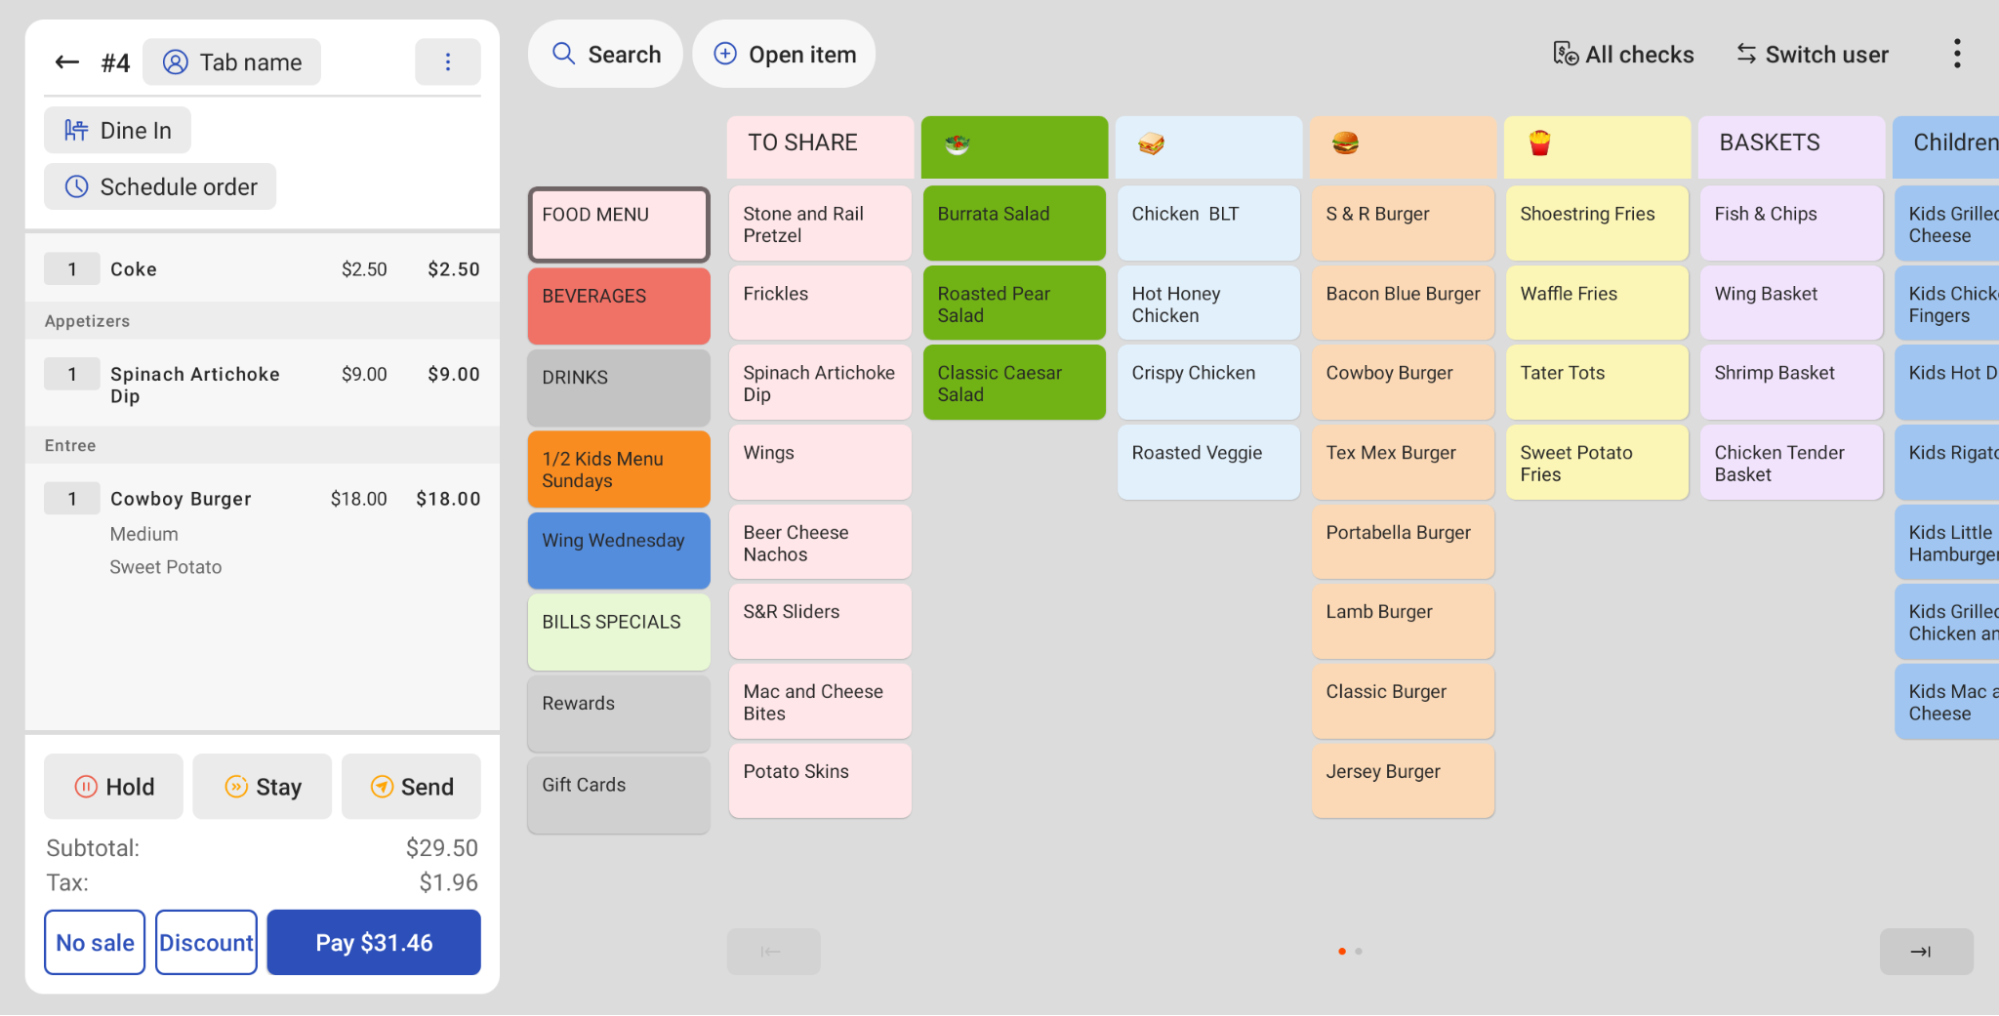
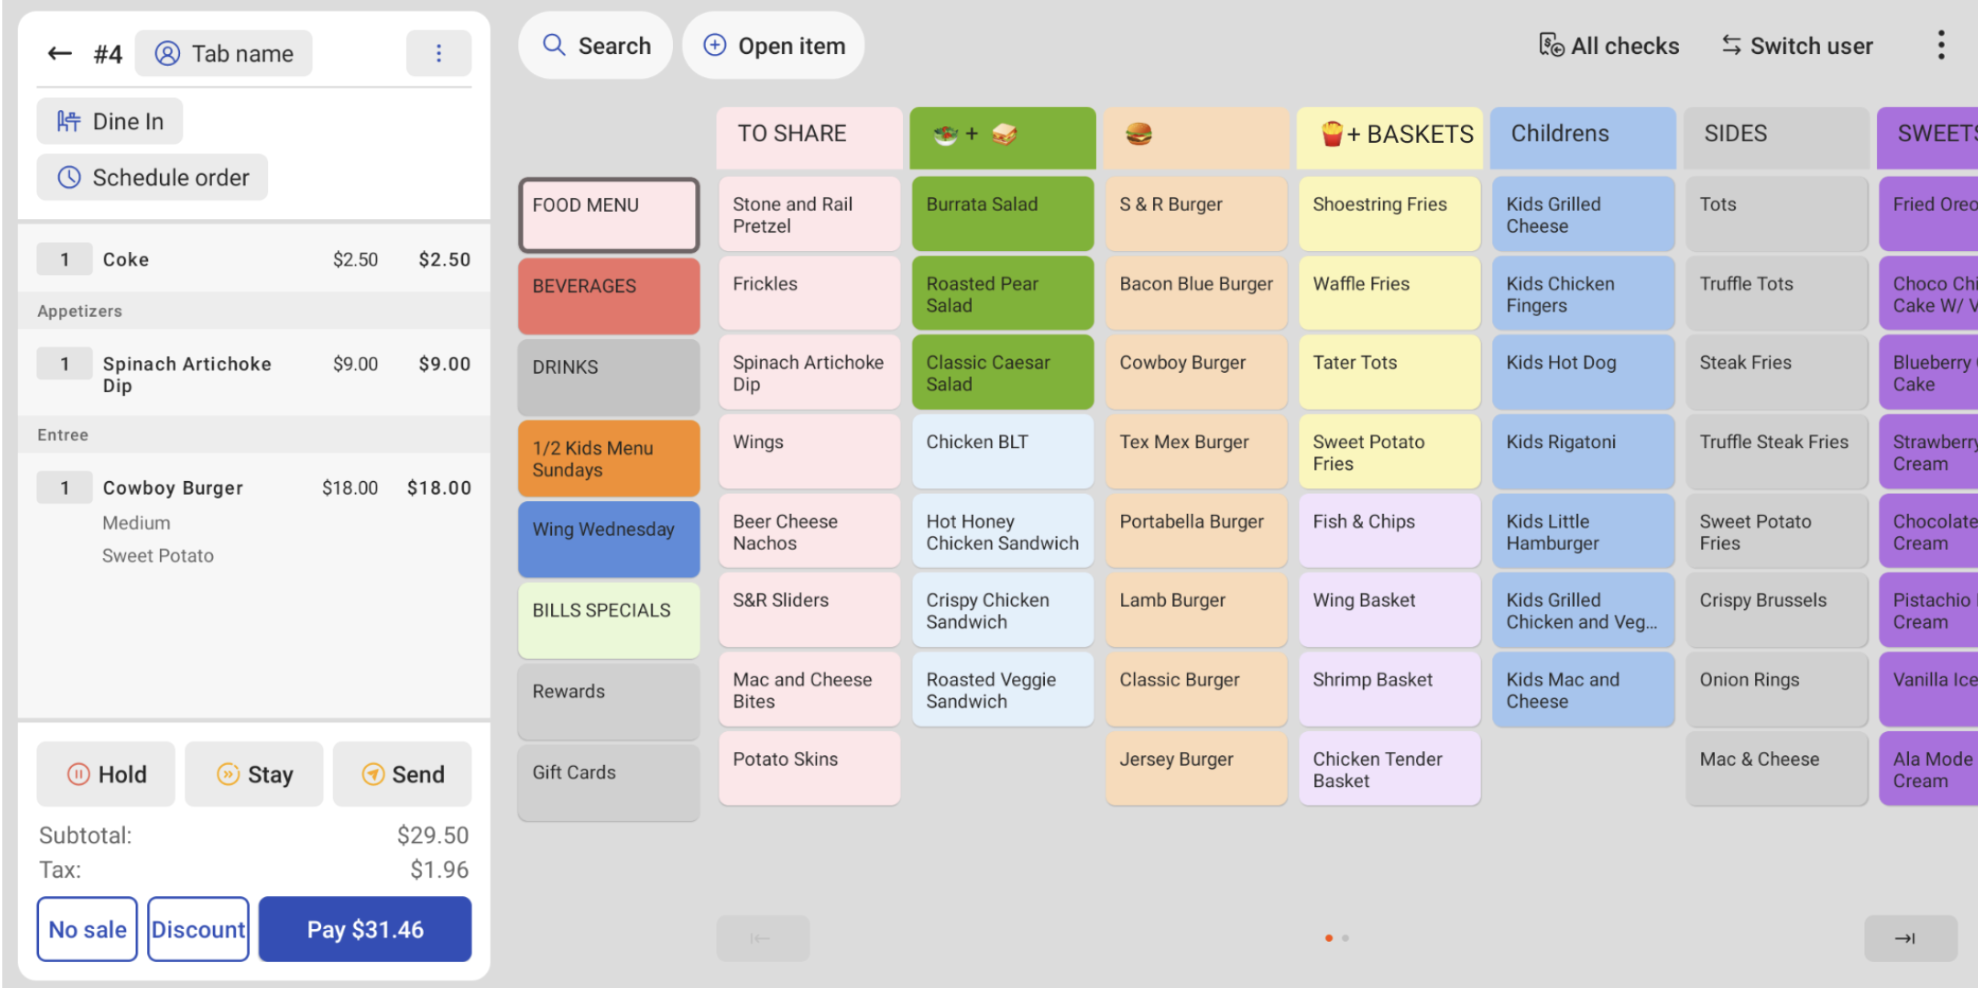
- Input the desired number of columns and rows (ex: 7 columns and 7 rows). More columns and rows mean smaller buttons on your POS, as shown in the example below.
Adjust Button Colors for Open View
Each menu subgroup and modifier group will now have a color assigned by default on your POS. The default colors can be overridden in Toast Web if you'd like.
To override the default menu colors in Toast Web:
- Navigate to Menus > Menu management > Menu manager.
- Use the arrow icons to open your menus and select the name of your desired menu group.
- Locate the Button color setting and select the eyedropper icon to select the desired color.
- Save and publish your changes.
Note: To override modifier colors, you'll need to open up the corresponding modifier group. Select the pencil icon next to any individual modifier and you'll see the same Button color setting.
In open view, when you set the button color for a menu subgroup or menu modifier group button, the button color will be assigned to all the menu items in that group. This can also be overridden in Toast Web by assigning a new color to a menu item or modifier buttons.
Open View Best Practices
In addition to following standard menu organization recommendations, we recommend the following tips and best practices for our customers who plan to use open view:
- DO opt for more top-level menus and fewer subgroups to minimize horizontal scrolling. For instance, if a menu has more than ~100 items in it, some should be split out into different top-level menus.
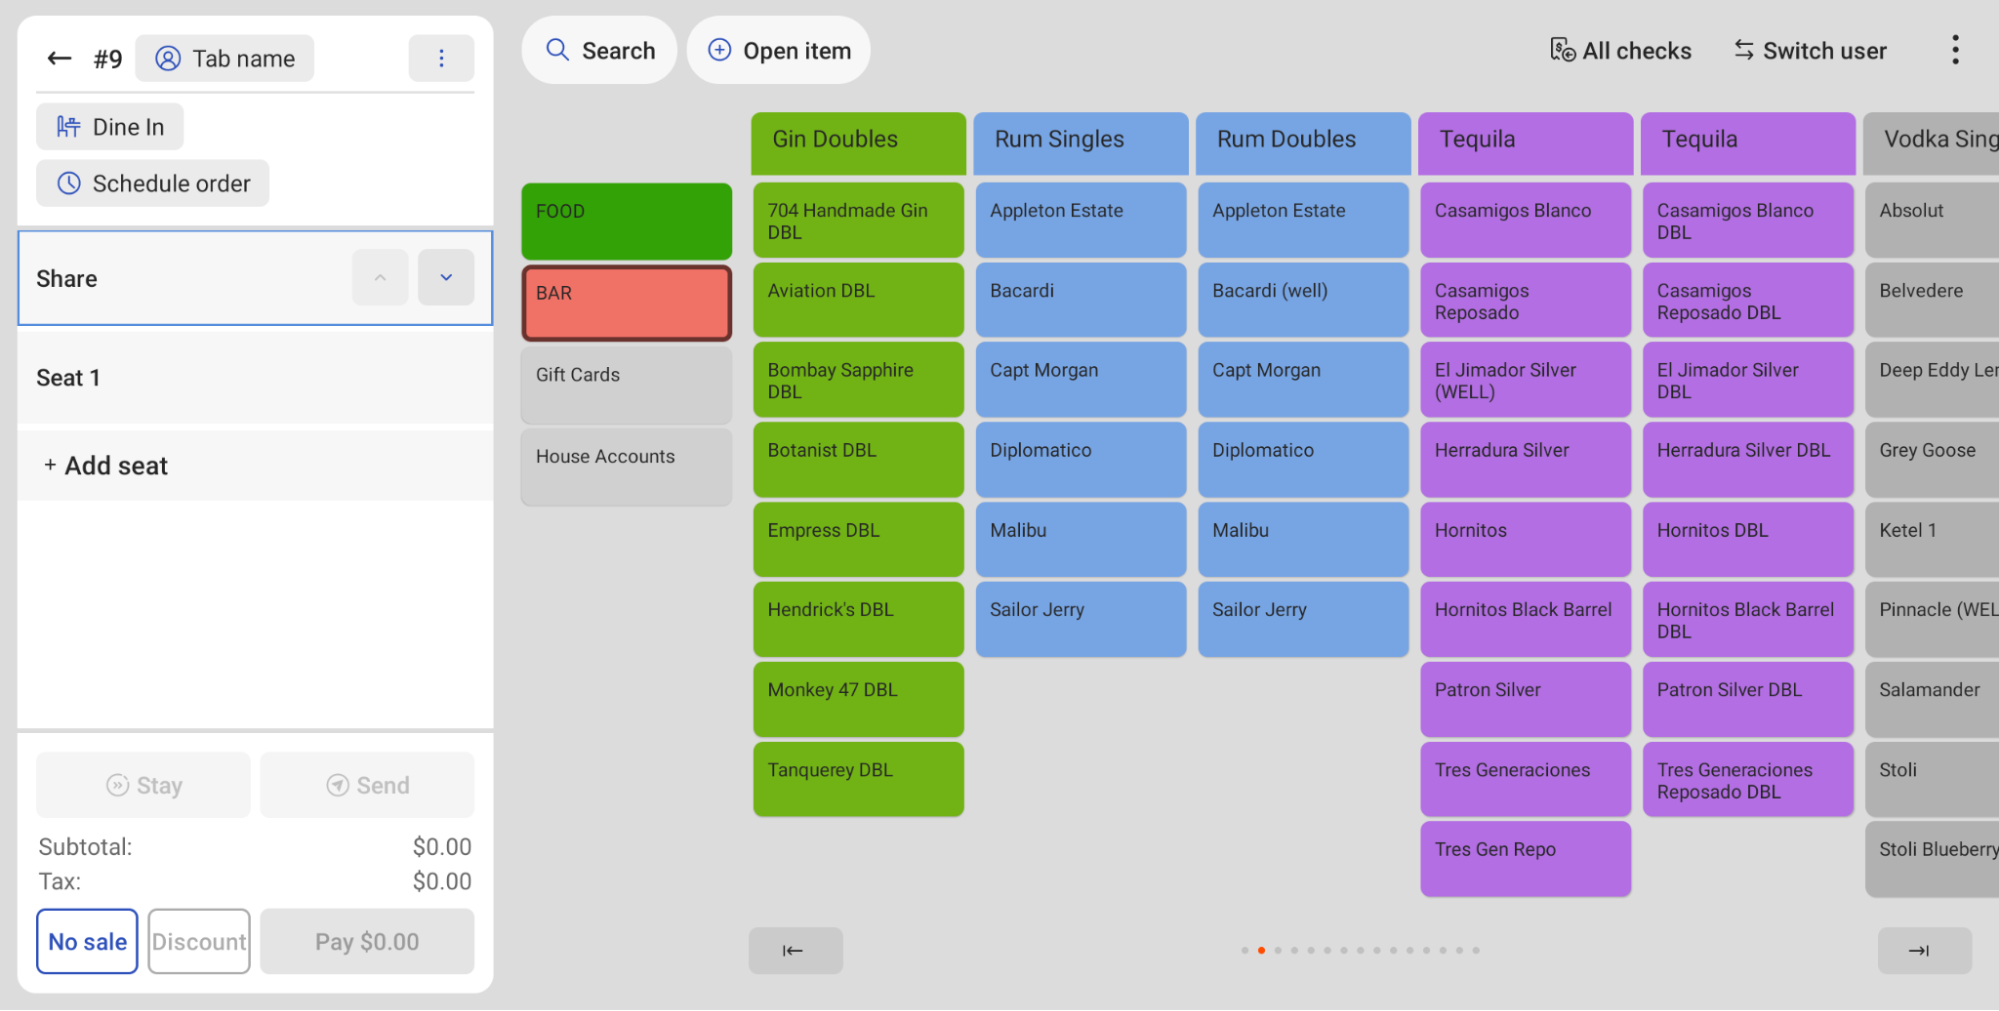
Before: Menu subgroups can be super difficult to navigate, having to scroll through multiple pages of alcohol lists to get to the desired menu item.
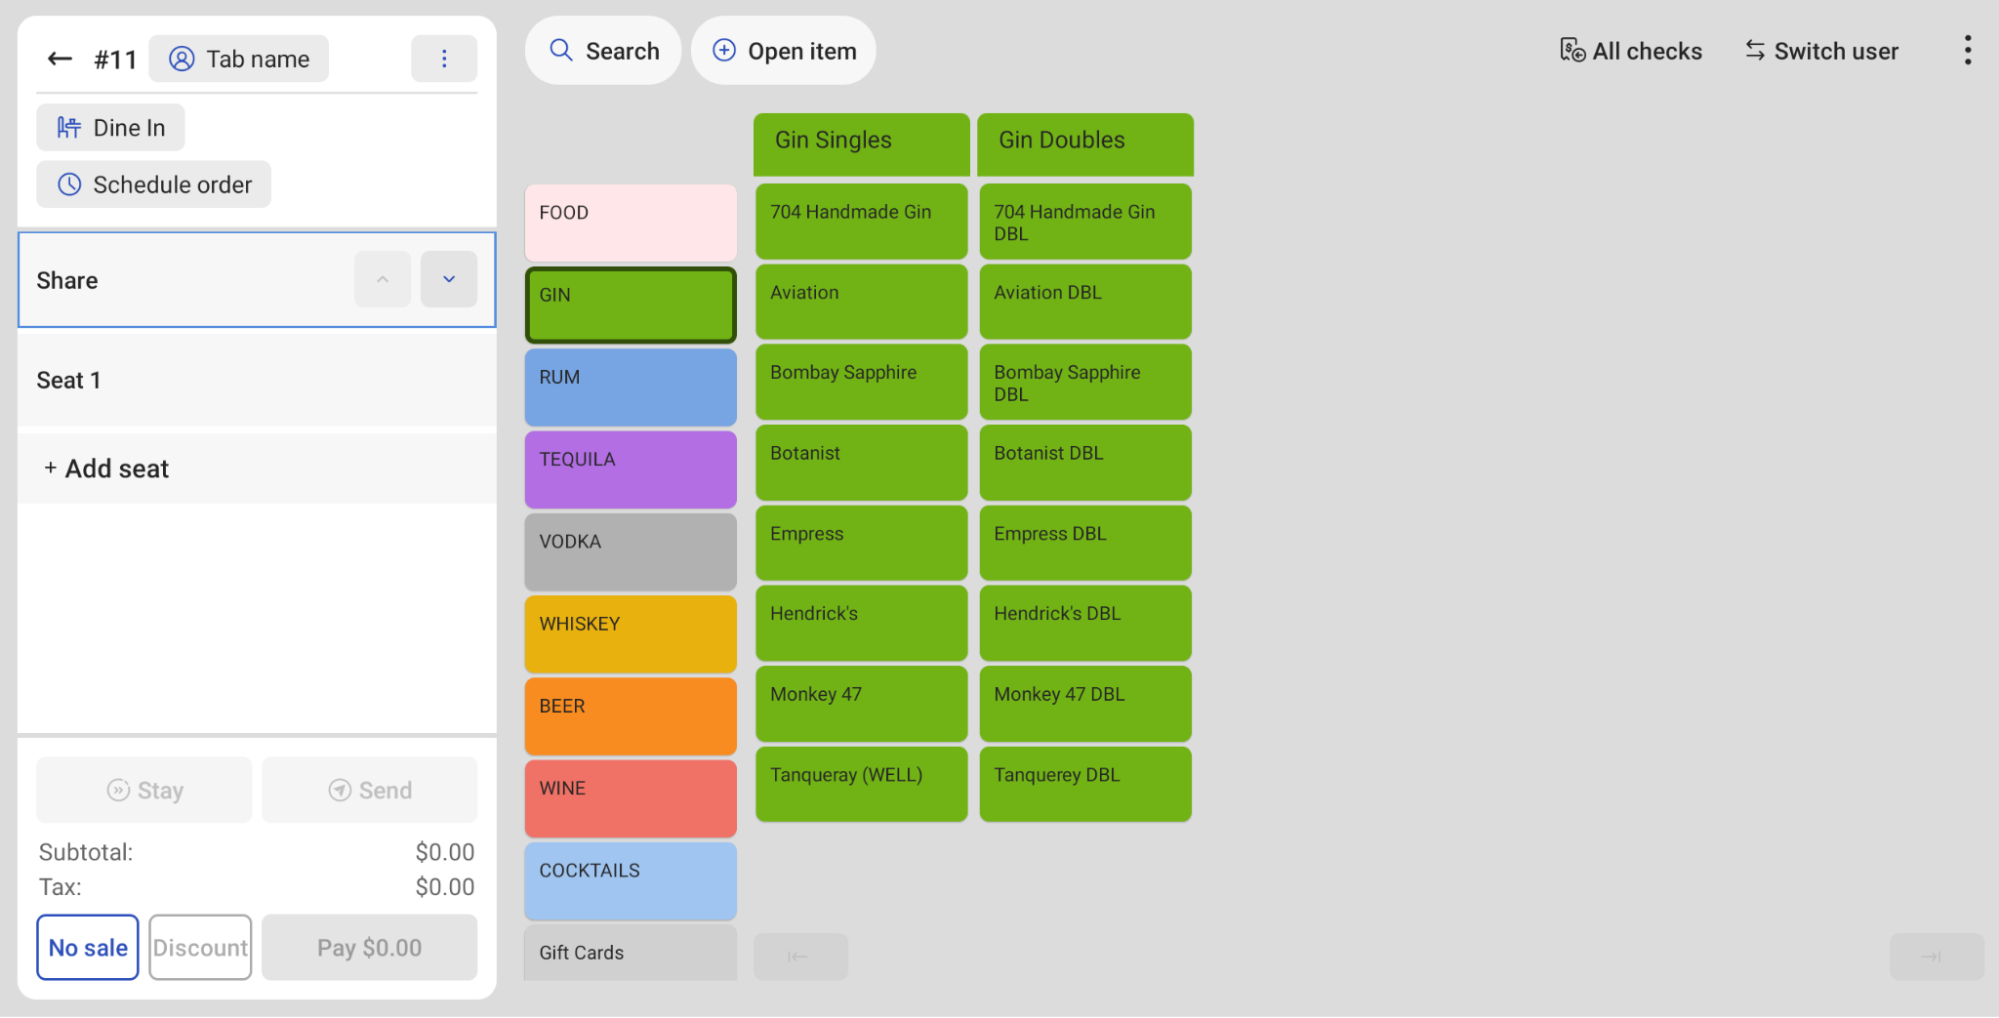
After: Having menu subgroups listed as menu items makes it easier to navigate between alcohol types as opposed to scrolling through a single large menu group.
- DO condense modifier and menu groups to minimize horizontal scrolling. If modifier groups have fewer than ~8 modifiers in them, consider consolidating that group with another.
Before:
After: Having menu subgroups listed as menu items makes it easier to navigate between alcohol types as opposed to scrolling through a single large menu group.
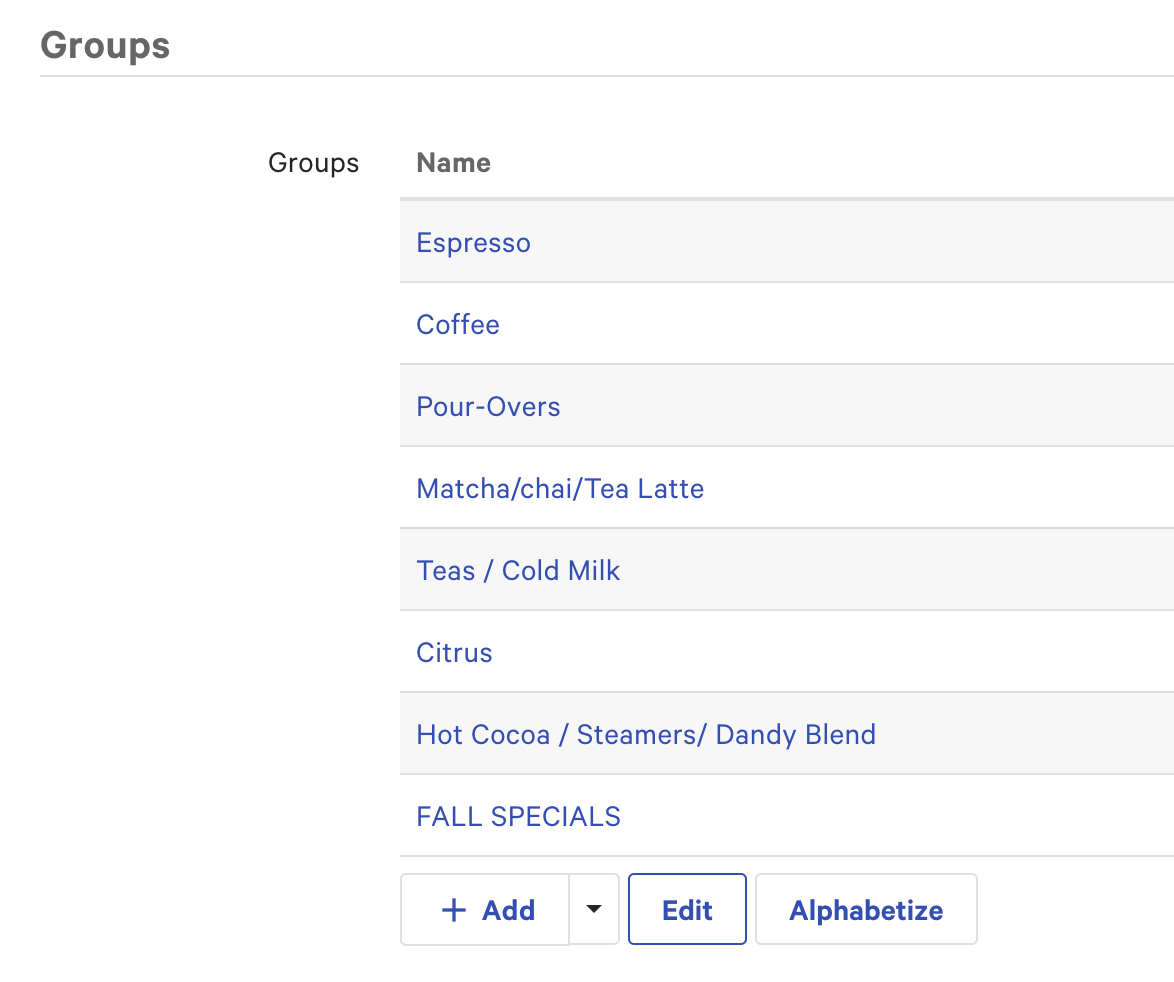
- DO rearrange the order of menus, menu items, modifier groups, and modifiers so that the most commonly ordered items and modifiers are at the top of the list in Toast Web.
Before: New and commonly ordered Fall Specials are at the bottom of the group list, meaning they will be on the last page in open view.
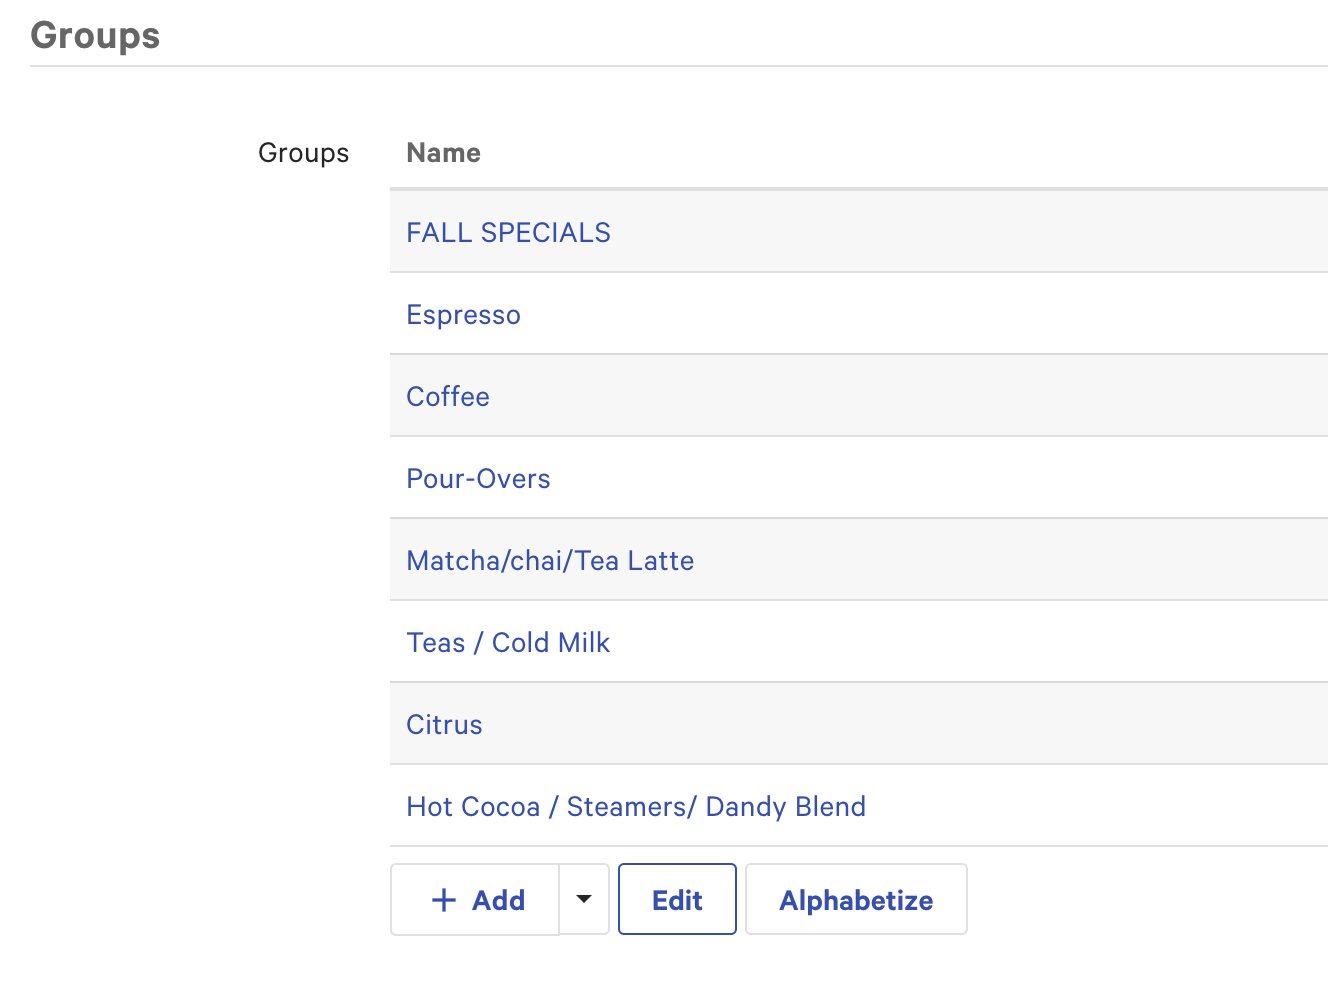
After: New and commonly ordered Fall Specials are the first menu group on the list, meaning they will be easy to access on the first page of the open view menu!
-
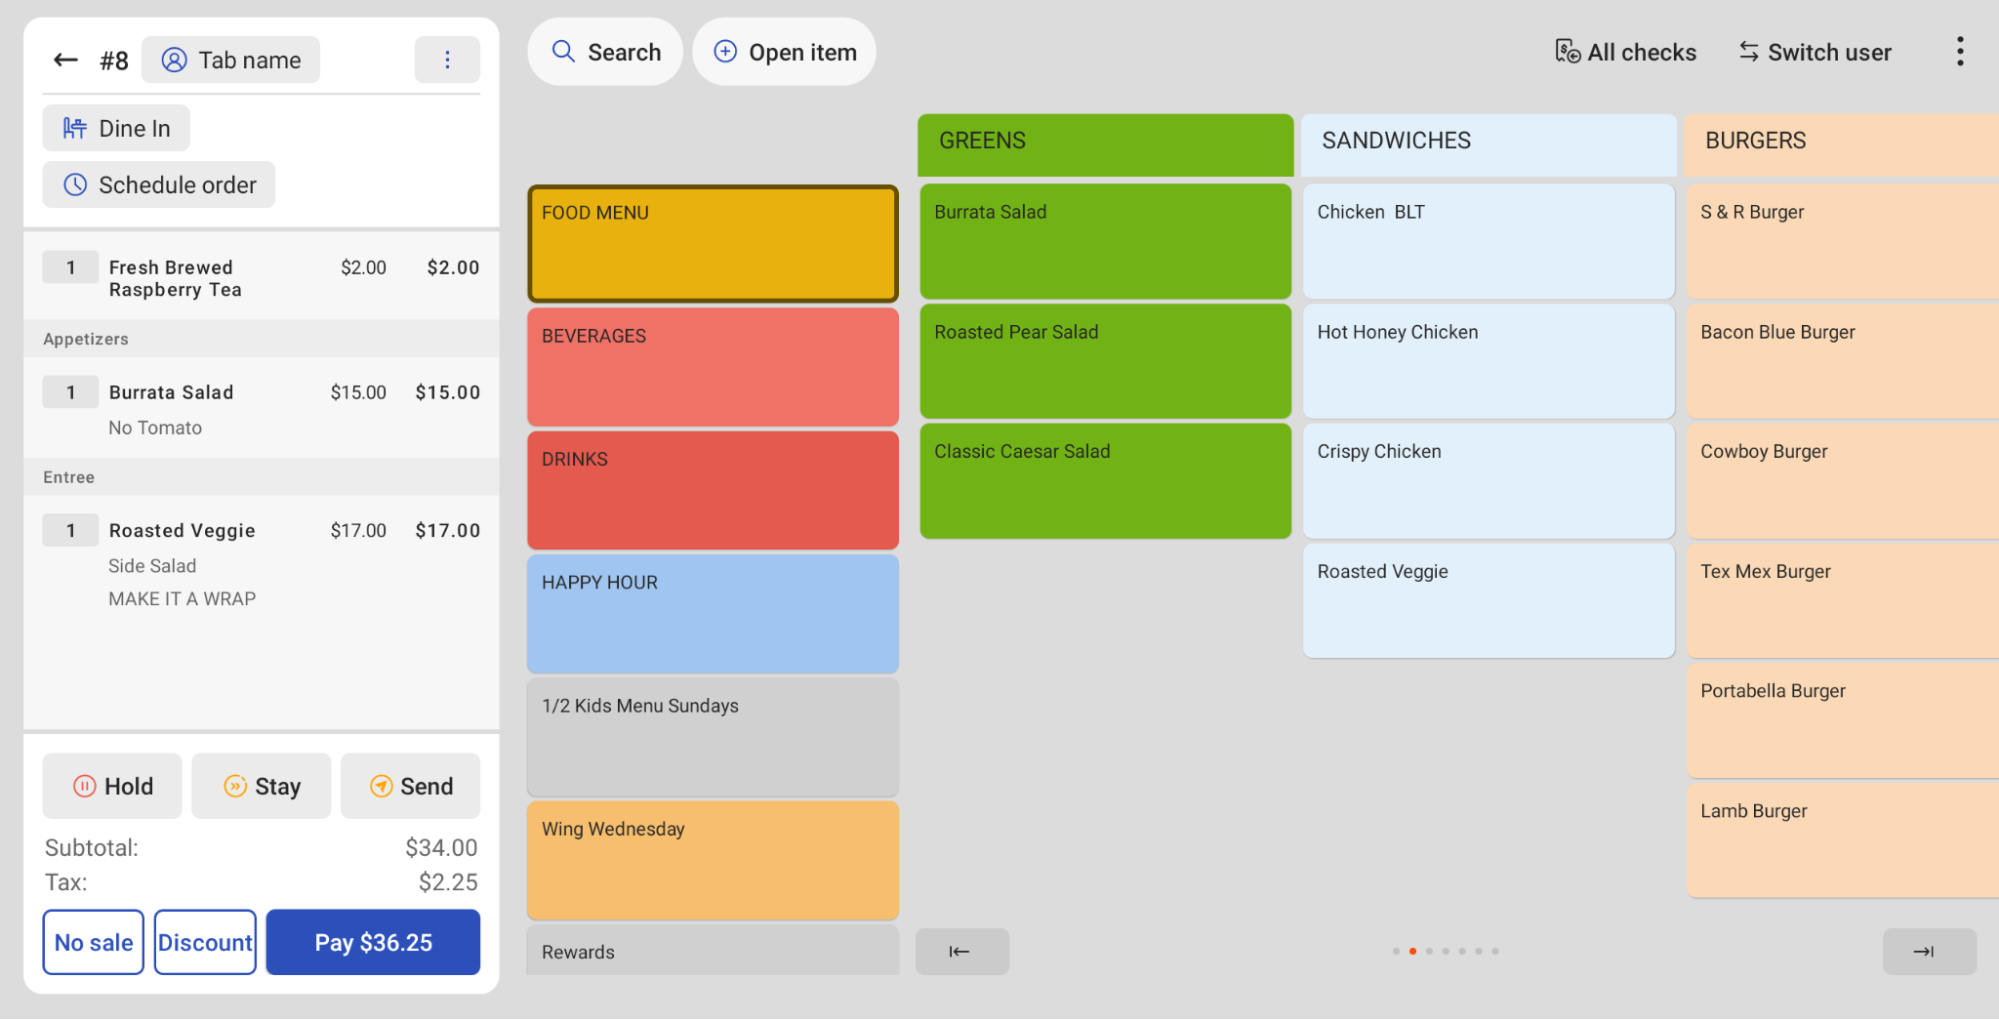
DO increase the number of columns and rows on the screen via the device display settings to show more menu items at once.
Before:
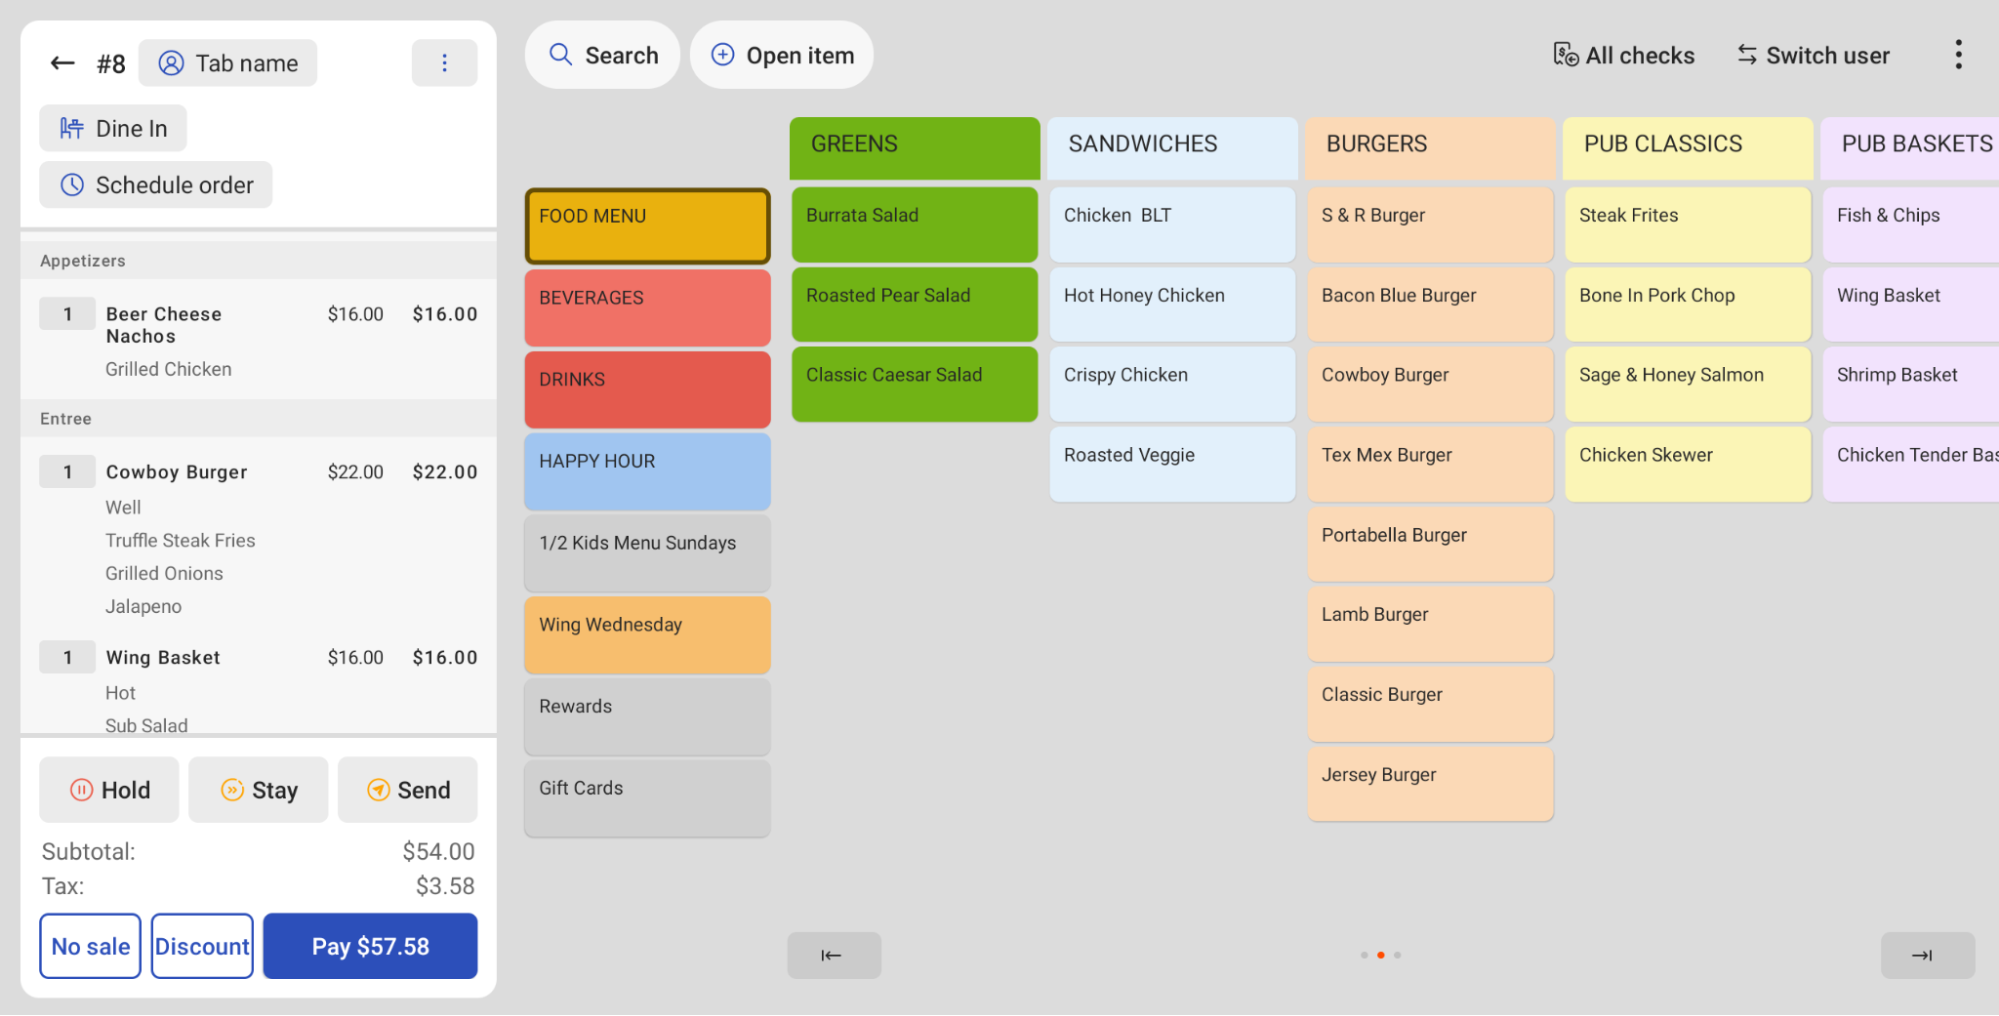
After:
Back to top
Additional Resources
- New POS: Manage Orders
- Create and Manage Menus, Menu Groups, and Subgroups
- Toast Classroom: Menu Basics On-Demand Training
- Toast Classroom: Menu Basics LIVE Training Registration