Manage Orders With Toast POS
Last updated: Jun 16, 2026, 4:19 PM
In this article, learn how to navigate order screens on your POS experience to help you and your staff efficiently create, send, and manage orders.
Learn how to navigate the order screens on your Toast POS so you and your staff can create, send, and manage orders efficiently. This article covers the main order screen, the Quick Order and Table Order screens, the Toast Go® handheld, and the order-management features available from each screen.
- Set up your POS experience
- Order screen overview
- Quick Order screen
- Table Order screen
- Toast Go® 2 order screen
- Send, Stay, and Hold buttons
- If the Send or Hold buttons are missing
- Server item firing
- Required coursing
- Order by Seat
- Open View ordering
- Quick Edit mode
- Overflow menu actions
- Related articles
Set Up Your POS Experience
Before you manage orders, configure how your POS looks and behaves. To learn how to set up your restaurant's POS experience, see Customize Your POS Experience.
Order Screen Overview
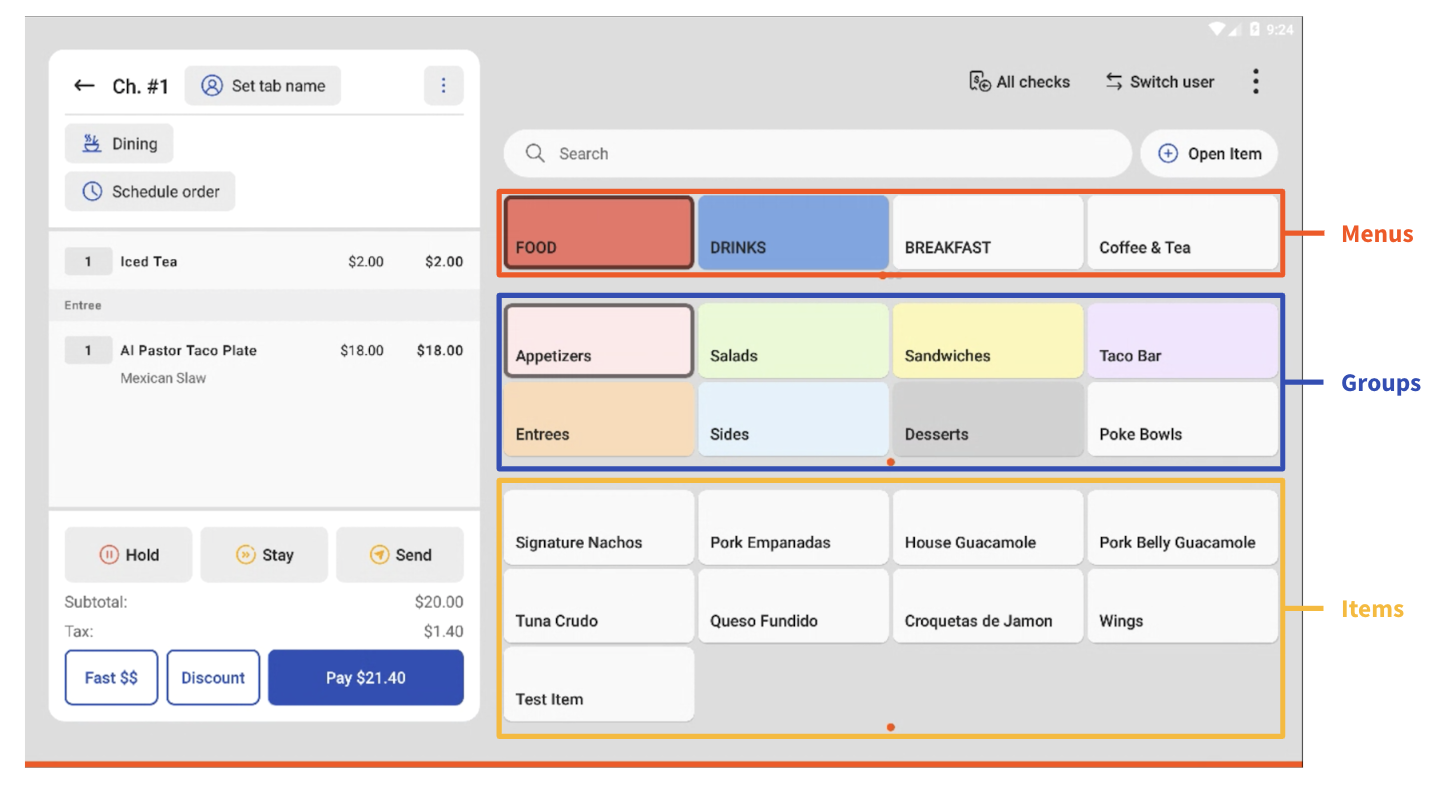
Your items are grouped by menus, groups, and items on the main ordering screen. Select a menu to see the groups within that menu, then select a group to see its items. For example, items like Signature Nachos and Wings appear under the Appetizers group within the Food menu.
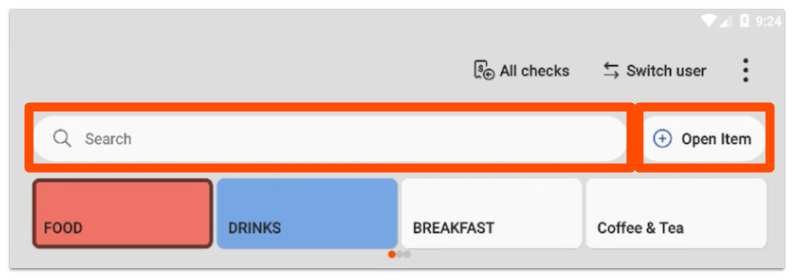
A search bar above your menu items lets you search for any menu item. The Open Item button sits next to the search bar on the main menu.
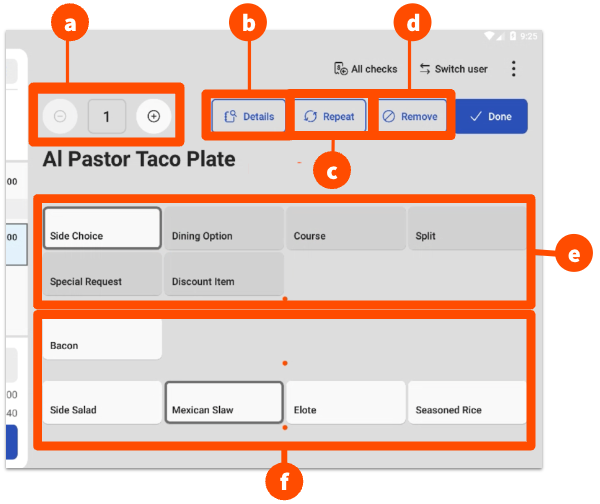
When you select an item on the check, you can change the quantity, view the item description and image, repeat the item, delete the item from the check, or change item-level options such as dining option, course, split, special request, or discount. Modifiers, such as sides, appear at the bottom of the screen and may be required before the item can be sent.
Check Details
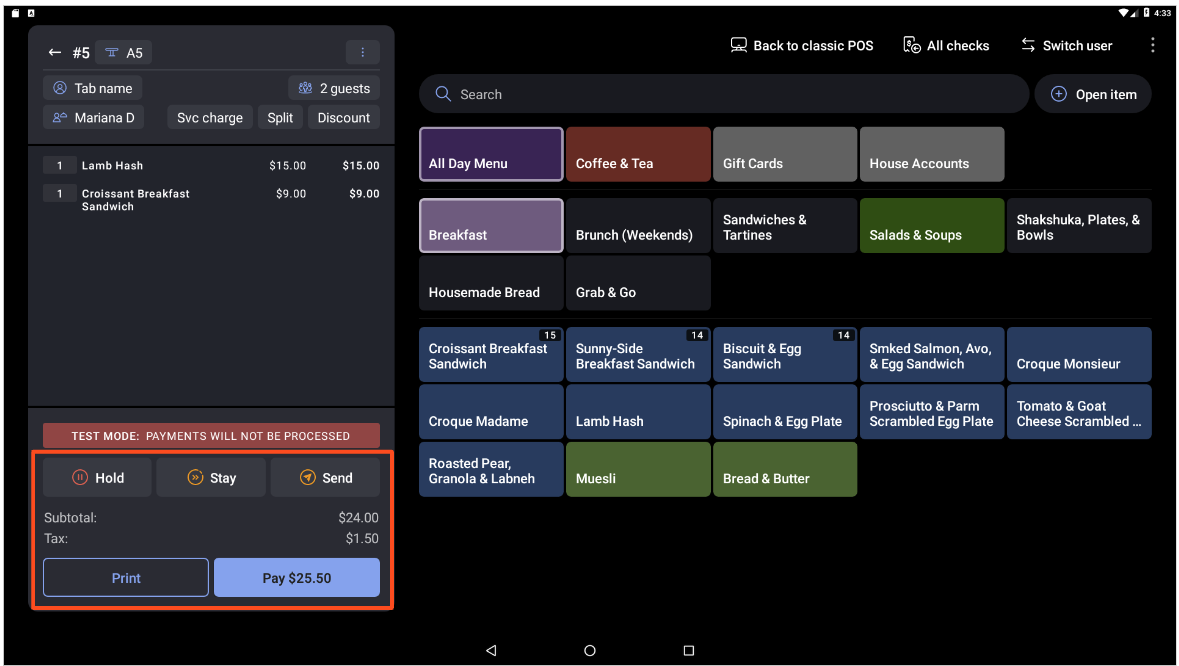
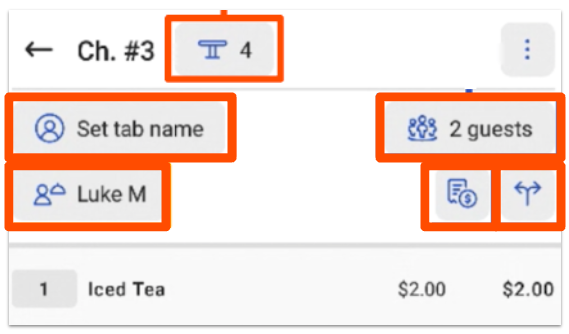
The check details on the left side of the screen show key menu actions while in Quick Order mode. Starting from the top left and moving counter-clockwise, these include the table number, tab name, server assignment, service charge, split, discount, and guest count. A Print button appears in the bottom-left corner of the check details when a printer is connected.
Note: On Toast Go® handhelds, the Service Charge, Split, and Discount buttons live in the overflow menu rather than the check details, which gives you more space to view orders on the smaller screen.
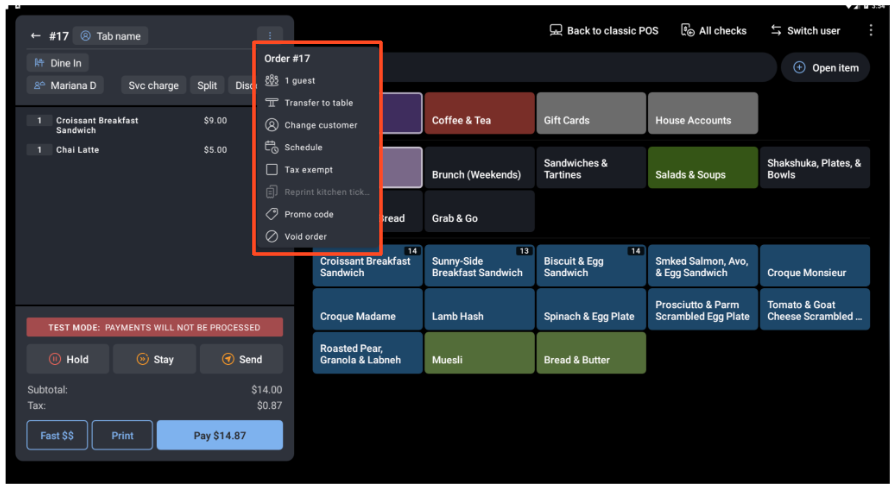
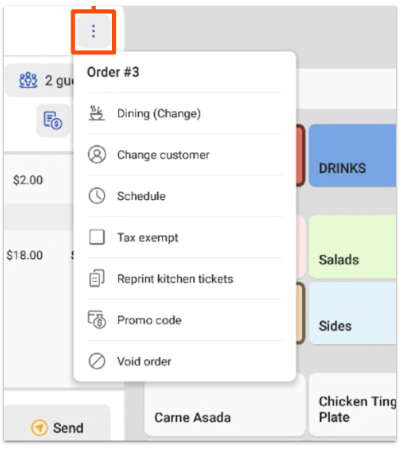
Check Overflow Menu
The check overflow menu holds less commonly used actions that are still relevant to server activity. Open it by selecting the vertical dots in the upper-right corner of the check details. The check overflow menu is different from the main menu overflow menu in the upper-right corner of the POS screen.
Below the Check
At the bottom of the check, you'll find the options to send items to the kitchen: Hold, Stay, and Send. These options appear only if they are enabled in Toast Web. Below them, the Print button appears when a printer is connected, alongside the Pay button. To learn more about taking payment, see Manage Payments With Toast POS.
Quick Order Screen
Quick Order screens work best for quick-service or fast-casual restaurants. Access the Quick Order screen by navigating from the main menu to Quick Order mode. Quick Order screens are available in dark and light modes, depending on your restaurant's preference and the specific terminal.
The Quick Order screen has a few key features:
- The check details on the left side of the screen show the most relevant actions. For a breakdown, see the Check Details section above.
- The Open Item button sits on the menu side of the screen, next to the search bar, for easier access.
- Less frequently used actions, including Split and Guest count, are placed in the check overflow menu within the check details (the three vertical dots in the top right of the check).
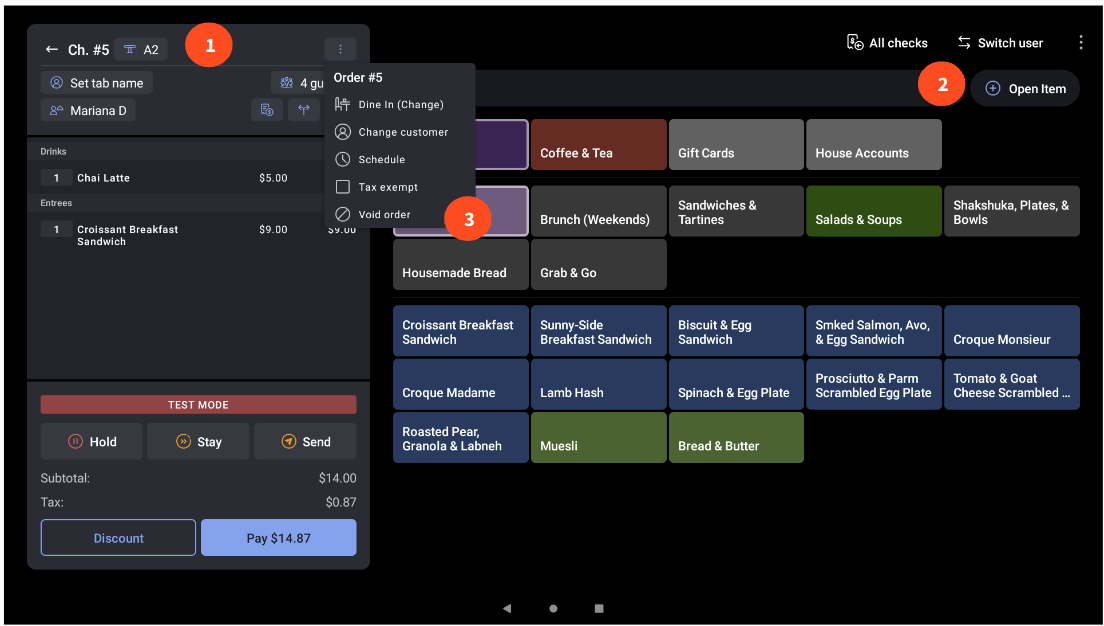
Table Order Screen
Table Order screens focus on table actions in Table Service mode for full-service restaurants. To learn how to manage tables, see Manage Tables With Toast POS.
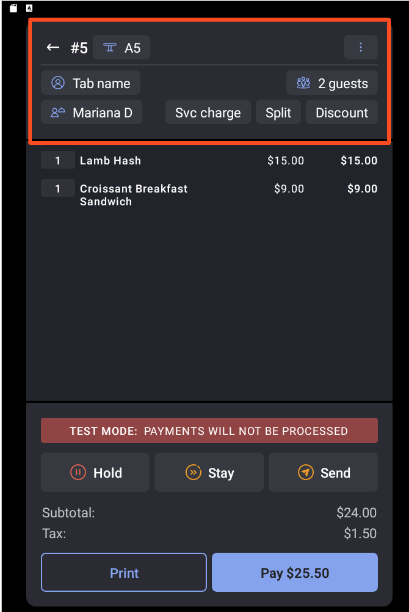
The Quick Order and Table Order screens differ mainly in the check details view. The Table Order screen offers more quick options at the top of the check, such as moving a check to another server and adding a service charge. The overflow menu in the check details of the Table Order screen also lets you change dining options and customers.
Check:
Overflow menu:
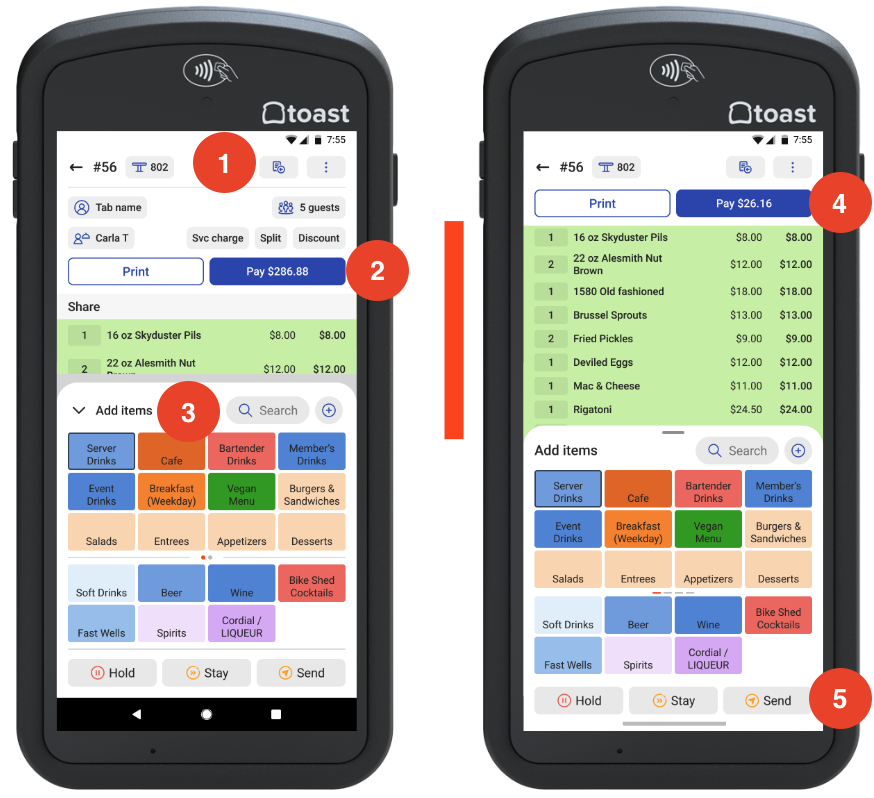
Toast Go® 2 Order Screen
On your Toast Go® handheld, the order screen shows menu items before any items are added to a check. As you build the check, the check details stack on top of the menu items.
Key features of the handheld order screen:
- An All Checks button in the action bar gives you easy access to all checks.
- The Print and Pay buttons are always in view.
- The Menu can be expanded or collapsed to add more items.
- The header automatically collapses when you add items to an order.
- The Hold, Stay, and Send buttons are locked at the bottom of the screen.
To edit an item on your Toast Go® handheld, select it from the order and make your changes, such as adding more items or sending an item you previously held. This applies to both Quick Order and Table Order screens.
Send, Stay, and Hold Buttons
The Hold, Stay, and Send buttons below the check control when items reach the kitchen:
- Send fires the highlighted items to the kitchen or bar for preparation. After the items are sent, the screen returns to the Table Service screen.
- Stay sends the highlighted items to the kitchen while keeping you on the order screen so you can add more items to the same check. If you select only some items and choose Stay, those items are sent and the remaining items are automatically held.
- Hold keeps items on the check without firing them to the kitchen. A held item will not fire until it is selected and sent.
For full details and an interactive practice exercise, see Use the Send, Stay and Hold Buttons on Your POS.
Note: The Send, Stay, and Hold buttons appear only after items are added to the check. An empty check has nothing to send, so the buttons will not display until at least one item is on the check.
If the Send or Hold Buttons Are Missing
If the Send, Stay, and Hold buttons do not appear on your order screen, check the following settings in Toast Web. After changing any setting, Save and publish your changes, then log out and back in to the POS and resync the device so the change takes effect.
The buttons are available in Table Service mode by default. To turn them on for Quick Order mode, in Toast Web navigate to Front of house > Order screen setup > UI options, scroll to Order Screen > Show Send/Hold/Stay Buttons (Quick Order only), and select the buttons you want to enable.
If the Send button is missing in any mode, check whether Send order after check is paid is turned on. In Toast Web, navigate to Front of house > Order screen setup > Send order after check is paid and toggle it off. When this setting is on, orders fire automatically after payment, and the Send and Hold buttons are removed from the order screen.
Note: The Send, Stay, and Hold buttons cannot be removed from Table Service mode at this time. They are on by default in Table Service and Delivery modes.
Server Item Firing
Server item firing gives servers full control over meal pacing on the POS. With it enabled, servers can individually hold and send items on a check, use the Hold button as a true hold so items do not fire until selected and sent, and add new items to the check and send them to the kitchen without sending held items. To learn more, see Use Server Item Firing at Your Restaurant.
Required Coursing
You can enable coursing to organize orders on the POS and help maintain kitchen operations. Once you enable courses in Toast Web, you can set them to Required, Optional, or Off for both Quick Order and Table Service modes. To learn more, see Manage Course Firing Options.
Order by Seat
Order by Seat is a workflow that lets servers enter orders separated by each guest's seat number when the feature is enabled. To learn more, see Use Order by Seat.
Open View Ordering
Open View is an ordering workflow on the POS that is ideal for small to medium-sized menus where speed and accuracy across many modifiers matter. It works well for quick-service, high-volume businesses like cafes, bars, breweries, and food trucks. To learn more, see Get Started with Open View.
Quick Edit Mode
Quick Edit mode lets you make fast menu changes directly from the POS, such as marking an item out of stock. To learn more, see Use Quick Edit Mode on the POS.
Overflow Menu Actions
The main menu overflow menu holds order and POS actions. Open it by selecting the overflow menu (three vertical dots) in the top-right corner of your screen. On Toast Go®, the overflow menu is consolidated to include actions related to your current screen along with some general POS settings.
The overflow menu can include the following actions:
- Switch user: Returns to the keypad so another user can log in.
- All checks: Returns to the Payment Terminal.
- Split: Splits the check.
- Discount: Applies a discount to an item or check.
- Guest count: Shows and changes the guest count on a check.
- Server: Shows and changes the server on the check.
- Transfer to table: Transfers a quick order check to a table order check.
- Change customer: Changes the customer name on the check.
- Service charge: Opens the list of service charges to add to the check.
- Tax exempt: Opens the tax exempt workflow for guests who do not pay tax on their check (a tax exemption number is required from the guest).
- Reprint kitchen tickets: Re-sends items to the kitchen for firing.
- Lookup check: Opens the check search workflow so you can find other checks. You must have permission to view other servers' checks.
- Void order: Voids the entire order, or select items to void off a check.
- Connect to PCI network: Confirms the device is on a PCI-compliant network.
- Go back to classic POS: Switches back to Legacy POS.
- Device status: Opens the Device Status page.
Related Articles
- Customize Your POS Experience
- Use the Send, Stay and Hold Buttons on Your POS
- Start and Send an Order on the POS
- Use Server Item Firing at Your Restaurant
- Manage Tables With Toast POS
- Manage Payments With Toast POS
- Toast POS: FAQ and Troubleshooting