Manage Tables With Toast POS
Last updated: Jun 16, 2026, 2:28 PM
Learn about the table management screens for your Toast POS which will help your staff efficiently manage your table layout and table service screens.
Learn how to use the Table Service screen, assign servers, move orders between tables, and manage table data on your Toast POS.
- Before You Begin
- Table Service Screen Overview
- Table Details Pane
- Pan and Zoom
- Table Data
- Check Details View
- Assign Servers to Tables
- Move Orders to Another Table
- Table Order Screen
- Frequently Asked Questions
- Before You Contact Customer Care
- Related Articles
Before You Begin
Applies to: Toast POS (terminal and Toast Go® handhelds)
Permissions needed:
- 1.1 Table Service Mode — required to access Table Service screens
- 1.16 Change Table — required to move orders to a different table or merge checks
- 1.17 Change Server — required to assign or change server assignments; employees with this permission can proceed without a manager passcode
- 1.8 View Other Employees' Orders — controls whether employees can see other servers' tables and checks (disable to restrict visibility to their own tables only)
What you'll accomplish: You will navigate the Table Service screen, view table data, assign servers to tables, and move orders between tables.
Table Service Screen Overview
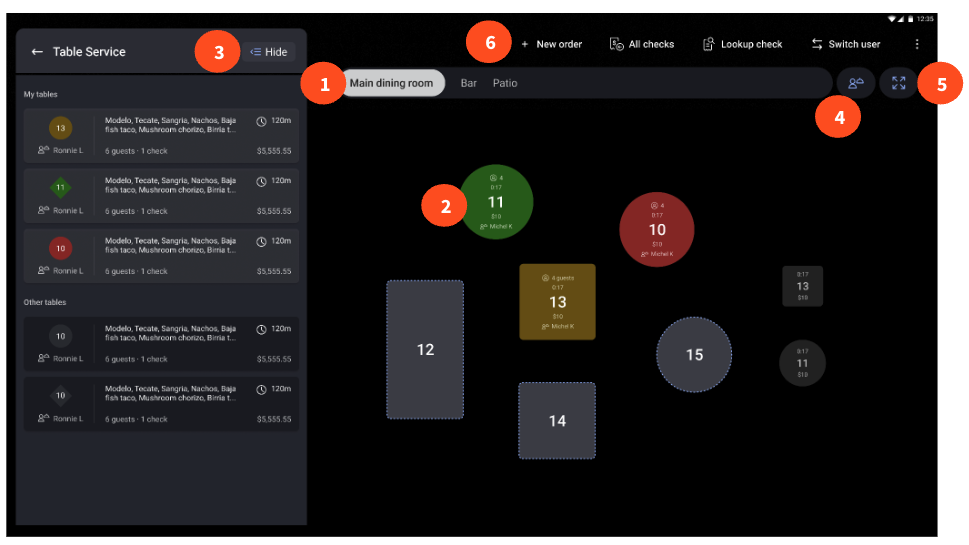
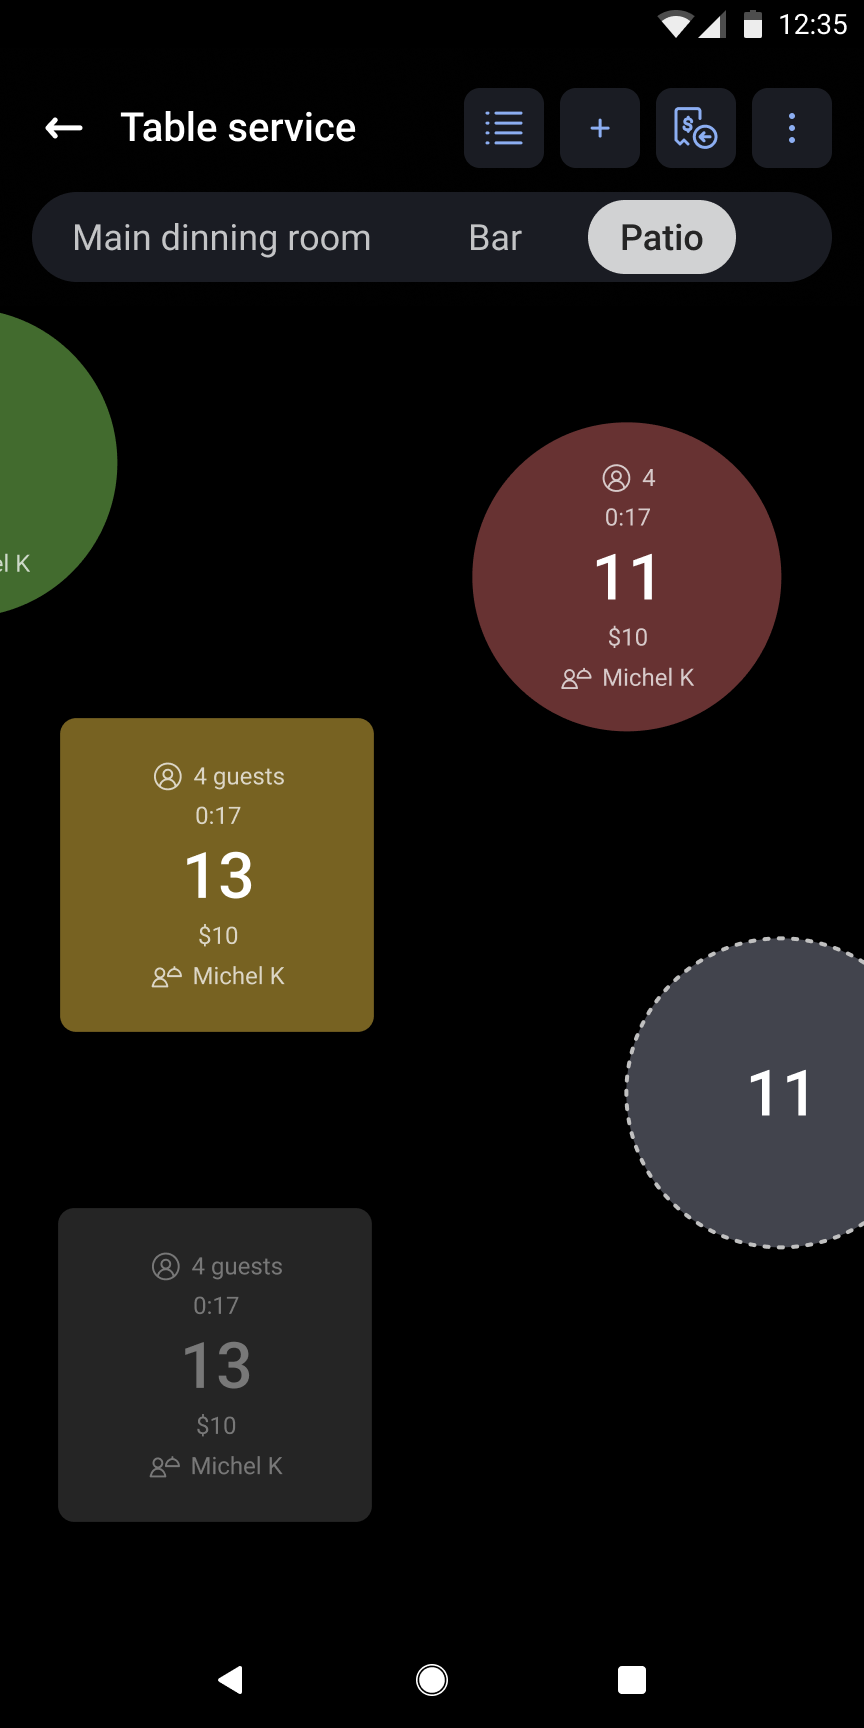
The Table Service screen is your main view for managing your dining room on the POS. Service areas appear in a navigation bar at the top of the screen for easy switching between areas. Each active table displays the following information at a glance:
- Guest count for the table
- Time since the check was opened (table timer)
- Total order spend across all checks on the table
- Server initials in a colored badge
Note: On smaller table tiles, you may need to zoom in to see all data. Use the Zoom button in the top-left corner or pinch the screen to adjust your view.
The action bar in the top-right corner of the screen includes four buttons:
- + New order — opens the Quick Order screen to create an order without a table (also called a tab)
- All checks — shows all open, paid, and closed checks
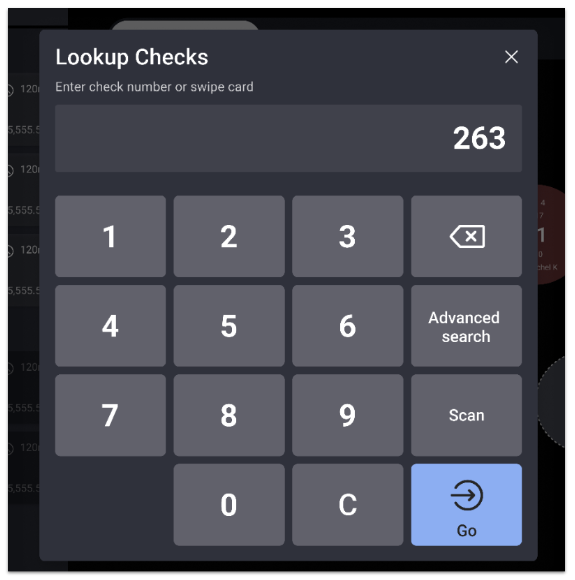
- Lookup — opens a screen where you can find a check by entering the check number or swiping a card
Note: On 10" Toast Flex terminals, the Lookup button is in the overflow menu.
- Switch user — returns you to the main login screen
To change your Table Service screen to dark or light mode, see Customize Your POS Experience.
Video: Navigate the POS experience on your Toast Go®.
Table Details Pane
Video: Table data, pan, and zoom functionality on the Table Service screen.
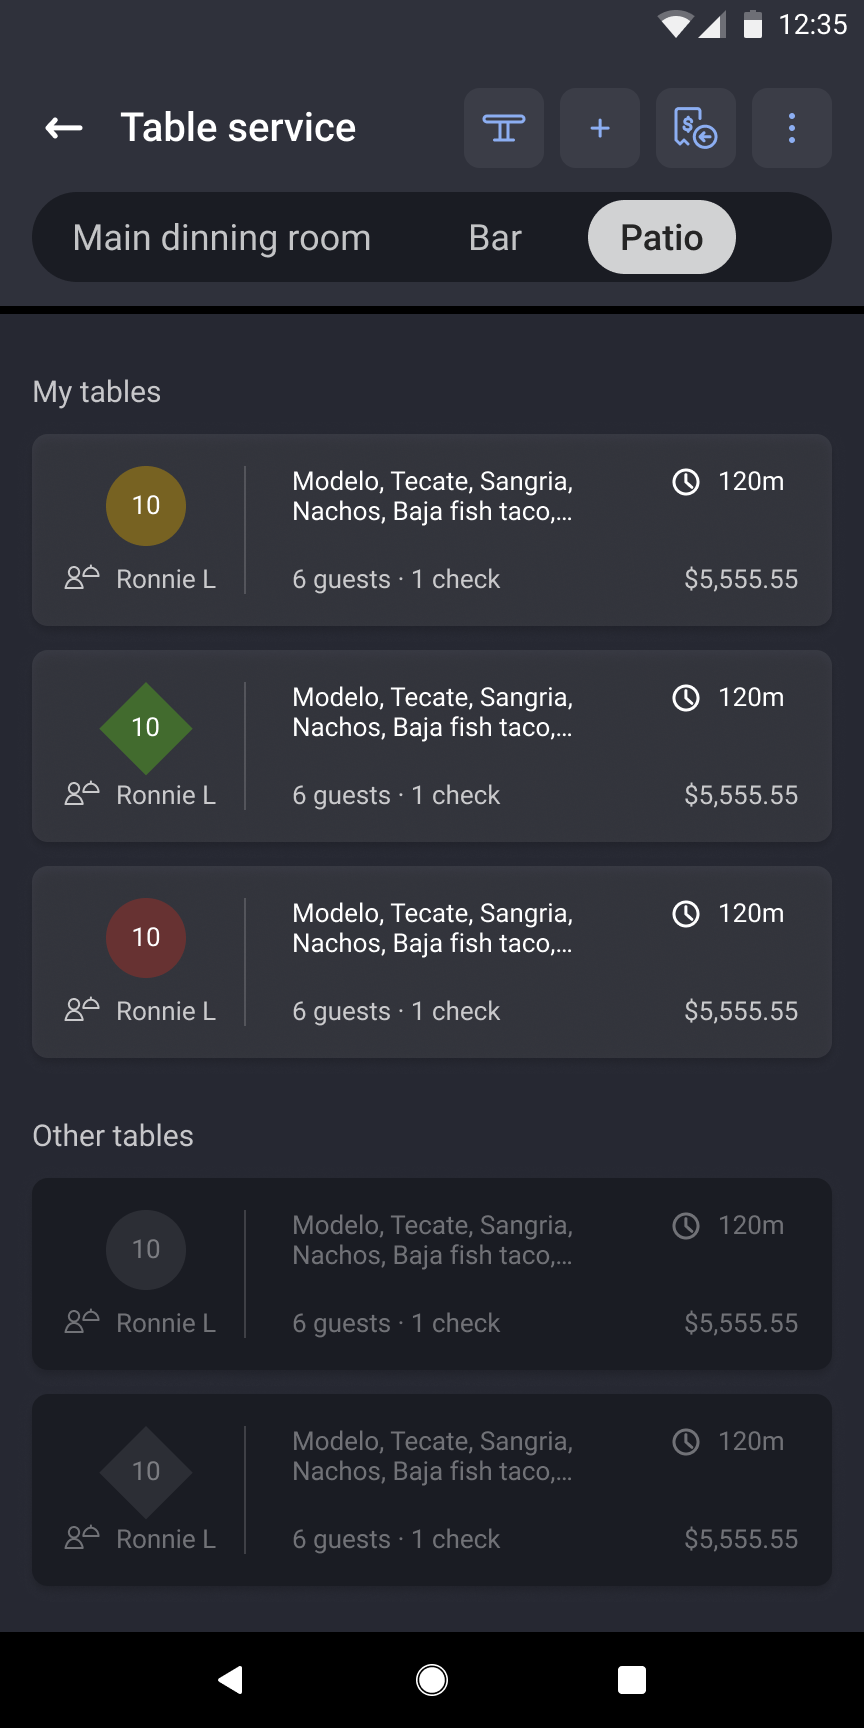
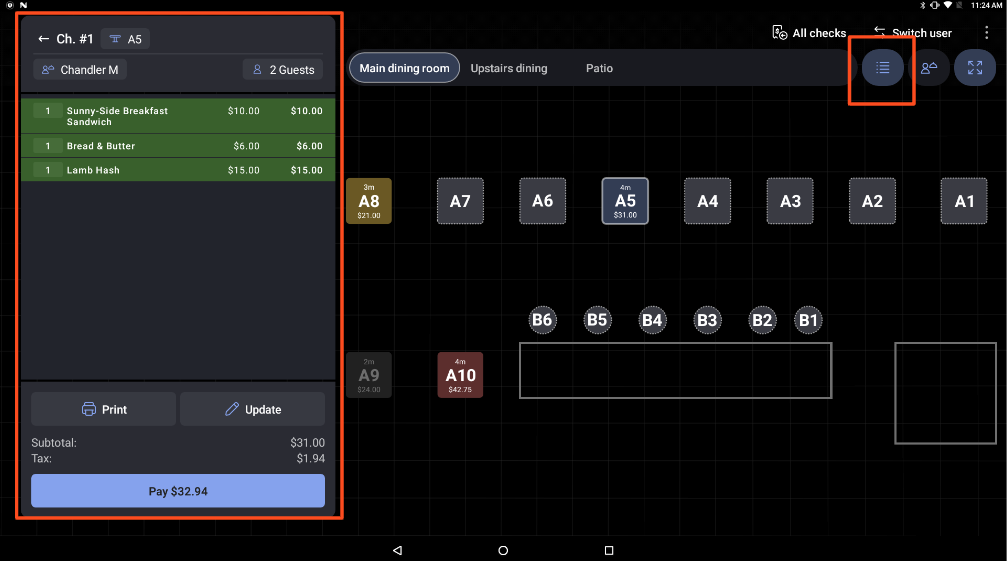
The Table Details pane displays a list of all active tables with high-level information — guest count, server, order items, and check subtotals — so you can compare tables and get a full overview of your dining area without selecting a specific table.
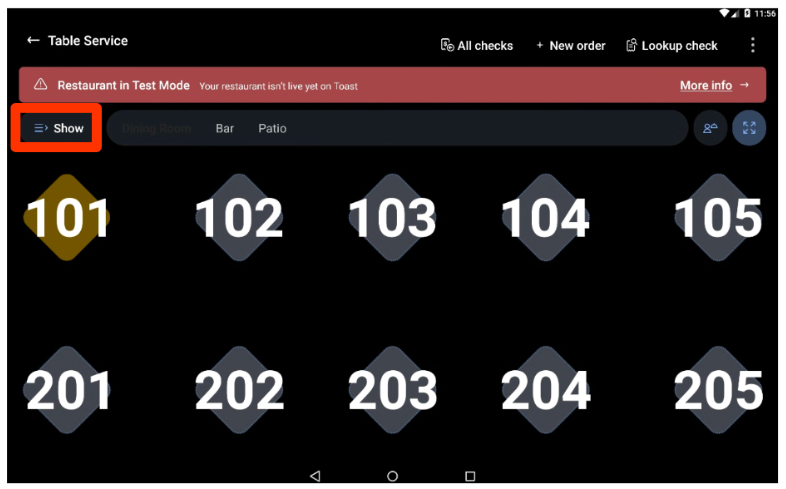
The pane is open by default in Table Service mode. To show or hide it, select the list button in the top-right corner of the Table Service screen.
Note: On terminals, a Hide button also appears directly on the Table Details pane. When the pane is hidden, you see the full table layout and can select any table to open its order screen directly. When the pane is visible, selecting a table opens the Check Details view; select Update to open the full order screen for that table.
Only employees with the 1.8 View Other Employees' Orders permission see other servers' tables in the pane. Without this permission, an employee sees only their own active tables.

For Toast Go® 2:

On Toast Go® 2 handhelds, the All Checks button appears as a blue icon with a dollar sign in the action bar on both the table and order screens. Selecting an item from the Check Details in the Table Details pane opens the order screen directly for quick edits.
Pan and Zoom
Video: Pan and zoom functionality on the Table Service screen.
Pan and zoom lets you navigate your table layout and control how much detail is visible for each table. Pan and zoom works on both your terminal and Toast Go®.
To zoom in or out, pinch the screen with two fingers or select the Zoom button in the top-left corner of the Table Service screen. Zooming out shows a summary view with the most important data in larger text. Zooming in reveals all available data per table in smaller text.
To pan across your table layout, slide your finger left, right, up, or down across the screen.
Table Data
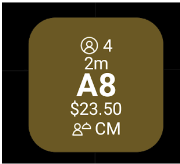
Each active table tile displays the following data:
- Guest count — the number of guests currently at the table (for example, four guests)
- Table timer — how long the check has been open (for example, two minutes)
- Table number and service area — the table identifier (for example, A8)
- Total table spend — the total dollar amount across all checks on the table (for example, $23.50)
- Server initials — the initials of the server assigned to the table (for example, CM)
To restrict servers to seeing data only for their own tables, disable the 1.8 View Other Employees' Orders permission for the employee or job in Toast Web. Disabling this permission also removes other servers' checks from the All checks and Payment Terminal screens.
Check Details View
The Check Details view displays key information about a table's order, including menu items, check subtotal, check total, and check number. It is open by default in Table Service mode. To close or reopen it, select the list button in the top-right corner of the Table Service screen.
From the Check Details view you can:
- Select the table number to move the current order to another table or remove a check from a table
- Select the server name to change the server assigned to the check (requires the 1.17 Change Server permission)
- Select the guest count to update the number of guests on the check
Assign Servers to Tables
Video: Assigning servers to tables using the server assignment screen.
The server assignment button is in the top-right corner of the Table Service screen, between the list button and the zoom button. Typically, an employee with the appropriate permissions assigns servers before the shift begins.
Note: Permission 1.17 Change Server is required to assign or change server assignments. Employees with this permission can proceed without a manager passcode. Add this permission at the job level so all servers in that role can assign and reassign tables without manager approval.
Note: Server assignment affects only orders that the assigned server opens on the table. If a different server opens a check on a table assigned to another server, the check is attributed to the server who opened it — not the server assigned to that table. This also applies to Toast Mobile Order & Pay™ orders started by guests at the table.
To assign servers to tables:
- Select the server assignment button in the top-right corner of the Table Service screen.
- Select a server from the server pane on the left side of the screen.
- Select the tables you want to assign to that server.
- Select another server from the server pane to assign tables for a different server. You can also select tables first and then choose a server from the pane.
Note: On Toast Go® handhelds, select a server before selecting tables.
- To reset server assignments, select the overflow menu on the server pane and choose to reset the selected server's tables or reset all server assignments.
Expected outcome: Each assigned table displays the server's initials in a colored badge, and the table border is outlined in the server's color. A count of the server's total tables, separated by service area, appears on their card in the server pane.
For instructions on customizing employee colors, see Assign a Color for Employees to Identify Their Tables.
Move Orders to Another Table
To move an order, press and hold a table tile on the Table Service screen. A quick-change table workflow appears so you can select a destination table.
Note: The Table Details pane and server assignment buttons are disabled during this workflow. To move an order to a table in a different service area, select that service area in the navigation bar while in the workflow.
- Press and hold the table with the order you want to move.
- Select the check you want to move, then select Move X Check.
- Select the destination table.
- Select Confirm to complete the transfer, or Cancel to exit without changes.
If the destination table already has a check, you will be prompted to merge the moved check with the existing check or keep them as separate orders on that table.
Expected outcome: The moved order appears on the destination table. If you chose to merge, both orders are combined into a single check. If you chose to keep them separate, both checks remain independent on the destination table.
Any employee with both the 1.16 Change Table and 1.17 Change Server permissions can move orders between tables. Add both permissions at the job level so all servers in that role can transfer tables without a manager passcode.
Video: Moving an order to another table, including the merge-check prompt when the destination table already has an open check.
Table Order Screen
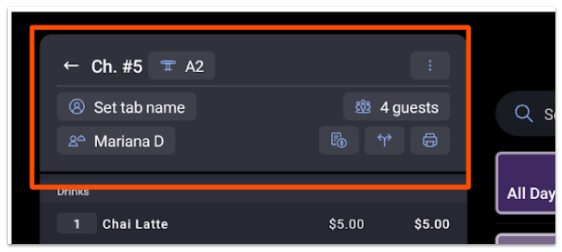
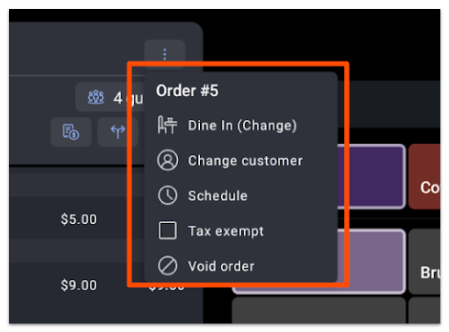
The Table Order screen is the order view for Table Service mode. The Change table, Tab name, Change server, Guest count, Service charge, Split, and Print buttons appear at the top of the check details view on your terminal.
The Dining option and Schedule order buttons are in the check overflow menu (the three vertical dots in the upper-right corner of the check).
Note: On Toast Go® handhelds, the Service Charge, Split, and Discount buttons are in the check overflow menu rather than the check details view to allow more screen space for viewing orders.
For a full description of the order screen features, check details, and overflow menu actions, see Manage Orders With Toast POS.
Frequently Asked Questions
Can two servers be assigned to the same table?
No, Toast POS does not support assigning two servers to the same table at the same time. Only one server can be assigned per table. For large parties where servers need to split tips, use the Split check feature to divide the check between servers.
Also asked as:
-
- Is there a way to put two servers on one table?
- Can a table have more than one server assigned?
How do I prevent servers from accessing other servers' checks and tables?
To prevent servers from accessing other servers' checks and tables, disable the 1.8 View Other Employees' Orders permission for the relevant employees or jobs in Toast Web. When disabled, a server sees only their own active tables in the Table Service screen, and other servers' checks are hidden from the All checks and Payment Terminal screens.
Also asked as:
-
- How do I stop servers from opening other servers' checks?
- Can I hide other servers' tables from my servers?
What permission do I need to move a table or change a server assignment?
To move an order to a different table, the 1.16 Change Table permission is required. To assign or change the server on a table, the 1.17 Change Server permission is required. Both permissions should be added at the job level so all servers in that role can perform these actions without a manager passcode. For a full list of POS permissions, see the Permissions Reference Guide.
Also asked as:
-
- What permission number lets me move tables?
- How do I remove the manager code requirement for moving or changing tables?
Why does my table show different data when I zoom in or out?
The Table Service screen adjusts which data is visible based on your zoom level. When zoomed out, the screen displays only the most important data — guest count, table timer, and total spend — in larger text. When zoomed in, all available data (including server initials and table number) appears for each table in smaller text to fit within the tile. This is expected behavior and does not affect the underlying check data.
Also asked as:
-
- Why does the table info disappear when I zoom out?
- Can I see all table data without zooming in?
Can I see which server is assigned to a table without entering server assignment mode?
Yes. Each table tile on the Table Service screen displays the assigned server's initials in a colored badge at all times. The table border is also outlined in the server's color. You do not need to enter server assignment mode to see this information. To change or customize employee colors, see Assign a Color for Employees to Identify Their Tables.
Also asked as:
-
- Can I change the color of a server's table on the table service screen?
- How do I tell which server is assigned to which table?
Before You Contact Customer Care
Contact Toast Customer Care if you experience either of the following after confirming that the correct permissions are assigned:
- A server's tables are being automatically reassigned to other employees who did not open those checks
- Tables are not appearing on a server's handheld device
For all other table management tasks — including changing permissions, assigning servers, and moving checks between tables — use the steps in this article.
Related Articles
- Manage Orders With Toast POS
- Customize Your POS Experience
- Create Service Areas and Table Setup
- Toast POS: FAQ and Troubleshooting
- Manage Payments With Toast POS