Toast Inventory: Get Started With Recipes (Canada, Ireland and UK)
Last updated: Apr 8, 2026, 10:21 AM
Toast's Recipes feature provides granular cost visibility by allowing you to build detailed ingredient make-ups, see profit margins directly at the recipe level, and accurately track COGS and Gross Profit in your Product Mix Report.
- Recipe Overview
- Key Features of Recipes
- Create Recipes and Prep Recipes
- Recipes FAQ
- Why don’t I see all my ingredients in Recipes?
- Can I change a recipe later?
- What happens if my ingredient prices change?
- What does the Product Mix report show?
- Do allergen flags show up on guest-facing menus?
- Can I set up Recipes for my modifiers?
- Can anyone see or update a Recipe?
- Can I add yield to an ingredient in a Recipe?
- Why is the save button not active on my Recipe?
- Can I add allergens to Prep recipes?
- Additional Resources
| This feature is currently in a Beta testing release in Canada, Ireland and the UK. Check back soon for updates. |
Recipes in Inventory Overview
You can now gain powerful visibility into your food costs and profitability with the new Recipes feature, available in Toast’s Inventory Management. Recipes give you the granular cost visibility you need to make smarter menu and pricing decisions.
With Recipes, you can:
- Build detailed ingredient make-ups for each item on your menu.
- See profit margins directly at the recipe level.
- Track Cost of Goods Sold (COGS) and Gross Profit (GP) in your Product Mix Report, aggregated across sales.
Key Features of Recipes
The key features of Recipes provide powerful functionality for cost and sales visibility:
- Instant Profit & Sales Visibility: Link Recipes directly to your POS menu items to connect true costs with sales data. This provides accurate, real-time gross profit margins and supports accurate sales reporting for every item sold.
- Dynamic, Hands-Off Costing: Eliminate manual spreadsheet math. Recipe costs are automatically calculated when you add ingredients and update instantly whenever an ingredient's price changes, ensuring your COGS data is always current.
- Cost Complex Batch Items: Use Prep Recipes to accurately cost multi-ingredient batch items (like sauces or cocktail mixes) once. You can then reuse these prep costs across dozens of final menu items for consistency and speed.
- Risk-Free Experimentation & Tracking: The system supports Draft state and safe editing. You can edit published recipes or save new builds as drafts to test cost changes instantly. Additionally, track allergens by pulling data directly from your ingredients or setting flags manually.
Create Recipes and Prep Recipes
Note: Recipes and Prep Recipes are created in Toast Inventory using your Ingredients. For that reason, you must have created ingredients in your Toast Web account before beginning with recipes. If you already have Ingredients set up, let's begin.
-
To begin utilizing this tool, navigate to Recipes in Inventory.

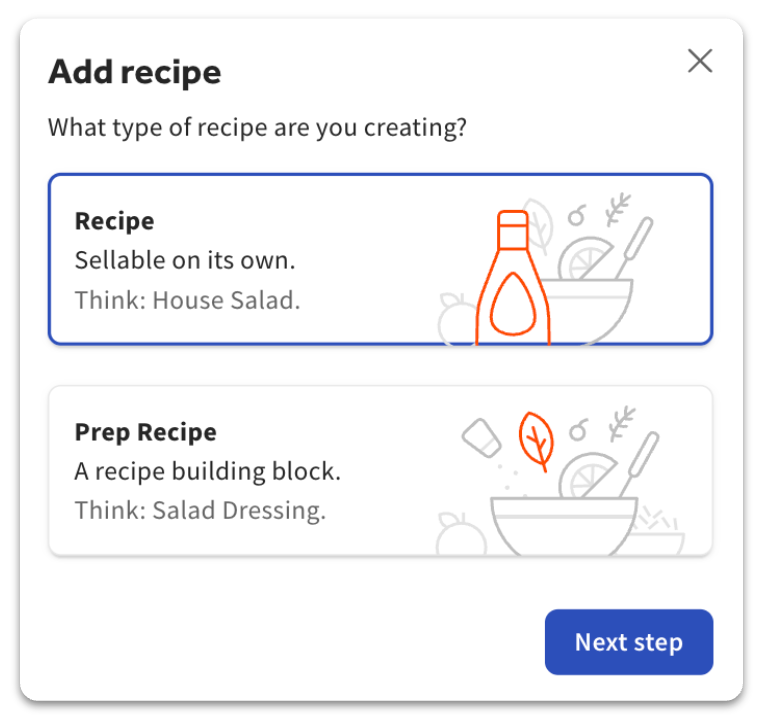
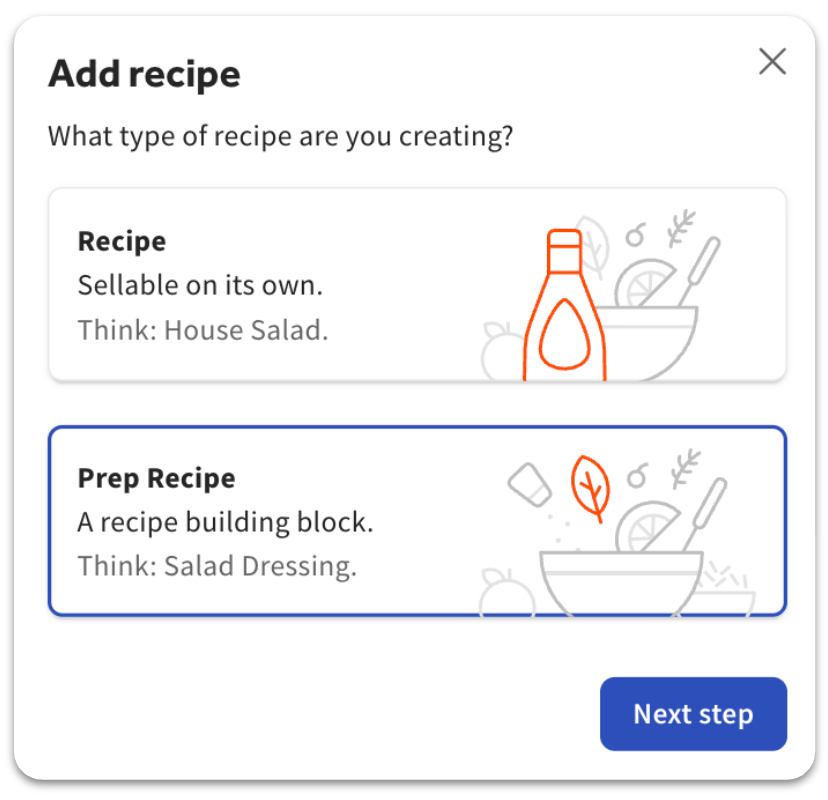
- Select New Recipe to create a new item. You will be asked which type of recipe you would like to create:
-
Recipes: For items that are sold directly to customers and can be associated with the relevant item from your POS Menu. These may contain both individual ingredients and Prep Recipes. See this section to Recipe.
-
Prep Recipes: For in-house batch items (like sauces, dressings, or cocktail mixes). These contain multiple ingredients but are not the final dish. They are used to simplify the creation of your final Recipes later on. See this section to create a Prep recipe.
-
Recipes
Choose Recipe and Next step to be brought to the recipe builder.
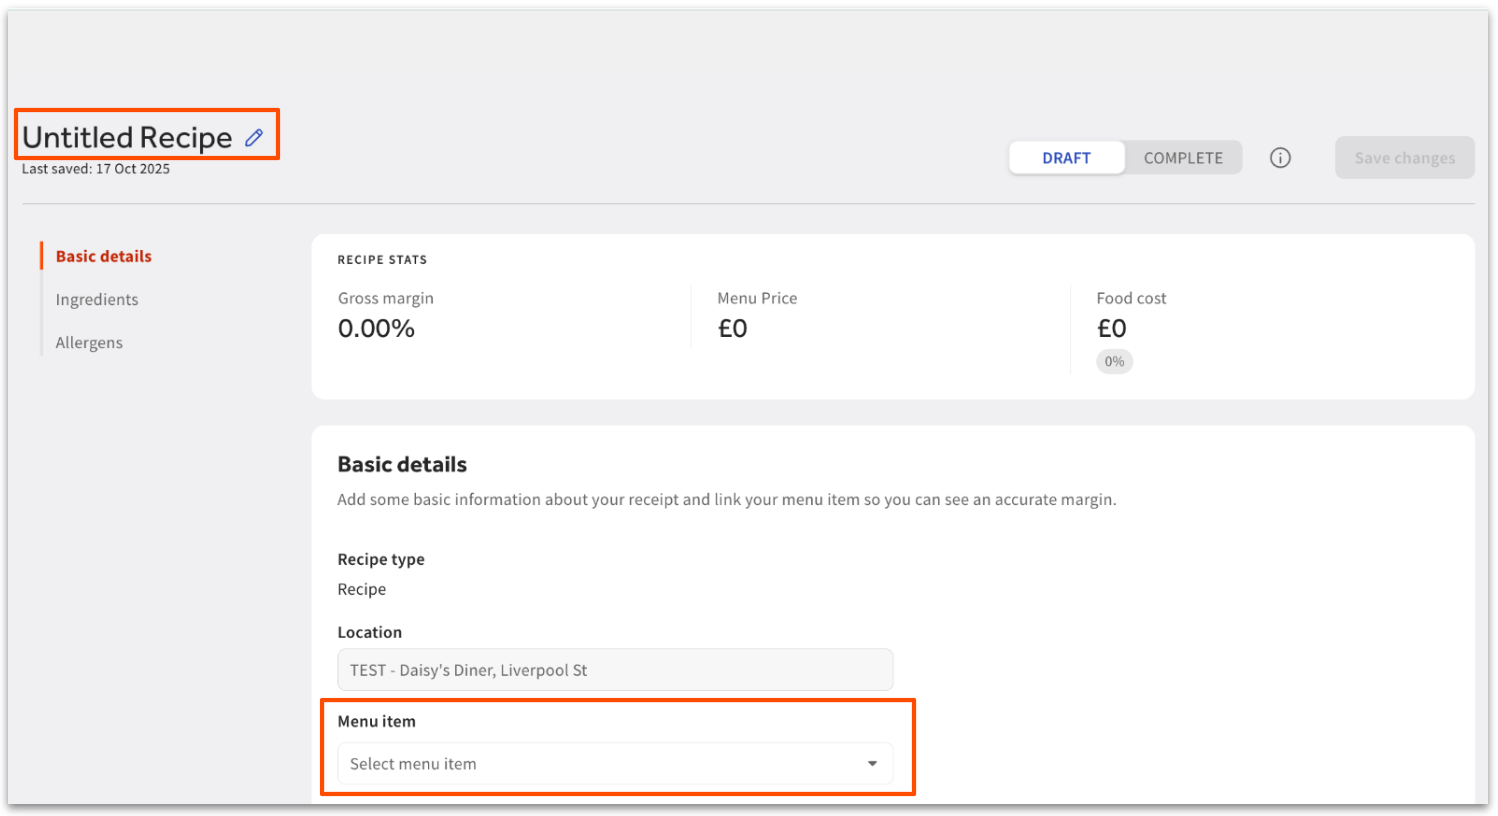
Step #1: Basic Details
By default, you will start with Basic details. Not all Basic details are necessary or required. To begin, select the empty fields and either type or select an applicable option. Basic detail fields include:
| Detail Name: | Description: |
| Recipe name | Names/rename the Recipe. Note: We recommend always attributing a Recipe name (upper-left corner with a blue pencil icon). |
| Location | Defines the location the Recipe is being created for. Note: This field is read-only. |
| Menu item | Select the relevant Menu item from your POS. This links recipe costs directly to your sales data and will pull in the Sales cost automatically. |
| Notes | Description of the Recipe, if needed. You can manually add any additional information regarding the Recipe here. |
Not all basic details are required. However, we recommend always attributing a Recipe name (upper-left corner with a blue pencil icon), and selecting the relevant Menu item from your POS. This links recipe costs directly to your sales data and will pull in the Sales cost automatically.
Step #2: Ingredients
Once basic details are entered, proceed by scrolling down to the Ingredients section. Here, you can begin to add ingredients and measurements to your Recipe. Choose Add Ingredient and select your ingredient from the drop-down menu.
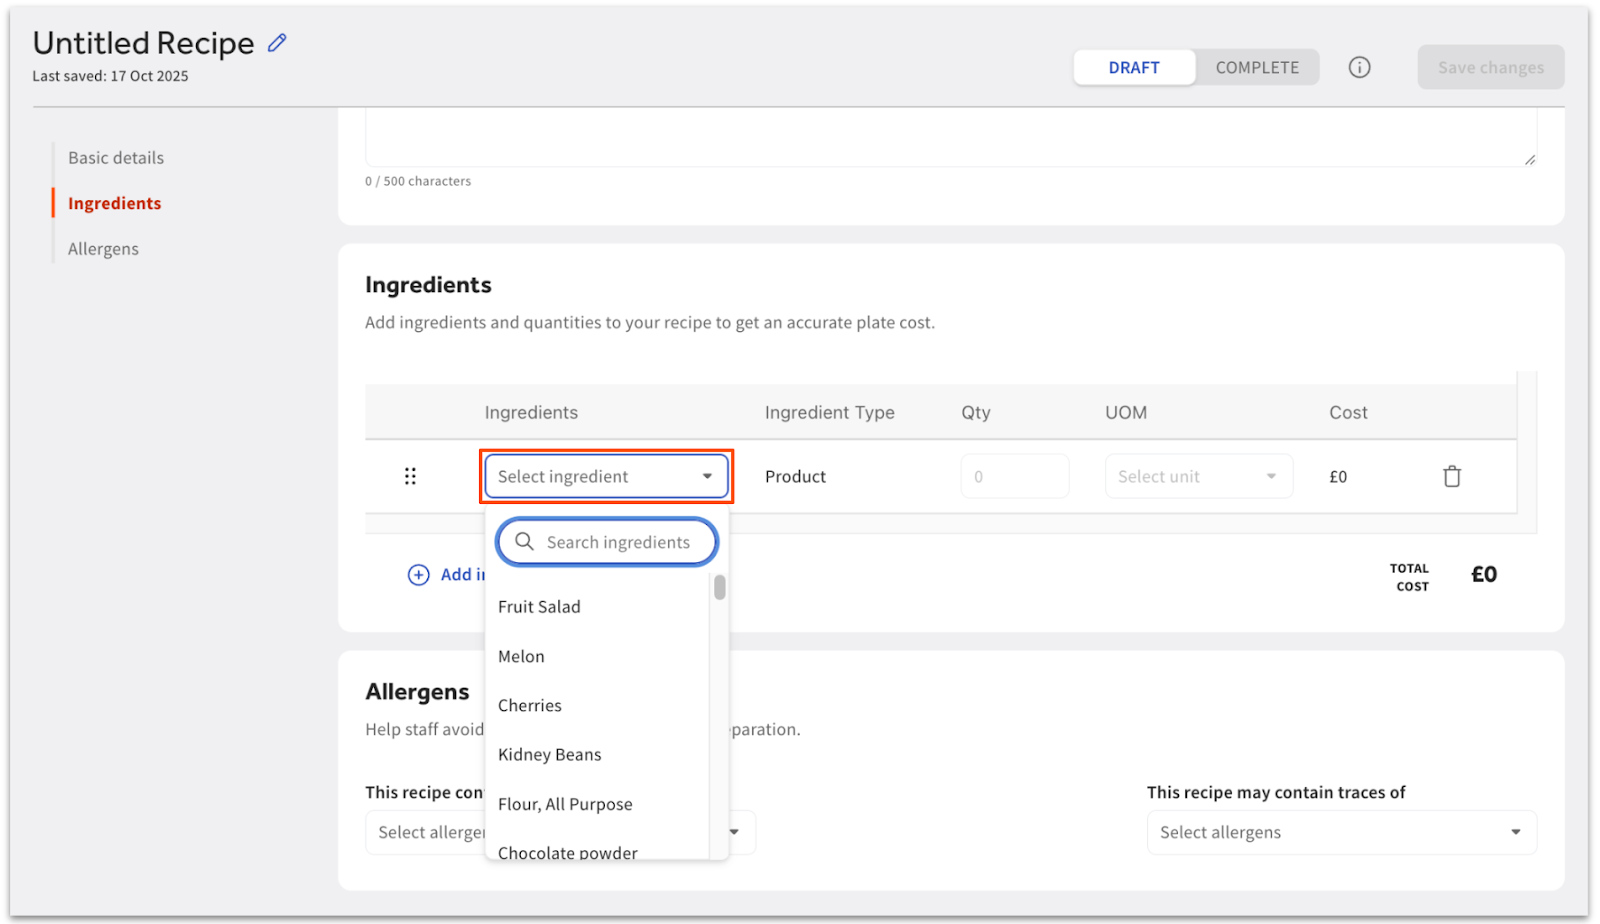
Note: If you are missing an Ingredient, this is likely because it has not been added to your Inventory.
Next, indicate the Qty (quantity) and UOM (unit of measurement) for the ingredient that is added to the recipe. You can only select a UOM that is compatible with the ingredient's existing setup. Since an ingredient can only have two UOMs added, you may need to adjust the ingredient's configuration if the desired UOM isn't available.
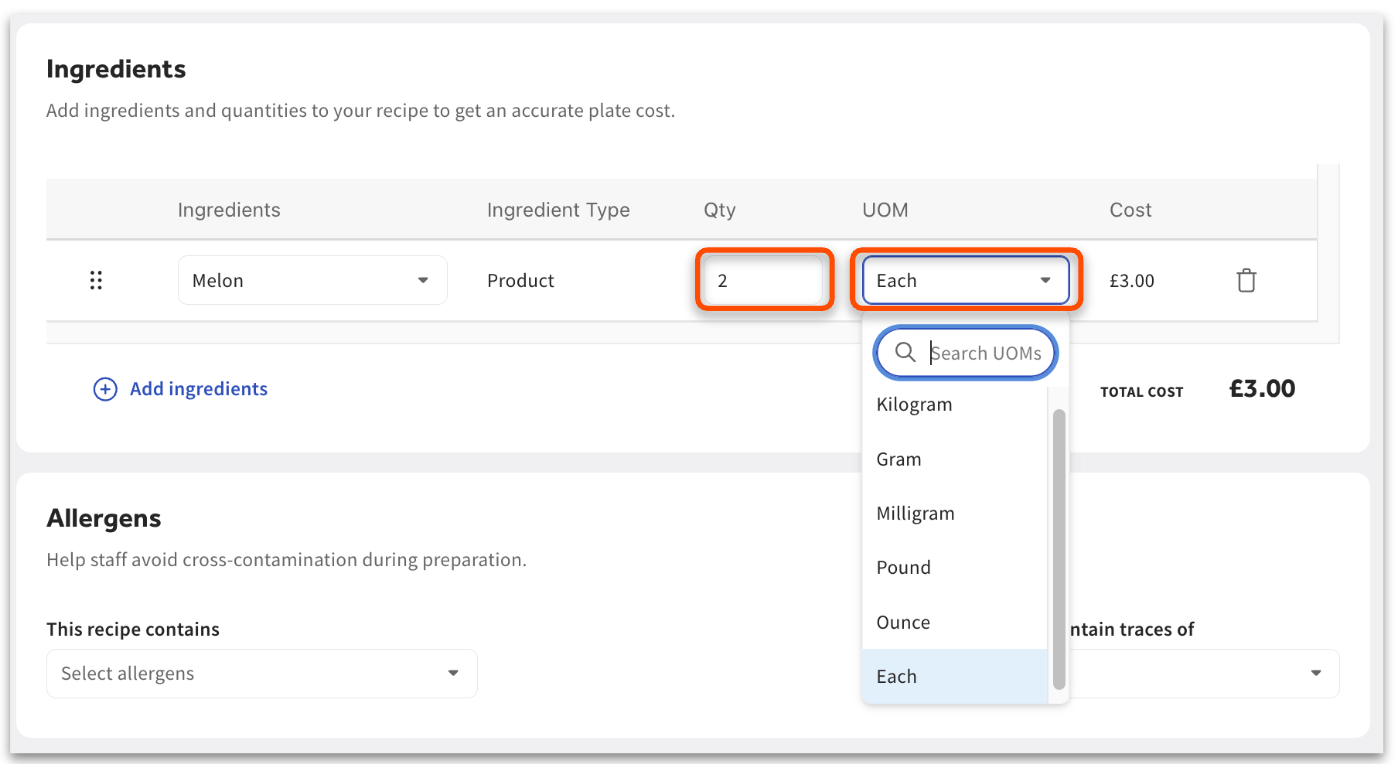
Shortly after adding your ingredient and measurement, a price will appear next to Total Cost. Toast automatically calculates the cost contribution of each item and the total recipe cost from its ingredients. You can continue to add additional ingredients by selecting Add ingredient and repeating the steps above.
Note: You must populate all Ingredient fields and rows before you can save the recipe.
Step #3: Allergens
Next, continue to the Allergens section. Here, you can continue to add additional recipe details. Allergens do not contribute to costing information or data.

Allergen data automatically pulls from your ingredients and helps prevent cross-contamination by clearly indicating allergen presence using the drop-down menus:
- This recipe contains: uses the drop-down to list allergens that are direct ingredients (e.g., milk, nuts).
- This recipe may contain traces of: uses the drop-down to list allergens that could be present due to cross-contamination or shared equipment (e.g., traces of peanuts).
Note: Allergen data is in limited release for select customers. For further information see the article Add Allergen Information to Online Ordering Menu Items.
Step #4: Save Changes or Save as Draft
Once you have completed your recipe, save it by selecting Save changes in the top right corner of your builder. This will make it live in your Toast Web account. If you are not yet finished with your Recipe and would like to save your work, you can also select Draft. Draft recipes allow you to experiment without affecting live reporting.
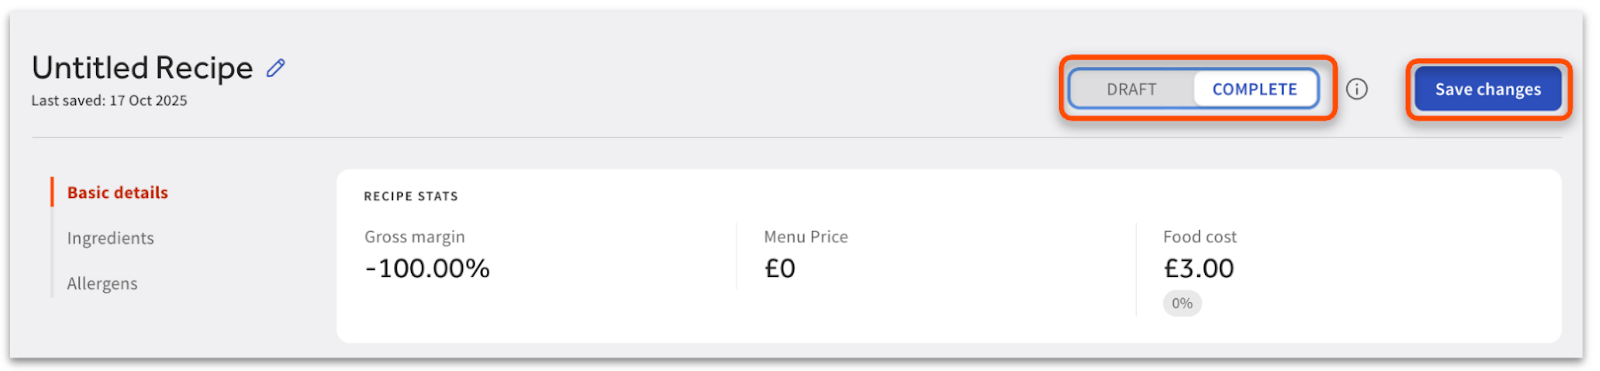
Note: Draft recipe costs do not appear in COGS reporting.
Prep Recipes
The process for creating a Prep Recipe mirrors that of a standard Recipe. Simply follow the existing steps, with the only difference being that instead of associating a Menu item, you must specify the batch size the recipe yields.
You can easily track the usage of your Prep Recipe: at the top of the screen, it shows you how many other recipes use this Prep Recipe, and selecting that number displays what those recipes are.

Once created, the Prep Recipe acts as a stock item within your Ingredient Library. This means it can be:
- Used in other recipes or other prep recipes.
- Added to a storage area for stock-checking.
You can manage core item details (like primary UOM and price) from the Prep Recipe screen, but you must use the Ingredient Library to add a secondary UOM.
Select Prep recipe and Next step to be brought to the Prep recipe builder.
Step #1: Basic Details
By default, you will start with Basic details. Not all Basic details are necessary or required. To begin, select the empty fields and either type or select an applicable option. Basic detail fields include:
| Detail Name | Description |
| Prep recipe name | Names/renames the Prep recipe. Note: We recommend always attributing a Prep recipe name (upper-left corner with a blue pencil icon) |
| Location | Defines the location the Prep recipe is being created for. Note: This field is read-only. |
| Batch size | Defines the size of the Prep recipe batch once finished. Note: This field determines how your Prep recipes are priced by measurement when used in Recipes. |
| Notes | You can a note or description of the Prep recipe, if desired. |
We recommend always attributing a Prep recipe name, Prep recipe group, and Batch size.Batch size is particularly important. This is the prep recipe's final measurement which future costing is based on when your prep recipe is used in other prep recipes or recipes.
To set the Batch size, select the empty field and enter the number of units, then choose the unit of measure (if you need to set a secondary UOM for more flexibility, this can be done in the Ingredient Library).
Recipes FAQ
Why don’t I see all my ingredients in Recipes?
Make sure your ingredients have been created in your Ingredient Library or Prep Recipes have been set up accordingly.
Can I change a recipe later?
Yes, you can edit or delete recipes anytime. Draft and experiment modes also let you test changes safely before publishing.
What happens if my ingredient prices change?
Recipe costs update automatically whenever ingredient costs are updated.
What does the Product Mix report show?
The Product Mix Report (PMIX) report will show the current cost of your Recipe, regardless of the date range selected.
Do allergen flags show up on guest-facing menus?
Not yet. Today, allergens are visible only in Inventory, but future updates plan to connect this data to your menus and guest surfaces.
Can I set up Recipes for my modifiers?
Not yet, Recipes are currently only supported for Menu Items and Prep Items.
Can anyone see or update a Recipe?
Yes, there are no user permissions currently to grant different levels of access to your team.
Can I add yield to an ingredient in a Recipe?
No, but you can create a Prep recipe that achieves the same thing as a workaround. Example set up would be 1000g Onion in a Prep recipe that makes a 900g batch of Prepared Onion.
Why is the save button not active on my Recipe?
Check you’ve completed all relevant fields and there are no empty rows or fields in the ingredient list.
Can I add allergens to Prep recipes?
Yes. This field functions exactly the same way as it does for regular Recipes, helping you maintain complete allergen information for any dish that uses your Prep Recipe as an ingredient.
Additional Resources
- Get Started with Toast Inventory (Canada, Ireland and U.K.)
- Toast Inventory: Generate Purchase Orders & Receive Inventory (Canada, Ireland and UK)
- Toast Inventory: Stock Depletion (Canada, Ireland and UK)