Print a Test Slip
Last updated: May 12, 2026, 2:51 PM
- Why am I printing a test slip?
- Print a Test Slip
- Read a Test Slip
- Exit Configuration Mode After a Test Slip
Why am I printing a test slip?
Printing a test slip provides us with lots of information about your printer! Not only does it confirm your printer is on, your paper has been loaded correctly, and your printer is able to print physically, but also gives us networking information about how your printer is connected to the internet.
Before printing a test slip, always confirm your printer is plugged into a power source by checking to see if your power cable is fully plugged into both the printer and the wall outlet. You want to also ensure that an Ethernet cable is plugged into your printer and also connected to your router.
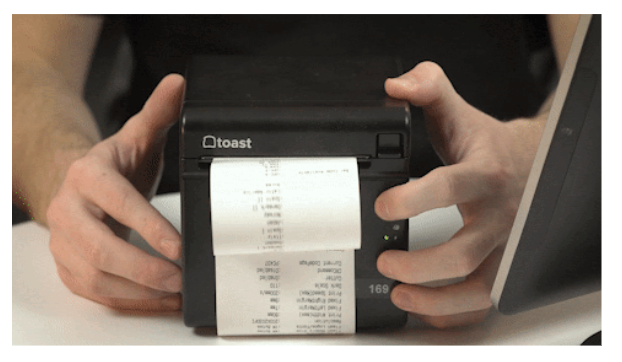
Print a Test Slip
Toast Receipt Printer TP200
- Locate the power button on the front of your printer. Press and hold until the light changes
- Next, press and hold the Feed button. Simultaneously press and hold the power button until the test slip prints.
Epson TM-M30 Thermal Printer, & Epson TM-T20ii Thermal Printer
The following instructions are applicable for both printers.
- Turn the power switch to the Off position. The power button is located in the top right-hand corner of the printer.
- Press and hold down the Feed button.
- Turn the power switch back to the On position.
- Release the Feed button once the printer begins to print.
If nothing prints, please contact Toast Customer Care and reference code #560.
Back to top
Toast Kitchen Printer (TKP300)
- Turn the power switch to the Off position. The power button is located in the top right-hand corner of the printer.
- Press and hold down the Feed button.
- Turn the power switch back to the On position.
- Release the Feed button once the printer begins to print
If nothing prints, please contact Toast Customer Care and reference code #521.
Epson TM-U220B Impact Kitchen Printer & Epson TM-L90/100 Label Printers
- Locate the back side of the printer. This is where the Ethernet cord is plugged in.
- There is a pin-sized hole next to the Ethernet port - hold this Reset button for several seconds while the printer is POWERED ON, using a small and narrow object (such as a paperclip or pen tip) until the printer produces a test slip
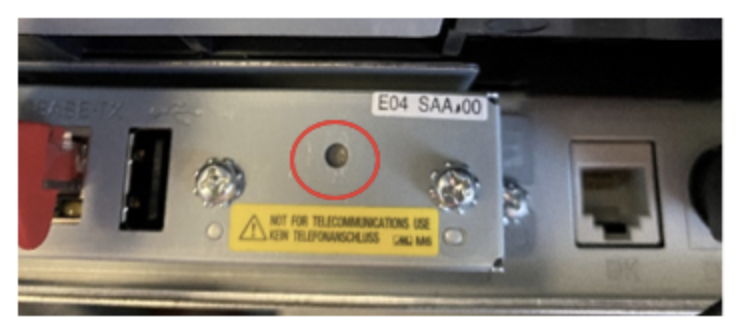
If nothing prints, please contact Toast Customer Care and reference code #516.
Toast Label Printer TLP400
- Power Off your printer.
- Hold the Feed button on the top of your printer.
- While holding the Feed button, power the printer back on. Your test slip will print with different submenu action items.
- To select Print Self Test, press the feed button 2 times, then press the feed button a third time while holding down on the button. This will produce a long slip that includes data on the firmware version and printer serial number.
- The print will pause with text on the final slip reading "Interface is Configuring". Wait approximately 1 minute for the remainder of the slip to print.
If nothing prints, please contact Toast Customer Care and reference code #550.
 Read a Test Slip
If you were able to print the test slip, you now have valuable information regarding your network setup. Although each slip will show this information differently, try to locate the following information on your test slip.
- IP Address
- DHCP Enabled or Disabled
The image below is an example of this information on a test slip printed on a TP200 Toast Receipt Printer.
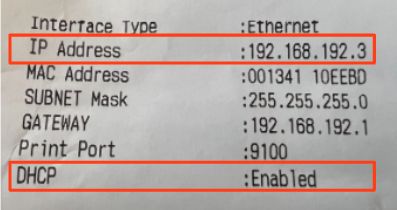
Note: Test slip for Epson printers will say Acquiring: Auto when the IP is dynamic and Acquiring Manual when the IP is static.
Is DHCP Enabled or Disabled?
| DHCP Enabled | DHCP Disabled |
| If your test receipt shows that DHCP is Enabled, your printer is set up for a dynamic IP address. In Toast Web, on the Printers and cash drawers configuration page, confirm the serial number field is populated (with the serial number of the device) and the IP address field is empty. Example: 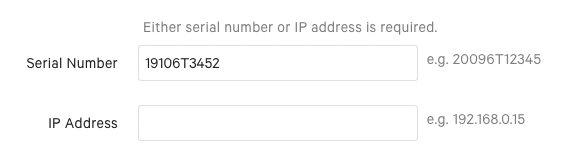 If you see both fields filled, delete the IP address. Don't forget to save and publish your changes! | If your test receipt shows that DHCP is Disabled, your printer is set up for a static IP address. In Toast Web, on the Printer and cash drawers configuration page, confirm the serial number field is empty and the IP address field is populated (with the IP address listed on your test slip). Example: 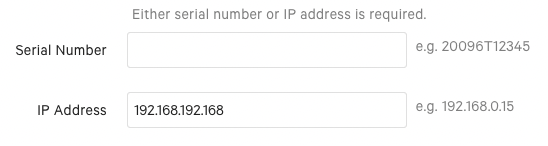 If you see both fields filled, delete the serial number. Don't forget to save and publish your changes! |
Note: If you're setting up a printer for the first time, please follow the directions in this Support Center article, Printer Setup Overview.
Back to top
Exit Configuration Mode After a Test Slip
After you've printed a test slip and worked with Toast to troubleshoot the printer, power-cycle the device to return it back to its normal function. To do this, press the power button. Once the lights on the printer have turned off, wait approximately 30 seconds and press the power button once more to turn the printer back on. Without power-cycling the printer, it will not print and may even appear offline, so this is important to return to normal business functions.