Upgrade Old Generation Hardware to Flex 3 Terminal and Printing Hub
Last updated: Jun 1, 2026, 12:01 AM
Use this hardware upgrade decision tree to identify the correct Toast equipment replacement for Flex 14 (Old Gen) and TP200 setups.
Upgrade Old Generation Hardware to Flex 3 Terminal and Printing Hub
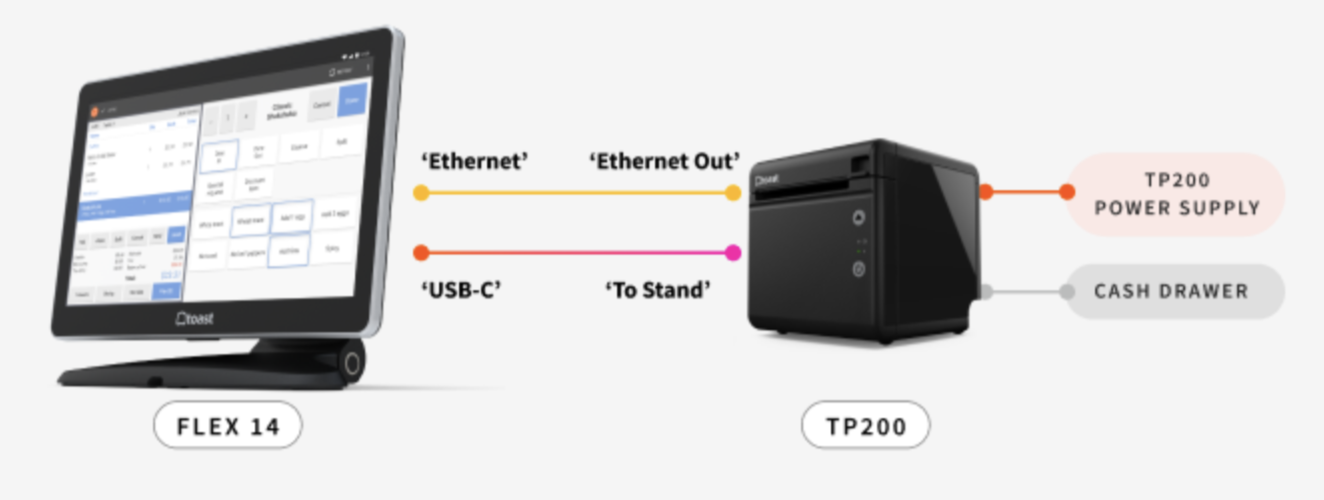
Use this decision tree if you have the following hardware setup:
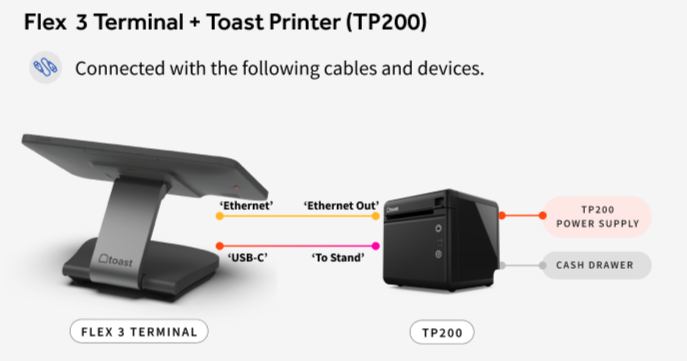
- Flex 14 (Old Gen) powered by the Toast Printer (TP200) via USB-C®
- Flex 14 (Old Gen) connected to Toast Printer (TP200) via Ethernet
- (If applicable) Cash drawer connected to Toast Printer (TP200)
- Toast Printer (TP200) powered by power supply (Old Gen)
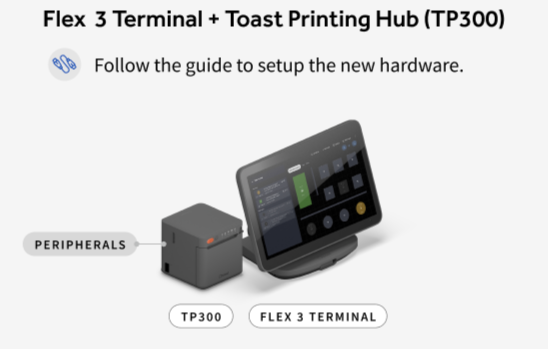
Replace both terminal and printer for the latest features and system functionality:
-
- Choose 14" Flex 3 Countertop Terminal + Printing Hub (TP300)
- After receiving the hardware, use the Toast Flex 3 Installation Guide for the next steps.
- Choose 14" Flex 3 Countertop Terminal + Printing Hub (TP300)
- Replace the TP200 printer with a TP300 Printing Hub and Printing Hub Adapter for Flex 14.
- Choose the Printing Hub (TP300) and the Printing Hub Adapter for Flex 14.
- After receiving the hardware, use the Toast Flex 3 Installation Guide for the next steps.
- Choose the Printing Hub (TP300) and the Printing Hub Adapter for Flex 14.
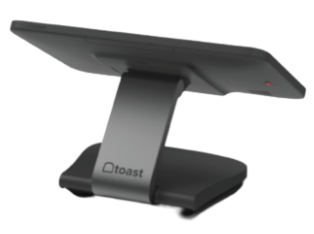
- Replace a Flex 14 (Old Gen).
- Choose 14" Flex 3 Countertop Terminal.
- Choose 14" Flex 3 Countertop Terminal.
-
-
- The Toast Printer (TP200) Power Supply will continue to power both the Toast Printer (TP200) and the 14" Flex 3 Countertop Terminal with the existing USB-C to stand cable.
- After receiving the hardware, navigate to Replace Flex 14 (Old Gen) in this article for replacement steps.
- Note: The TP200 connected to Flex 3 configuration will only power the Flex 3 Terminal. It will not support USB networking and Ethernet is only supported by connecting the devices with an RJ45 Ethernet cable.
- The Toast Printer (TP200) Power Supply will continue to power both the Toast Printer (TP200) and the 14" Flex 3 Countertop Terminal with the existing USB-C to stand cable.
-
Installation Steps After Receiving Your Hardware Upgrades
Replace Flex 14 (Old Gen) With a 14" Flex 3 Countertop Terminal
- Power off your Flex 14 (Old Gen), then disconnect the Ethernet and USB-C cables from the terminal. Note: Leave the cables connected to the Toast Printer (TP200).
- Place the 14" Flex 3 Countertop Terminal in your preferred location.
- Lift the neck until the terminal screen reaches its highest position.
- Tilt the screen forward until it stops rotating, aligning it with the front of the Toast logo.
- Gently push up on the base cover until it releases and opens, revealing the ports.
- To power the 14" Flex 3 Countertop Terminal, connect the USB-C cable to the Toast Printer (TP200).
- For internet connection, connect the Ethernet cable from the 14" Flex 3 Countertop Terminal to the Toast Printer (TP200).
- The Toast Printer (TP200) Power Supply will continue to power both the Toast Printer (TP200) and the 14" Flex 3 Countertop Terminal with the existing USB-C to stand cable.
Replace Toast Printer (TP200) With a Printing Hub (TP300) and Adapter
- Power off the Toast Printer (TP200) and disconnect the USB-C cable and the power supply.
- To connect the Printing Hub (TP300) to your Flex 14 (Old Gen), open the printer's back cover.
- Connect the Printing Hub (TP300) power adapter to the printer, then plug it into a wall outlet.
- The printer will power on automatically.
- Connect the end of the Printing Hub Adapter labeled "To TP300" directly to the USB-C port on the TP300 Printer. Secure the connection using the integrated thumbscrews to prevent accidental disconnects.
- Plug the Printer Power Plus Cable provided with the Printing Hub into the receptacle on the adapter.
- Connect the other end of the Power Plus Cable to your Flex 14 (TT200) terminal.
- Optional: Connect a cash drawer and/or USB accessories to the printing hub.
- On your Toast POS, follow: Printer Setup > Add or replace printer. We will guide you through setting up your new printer.
Additional Resources
USB-C® is a registered trademark of USB Implementers Forum.