Set Up Your Toast Go® 3 Handheld
Last updated: Oct 1, 2026, 4:52 PM
Learn how to set up your Toast Go® 3 handheld and understand the differences between cellular and Wi-fi devices.
- Toast Go® 3 Overview
- Before You Begin
- Set Up Your Toast Go® 3
- Set Up Cellular on Your Toast Go® 3
- Enable Cloud Printing on Your Toast Go® 3
- Enable Barcode Scanning on Your Toast Go® 3
- Accepted Payment Methods
- Charge Your Toast Go® 3
- Related Articles
Toast Go® 3 Overview
The Toast Go® 3 handheld lets staff take orders, accept payments, and print receipts over Wi-Fi and cellular networks, switching between them automatically. There are two versions of the device:
- Toast Go® 3 Wi-Fi: Takes orders and payments wherever a Wi-Fi network is available.
- Toast Go® 3 Wi-Fi + Cellular: Also takes orders and payments and sends print jobs over cellular when Wi-Fi is unavailable. Cellular-only features are identified throughout this article.
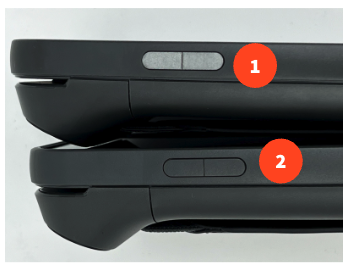
To check which version you have, look at the label on the back of the box, or check the button color on the device: a silver button is Wi-Fi + Cellular, and a dark gray button is Wi-Fi only.
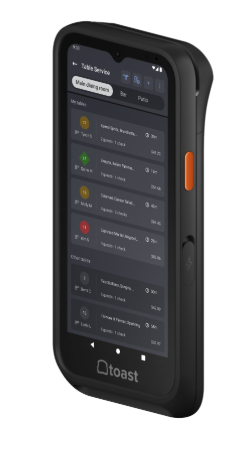
Note: The Toast Go® 3 does not support web browser usage. Self-managed device customers are limited to the apps preloaded on the handheld, and no additional apps can be installed at this time. The preinstalled apps are Calculator, Card Reader Test App, Settings, Toast A/B Updater, Toast Guardian, Toast POS (with access to the Support Center), and Toast POS Updater.
Before You Begin
Applies to: Toast Go® 3 Wi-Fi, Toast Go® 3 Wi-Fi + Cellular
Permissions needed:
- Your Toast login credentials (Username and Passcode)
What you'll accomplish: Power on, connect, and configure a new Toast Go® 3 handheld so it is ready to take orders and process payments.
Before you start, make sure the device is fully charged and confirm whether your device is Wi-Fi only or Wi-Fi + Cellular.
Set Up Your Toast Go® 3
Watch the setup overview video, then follow the steps below to set up your handheld.
- Power on the device by pressing and holding the power button until the Toast logo appears.
- Begin the initial setup.
- Select Get started and follow the on-screen prompts.
- Select Set up using Wi-Fi (recommended) or Mobile data.
- Log in to Toast.
- Select Go to POS to open the Toast POS app.
- Enter your Username and Passcode.
- Configure your device settings. You will be prompted to complete several steps in order:
- Choose how to set up the device.
- Select the initial screen that employees will see.
- Select a POS display theme.
- Name the device for easy identification.
- Choose whether to enable digital receipts.
- Select a printer, if applicable.
- Enable EMV payments (dip and tap). This step is required for United States customers only.
- Select Turn on EMV and check for card reader updates.
- Confirm EMV is set to Yes.
- Select Continue.
- Select the back arrow to return to the ordering screen.
Expected outcome: Your Toast Go® 3 returns to the main POS screen and is ready to take orders and process payments.
Note: Need your Toast Wi-Fi password to connect during setup? See Locate Your Toast Wi-Fi Password.
Note: Customers in Australia, Canada, Ireland, and the UK see an extra step during setup. A screen showing Staging and Setting Up appears after configuring device settings — wait for it to finish, then select the Toast POS app from the home screen. These customers can skip the EMV payments step, which applies to United States customers only.
Set Up Cellular on Your Toast Go® 3
This section applies to Toast Go® 3 Wi-Fi + Cellular devices only.
When you purchased your handheld, you also purchased the data plan needed to run the Toast Go® 3 on cellular. This appears on your monthly invoice as two separate line items: one for the handheld software and one for the cellular data fee.
To enable your cellular connection, swipe down from the top of the screen, select Internet, and enable 4G. By default, both cellular and Wi-Fi stay on and work together: the handheld prioritizes Wi-Fi and switches to cellular when the cellular signal is stronger. This is useful when staff walk in and out of range of your Toast Wi-Fi network.
Note: To confirm cellular is working, temporarily disable Wi-Fi on the handheld so the device uses the cellular connection.
Enable Cloud Printing on Your Toast Go® 3
This section applies to Toast Go® 3 Wi-Fi + Cellular devices only.
Cloud printing lets your Toast Go® 3 print over cellular and over any internet-connected Wi-Fi network. To use cloud printing, you must have at least one terminal online on the same network as your printers.
On the handheld, navigate to Devices > Cloud Printing and toggle to On.
Expected outcome: Cloud printing is enabled, and the handheld can send print jobs over cellular and Wi-Fi.
Note: This setting must be enabled in-store. If cloud printing does not work, see Get Help With Your Toast Go® 3 Handheld.
Enable Barcode Scanning on Your Toast Go® 3
If you are a Toast Retail customer or you sell packaged goods, you can enable barcode scanning on your Toast Go® 3.
First, enable barcodes on the device:
- On the device, navigate to Setup > Device Setup.
- Scroll to the Order Screen section.
- Enable Enable SKUs.
- Select Continue to save.
Then scan a barcode:
- Open the ordering screen on your Toast Go® 3.
- Select the scan icon to open the camera. If the device prompts you for camera access, "WHILE USING THE APP" should be chosen, to allow the scanner to use the camera.
- Point the camera at a product barcode to add the item to the order. You can enable the flash to help capture, or capture manually if the barcode does not scan automatically.
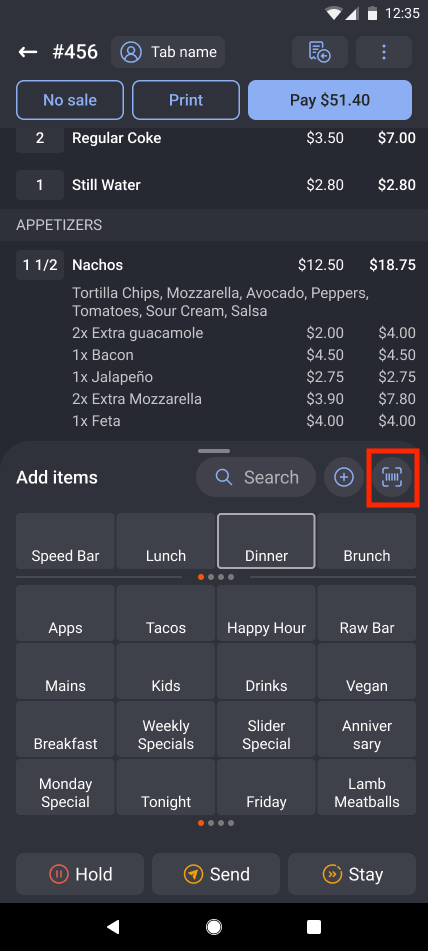
Expected outcome: Scanning a barcode adds the matching item to the current order.
Note: To add barcodes or UPCs to your menu items so they can be scanned, see Use Barcodes With Toast.
Accepted Payment Methods
Your Toast Go® 3 accepts the following payment methods:
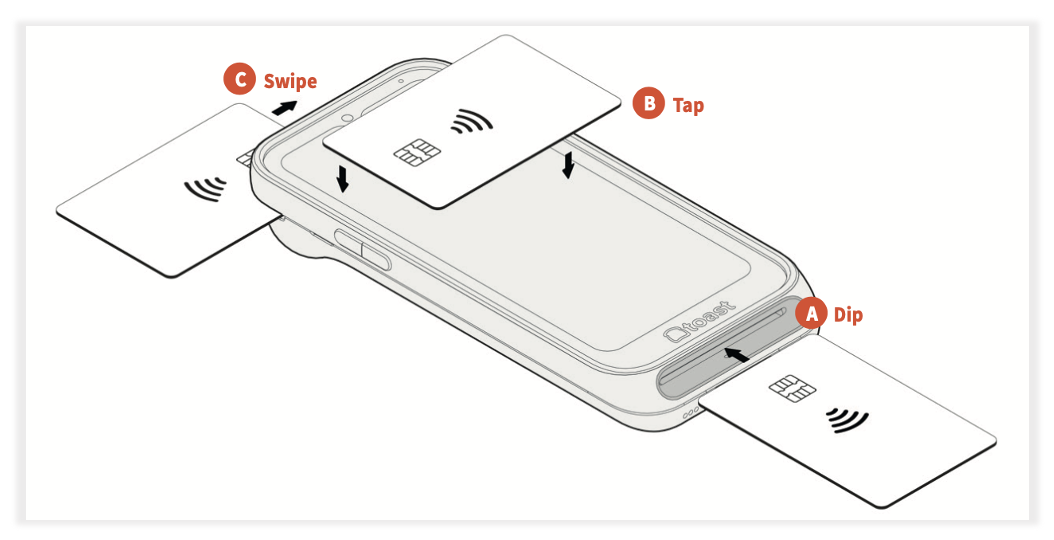
- Chip cards: Insert the card chip first into the Dip Slot at the bottom of the device.
- Tap to Pay (contactless): Tap a contactless card or an NFC-enabled device on the Contactless Payment Zone to pay with Apple Pay®, Samsung Pay, or Google Pay™.
- Magnetic stripe cards: Swipe the card in the Swipe Slot at the top of the device.
Charge Your Toast Go® 3
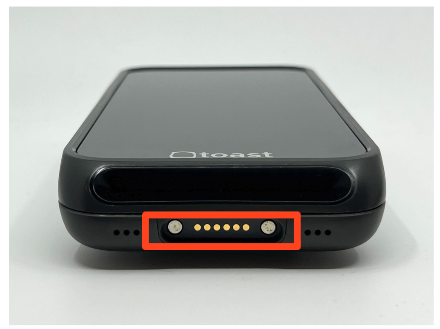
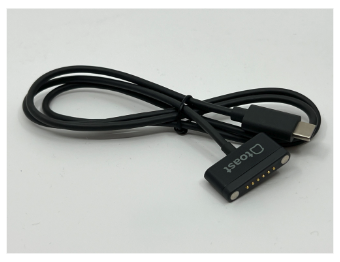
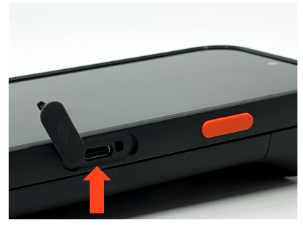
You can charge your Toast Go® 3 with the magnetic charging port, the USB charging port, or a charging dock.
Magnetic charging port (bottom): Located at the bottom of the device, this port works with Toast magnetic charging cables or docks. Align the magnetic connector and it snaps into place. This option is ideal for countertop or multi-device charging stations.
USB charging port (side): Located on the side of the device, this port charges with a USB cable and a power adapter. A USB cable does not come with the device. This option is good for individual or on-the-go charging.
Charge With the Toast Go® 3 Charging Dock
To charge a Toast Go® 3 without a protective case:
- Place the Toast Go® 3 directly into a charging slot so the magnetic charging contacts on the bottom align automatically.
- Plug the USB power cable (found in the small accessories box) into the bottom of the dock near the orange label, then secure it with the thumbscrew.
- Press the power cable through the back slot of the dock so the dock sits flat.
- Connect the power adapter to a wall outlet. The device begins charging automatically.
To charge a Toast Go® 3 with a protective case:
- Remove the plastic insert from the charging slot to make room for the case.
- Place the Toast Go® 3 with the case into the dock slot so the magnetic charging contacts on the bottom align.
- Plug the USB cable into the bottom of the dock near the orange label, then secure it with the thumbscrew.
- Press the cable through the back slot so the dock sits flat.
- Connect the power adapter to a wall outlet. The device begins charging automatically.
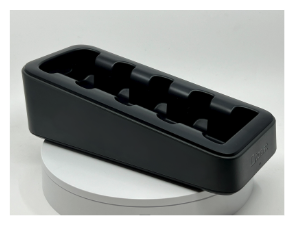
Expected outcome: The charging dock indicator light shows the device is charging. For what each indicator light color means and for help when the device will not charge or power on, see Get Help With Your Toast Go® 3 Handheld.
Related Articles
- Locate Your Toast Wi-Fi Password
- Get Help With Your Toast Go® 3 Handheld
- Use Toast for Off-Site Operations
- Use Barcodes With Toast
- Identify Your Toast Hardware
- Toast Go® 3 Handheld Upgrade Programme FAQ