Set Up Restaurant Hours and Services
Last updated: Jun 24, 2026, 11:15 AM
- Before You Begin
- Add Your Service Periods
- Build Your Day Schedules
- Assign Days to Each Schedule
- Save and Publish Your Hours
- See Your Service Periods in Reporting
- Frequently Asked Questions
- Related Articles
Set your restaurant's hours of operation and define service periods in Toast Web so guests know when you're open and your reports break out sales by meal.
Before You Begin
Applies to: Toast Web
Permissions needed:
- Access to edit restaurant settings in Toast Web (Reports > Settings)
What you'll accomplish: Your restaurant's operating hours and service periods (for example, Lunch and Dinner) will be set so guests see accurate hours and your reports group sales by service period.
Add Your Service Periods
A service period is a named part of your day, such as Breakfast, Lunch, or Dinner. Add one for each part of your day you want to track separately.
- In Toast Web, navigate to Reports > Settings > Hours/services.
- In the Services section, enter the name of a service period that applies to your restaurant, such as Breakfast, Lunch, or Dinner.
- Select + Add Row to add another service period, or select the trash can icon to remove one.
- Select Save at the top of the page to update the schedule options below.
Expected outcome: Your service periods now appear as options in the Day Schedules section below.
Build Your Day Schedules
A day schedule sets the hours for each service period on a given type of day. A common setup is a Weekdays schedule and a Weekends schedule. If your hours differ on individual days, create a separate schedule for each day.
- In the Day Schedules section, create a schedule and give it a name, such as Weekdays.
- For each service period that applies to that schedule, select the checkbox in the Available? column.
- Select Edit next to each available service period and set the start and end times for that service on that schedule.
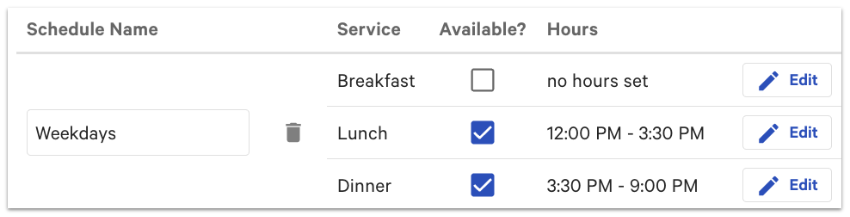
Note: Set your service periods so they connect end to end with no gaps and no overlaps across the day. A gap between periods can cause sales to appear under a "No Service" column in reporting, and overlapping periods can cause a service period to repeat or fail to save.
Expected outcome: Each service period on the schedule shows the hours you set.
Assign Days to Each Schedule
After your schedules have hours, tell Toast which days of the week use each schedule.
- Select the checkboxes for the days that match each schedule you created. For example, select Monday through Friday for a Weekdays schedule and Saturday and Sunday for a Weekends schedule.
- Confirm every day your restaurant is open is assigned to a schedule.
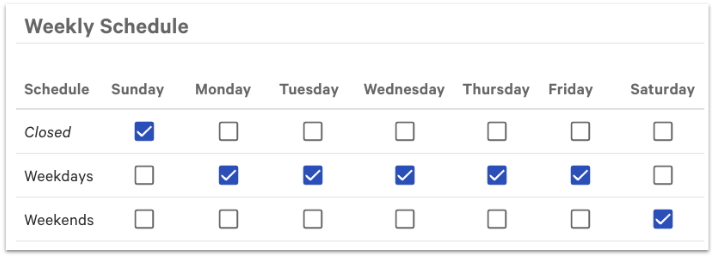
Expected outcome: Every open day is mapped to a schedule with the correct service periods and hours.
Save and Publish Your Hours
To make your hours live, select Save and then Publish your changes at the top of the page.
Expected outcome: Your updated hours and service periods are now active. Recent changes are not retroactive, and some changes can take a few hours to appear in reporting.
See Your Service Periods in Reporting
The Sales Summary report shows a breakdown of orders and sales for each service period you set up. For details on reading this report, see Sales Summary Report Overview.
Frequently Asked Questions
Why do I get a "service period must not overlap" error when I change my business day cutoff?
You get a "service period must not overlap" error because your business day cutoff time falls inside one of your service periods. The error message names the schedule and service period it conflicts with, for example "Service period on Sunday-Saturday for Lunch must not overlap 12:00 PM. Please update restaurant hours." Set your business day cutoff to a time when no service period is active, such as a time when your restaurant is closed, and then try saving again.
Also asked as:
-
- "Why can't I update my business day cutoff?"
- "How do I fix the service period overlap error?"
- "It won't let me change my closing time"
Why are my sales showing under a "No Service" column?
Your sales show under a "No Service" column because some orders fell outside the hours covered by your service periods. This usually happens when there is a gap between two service periods, even a one-minute gap, or when the full day is not covered. Review your day schedules so each service period connects end to end with no gaps and the times you are open are fully covered, then save and publish.
Also asked as:
-
- "What is the No Service daypart?"
- "Why is there a No Service column in my report?"
- "My dinner sales aren't showing in the right service"
Why isn't my new service period showing correctly in reports?
A new service period may not show correctly in reports because the change has not finished updating or because the report covers a date before the change. Recent changes are not retroactive and can take a few hours to appear. Make sure you selected both Save and Publish, then check a report dated after you made the change.
Also asked as:
-
- "My new service isn't breaking out in reporting"
- "Why is my report showing the full day instead of by service?"
- "How long until service period changes show up?"
Why aren't my hours showing on my online ordering page?
Your hours may not show on your online ordering page because online ordering hours are set separately from your restaurant's operating hours. By default, online ordering uses your operating hours, but you can set different online ordering hours. To review or set them, see Get Started With Online Ordering.
Also asked as:
-
- "My online ordering hours are wrong"
- "Why is my online ordering page showing closed?"
- "Do online ordering hours match my restaurant hours?"
Why are my hours wrong on my Google listing?
Your hours may be wrong on your Google listing because a Google listing is managed through Google, not through Toast Web. Update your hours in your Google Business Profile directly. If you use Order with Google through Toast, see Manage Order with Google.
Also asked as:
-
- "My Google hours don't match Toast"
- "How do I fix my hours on Google?"
- "Google shows the wrong hours"
Related Articles
- Get Started With Online Ordering
- Sales Summary Report Overview
- Manage Your Takeout and Delivery Schedule
- Holiday Weekend Restaurant Preparedness Guide
- Manage Order with Google