Get Started With Online Ordering
Last updated: May 20, 2026, 4:14 PM
Own your profits and guest relationships by allowing guests to easily order pickup or delivery directly from your restaurant — commission-free. This guide walks you through every step required to activate Toast Online Ordering, from menu visibility to placing a test order.
- Toast online ordering overview
- Before you begin
- Step 1: Set your menu visibility for online ordering
- Step 2: Choose your approval mode
- Step 3: Configure your auto-firing device
- Step 4: Set your dining options
- Step 5: Assign a server and revenue center
- Step 6: Set special requests and payment options
- Step 7: Set up delivery (optional)
- Step 8: Set your online ordering hours
- Step 9: Customize your online ordering page
- Step 10: Place a test order
- Related articles
Toast online ordering overview
Toast Online Ordering allows guests to order pickup, curbside, or delivery directly from your restaurant's branded ordering page. Orders flow into your Toast POS the same way as in-house orders, and you keep 100% of the revenue with no per-order commission to a third party.
By the end of this guide, you will have:
- Made your menus, menu groups, and items visible on your online ordering page.
- Chosen how online orders are received and approved at your restaurant.
- Designated one POS device as your auto-firing device.
- Set the dining options, hours, and payment methods guests can use.
- Customized your online ordering page with your logo and a public link.
- Placed a successful test order to confirm everything is working.
Prefer a guided walkthrough inside Toast Web? Log in to Toast Web and open the online ordering setup checklist. You can also sign up for a free live Toast Classroom: Getting Started With Online Ordering session.
Before you begin
To complete online ordering setup, you need:
- Access to Toast Web with permission to edit Takeout & delivery, Menus, Kitchen, and Front of house settings.
- The Toast Online Ordering module enabled on your account. If you do not see Online Ordering under Takeout & delivery in Toast Web, contact Customer Care to confirm your subscription.
- At least one Toast POS device that stays powered on during your operating hours. This device will be assigned as your auto-firing device.
- A takeout dining option already created in Toast Web. Curbside cannot be the only dining option enabled.
Note: These steps are completed in Toast Web. We recommend completing them with Toast Web open in another tab so you can follow along.
Step 1: Set your menu visibility for online ordering
Before guests can see your menu online, you must mark each menu, menu group, and menu item as visible to the Toast Online Ordering channel.
- Log in to Toast Web and navigate to Menus > Menu management > Menu manager.
- Select the menu you want to adjust.
- In the menu settings panel on the right, scroll to the Channel visibility section and enable Toast Online Ordering, Toast Local App for any menus that should appear online.
- Select Save and Publish all changes.
- Repeat for all menus, menu groups, menu items, and modifier groups you want available online.
Expected outcome: The menus, groups, and items you enabled now appear on your online ordering page when previewed.
Note: As you start taking online orders, review your Manage Your Quote Time Strategy to make sure your kitchen capacity calculation accounts for online orders.
Step 2: Choose your approval mode
The approval mode determines how incoming online orders are received at your restaurant.
- In Toast Web, navigate to Takeout & delivery > Availability > Online Ordering.
- Locate the Toggle Online Ordering header and select Accept online orders for the Accept Online Orders setting.
- In the Approval section, choose one approval mode:
| Approval mode | What it does | When to use it |
|---|---|---|
| Approve manually | All incoming orders go to Pending Orders mode on your POS for manual approval before firing to the kitchen. | You want to confirm every order before it is prepared. |
| Send orders directly to kitchen | Orders fire automatically to the kitchen as they arrive. Toast recommends this option. | You want the fastest, hands-off workflow. Requires an auto-firing device (Step 3). |
| Use rules | Orders fire automatically unless they trigger a rule (cash threshold, credit minimum, delivery minimum, total amount). Triggered orders require manual approval or are auto-rejected. | You want most orders to fire automatically but flag specific scenarios. Requires an auto-firing device (Step 3). |
If you selected Use rules, the Approval Rules section appears. Enable each rule you want and enter the trigger amount and enforcement behavior (Approval Needed or Reject):
- Cash Threshold — Online cash orders over the trigger amount require approval or are rejected. Useful when delivery drivers cannot carry large amounts of cash.
- Credit Minimum — Online credit orders under the trigger amount require approval or are rejected. Useful for restaurants that do not accept small credit orders.
- Delivery Minimum — Prevents online delivery orders below a minimum total. Applies to cash and credit orders.
- Total Amount — Applies to orders whose post-tax total is at or above the specified amount.
- Select Save and Publish your changes.
Expected outcome: Online ordering is enabled, and incoming orders will follow the approval mode you selected.
Note: If you ever need to pause online orders, return to this section and select Stop accepting online orders under Toggle Online Ordering.
Step 3: Configure your auto-firing device
Auto-firing is required if you choose Send orders directly to kitchen or Use rules in Step 2. You must enable order auto-firing on exactly one Toast POS device per restaurant location. The autofire device should be connected to your Toast Network via Ethernet, not Wifi, to avoid any syncing errors.
Assign the device in Toast Web
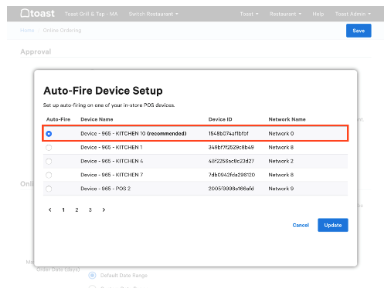
- In Toast Web, scroll to the auto-firing device prompt that appeared after you selected your approval mode.
- Toast will recommend a configured POS device. Select Update to accept the recommendation, or choose another device from the list.
- Confirm your selected device appears next to Current Selection.
- Select Save and Publish to finalize.
Enable auto-firing on the POS device
- On the POS device you selected, open the Toast app main menu.
- Navigate to Setup > Device Setup.
- Select Order Auto-Firing.
- For Does this device manage scheduled orders or auto-approve any online orders?, select Yes, then select Continue.
Expected outcome: The device shows as your auto-firing device in Toast Web, and online orders will fire to the kitchen from this device.
Important: Only one device should be set as the auto-firing device. Configuring a second auto-firing device causes duplicate kitchen tickets. For more details, see Set Up Order Auto-Firing.
Note: If you ever see a message that "Auto approval for Toast Online Ordering is currently paused" or "An issue with the Auto Firing device was detected," your auto-firing device is offline. See Troubleshoot Your Autofire Device to bring it back online.
Step 4: Set your dining options
The Dining Options section controls whether guests can choose curbside pickup, takeout, or delivery on your online ordering page. You can also add a customized order-ready message for each option.
- In Toast Web, navigate to Takeout & delivery > Availability > Online Ordering.
- Scroll to the Dining Options section.
- For each dining option you want to offer, select a dining option from the drop-down menu (for example, Takeout, Curbside Pickup, or your delivery option). Leaving a drop-down set to Select disables that option for online orders.
- Optional: Select Add instructions to enter a custom message for guests. Examples:
- Takeout: "Thank you for your order! Please look for your order at the left-hand counter."
- Curbside: "Thank you for your order! Let us know when you've arrived by clicking the link in your confirmation."
- Delivery: "Thank you for your order! We will call you when your order is outside your door."
- Select Save and Publish to finalize.
Expected outcome: The dining options you enabled now appear on your online ordering page, and your custom messages will appear on each guest's confirmation screen and e-receipt.
Important: If a dining-option drop-down is set to Select, your online ordering hours will not display correctly for that option, and guests will not be able to place orders for it.
Note: If you do not want to offer curbside pickup, leave the Curbside Option drop-down on Select. To remove curbside completely, see How do I disable curbside pickup? for the full archive workflow. To set curbside pickup properly with arrival notifications, see Set Up Curbside Pickup for Online and Call-In Orders.
Step 5: Assign a server and revenue center
Server assignment controls who is credited for online order tips and reports. Revenue center mapping lets you report online orders separately from in-house revenue.
Server selection for Toast Online Ordering
In the Server Selection section, choose one option:
- Assigned by auto-firing tablet — The order is assigned to whichever employee last entered their passcode on the auto-firing device, even if that employee has clocked out.
- Online Order Server — The order is assigned to a specific employee you designate. Toast recommends creating a generic "Online Ordering" employee and assigning it here so all online orders are attributed consistently. To create the "Online Ordering" employee, see Add and Edit Employees and Wages for Toast POS.
Server selection for scheduled third-party orders
If your restaurant uses third-party ordering channels (DoorDash, Uber Eats, Grubhub) and accepts scheduled orders, those orders may not be auto-assigned to a server. Choose one of:
- Assign a default server for online orders in your Toast Web configuration.
- Manually assign a server to each order after it arrives.
Note: Branded Mobile App orders use the same server-assignment settings as third-party orders.
Revenue center mapping
Mapping online orders to a dedicated revenue center makes them easy to isolate in reports.
- In Toast Web, navigate to Front of house > Tables & sections > Revenue centers.
- Select +Add to create a revenue center named Online Ordering.
- Select Save and Publish.
- Navigate to Takeout & delivery > Availability > Online Ordering.
- Locate the Revenue Center header and use the Revenue Center Mapping drop-down to select Online Ordering.
- Select Save and Publish.
Expected outcome: All future online orders are tagged with the Online Ordering revenue center in your sales reports.
Note: Branded Mobile App orders use the same revenue center as Toast Online Orders.
Step 6: Set special requests and payment options
Special requests
The Special Requests section lets guests add a note to individual menu items (for example, "extra sauce on the side"). You can customize the prompt that guests see — for example, "No substitutes. Additions may cost extra."
Note: Special requests apply to all menu items. They cannot be limited to specific items, and there is no other open-response field for online orders at this time.
Payment options
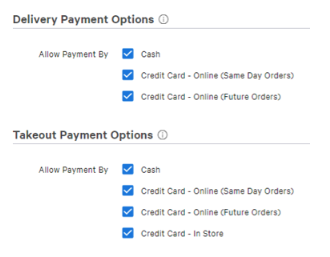
- In Toast Web, navigate to Takeout & delivery > Availability > Online Ordering.
- In the Delivery Payment Options section, enable Cash, Credit card, or both.
- Optional: Enable Allow tips so guests can add a tip when paying by credit card.
- Select Save and Publish.
Expected outcome: Guests will see the payment methods you enabled at checkout.
Note: Guests cannot split payment for an online order across two credit cards at this time.
Step 7: Set up delivery (optional)
If you offer delivery, you can use either your own drivers or Toast Delivery Services® (TDS).
- To use your own drivers, see Set Up Delivery Using Your Own Drivers.
- To use Toast Delivery Services®, see Toast Delivery Services®.
Both options are configured from the Other Setup section of Toast Web on the Takeout/delivery page.
Important: You cannot use both delivery using your own drivers and Toast Delivery Services at the same restaurant — you cannot toggle between them.
Note: Toast Delivery Services® is unavailable in Canada, Ireland, and the United Kingdom at this time.
If you do not plan to offer delivery for online orders, skip to Step 8.
Step 8: Set your online ordering hours
Online ordering hours can be different from your restaurant's operating hours. For example, you can keep online ordering open 10:00 a.m. – 8:00 p.m. even if your dining room stays open until 10:00 p.m.
- In Toast Web, navigate to Takeout & delivery and locate the Online ordering hours section.
- For each day of the week, select the pencil icon to edit the hours, or use the toggle to disable orders for that day.
- Select +Add interval to add additional time blocks for busy peaks.
- To copy the same hours to other days, select the days you want to apply them to under Apply these hours to other days.
- To mark a day as closed all day, enable the Closed all day checkbox.
- Select Update to save your changes.
- Optional: Select +Add override to set custom hours for specific dates, such as holidays.
Expected outcome: Your online ordering page now shows the hours you configured. Outside those hours, the page shows as closed even if your dining room is open.
Note: Setting online ordering hours is separate from your restaurant's operating hours. By default, online ordering uses your restaurant's operating hours — Toast recommends reviewing this schedule before adjusting.
Note: Schedule overrides apply to the dining option, not to all online orders. For example, a Takeout & Third-party delivery override applies to pickup (including curbside), Toast Delivery Services, and third-party integrations (Uber Eats, DoorDash, Grubhub). It does not automatically apply to first-party delivery. For details, see Manage Your Takeout and Delivery Schedule.
Note: To allow guests to schedule orders for a future date or to adjust the order cut-off time, see Schedule Future Orders and Manage Your Takeout and Delivery Schedule.
Step 9: Customize your online ordering page
Add your logo, a banner, and a custom URL so guests recognize your brand.
- In Toast Web, navigate to Takeout & delivery > Restaurant info.
- Scroll to Logo and banner image.
- Select +Upload image for your first upload, or Replace image to update an existing one. Image requirements:
- Logo — Minimum resolution 230 px by 230 px. Maximum file size 5 MB.
- Banner image — Minimum resolution 1400 px by 788 px. Maximum file size 5 MB.
- Under Public Links, customize your online ordering URL. The URL begins with https://www.toasttab.com/. The portion after the slash is up to you. This is the link you will share with guests.
- Select Save and Publish.
Expected outcome: Your online ordering page now displays your logo and banner, and your custom URL is the link guests will use.
Note: To customize colors, fonts, and other branding elements, see Customize Your Online Ordering Site.
Step 10: Place a test order
A test order confirms that orders flow through approval, fire to the kitchen, and print correctly.
Before you place the test order
- Notify your kitchen staff that you will place a test order that they should not prepare.
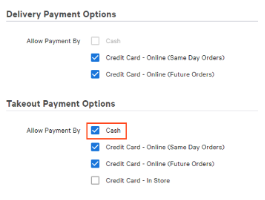
- In Toast Web, navigate to Takeout & delivery and select Online ordering setup in the Toast Online Ordering section under Related Settings.
- Scroll to the Delivery Payment Options or Takeout Payment Options section and enable Cash by selecting the checkbox.
- Select Save and Publish.
If you do not want to temporarily enable Cash payments for online ordering, try creating a promo code specifically for your test orders!
- In Toast Web, go to Finance > Related > Settings > Discounts & promo codes.
- Select +Add a Discount.
- Name discount "Online Test Order" and select the Fixed % Off discount type. Set the value to "100%".
- Under the "Applies to" section, select Entire Check.
- Scroll to the Promo Code section and select +Add Promo Code. Enter "TEST" as the code.
- Save and publish all changes.
Now you can enter the promo code on the payment screen when placing a test order on your online ordering page!
Note: Make sure to archive the discount code after tests are completed.
Note: To avoid charges on test transactions, use Test Transaction Mode instead of enabling cash temporarily.
Place the test order
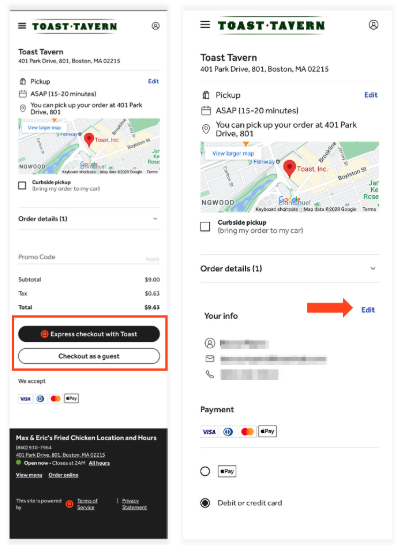
- In a different browser tab, open your online ordering URL.
- Add a varied range of items and modifiers to your cart so you can verify all prep stations print correctly.
- Select a dining option that has cash enabled.
- Select Checkout and follow the prompts. At the Payment Method step, select Cash.
- If you have an active promo code, enter it in the Promo Code field to test it.
- If online ordering tips are enabled, select a tip option.
- Select Submit to place your order.
Expected outcome: You receive an order summary message confirming the order was placed successfully. Depending on your approval mode, the order appears on the Pending Orders screen under the Needs Approval tab or fires automatically to the kitchen.
Void the test order
- On your POS device, find the test order.
- Select the three-dot overflow menu in the top right corner.
- Select Void Order and enter a valid void reason.
For more details on voiding, see Void Items, Payments, and Checks.
After the test order
Return to the Online ordering setup page and disable Cash if you do not want to offer cash payment for online orders. Save and publish any changes. Note: Express checkout (where guests authenticate with their Toast account) is not available for guests outside the United States at this time.
Place a test order for third-party ordering
If you also offer ordering through DoorDash or Uber Eats, place a test order through each integration to confirm the workflow.
DoorDash
- Use the DoorDash portal to create a test order. Choose takeout instead of delivery for the simplest verification.
- Confirm the test order displays on your Kitchen Display System (KDS) or prints a ticket. Review your Ticket Display Options if the order does not appear correctly.
- For DoorDash-specific guidance, see the DoorDash Help Center.
Uber Eats
- Log in to your Uber Eats account and place a real order as if you were a guest.
- If Uber Eats does not support test mode, place a real order and refund it afterward, or wait for a guest's live order to verify the workflow.
Related articles
- Set Up Order Auto-Firing
- Set Up Curbside Pickup for Online and Call-In Orders
- How do I disable curbside pickup?
- Troubleshoot Your Autofire Device
- Online Ordering: Advanced Settings
- Online Ordering FAQ
- Manage Your Takeout and Delivery Schedule
- Schedule Future Orders
- Customize Your Online Ordering Site
- Online Ordering Launch Best Practices Checklist