Toast Retail: Generate Purchase Orders & Receive Inventory
Last updated: Dec 10, 2025, 10:26 AM
- Purchasing & Receiving Overview
- Create a Purchase Order
- Send or Download a Purchase Order
- Receive Against a Purchase Order
- Use Invoices to Receive Inventory
- Frequently Asked Questions
- Additional Resources
Toast Retail: Purchasing & Receiving Overview
You can access the Purchasing & Receiving page by navigating to Retail > Purchasing > Purchasing & Receiving in Toast Web. The Purchasing & Receiving page is where you can view, create, and manage your purchase orders (POs), or receive via invoice if desired.
For full access to the features on the Purchasing & Receiving page, you'll need the 4.5 Edit Full Menu permission. Employees who need to receive new inventory but who will not create or edit items in Toast will need the 5.2 Inventory and Quantity permission. To learn more about permissions, check out our Permissions Reference Guide.

- At the top of the page, you’ll see a summary of purchase order data including committed PO order value, total number of POs ordered (but not yet received), total number of POs received, and number of POs partially received.
- Below the data summary is a table that contains all POs and invoices. You can use the Type, Status, Supplier, and Payment status drop-downs to narrow down your visible rows, or select More filters to further customize by showing only Paid or Unpaid items, filter by expected delivery date or supplier, or show/hide any Archived items.
- The Columns button will allow you to show, hide, or rearrange information in the table to suit your needs. You can select any column header to sort your list in ascending or descending order.
- In the top right corner, you’ll see buttons to Create PO or Receive via invoice.
Create a Purchase Order in Toast Retail
To create a purchase order for Toast Retail:
- Select Create PO at the top of the Purchasing & Receiving page. This will open a new Purchase order.
- Open the Supplier drop-down and select the supplier for this PO. Supplier details will appear on the page – you can select the pencil icon to make global updates to these supplier details if needed.
- Optional: Select Expected on date and add a Note to supplier that will appear on your purchase order. The expected date can be helpful for filtering your purchase order list or planning for additional staff as needed to receive inventory.
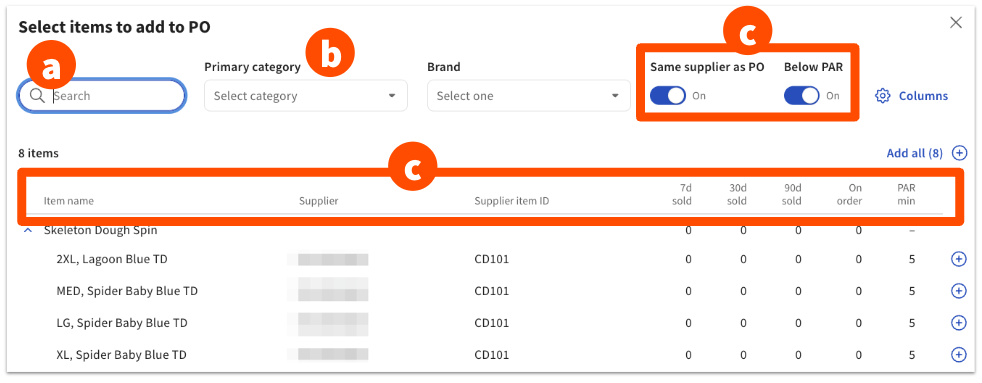
- Select Add Item to find the items you’d like to add to your purchase order. There are several options to help you filter your item list and identify what you want to order:
- The Search feature allows you to enter keywords to find a specific item or group of items. If you have a barcode scanner connected to your computer, you can also use that to scan and quickly find a specific item.
- You can select a Primary category from the drop-down menu to filter items within a certain category or subcategory, or you can select the Brand drop-down to filter items by brand.
- The Same supplier as PO filter will narrow down items to add that are associated with the supplier you selected for this purchase order, and Below PAR will only show you items with inventory lower than the configured PAR minimum. You can toggle one or both of these filters On or Off as needed.
- The items table includes the following information to help you make decisions about what to include on your order:
- 7d sold, 30d sold, and 90d sold show the number of units sold in the last 7/30/90 days. If an item is sold by weight, then this value indicates the number of sales (not the total weight).
- On order shows the number of units ordered as part of another PO or cross-location transfer.
- PAR min and PAR max will show if configured for an item (learn more: Manage Your Inventory for Toast Retail).
- On hand indicates the number of units currently in stock.
- Supplier and Supplier item ID will show all suppliers and item IDs associated with an item.
- Barcode and PLU.
- Days left is the number of days of inventory you have left based on the quantity on hand and average past sales.
- To update the information that appears on the items table, select the Columns button at the top to check/uncheck individual columns described above.
- Select the plus sign next to an individual item to add it to the PO, or select Add all to include all items that are visible on the page. You can add up to 500 items to a single PO or invoice.
- Select the X in the top right corner of the pop-up when you’re finished adding items to go back to the draft of your purchase order.
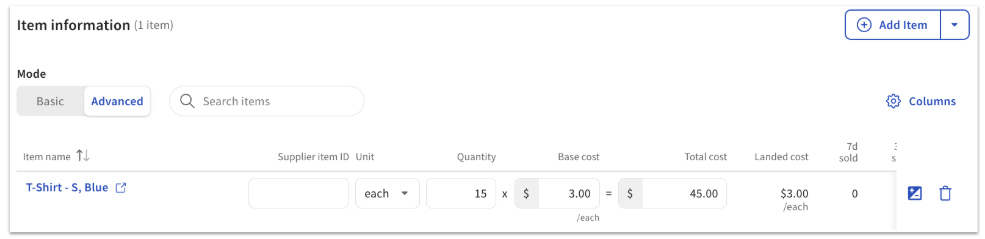
- Back on the purchase order creation page, you can enter a Supplier item ID (optional) and enter the Quantity, Unit, and Cost for each item you want to add to your order. These fields may be prefilled based on previous POs for your convenience. The Amount column will update automatically based on any changes.
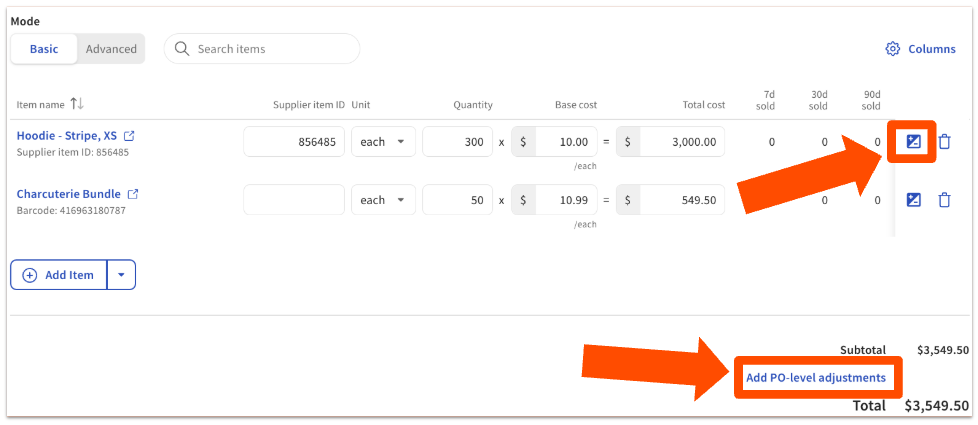
- Below the Item information header, you’ll also see the option to toggle your purchase order from Basic mode to Advanced mode. Advanced mode will display Landed cost, which is a Toast-calculated value showing cost per unit with any discounts, fees, or taxes incorporated. You can add item-level discounts, taxes, or fees using the +/- icon in the rightmost column (see Invoice Adjustments).
- At the bottom of the purchase order creation page, you’ll see the total due to your supplier, along with the option to Add fees/taxes/discounts if needed (see Invoice Adjustments). These adjustments are applied to the subtotal of the PO.
- Select Save as draft at the top right corner of the page when you’re finished editing your purchase order.
Purchase Order/Invoice Adjustments for Toast Retail
Invoice adjustments, including discounts, taxes, and fees, can be applied to an entire purchase order or to specific items. Adjustments give your POs a level of precision at the same level as your supplier invoices. This means better cost accuracy, more transparency, and easier tracking for your business.
Adjustments can be made before ordering, during receiving, or after receiving. You can also add taxes, discounts, or fees to past received invoices and POs.
To add an item-level adjustment on a PO, follow these steps or watch the video overview below:
- Select the +/- icon on the right side of the Item information table.
- Select + Add discount/tax/fee.
- Select the adjustment Type from the drop-down.
- Enter a Fee name and Fee amount. You can use the toggle to change the amount from a fixed dollar amount to a percentage.
- Use the toggle to mark if the Fee is taxed.
- Select Save to update your PO.
Apply item-level discounts, taxes, and fees to a purchase order.
To add an adjustment to the entire PO, follow these steps or watch the video overview below:
- Select Add PO-level adjustments below the PO subtotal.
- Select + Add discount/tax/fee.
- Select the adjustment Type from the drop-down.
- Enter a Fee name and Fee amount. You can use the toggle to change the amount from a fixed dollar amount to a percentage.
- Select the appropriate Distribution type from the drop-down. This will impact how the landed cost per item is calculated after the adjustment is applied.
- Equally per item divides the adjustment equally among all line items.
- Item quantity divides the adjustment among line items based on quantity.
- Item total cost divides the adjustment based on the percentage each line item’s cost represents of the total invoice amount.
- Use the toggle to mark if the Fee is taxed.
- Select Save to update your PO.
Apply discounts, taxes, and fees to entire purchase orders.
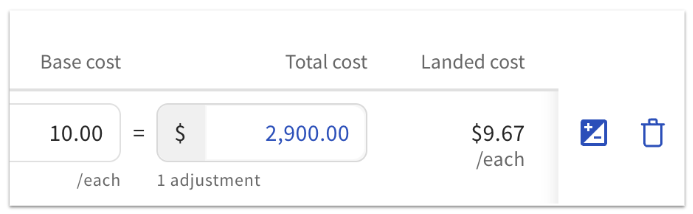
Both item-level and whole-PO adjustments will update your landed cost to reflect the cost per unit after all discounts/taxes/fees. If you make an item-level adjustment, the total cost for that item will show in blue text, with the number of item-level adjustments displayed on the bottom.
Note that the base cost of the item, not the landed cost, will be displayed on the item details page and the Item Library. Landed cost will be shown on the invoice or PO and the inventory history record.
Edit a Purchase Order in Toast Retail
To make changes to a purchase order, select it from the table on the Purchasing & Receiving page to open up the PO details.
- If a PO is in ordered or draft state, you can edit the Expected on date; the Note to supplier; make changes to Supplier item ID, Quantity, Unit, or Cost; add or remove items; add or edit any fees/taxes/discounts; and edit the Receiving note.
- If a PO is in a received or partially received state, you can only edit the Expected on date, fees/taxes/discounts, and the Receiving note.
- You can account for changes to the items ordered in the receiving workflow. See the Receive Against a Purchase Order section of this article for more details.
- If a PO is voided or archived, it cannot be edited.
- If a PO is voided, you can archive it if you’d like to remove it from your list of purchase orders. Open the PO and select the three dot overflow menu in order to archive it.
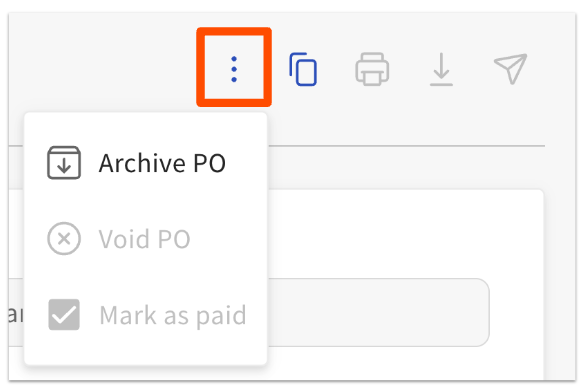
- If a PO is archived, you can unarchive it using the same three dot overflow menu shown above.
Send or Download a Purchase Order in Toast Retail
Once you’ve created a purchase order draft, you’ll see the following options for exporting or sending your PO to your supplier.

- Select the send icon (to the left of the Edit button) to email your PO to your supplier directly from Toast Web. You’ll be able to edit your email details and see a preview of your PO before sending it. If you send an email, your PO will automatically update from draft to ordered status.
- You can resend a PO at any time using the same steps.
- Alternatively, you can select the download (down arrow) icon if you want to save your PO as a PDF or .CSV file to submit to your supplier. If you download your PDF or CSV, you’ll need to select the Mark as ordered button in order to update from draft to ordered status.
After a PO is ordered (either by sending an email or selecting the Mark as ordered button), you’ll have the ability to select the printer icon at the top of the page to print barcode labels for the items that you’ve ordered, if needed.
Once a PO has been paid, you can select the Paid? checkbox for that PO on the Purchasing & Receiving page. This does not connect with other accounting systems at this time, but is available for your own records to track which orders still require payment to be made.
Back to top
Receive Against a Purchase Order in Toast Retail
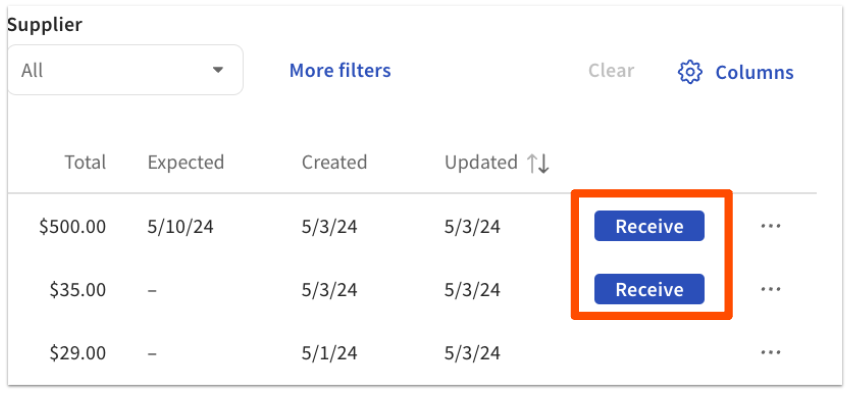
When you’re ready to receive your inventory from your supplier, there are several ways you can receive against a PO in Toast Retail:
- On your desktop, on the Purchasing & Receiving page in Toast Web, any ordered or partially received PO will have a Receive button on the PO table.
- On desktop or mobile, from the Quick Actions section of the Retail Dashboard, you can select Receive new inventory. When you scan or search for an item that is part of a purchase order, you’ll see a Receive against PO drop-down menu that will allow you to select from any open and ordered PO associated with that item.
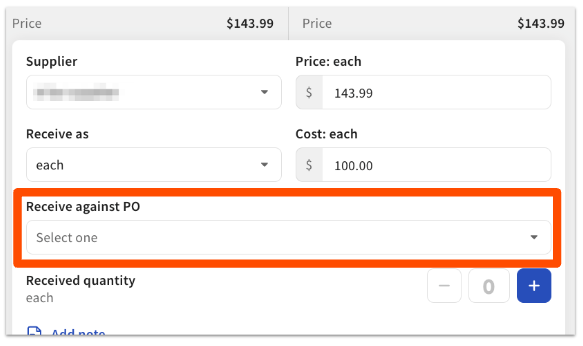
- The same flow can be accessed when you select Receive stock from the item library.
When you receive against a PO, if you make changes to any quantity (for example, if you ended up ordering a higher quantity of a certain item), the total amount on the PO will be updated to match what you actually received. Any other item-level changes you make to cost or price on a PO will be saved to that item for reporting purposes (like your COGS: cost of goods sold).
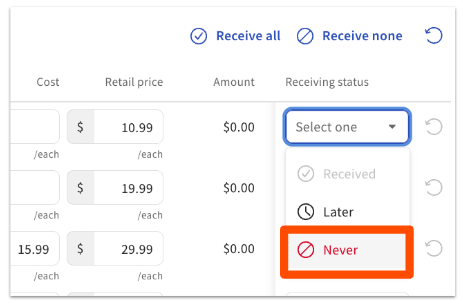
If something has changed and you will not be receiving a quantity of an item, you can use the receiving workflow from the Purchasing & Receiving page and select Never from the Receiving status drop-down for that line on the PO.
Use Invoices to Receive Inventory in Toast Retail
If your business doesn’t need to create or manage POs in Toast Retail, you can also receive inventory via invoice by selecting the Receive via invoice button at the top of the Purchasing & Receiving page, next to the Create PO button.
On the invoice page, you can select a supplier, enter an invoice number and invoice notes, and add the items that you are receiving.
Toast Retail also gives you the ability to import invoices directly from supplier portals. With invoice imports, you can avoid manual invoice entry and quickly and accurately receive inventory quantities and their associated costs into Toast Retail. To learn more, see Toast Retail: Import Invoices.
Back to top
Frequently Asked Questions - Purchasing and Receiving With Toast Retail
How do I edit the cost or quantity for items on a PO that have already been marked as received?
When a PO is in received state, the items on it can no longer be edited from the PO itself. Instead, select the item from your item library to open the item details page.
In the Inventory section, select Adjust to increase or decrease the number of items you have on hand.
To adjust the cost of an item that was received, select See all next to the Recent inventory history that appears in the same section of the item details page. Select the pencil icon for the line you wish to adjust, and a pop-up window will appear where you can edit the Cost for the item.
What happens if I archive an item on a PO?
- If the PO is in draft, the item will be removed from the PO.
- If the PO is ordered, the item will be grayed out and can be removed by selecting Edit then using the trash can icon.
- If the PO is received or partially received, the archived item cannot be received. It will appear grayed out.
If the item was archived by accident, see How do I restore archived items to Toast Retail? for detailed instructions.
How do I update category group shared prices for items I receive via invoice or PO?
When receiving items that use a category group shared price (e.g. all sandwiches in the group are set to $5.00), do not change the base price of the item(s) from the invoice or PO. Doing so will override the category group shared price setting and change the base price for that item alone. If you wish to update the price for all items in the group, navigate to the group within a menu editor in Toast Web and adjust the category group price directly.
What happens to the taxes, discounts, or fees that I add to a past PO or invoice?
At this time, you can only add taxes/discounts/fees to the whole past PO or invoice (not on the item level).
When you edit an old PO or invoice to add a tax, discount, or fee, the landed cost will be calculated using the distribution method that you select (item total cost, item quantity, equally per item).
Does Toast Retail support automatic invoice upload?
No, Toast Retail does not currently have automatic invoice capture (with or without xtraCHEF). You can manually create purchase orders and invoices in the Toast Retail module, or use the invoice import feature.