Toast Retail: Manage Your Inventory
Last updated: Jun 15, 2026, 10:54 PM
- Enable Inventory Tracking
- Periodic Automatic Replacement (PAR) Overview
- Configure Receiving Units
- View Inventory Adjustment/Change History
- Manage Item Library in the Toast Now App
- Inventory Tracking Best Practices
- Link Inventory
- Additional Resources
Enable Inventory Tracking for Toast Retail
Inventory tracking for Toast Retail helps you maintain accurate inventory levels, optimize your product assortment and ordering schedule, and make informed business decisions about pricing, promotions, and marketing campaigns.
Certain actions in Toast Retail will automatically turn on inventory tracking for an item, such as receiving an item in Toast Web or importing a new item with an inventory quantity included. To manually turn on inventory tracking for an individual item, follow these steps:
- In Toast Web, navigate to Retail > Item management > Item Library.
- Search for and select the item you'd like to track inventory for to open the item details page.
- Select the Inventory tab on the item details page and select the Track toggle to move it to the On position.
- You can adjust your inventory on hand and set values for PAR max and PAR min in the same section of the item details page (learn more below).
- Save your changes.
To turn on inventory tracking for multiple items:
- On your item library, select the checkboxes for each item you'd like to track inventory for.
- Open the Set values drop-down that appears at the bottom of the page, then select Set quantity. Inventory tracking will be enabled for any items that have it turned off.
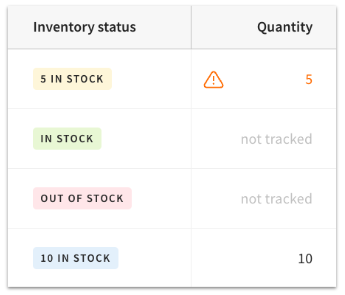
Items that have inventory tracking enabled will show the amount of inventory on hand in the Status column of the item library, as well as the Quantity column. Items that don't have inventory tracking will only show "In stock" or "Out of stock" as their status, and the quantity will display as "not tracked". Examples are shown below:
You can adjust your quantity from the item details page, or directly on the item library by selecting the Quantity value and using the pop-up window to enter the information for your inventory adjustment. Learn about the different inventory adjustment types in this Support Center article, Toast Retail: Adjust Inventory to Optimize COGS Calculations.
You can turn off inventory tracking by following the steps above and moving the toggle to the off position. Any previous inventory history will remain visible even after tracking is disabled.
Note: If inventory tracking is on and the item has a barcode, the inventory quantity can go into the negative if you scan and sell more than the quantity on hand. You will see a negative number in your Sales & COGS Report, Inventory Snapshot Report, and the item library. There is no setting that will prevent this behavior.
Periodic Automatic Replacement (PAR) Overview
PAR is a common inventory tracking method for businesses to ensure they have sufficient inventory on hand at all times. Within Toast Retail, you can set a minimum and maximum PAR for each item.
The minimum PAR is the lowest quantity of an item you want to have on hand before being notified of low stock.
The maximum PAR is the highest quantity of an item you want to have on hand to avoid overstocking. You can think of this value as your optimal quantity, or the total amount you would want to have in stock.
Once you set your PAR levels, you’ll be able to filter to items that are below or above your minimum and maximum to efficiently manage items that need to be reordered.
Set the PAR Maximum and Minimum per Item in Toast Retail
In order to access the PAR maximum and minimum settings, you’ll need the 4.5 Edit Full Menu permission. If your business uses multi-location management (MLM) you’ll need the 4.5 Edit Full Menu permission for all locations/groups.
To set a PAR minimum or maximum for an item:
- In Toast Web, navigate to Retail > Item management > Item Library.
- Search for and select the checkbox for the item you’d like to edit. You can select multiple items if you want to apply the same PAR levels.
- Open the Set values drop-down at the bottom of the page and select Set PAR levels.
- Toggle the PAR level tracking for these items setting to the On position.
- Enter a PAR min and/or a PAR max as desired. PAR levels cannot use a decimal point value.
- Select Set PAR. This action will override any existing PAR levels.
You can also use the Columns button on the item library to add the PAR min and/or PAR max fields to your item library page and make edits directly on the table. Or, if you’re looking at item details, the Inventory section has the same settings available.
Remember: you must have inventory tracking enabled and you must toggle PAR tracking On for the individual item in order to be able to add a PAR min or PAR max on that item.
PAR for Toast Multilocation Management (MLM)
A few things to note for using PAR at businesses which are part of a multilocation group:
- For MLM businesses, PAR can be set at the location level or the group level.
- If a location-specific PAR is set, that location will ignore any group-level settings.
- When a PAR is targeted and owned at the group level, and local PARs also exist, all locations will be able to view but not edit the local PARs.
- PAR can be set on the item detail page, or in bulk in the item library. It cannot be edited directly via the PAR min/PAR max column in the item library.
Configure Receiving Units for Retail Items
If your business purchases items in cases or other groupings of inventory, you can configure your receiving units on the item level to make updating your stock easy and quick.
In order to access this setting, you’ll need the 4.5 Edit Full Menu permission. If your business uses multilocation management (MLM) you’ll need the 4.5 Edit Full Menu permission for all locations/groups. For more information, see the Permissions Reference Guide.
To create a receiving unit:
- In Toast Web, navigate to Retail and then on the navigation menu on the left-hand side of the screen, navigate to Purchasing > Receiving Units.
- Select + Add receiving unit.
- Enter the name of the receiving unit (e.g. case, box). You’ll be able to indicate how many items come in each receiving unit later.
Once you’ve created your receiving units, you can start adding them to the items they apply to.
- Navigate to your item library within the Retail module.
- Search for and select the checkbox for the item you’d like to edit. You can select multiple items if you want to apply the same receiving units.
- Open the Set values drop-down at the bottom of the page and select Set receiving units.
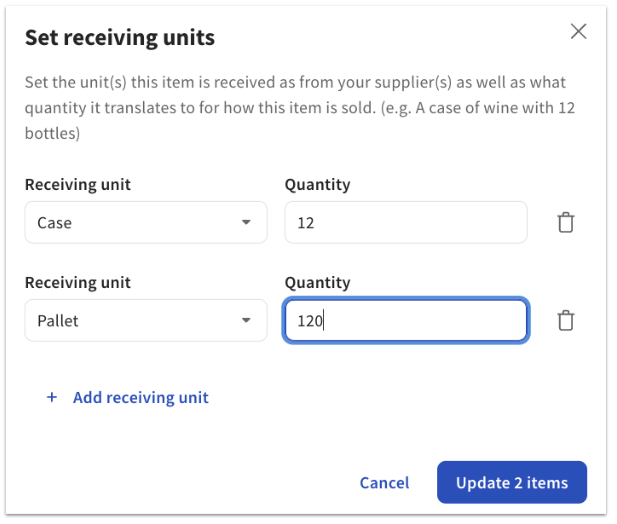
- Enter the Receiving unit (which you created earlier) and the Quantity (the number of individual items that are part of that unit). You can also select + Add receiving unit here if you need to create a new receiving unit.
- In this example, the items selected can be received in a case of 12 items or a pallet of 120 items.
- In this example, the items selected can be received in a case of 12 items or a pallet of 120 items.
- Select Update. This action will override any existing receiving units.
You can also use the Columns button on the item library to add the Receiving unit field to your item library page and make edits directly on the table. Or, if you’re looking at item details, the Receiving Units section has the same settings available.
Note:
- Receiving units are not shared across MLM locations.
- You can’t create two receiving units with the exact same name.
Receive Inventory by Unit in Toast Retail
After you’ve created your receiving units and associated them with an item, you can receive inventory by unit in Toast Retail. You cannot create or assign a new receiving unit within this workflow:
- From your Retail Dashboard or your item library (on desktop or mobile), select the three dot overflow menu next to the Retail search bar and select Receive stock.
- Search or scan a barcode of an existing item.
- Open the Receive as drop-down and select an existing receiving unit assigned to the item. You cannot create or assign a new receiving unit from this page.
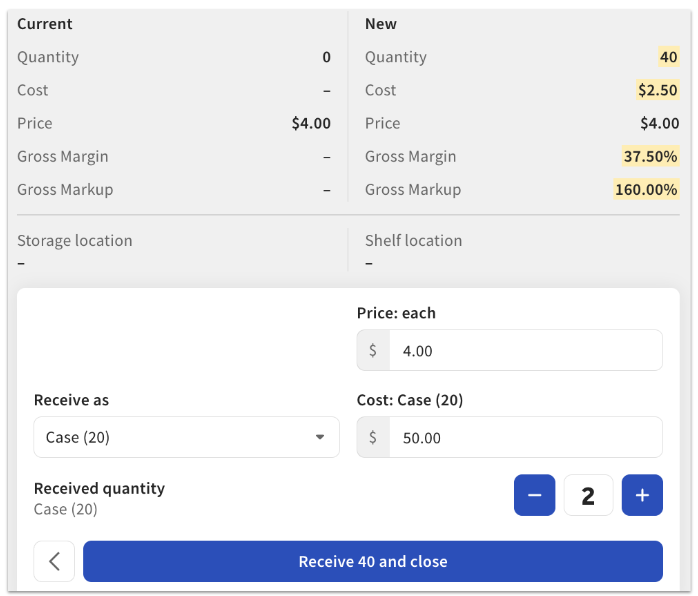
- Enter the Cost of the receiving unit. The calculations at the top of the page will update to reflect the quantity, cost, price, gross margin, and markup for the item.
- In this example, two cases of 20 items were received (40 items total) at a cost of $50 per case. The cost per individual item is $2.50.
- You can select the Price field to increase the price by a dollar or percentage amount, set the price from margin, or choose the new item price yourself.
- In this example, two cases of 20 items were received (40 items total) at a cost of $50 per case. The cost per individual item is $2.50.
- Select Receive and close to confirm your selection.
View Inventory Adjustment/Change History in Toast Retail
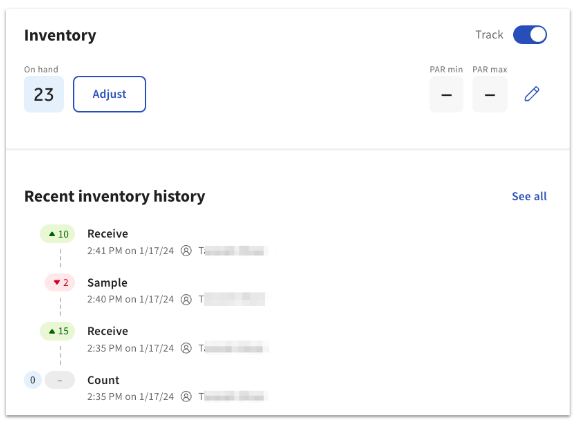
On the item details page, the Inventory section will show a history of any inventory changes that were made. You'll be able to see the type of adjustment made, the amount of adjustment, the date and time, and the name of the person who made the adjustment.
The inventory history will remain even if tracking is later disabled.
Manage Item Library in the Toast Now App
Follow the steps in this section to quickly view, search, edit, and manage your item library directly from your mobile device.
Key features:
- Browsethe full item library with search and filtering
- Editing item details from mobile
- Configurable low-stock notifications at both the item and global level
- Mobile photo uploads for item identification
- Smart Scan and manual item creation workflows
Permissions needed: 4.5 Edit Full Menu
Navigate to the Item Library
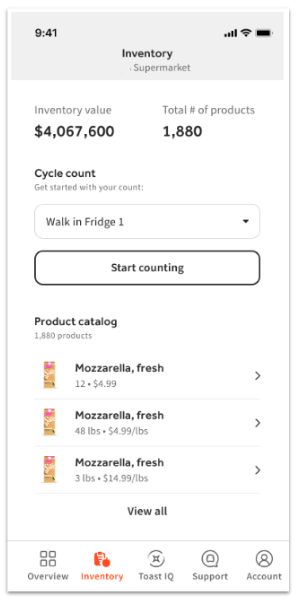
- To access the item library, log in to the Toast Now app with your credentials, then navigate to Inventory.
- Select your item from the list of available items or use the search bar at the top of the list. Here you can also filter your Low stock, Out of Stock, and items Not Selling.
- Once you select your item, you can choose to View full details or Edit the following:
- Product name
- Primary category
- Count unit
- Each
- Barcode
- PLU
- Description
- Pricing
- Pricing strategy
- Price (each)
- Purchased Info
- Vendor
- Cost
- Par
- Minimum
- Max
- Once all selections have been entered, select Save.
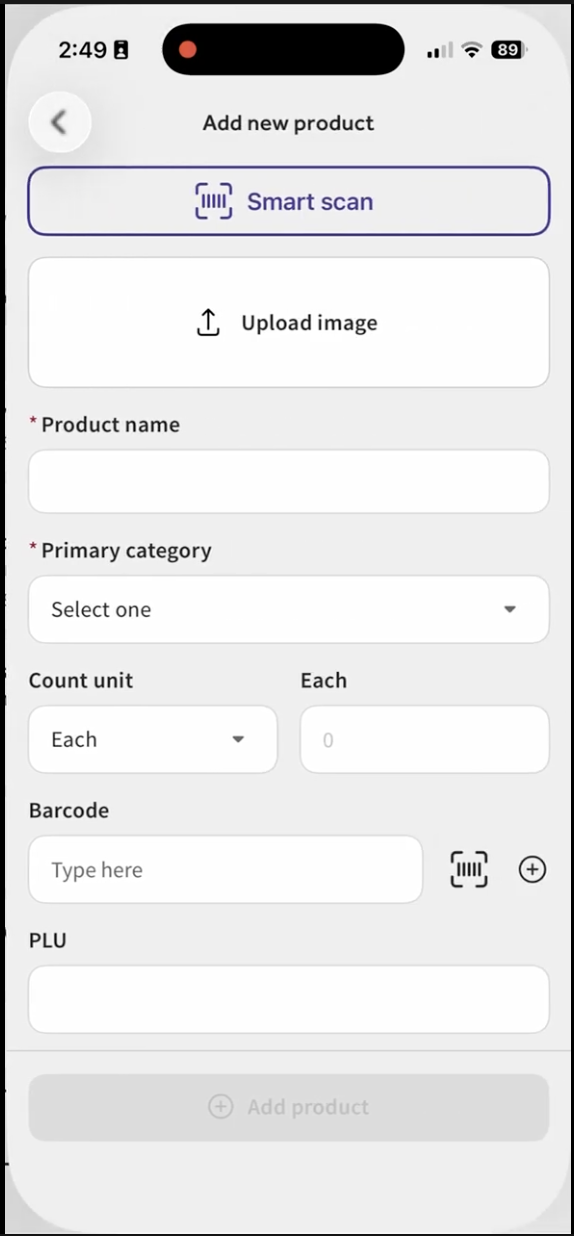
Add a New Product to the Item Inventory
In the Inventory section of the Toast Now app, you can select +Add product to add a new product to your item Library. You can leverage the Smart Scan feature to scan the barcode or upload an image. Enter the item's details, then select +Add product.
Inventory Tracking Best Practices for Toast Retail
To ensure your inventory counts are accurate, it’s important to make any changes to your inventory tracking settings or adjustments to your inventory count directly within the Toast Retail section of Toast Web.
If you make changes using other methods, like Quick Edit mode on the POS or by editing your menus, your reports might not be accurate.
If you notice any discrepancies, the best way to fix them is to perform a count of your inventory on hand and make adjustments in Toast Retail (Use Cycle Counts to Manage Retail Inventory).
Back to top
Link Inventory in Toast Retail
Inventory linking in Toast Retail lets you unify inventory accounts across multiple items by using two item types: bundles and alternate packages. This is useful if your business sells things like gift baskets, flights, or boards that are assembled on site, or if you sell a specific item in different quantities (e.g. wine by the bottle or BTG/by-the-glass).
With bundles and alternate packages, you’ll be able to indicate how your items are related to each other and how inventory counts should be updated when one of the linked items is sold. To learn more, see this Support Center article: Create Item Bundles and Alternate Packages.
Additional Resources for Toast Retail
- Optimize Toast Retail
- Toast Retail: Create Item Bundles and Alternate Packages
- Toast Retail: Adjust Inventory to Optimize COGS Calculations
- Use Cycle Counts to Manage Retail Inventory