Crea un menú para el tablero de menú digital de Delphi
Última actualización: 28 may 2026, 10:34 a.m.
- Decide qué menú usar para tu tablero de menú digital de Delphi
- Crea un nuevo menú para un tablero de menú digital de Delphi
- Usa un menú existente para un tablero de menú digital de Delphi
- Gestiona los modificadores en un tablero de menú digital de Delphi
- Crea menús para múltiples ubicaciones
- Configura la configuración de stock de artículos en Toast Web
| Antes de seguir los procedimientos en esta sección, contacta a tu representante de ventas de Delphi y pídeles que habiliten el canal de visibilidad del tablero de menú digital para tu restaurante. Los procedimientos a continuación dependen de que ese canal de visibilidad esté disponible. |
Decide qué menú usar para tu tablero de menú digital de Delphi
Para los clientes que usan un tablero de menú digital de Delphi, Toast generalmente recomienda crear un menú específicamente para mostrar en el tablero de menú digital. Para crear rápidamente el menú para un tablero de menú digital de Delphi, creas un nuevo menú en Toast Web y luego agregas tus grupos de menú existentes a él. Para más información, consulta Crea un nuevo menú para un tablero de menú digital de Delphi a continuación.
Si tienes un menú existente que deseas usar para mostrar en el tablero de menú digital de Delphi, puedes hacerlo. Para más información, consulta Usa un menú existente para un tablero de menú digital de Delphi a continuación.
Una vez que el menú para tu tablero de menú digital de Delphi esté listo para compartir con los invitados, debes:
- Publica tu menú. El tablero de menú digital Delphi solo puede mostrar precios para un menú publicado.
- Contacta a tu consultor de incorporación de Delphi para habilitar actualizaciones automáticas de precios desde Toast Web al tablero de menú digital Delphi. Una vez que este paso esté completo, cualquier cambio que realices en tus precios en Toast Web se actualizará automáticamente en el tablero de menú digital Delphi.
Crea un Nuevo Menú para un Tablero de Menú Digital Delphi
Para crear un nuevo menú para un tablero de menú digital Delphi:
- Inicia sesión en Toast Web y ve a Menús > Gestión de menús > Gestor de menús.
- Selecciona el botón + Agregar menú, ingresa un nombre para el nuevo menú y selecciona el checkmark.
- Selecciona el menú que acabas de crear y selecciona Configuración avanzada en la barra lateral.
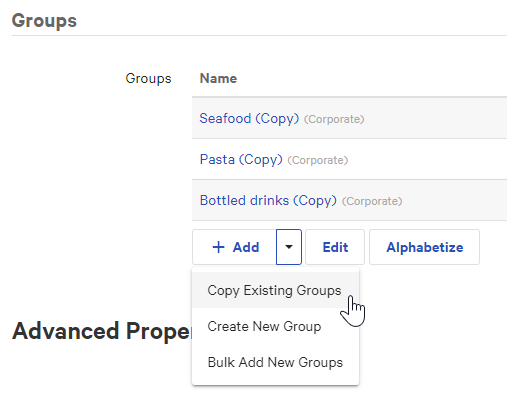
- En la sección Grupos, selecciona la flecha junto al botón + Agregar y selecciona Copiar Grupos Existentes. Se abre el diálogo Seleccionar Grupos de Menú para copiar.
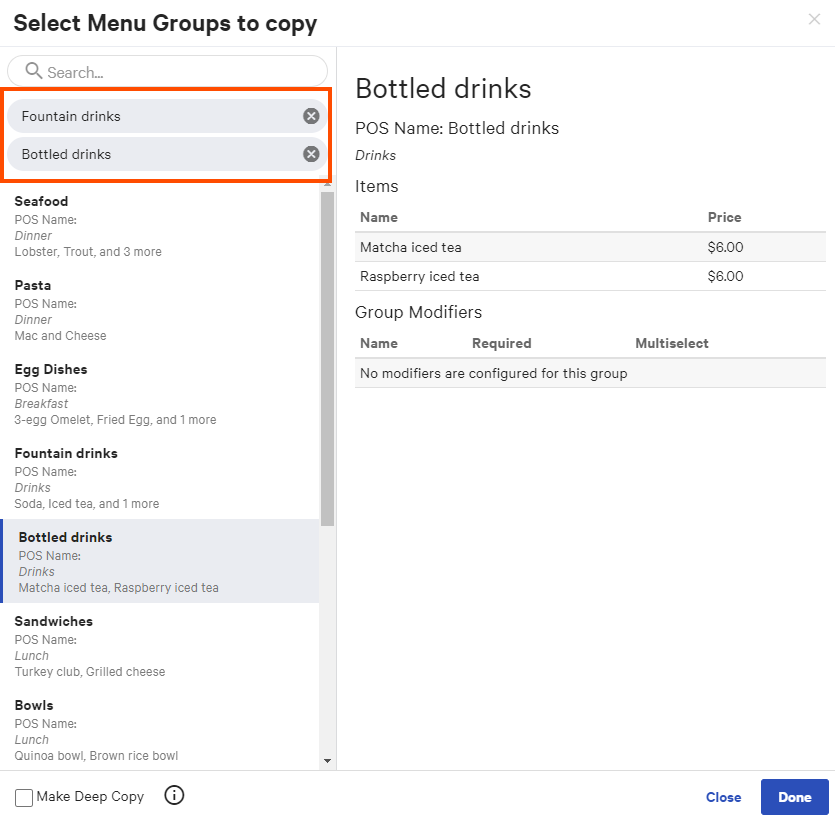
- Busca o desplázate hasta el primer grupo de menú que deseas agregar al menú para el tablero de menú digital y luego selecciónalo. El grupo de menú se agrega a la parte superior izquierda del diálogo, indicando que se añadirá a tu menú. Repite este paso para cada grupo de menú que desees agregar al menú para el tablero de menú digital. Para eliminar un grupo de menú de la lista, selecciona su botón X.
- Cuando hayas terminado de seleccionar grupos de menú, selecciona Listo.
- Selecciona Guardar.
- En la parte superior de la página, en el banner azul, selecciona el enlace de la página del menú para ir a la herramienta de creación de menús. Nota: La herramienta de creación de menús es la más nueva herramienta de configuración de menús de Toast. Algunas configuraciones solo están disponibles en esta herramienta.
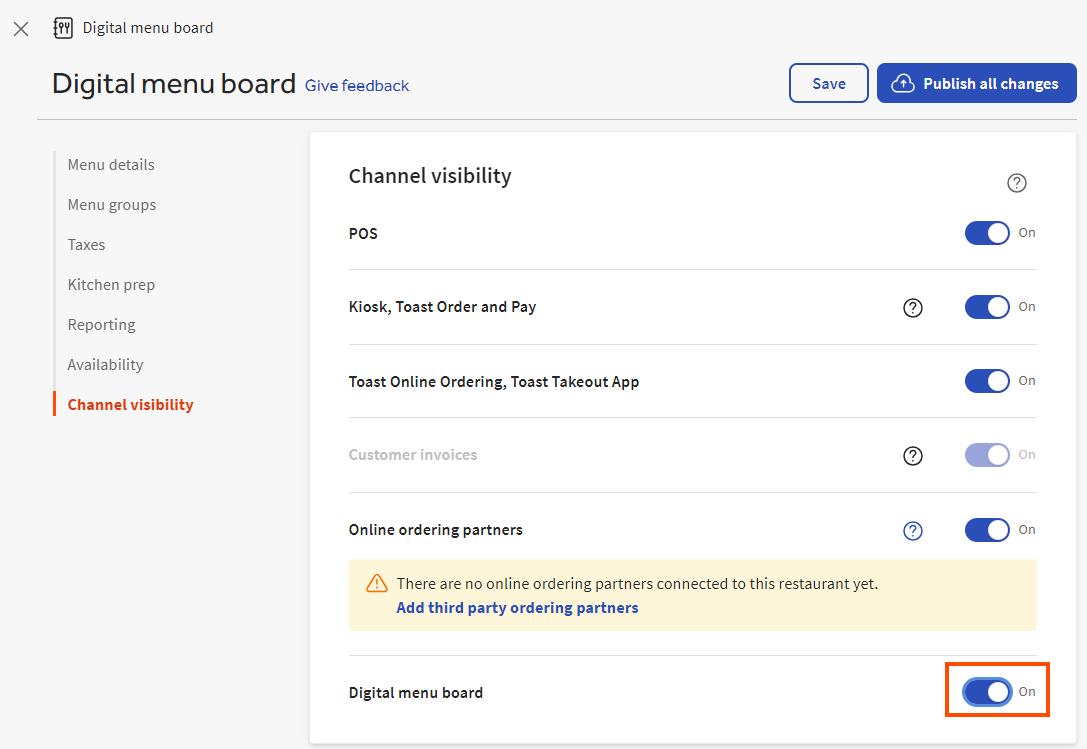
- Desde el panel izquierdo, selecciona Visibilidad del canal.
- Habilita el canal de visibilidad Tablero de menú digital:
- Si tienes un restaurante de una sola ubicación, establece la configuración del Tablero de menú digital en Activado.
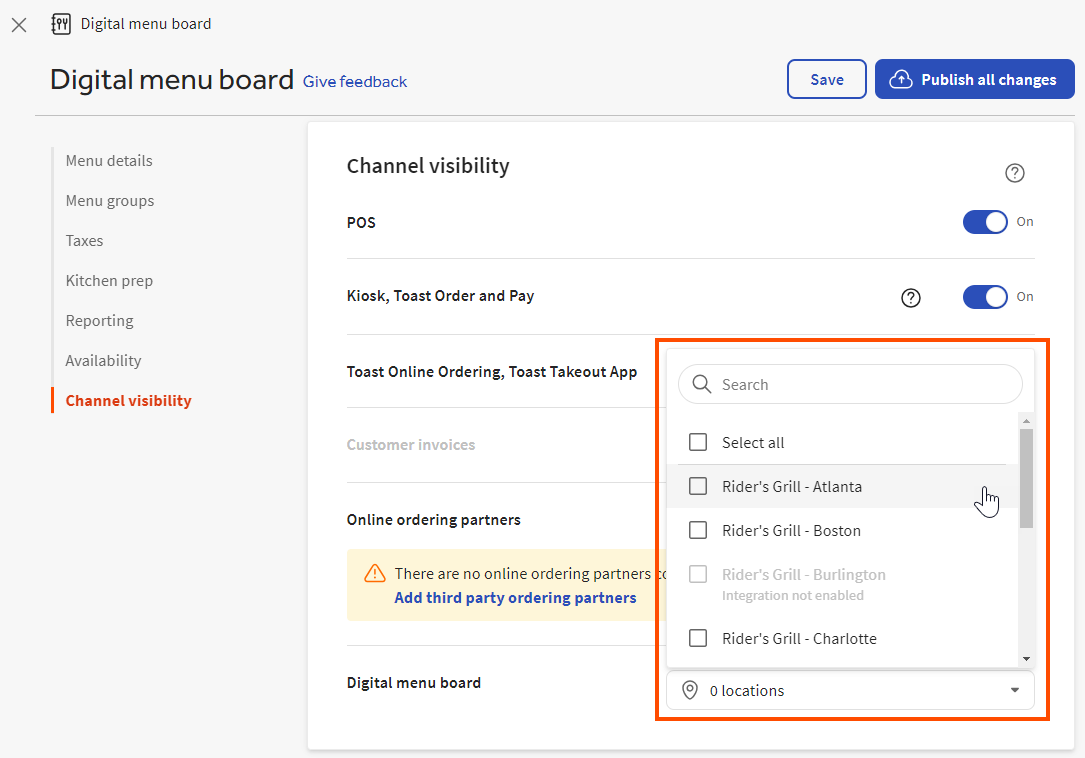
- Si tienes un restaurante de múltiples ubicaciones, selecciona las ubicaciones que tienen un tablero de menú digital de Delphi de la lista. Si la integración del tablero de menú digital de Delphi no está habilitada para una ubicación, estará atenuada y no podrás seleccionarla.
- Si tienes un restaurante de una sola ubicación, establece la configuración del Tablero de menú digital en Activado.
- Selecciona Guardar.
- Publica tus cambios:
- Si tienes un restaurante de una sola ubicación, selecciona Publicar todos los cambios en la parte superior de la página para publicar tus cambios, luego selecciona Publicar nuevamente para confirmar.
- Si tienes un restaurante de múltiples ubicaciones, debes usar la página Configurar publicación para publicar tus cambios en cada restaurante afectado. Selecciona el ícono X en la esquina superior izquierda para regresar a la página de detalles del menú, luego sigue las instrucciones en Publicar cambios para múltiples ubicaciones en la Guía de la plataforma Toast.
Usar un menú existente para un tablero de menú digital de Delphi
| Usar un menú existente significa que todos los elementos y modificadores dentro de ese menú están marcados para mostrarse cuando tu consultor de incorporación de Delphi configura tu tablero de menú digital. Para asegurar que los elementos correctos estén en el tablero y tengan habilitadas las actualizaciones automáticas de precios, trabaja con tu consultor de incorporación. |
Para usar un menú existente para un tablero de menú digital de Delphi:
- Inicia sesión en Toast Web.
- En el panel izquierdo, selecciona Menús para ir a la sección Menús , luego selecciona Constructor de menús.
- Selecciona el menú que deseas usar para tu tablero de menú digital de Delphi para resaltarlo, luego selecciona su menú de desbordamiento (el ícono ⋮) y elige Editar. Se abre la página de detalles del menú.
- Desde el panel izquierdo, selecciona Visibilidad del canal.
- Habilita el canal de visibilidad Tablero de menú digital:
- Si tienes un restaurante de una sola ubicación, establece la configuración del Tablero de menú digital en Activado.
- Si tienes un restaurante de múltiples ubicaciones, selecciona las ubicaciones que tienen un tablero de menú digital de Delphi de la lista. Si la integración del tablero de menú digital de Delphi no está habilitada para una ubicación, estará atenuada y no podrás seleccionarla.
- Si tienes un restaurante de una sola ubicación, establece la configuración del Tablero de menú digital en Activado.
- Selecciona Guardar.
- Publica tus cambios:
- Si tienes un restaurante de una sola ubicación, selecciona Publicar todos los cambios en la parte superior de la página para publicar tus cambios, luego selecciona Publicar nuevamente para confirmar.
- Si tienes un restaurante de múltiples ubicaciones, debes usar la página Configurar publicación para publicar tus cambios en cada restaurante afectado. Selecciona el ícono X en la esquina superior izquierda para regresar a la página de detalles del menú, luego sigue las instrucciones en Publicar cambios para múltiples ubicaciones en la Guía de la plataforma Toast.
Volver al inicio
Gestionar modificadores en un tablero de menú digital de Delphi
En la página de detalles de un grupo de modificadores, puedes elegir si seleccionar un modificador del grupo es obligatorio u opcional.
Si un grupo de modificadores está marcado como obligatorio, sus modificadores se incluyen por defecto en los datos que están disponibles para mostrar en el tablero de menú digital de Delphi. Específicamente, los datos incluyen una entrada para cada combinación de artículo del menú y modificador del grupo obligatorio, además de la entrada para el artículo del menú en sí. Por ejemplo, un artículo del menú Ensalada de Cena tiene un grupo de modificadores de Proteína con dos modificadores, Pollo y Salmón. Los datos que están disponibles para mostrar en el tablero de menú digital de Delphi incluyen tres entradas: una para el artículo del menú Ensalada de Cena sin modificadores, una segunda para el artículo del menú Ensalada de Cena con el modificador de Pollo, y una tercera para el artículo del menú Ensalada de Cena con el modificador de Salmón. Puedes trabajar con tu consultor de incorporación de Delphi para definir cómo se muestran las combinaciones de artículos del menú y modificadores en tu tablero de menú digital de Delphi.
Los grupos de modificadores opcionales aún no están incluidos en los datos que están disponibles para mostrar en el tablero de menú digital de Delphi. Como solución a esta limitación, puedes agregar modificadores como artículos de menú independientes y asignarles un precio. Tu consultor de incorporación de Delphi puede ayudarte a presentar el modificador de manera adecuada en el tablero de menú digital de Delphi. Por ejemplo, tienes un artículo del menú Sándwich que tiene un modificador de Queso Cheddar que cuesta $1. Agrega un artículo de menú de Queso Cheddar, para reemplazar al modificador, y asígnale un precio de $1.
Volver al inicio
Crear menús para múltiples ubicaciones
Si tu restaurante tiene múltiples ubicaciones, puedes copiar el menú que creaste para el tablero de menú digital de Delphi a esas otras ubicaciones, utilizando las instrucciones en Copiar menús y cambiar el destino/propietario.
Es importante notar que los menús copiados no mantienen una relación con el menú del que fueron copiados de. Esto significa que si agregas artículos al menú que copiaste de, esos artículos no se agregan automáticamente a los menús copiados ni se agregan automáticamente al tablero de menú digital de Delphi.
Configurar ajustes de stock de artículos en Toast Web
Puedes configurar los ajustes de stock de artículos para tu tablero de menú digital de Delphi en Toast Web. En Toast Web, navega a Menús > Tablero de menú digital >Configuración del tablero de menú digital para abrir la página Tablero de menú digital . En la página Tablero de menú digital , puedes elegir:
- Suscripción a actualizaciones de stock
- Etiquetar como “Agotado” cada artículo sin stock
- Cargar una imagen de sin stock
| Debes elegir activar las actualizaciones de stock para mostrar las otras configuraciones de stock. |
Puedes elegir aplicar la configuración de stock de tu artículo a una ubicación o a múltiples utilizando el menú desplegable de ubicación en la parte superior de la página. Selecciona tu(s) ubicación(es) desde las pestañas de Ubicaciones o Grupos o utiliza la opción de búsqueda para buscar y encontrar ubicaciones. Marca la casilla junto a la ubicación para seleccionar la(s) ubicación(es) a las que se aplicarán las configuraciones.
Por ejemplo, si tu restaurante tiene 64 ubicaciones, puedes elegir aplicar las configuraciones solo a 60 ubicaciones. Desde allí, puedes personalizar cada configuración para ubicaciones específicas, como activar la configuración de actualizaciones de stock para 50 de las 60 ubicaciones y desactivarla para las 10 ubicaciones restantes.
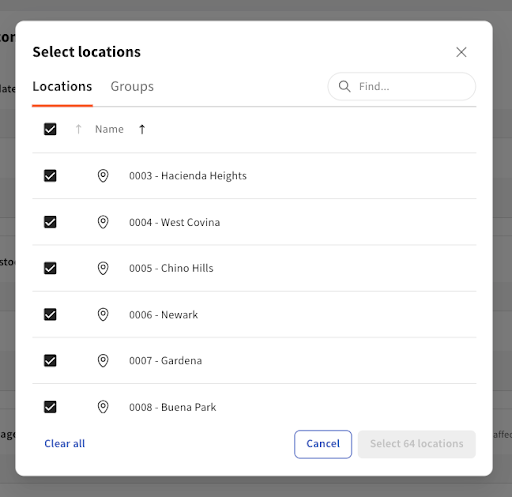
Selecciona el botón de seleccionar ubicación(es) para guardar tus cambios o el botón de Cancelar para cancelar el cuadro de diálogo.
Activar Actualizaciones de Suscripción de Stock
Para enviar una actualización desde la plataforma Toast a tu Tablero Digital Delphi cuando un artículo está marcado como sin stock, selecciona la configuración de Suscripción de stock y activa la configuración a Activado. Puedes elegir aplicar esta configuración a ciertas ubicaciones en tu grupo de restaurantes utilizando el menú desplegable de ubicación. LaActivado fila muestra las ubicaciones que están activadas para recibir actualizaciones de stock. Para desactivar esta configuración para ciertas ubicaciones, navega a la fila Desactivado y, utilizando el menú desplegable, selecciona qué ubicaciones desactivar esta configuración.
Selecciona el botón Guardar y luego navega al Centro de Publicación para publicar tus cambios.
Etiquetar "Agotado" para Artículos Sin Stock
| El valor predeterminado para esta configuración es Desactivado. Debes activar esta configuración. |
Para permitir que la plataforma Toast reemplace automáticamente el precio de un artículo con una imagen de "Agotado" cuando el artículo se queda sin stock en un tablero de menú digital Delphi, selecciona la configuración de Etiquetar “Agotado” para artículos sin stock y activa la configuración a Activado. Puedes elegir aplicar esta configuración a ciertas ubicaciones en tu grupo de restaurantes utilizando el menú desplegable de ubicación. La fila Activada muestra las ubicaciones que están activadas para etiquetar artículos sin stock. Para desactivar esta configuración para ciertas ubicaciones, navega a la Apagarfila, y usando el menú desplegable, selecciona qué ubicaciones deseas desactivar esta configuración.
Selecciona el botón Guardar y luego navega al Centro de Publicación para publicar tus cambios.
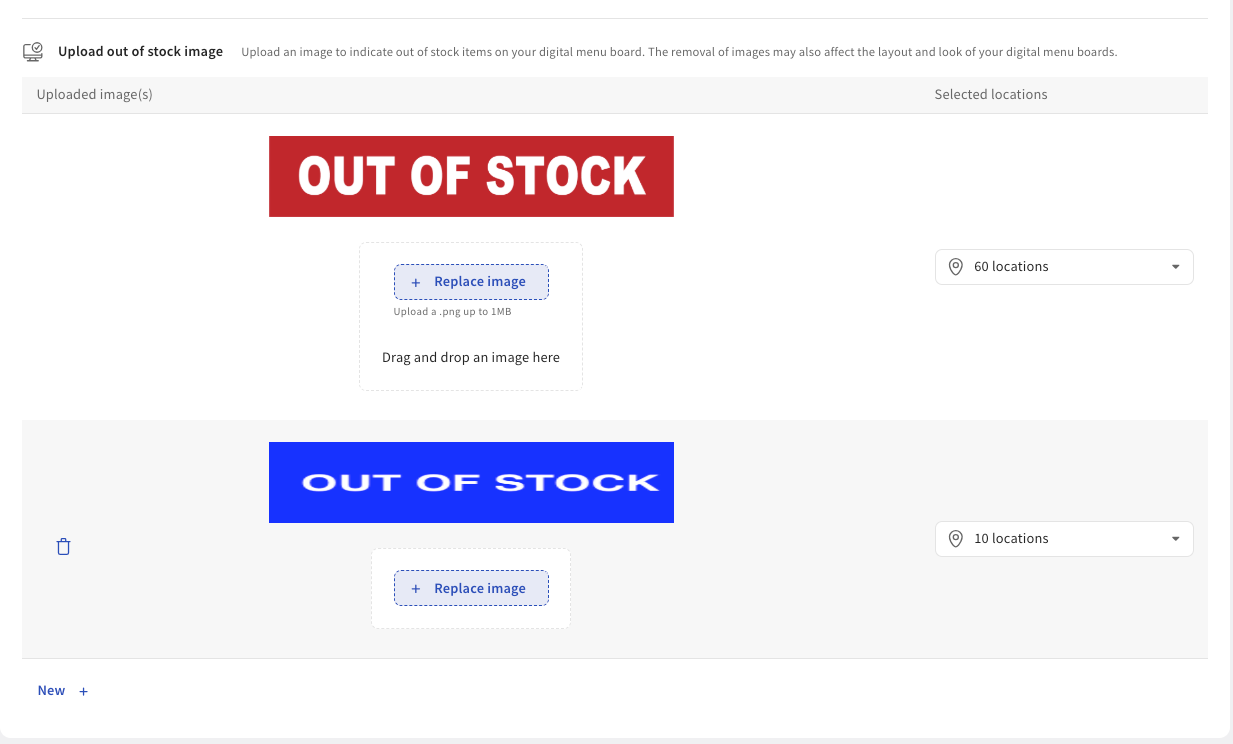
Cargar una imagen de sin stock
| La plataforma Toast proporciona automáticamente una imagen reemplazable de sin stock que se puede usar para el tablero de menú digital Delphi. No hay límite en la cantidad de imágenes que puedes cargar en la plataforma Toast. |
Para cargar una nueva imagen que indique artículos sin stock en tu Tablero de Menú Digital Delphi, selecciona la Cargar imagen de stock configuración y selecciona el Nueva +botón y luego el + Agregar imagen botón para cargar una imagen. También puedes arrastrar y soltar una imagen para usarla. El tamaño máximo de archivo para cargar es de 1MB. Usa el menú desplegable de ubicación para seleccionar qué ubicación(es) utilizarán la imagen cargada. Selecciona el Seleccionar ubicación(es) botón para guardar tus cambios o el Cancelarbotón para cancelar el cuadro de diálogo.
| La nueva imagen solo está disponible para las mismas ubicaciones que tienen la Suscribirse a actualizaciones de stock configuración en Activado. |
Selecciona el botón Guardar y luego navega al Centro de Publicación para publicar tus cambios. Cuando publicas tus cambios, la imagen de sin stock se guarda en el archivo XML. La imagen estará disponible para usar en el Diseñador de Plantillas en la Plataforma Insight Engage.
Para eliminar una imagen, selecciona el ícono de papelera junto a la imagen. Para reemplazar una imagen, selecciona el + Reemplazar imagen botón para abrir el directorio de tu computadora y luego elige otra imagen para cargar.