Configure a Menu-Specific Pricing Strategy
Last updated: Jun 30, 2026, 6:16 PM
Learn how to use the menu-specific pricing strategy, and how to build a happy hour drink/beverage menu.
- Before You Begin
- About Menu-Specific Pricing
- Set an Item to Menu-Specific Pricing
- Build a Happy Hour Menu With Menu-Specific Pricing
- Limit the Happy Hour Menu to Specific Devices
- Train Staff and Handle Discounts
- Multi-Location and Online Ordering Considerations
- Frequently Asked Questions
- Related Articles
Before You Begin
Applies to: Toast Web (Menu manager and Bulk management)
Permissions needed:
- 4.5 Edit Full Menu to edit menu groups, items, and prices
- 6.4 Publishing to publish saved changes
What you'll accomplish: You will set an item to use menu-specific pricing and build a happy hour menu that prices duplicated items differently from your regular menu.
Note: Menu prices are edited in Toast Web. You cannot change menu prices from the Toast mobile app.
About Menu-Specific Pricing
Menu-specific pricing lets you set a different price for an item depending on where it's ordered from. For example, an entree might cost $10 from the Lunch menu but $15 from the Dinner menu. This is useful for adjusting prices between lunch and dinner, between in-store and third-party ordering menus, or for happy hour menus.
To use menu-specific pricing, the item must first be set to the base price. No other pricing method (such as time-specific, open, or size pricing) can be converted to menu-specific pricing.
Note: Menu-specific pricing requires extra consideration if you use xtraCHEF. If your items are the same on both menus (for example, 1.5 oz of vodka on your regular menu and 1.5 oz of vodka on your happy hour menu), it works as expected. If you plan to use different portions with menu-specific pricing (for example, lunch pasta and dinner pasta), list them as separate items.
Set an Item to Menu-Specific Pricing
To set an item's pricing strategy to menu-specific pricing, open the item details page in your menu editor and select Menu Specific Price for the Pricing Strategy setting. Set the Base Price for the item. A Menu Prices table then appears, showing all menus at your location. Technically, you only need to enter a price for each menu that contains the item, but it's a best practice to enter a price for all menus in case you add the item to another menu later. Save and publish your changes. If a menu does not have a specific price set, the item will revert to the Base Price for that menu.
Note: The item must have been Shallow Copied into multiple menus for Menu Specific Pricing to work. A Deep Copy creates a new item, which is not linked to the original. See What's the difference between a copy, a deep copy, and a version for more information.
Note: If the item won't convert to menu-specific pricing, it is most likely set to a pricing method other than base price. All items must be set to base price before you can convert them to menu-specific pricing using the bulk feature in the Price editor.
Build a Happy Hour Menu With Menu-Specific Pricing
If a menu wasn't built with happy hour pricing from the start, repricing every item one by one can be slow, especially with large drink menus. Instead, create a new happy hour menu that duplicates the items you want and prices them differently based on the menu they live in. Watch the video or follow the steps below.
- In Toast Web, navigate to Menus and open your menu editor to create a new menu called HAPPY HOUR.
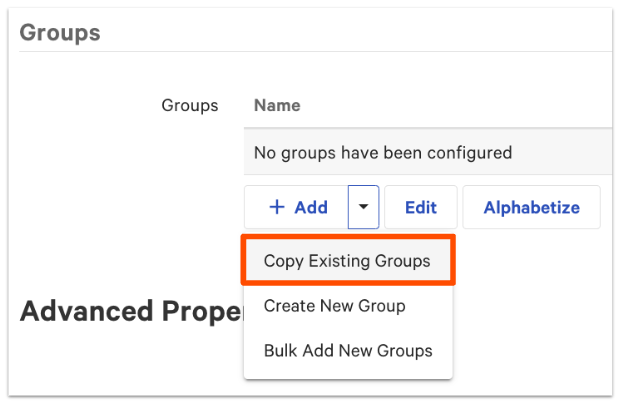
- Copy the menu groups that contain the items you want to price differently for happy hour. This is a shallow copy, so do not select the Make Deep Copy checkbox. The word (Copy) appears next to the copied group's name. Rename it so you can tell it apart from the original, for example House Margaritas (Happy Hour).
Note: Make a copy of the menu group, not an individual item. A shallow copy of a menu group creates a new group but keeps the items the same, so any inventory updates to an item on your happy hour menu also apply on your regular menu.
- Save your changes.
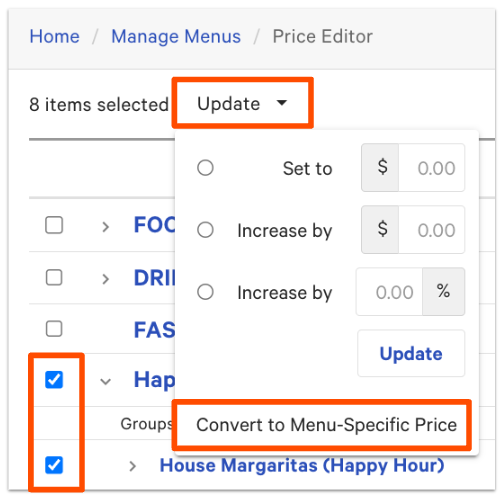
- Navigate to Menus > Bulk management > Price editor.
- Select the checkboxes next to the copied groups in your happy hour menu, then select Update to convert the selected menu groups to menu-specific pricing. Make sure you've selected every item in the menu group. The top of the price editor confirms how many items you've selected to update.
Each item now shows a label next to its price to signify that it's using menu-specific pricing.
- Use the Increase By field to increase or decrease the price by a dollar amount or percentage. To reduce a price, place a hyphen in front of the amount to represent the minus symbol (for example, -$3.00). Select Update, then save your changes once the prices update.
- Navigate to Menus and select your HAPPY HOUR menu.
- Scroll to the Availability section and select the days of the week and time of day this menu should be visible on your POS.
- Save and publish your changes.
Expected outcome: Your happy hour items appear on the HAPPY HOUR menu at their discounted prices, and the menu is visible on the POS only during the days and times you set.
Note: The Price editor can update the prices of items or menus, but not modifiers.
Note: Deep copies can be used to reprice an item without affecting the original, but this is not recommended because it creates duplicate items in your items database. If the original item's pricing method is not the base price, you will be unable to convert the pricing to menu-specific pricing.
Limit the Happy Hour Menu to Specific Devices
If only specific locations, such as the patio or bar, should display the happy hour menu, hide the menu by default for all devices, then adjust the menu's visibility on a specific POS device under Device Settings.
To learn more, see Configure Hidden Menus.
Train Staff and Handle Discounts
With menu-specific pricing, the same item lives on two menus. For example, a margarita offered at a discount for happy hour may live on both your drink menu and your happy hour menu. Servers need to be trained to ring in the right menu item based on whether a purchase qualifies for the discount. This is useful when drinks at the bar are discounted but drinks in the dining room are not, or when appetizers are discounted in-house but full price for carryout.
To prevent discounts from applying to items that don't qualify, Toast recommends creating manual discount buttons for eligible checks instead of auto-applying discounts, and excluding merchandise items from happy hour menus.
Multi-Location and Online Ordering Considerations
If your restaurant uses Toast Multilocation Management (MLM) and you need shared happy hour menus across time zones with location-specific and time-specific pricing, see Configure Location-Specific Pricing for MLM.
If you want a different price on a third-party or online ordering channel, menu-specific pricing lets you set that price on the channel's menu without affecting your in-store POS price.
Frequently Asked Questions
Why won't my items convert to menu-specific pricing?
Your items won't convert to menu-specific pricing because one or more of them are set to a pricing method other than base price. To use the bulk change feature in the Price editor, every item must be set to base price first. If any item is set to time-specific, open, size, or location-specific pricing, you won't be able to convert it. Set all items to base price, then convert them to menu-specific pricing.
Also asked as:
- My menu items won't convert to menu-specific pricing. How do I fix it?
- Why is the menu-specific pricing option grayed out?
- Why can't I change my item to menu-specific pricing?
What's the difference between menu-specific pricing and time-specific pricing?
Menu-specific pricing and time-specific pricing are two different ways to vary a price. Menu-specific pricing changes the price based on which menu the item is ordered from, so you control it by which menu is visible. Time-specific pricing changes the price automatically based on the time of day or day of the week, set directly on the item or group. Use menu-specific pricing when you want to build a separate happy hour menu; use time-specific pricing when you want one item to reprice itself on a schedule. To learn more about time-specific pricing, see Set Your Menu Pricing Strategy.
Also asked as:
- Should I use a happy hour menu or time-specific pricing?
- Can I set a happy hour price without using time-specific pricing?
Can I change my menu prices in the app?
You cannot change your menu prices in the Toast mobile app. Menu prices, including base prices and menu-specific prices, are edited in Toast Web under Menus. Log in to Toast Web on a computer to update your prices, then save and publish your changes.
Also asked as:
- How do I edit menu prices on my phone?
- Where do I change prices in Toast?
Should I use a shallow copy or a deep copy for happy hour?
For happy hour, you should use a shallow copy, not a deep copy. A shallow copy keeps the items the same as the original, so inventory stays linked, and you then apply menu-specific pricing to change the price. A deep copy creates fully independent duplicate items in your items database, which is not recommended for happy hour pricing. To learn more about copy types, see Reuse or Copy Menu Groups, Items, and Modifiers.
Also asked as:
- Do I deep copy or shallow copy my happy hour menu?
- Which copy type do I use to reprice a menu group?
How do I restrict the times for happy hour pricing?
To restrict happy hour pricing to specific days or times, open your HAPPY HOUR menu in Toast Web under Menus, scroll to the Availability section, and remove or restrict the days and times so the menu is no longer visible on the POS. Save and publish your changes. The regular-priced version of the item on your standard menu remains available.
Also asked as:
- How do I stop my happy hour prices from showing?
- How do I disable a happy hour menu?
Related Articles
- Set Your Menu Pricing Strategy
- Configure Menu Pricing Strategy in the Menu Builder
- Set an Item's Pricing Strategy to Menu-Specific Pricing
- Reuse or Copy Menu Groups, Items, and Modifiers
- Configure Location-Specific Pricing for MLM