Change the Static IP Address on Your Printer
Last updated: Sep 17, 2026, 6:45 PM
| Only use the IP address change steps below if you have a printer with a static IP purchased prior to July 2021. All new printers purchased after that date will come configured with a DHCP IP address and will not need to be changed. Your printer will automatically connect to your network and you'll be prompted through setup steps. Check out this Support Center article, Printer Setup Overview for more information. |
Change Your Toast Printer's Static IP Address
These steps can be followed for Toast Printers (TP200, TP300), as well as the Toast Kitchen Printer (TKP300).
- Navigate to Settings on the Toast terminal and check the Ethernet setting to verify 192.168.192.### has been entered.
- If your network administrator uses a different IP scheme, the terminal should match this scheme.
- The printer has a default IP setting of 192.168.192.200 unless your printer was pre-configured by Toast prior to shipping (in which case, it will match your restaurant's unique IP scheme). Note: Default offline IP addresses can vary by printer model. Always print a configuration slip to verify your device's specific IP address before continuing, rather than assuming 192.168.192.200.
- Note: If your printer has already been in service and shows an IP ending in .169 (or .168 on some Epson models), this is a different thing than the factory default above — it’s the address a printer self-assigns when it loses its network connection, and indicates a connectivity issue rather than an unconfigured device. See Troubleshoot Printer IP Conflicts if you’re seeing this.
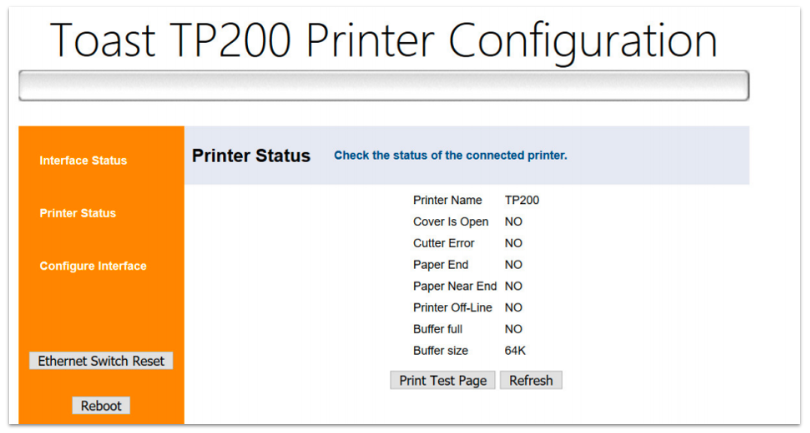
- Open a web browser from your Toast terminal and type your printer’s verified IP address into the URL address bar.
- A configuration window for the printer will open. The title of the webpage may vary depending on the type of printer being reconfigured.
- Select the Configure Interface button. A window will open requesting a username and password. Enter the Username "Toast". For the password, use the serial number of the device*. The serial number can often be found on a label on the bottom or side of the device. Capitalize any letters in the serial number.
- If the serial number of the device does not work for the password, try using "Toast" as the password.
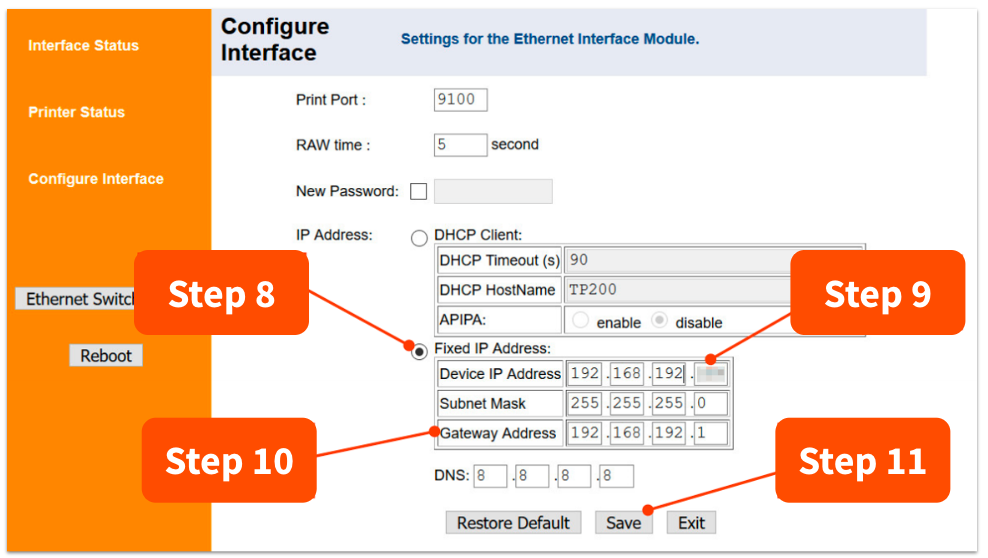
- Under the IP Address section, select Fixed IP Address.
- On the Device IP Address line, type in the printer’s new IP address to 192.168.192.### (see below).
- IP Range: If your printer is on the standard 192.168.192.x scheme, the "###" must be a number from 170 to 200.
- Note: Toast does not support static printer IP addresses above 200 on the 192.168.192.x scheme, even if your self-managed router allows it.
- Note: If your self-managed network uses a different IP scheme entirely, this 170–200 range does not apply — instead, use whatever address your network administrator has assigned for this device.
- The numbers listed in the picture are examples only.
- IP Range: If your printer is on the standard 192.168.192.x scheme, the "###" must be a number from 170 to 200.
- Then, verify the Gateway number is 192.168.192.1
- Select the Save button.
- On your printer, hold the Feed button while pressing the Power button. The printer should print a long configuration page.
- The IP address listed should now be 192.168.192.###, the subnet should be 255.255.255.0, and the Gateway should be 192.168.192.1
Nice work! You've successfully changed your printer's IP address.
Change Your Epson Printer's Static IP Address
Find the Current IP Address
Before updating the IP address on any printer, it's important to locate the current one on the printer you are working with. This can vary from printer to printer, but below are the steps you'll need to take per printer to ensure you are getting the IP address that is currently assigned.
Epson T20, Epson M30 & Epson T88V
- Turn the power switch to the Off position. Note: The power switch is located on the bottom right corner of the printer.
- Press and hold down the Feed button.
- Turn the power switch back to the On position (while still holding the Feed button).
- Release the Feed button once the printer begins to print. A receipt will print out with the printer's IP address on it, along with other configuration settings.
Epson U220B & Epson L90/L100
- Rotate the printer so you are facing the back side where the Ethernet cord is connected.
- Locate the pin-sized hole next to the Ethernet port.
- Insert the tip of a pen into the pin-sized hole and hold the pen there until the printer starts to print (approximately 10 seconds). A receipt will print out with the printer's IP address on it, along with other configuration settings.
Update the IP Address
Now that you have the current IP address of your printer, proceed to check the following settings before updating the IP address.
- The printer must be powered on.
- The printer must be connected to the Toast network.
- If there's another printer with the same IP address, turn off that printer.
If all of the above items are checked, you may proceed to update the IP address using the steps below:
- Locate and launch the web browser on your terminal or handheld device.
- A Toast Flex terminal or handheld device connected to your Toast secured network is recommended to complete this process, as the web browser on Elo devices may encounter issues accessing the required Epson configuration menu. If you're unsure which hardware you have, check out this Support Center article: Identify Your Toast Hardware.
- Enter the current IP address that you got from the printer's printed receipt into the address bar (where you'd normally type in a website URL). Note: If you're using Google Chrome, you might see a page saying, "Your connection is not private." If so, select Advanced and at the bottom of the page select Proceed to [IP address].
- A sign in pop-up will appear. Use the Username "epson" and Password "epson". If that doesn't work, the Password is the serial number of the device. The serial number can be found oftentimes on a label under the device. Select Sign in.
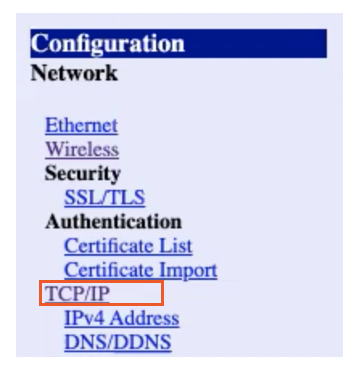
- Navigate to TCP/IP Settings under Configuration.
- Enter the new IP address for the printer in the IP Address field.
- Ensure the settings are set to Manual (or Static) and not Auto (Dynamic/DHCP) for the Acquiring the IP Address field.
- Select Submit.
- Select Reset.
- Turn the printer off and back on again.
Nice work - your printer's new IP address is live! For these changes to be reflected on the POS, ensure that the correct changes are also applied under Finance > Related > Settings > Printers & cash drawers in Toast Web.
Back to top
Note: Having an IP address conflict? See Get Help: Troubleshoot Printer Error Messages for steps to resolve it.