Menu Features That Will Cause Syncing Issues For DoorDash, Grubhub, Deliveroo, Skip and Uber Eats
Last updated: May 15, 2026, 10:23 AM
If one of your menus or menu items is not showing up on DoorDash, Grubhub, Deliveroo, Skip or Uber Eats, there may be some incompatible menu features set up.
- Overview Steps
- Before You Begin
- Quick Fix
- Start Here: Check Your Menu for Incompatibility Warnings
- Time-Specific Pricing
- Overlapping Menu Times
- Pre-Modifiers
- Substitution Pricing on Default Modifiers
- Subgroups
- Prompt for Quantity
- Sequence Pricing
- Size Pricing
- Size-Sequence Pricing
- Portions
- Alcoholic Items (Grubhub Only)
- Frequently Asked Questions
- Why are my menu items not showing up on DoorDash?
- Why is my menu not syncing to Uber Eats?
- Why are my subgroups not compatible with DoorDash?
- Why is my time-specific menu always visible on DoorDash or Uber Eats?
- Can I keep using Portions on my POS and still sync my menu to DoorDash or Uber Eats?
- Why is Grubhub showing duplicate menus instead of my existing ones?
- Related Articles
Overview Steps
Applies to: Toast Web; direct integrations with DoorDash, Grubhub, Deliveroo, Skip, and Uber Eats.
If a menu or item is not showing up on a third-party delivery partner, one or more menu features may not be supported by that partner. To fix it:
- Open the Menu Settings page for your third-party integrations in Toast Web.
- Read the menu feature incompatibility warnings shown for your menus.
- Use the Quick Fix table below to map each warning to the section that explains how to reconfigure that menu feature.
- Reconfigure the affected menus, groups, items, or modifier groups.
- Save and publish your changes.
Before You Begin
Applies to: Toast Web; direct integrations with DoorDash, Grubhub, Deliveroo, Skip, and Uber Eats.
Permissions needed:
- 4.5 Edit Full Menu
- 6.4 Publishing
What you'll accomplish: Identify which menu features are blocking sync to your third-party delivery partners and reconfigure them so menus and items appear correctly on those platforms.
Quick Fix
Use this table to match the issue you're seeing to the reconfiguration section that fixes it. Each section below explains what the feature is, which partners are affected, and how to reconfigure the menu so the items sync.
| Symptom | Most Common Cause | Quick Fix | Self-Service? |
|---|---|---|---|
| Menu items or prices not syncing at certain times of day | Time-Specific Pricing is set on a menu group or item | Move time-priced groups or items into separate menus and use Menu-Specific Pricing — see Time-Specific Pricing | Yes |
| A menu is always visible on DoorDash or Uber Eats, even outside set hours | Overlapping menu availability times | Configure menus so their times do not overlap — see Overlapping Menu Times | Yes |
| Pre-modifier options (such as "No," "Add," or "On Side") are missing on the partner menu | Pre-Modifiers are configured on the modifier group | Create a separate modifier group for each pre-modifier — see Pre-Modifiers | Yes |
| Default modifier substitution pricing does not apply on the partner menu | Substitution Pricing is set on default modifiers | Remove substitution pricing and use a deep-copied modifier group — see Substitution Pricing on Default Modifiers | Yes |
| Subgroups are not appearing under their parent menu group on the partner menu | Subgroups are not supported by most partners | Archive unused subgroups, or flatten them into separate menu groups — see Subgroups | Yes |
| A menu item is missing on a partner menu | Prompt for Quantity is enabled on the item | Disable Prompt for Quantity in the item's Properties section — see Prompt for Quantity | Yes |
| Sequence-priced modifiers (for example, "first two free") are not pricing correctly | Sequence Pricing is set on a modifier group | Split the modifier group into an Included Modifiers group and an Extra Modifiers group — see Sequence Pricing | Yes |
| Size-priced modifiers (for example, Small or Large) are not pricing correctly | Size Pricing is set on a modifier group | Create one modifier group per size option — see Size Pricing | Yes |
| Combined size and sequence modifiers are misbehaving | Size-Sequence Pricing is set on a modifier group | Create one modifier group per size × sequence combination — see Size-Sequence Pricing | Yes |
| Pizza toppings are missing or wrongly priced after enabling Portions | Portion configuration is not supported by most partners | Deep-copy modifier groups for each portion, and disable Enable Portions? — see Portions | Yes |
| Alcoholic items not appearing on Grubhub | Alcoholic items are not supported by Grubhub | Remove alcoholic items from your Grubhub-specific menu — see Alcoholic Items (Grubhub Only) | Yes |
Start Here: Check Your Menu for Incompatibility Warnings
Toast Web flags menu feature incompatibilities directly on the third-party ordering page. Start there to see exactly which menus, groups, items, or modifier groups need attention.
- In Toast Web, navigate to Takeout & delivery > Third-party ordering > Menu Settings.
- In the Menus section, look for the banner that lists menu feature incompatibilities.
- Select an incompatibility to see the list of items or groups configured that way.
- Select an item or group to open its detail page.
- Use the Quick Fix table above to find the section that explains how to reconfigure that feature.
Expected outcome: You can see which menus, groups, items, or modifier groups are flagged as incompatible, and you know which section below explains the fix.

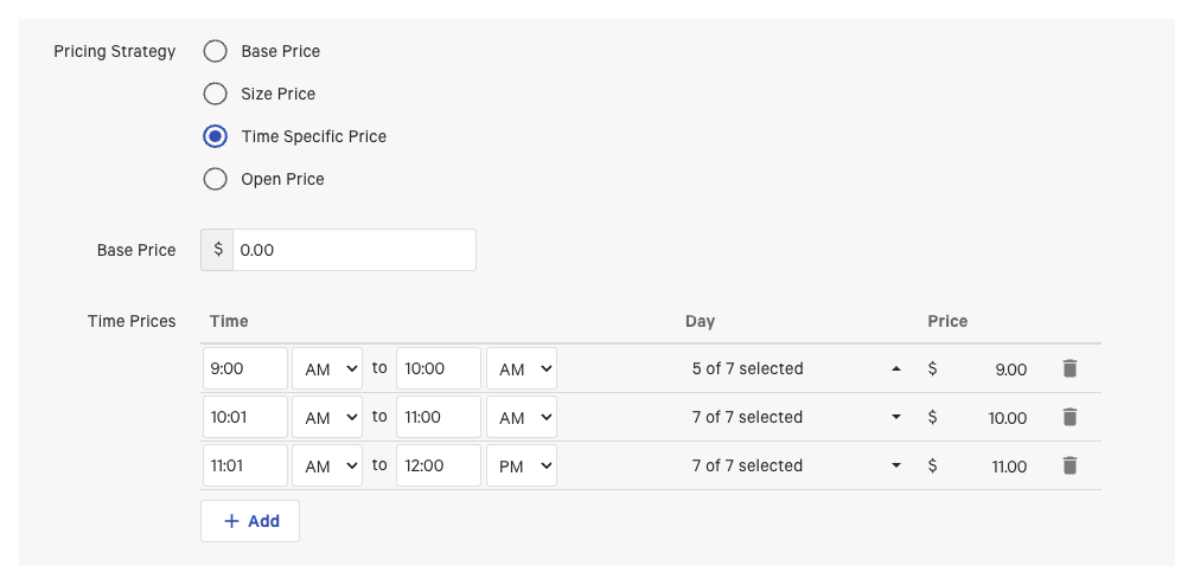
Time-Specific Pricing
Affects: DoorDash, Grubhub, Deliveroo, Skip. Not Uber Eats.
What this means: Time-Specific Pricing changes the price of a menu group or item based on the time of day. Third-party partners do not read time-based prices on individual groups or items, so the wrong price (or no price) is sent to the partner.
Symptom you'll see: Prices for menu items are not syncing with the partner, or are showing the wrong amount at certain times of day.
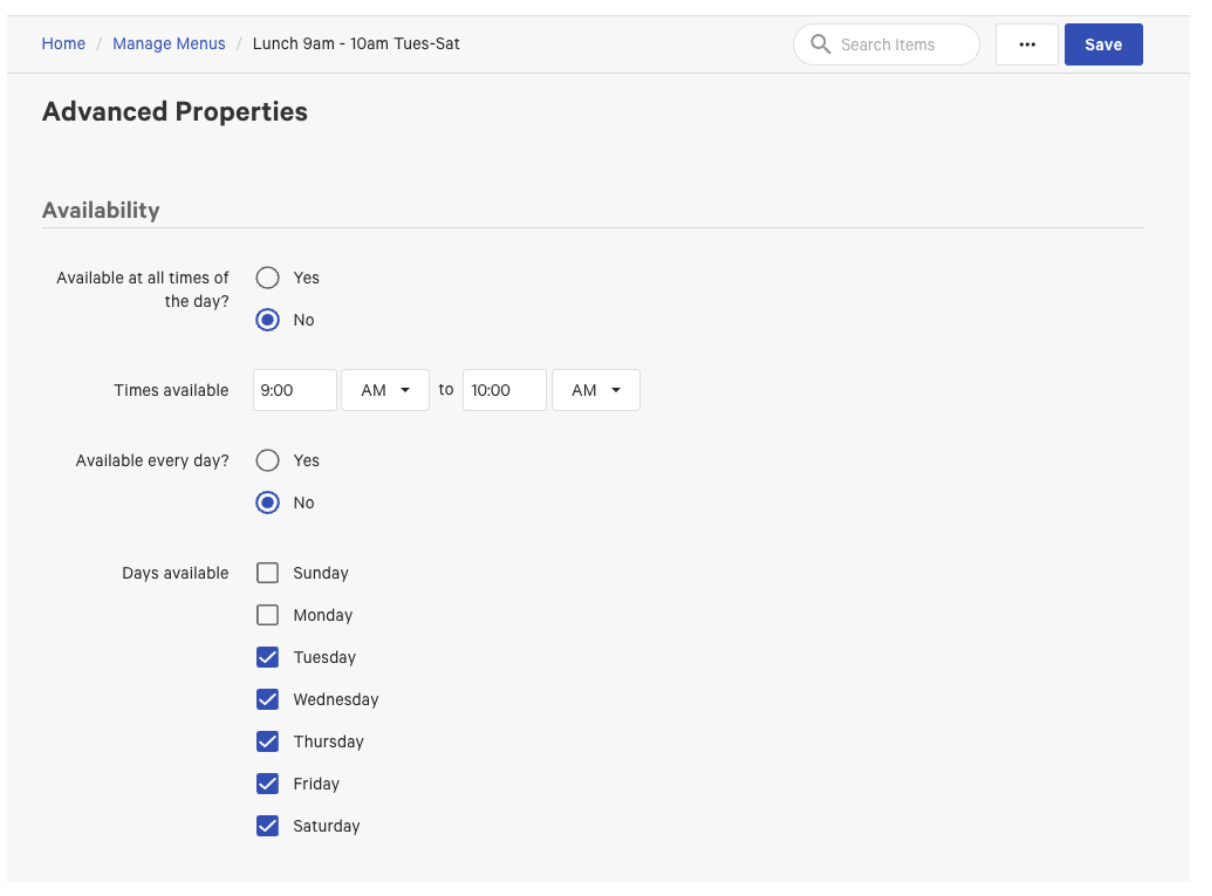
To fix this, replace Time-Specific Pricing with Menu-Specific Pricing: create a separate menu for each time span, set each menu's Availability to match that time span, and copy the affected menu groups or items into each new menu.
How to reconfigure:
- Open the menu group or item that has Time-Specific Pricing. Note the current time spans and the price for each.
- Return to Manage Menus. Select + Add at the bottom to create a new menu for each time span. Name each menu to match the time span (for example, "Breakfast" or "Happy Hour"). Save your changes.
- Open one of the new menus. Scroll to the Advanced Properties > Availability.
- Use Available at all times of the day? and Available every day? to match the time period you set in the original Time Pricing. Save your changes.
- If the time span runs only on certain weekdays (for example, Tuesday to Saturday from 9:00 a.m. to 10:00 a.m.), set Available every day? to No and specify the days.
- If the time span runs every day, leave Available every day? set to Yes.
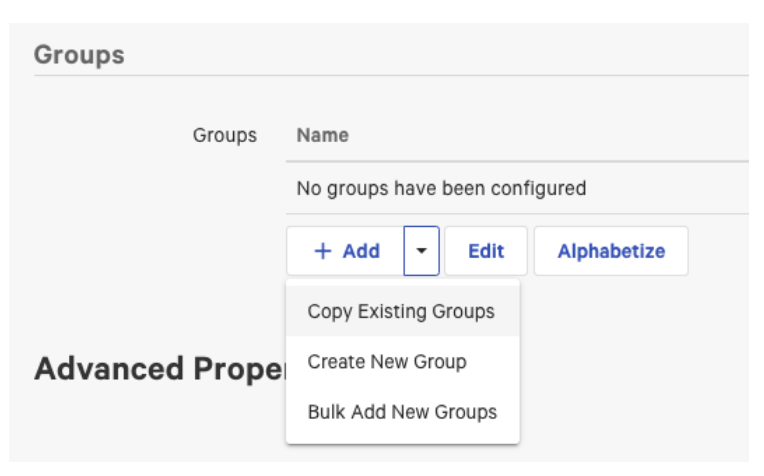
- Add the menu group or groups to the new menu. In the Groups section, select +Add and then select Copy Existing Groups.
- In the pop-up, select the menu group to copy. Select Done. Select Save.
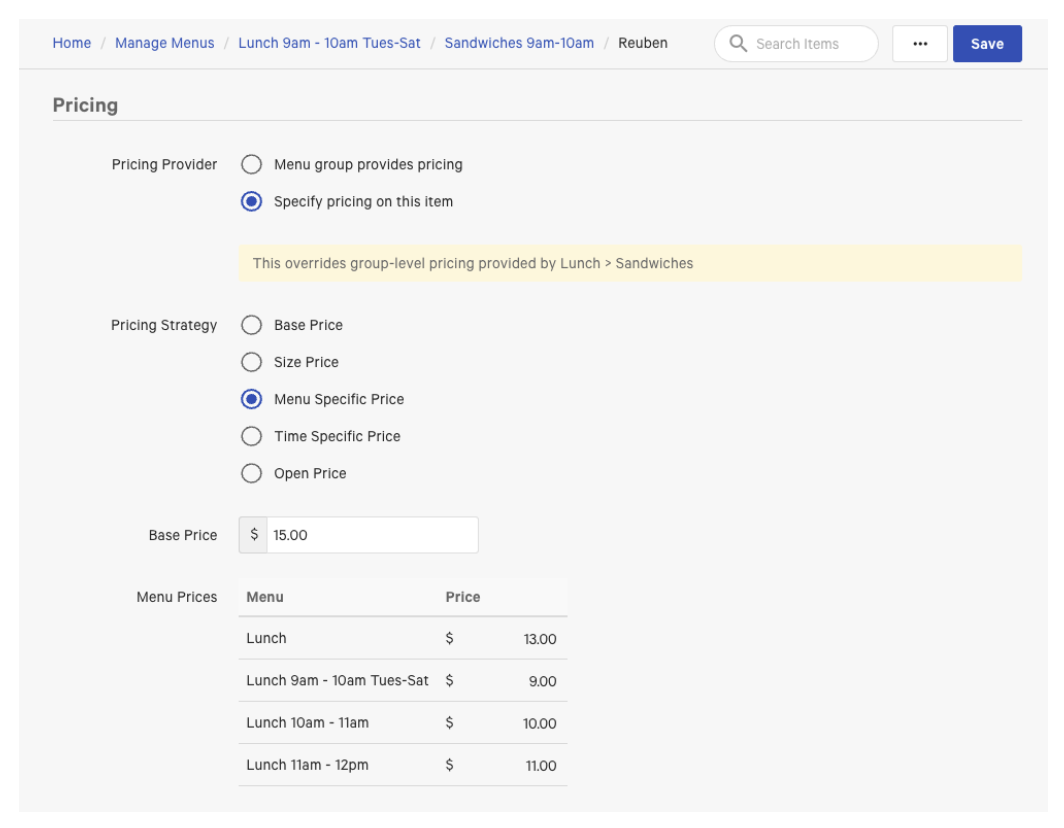
- Open the copied menu group. If you want, rename it to remove the "(Copy)" suffix. In the Pricing section, set Menu group provides pricing to No. Select Save.
- Open the first menu item that uses time-specific pricing. In the Pricing section, change Pricing Strategy to Menu-Specific Pricing. Enter the price for each of your new time-specific menus. Any menu without a price entered uses the Base Price. Save the changes.
- Repeat for each time-specific item in the group. Items that do not use time-specific pricing do not need to change.
- Repeat the Availability and copy-groups steps for each remaining time-specific menu.
Expected outcome: The affected items send the correct partner-facing price for each time span, and the Menu Settings page no longer flags Time-Specific Pricing for those items.
Overlapping Menu Times
Affects: Skip, Deliveroo. May also affect DoorDash and Uber Eats when menu availability times overlap.
What this means: Menu availability is supported by third-party partners, but overlapping availability times are not. If two menus are configured to be available at the same time, the partner cannot determine which menu to show. Menus must be available at all times, or configured with availability windows that do not overlap.
Symptom you'll see: A time-specific menu is always visible on DoorDash or Uber Eats, even outside the hours you set. Or, a menu disappears at unexpected times.
Here are two examples that show supported and workaround configurations.
Example 1 — Same items all day, with a separate drinks menu:
Scenario: A restaurant has the same food items available from 12:00 p.m. to 10:00 p.m. daily, with a separate drinks menu also available during those hours.
Supported configuration:
- Food menu availability: 12:00 p.m. – 10:00 p.m.
- Drinks menu availability: 12:00 p.m. – 10:00 p.m.
How it works: Both menus are available during the same window, but neither window overlaps any other menu, so the partner can show both.
Example 2 — Time-specific menus with an all-day drinks menu:
Scenario: A restaurant has separate menus for Breakfast (10:00 a.m. – 12:00 p.m.), Lunch (12:00 p.m. – 4:00 p.m.), and Dinner (4:00 p.m. – 10:00 p.m.), plus an all-day drinks menu.
Supported configuration:
- Breakfast: 10:00 a.m. – 12:00 p.m.
- Lunch: 12:01 p.m. – 4:00 p.m.
- Dinner: 4:01 p.m. – 10:00 p.m.
- Drinks: 10:00 a.m. – 10:00 p.m.
How to reconfigure:
To remove a time overlap, set each menu's availability explicitly.
- In Toast Web, navigate to Menus > Edit Menus.
- Select the menu to update.
- Scroll to Advanced Properties > Availability.
- Set Available at all times of the day? to No.
- Set Available every day? to No.
- Specify Times Available and Days Available so the windows do not overlap any other menu.
- Save and publish your changes.
Expected outcome: Each menu shows on the partner platform only during its configured availability window, and the Menu Settings page no longer flags overlapping menu times.
Pre-Modifiers
Affects: DoorDash, Grubhub, Deliveroo, Skip, Uber Eats — all five partners.
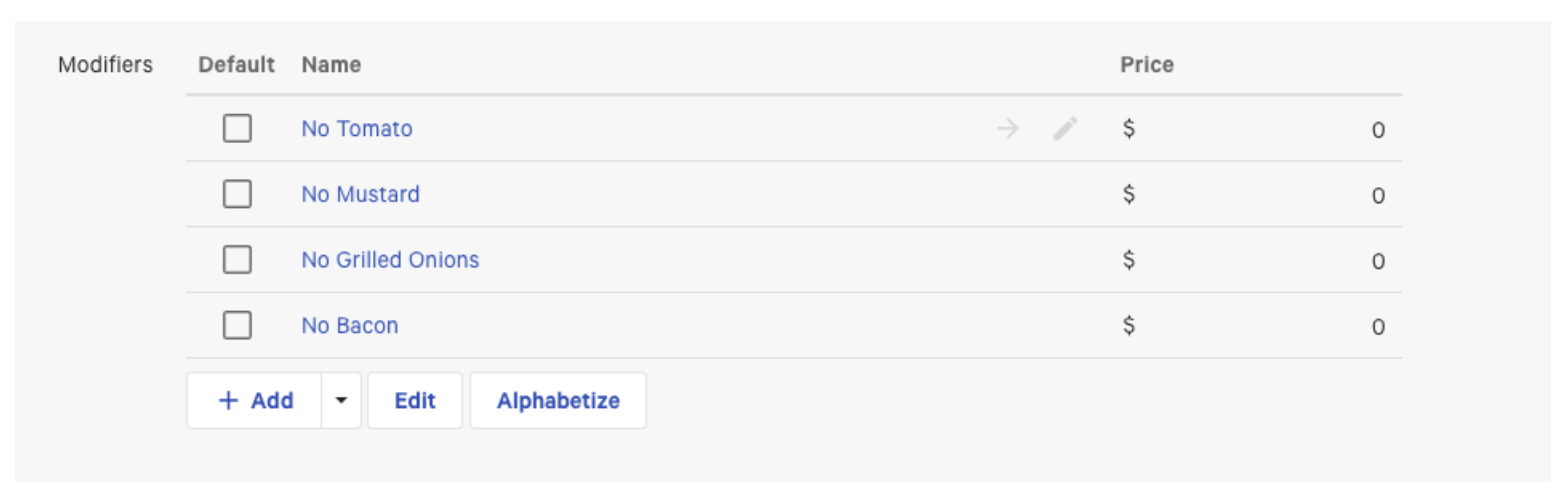
What this means: Pre-Modifiers (such as "No," "Add," or "On Side") are prefixes Toast applies to a modifier on the POS — for example, "No Tomato." Third-party partners do not show pre-modifier prefixes. To preserve the same customer experience on a partner menu, create a separate modifier group for each pre-modifier and rename the modifiers inside each group to include the pre-modifier text.
Symptom you'll see: Pre-modifier options like "No," "Add," or "On Side" are missing on the partner menu.
For example, a single Sandwich Toppings modifier group that uses the pre-modifiers "No," "Add," and "On Side" becomes three separate modifier groups: "No Sandwich Toppings," "Add Sandwich Toppings," and "On Side Sandwich Toppings."
How to reconfigure:
- Open the menu group or menu item that uses Pre-Modifiers. Scroll to the Modifier Groups section. Select the dropdown arrow next to + Add, then select Copy Existing Modifier Group.
- In the Select Modifier Groups to Copy pop-up, select the modifier group to copy. Select Make Deep Copy in the bottom left so you can rename the new modifiers without changing the original. Make one copy for each pre-modifier option (for example, three copies for "No," "Add," and "On Side"). Select Save.
- Rename each copied modifier group to reflect its pre-modifier (for example, "No Sandwich Toppings," "Add Sandwich Toppings," "On Side Sandwich Toppings").
- Open the first new modifier group. Scroll to the Modifiers section. Select the pencil icon next to each modifier and rename it to include the pre-modifier (for example, "No Tomato," "No Onion"). Adjust prices and any other modifier options as needed. Select Save. Repeat for each new modifier group.
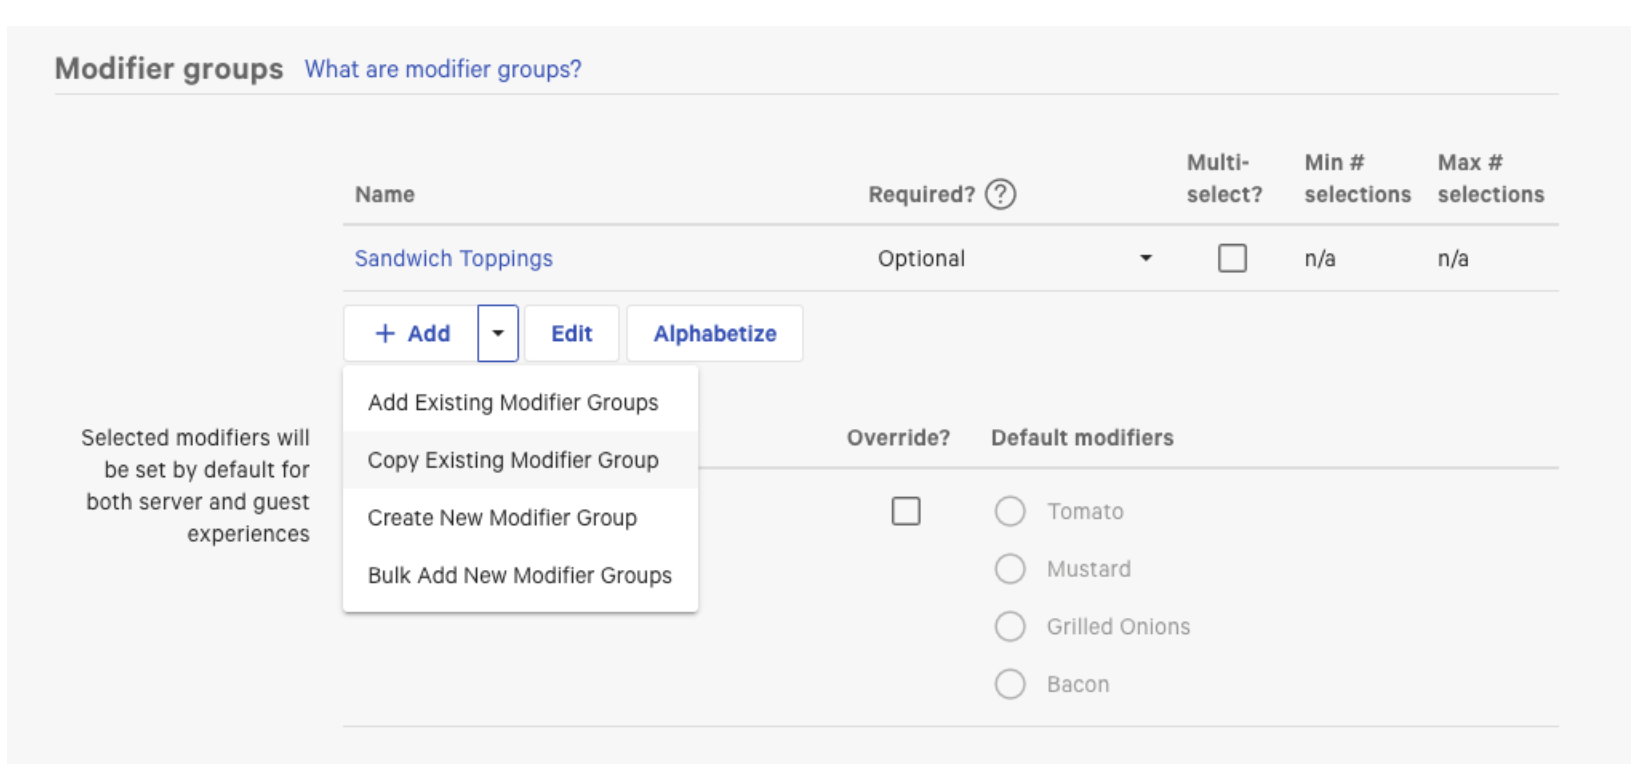

Expected outcome: The partner menu shows separate modifier choices for each pre-modifier (for example, customers see "No Tomato" instead of selecting a "No" pre-modifier and then "Tomato"), and the Menu Settings page no longer flags Pre-Modifiers.
Substitution Pricing on Default Modifiers
Affects: DoorDash, Grubhub, Deliveroo, Skip, Uber Eats — all five partners.
What this means: Default modifiers are modifiers included with an item by default (for example, tomato and mustard included with a sandwich). Substitution Pricing applies a separate price when a guest swaps a default modifier for another option. Third-party partners do not support substitution pricing, so the modifier group must be reworked to keep the same behavior using fixed prices and a maximum selection limit.
Symptom you'll see: Default modifier substitution pricing does not apply on the partner menu, or the partner price for a substitution is wrong.
How to reconfigure:
- Open the modifier group. Scroll to the Modifiers section.
- If all modifiers in the group have the same price as the default modifiers, set the price on each modifier to $0.
- If modifiers in the group have different prices, subtract the default-modifier amount from each modifier's price.
- If there are multiple distinct default-modifier prices, separate the modifiers into two or more modifier groups (for example, "Proteins" and "Veggie Toppings/Sides").
- Scroll to the Default Modifiers and Substitutions section. Set Allow default modifiers to charge their configured price to Yes.
- Scroll to the Modifier group settings section. Set Allow guests to select more than one modifier? to Yes. Set What is the maximum number a guest can select? to match the number of default modifiers. For example, if "Tomato" and "Mustard" are your only default modifiers, set the maximum to 2.
- If you want guests to be able to choose extra modifiers beyond the default selections, deep-copy the original modifier group and restore the original prices on the new modifier group. Add the new modifier group to the item alongside the reconfigured one.

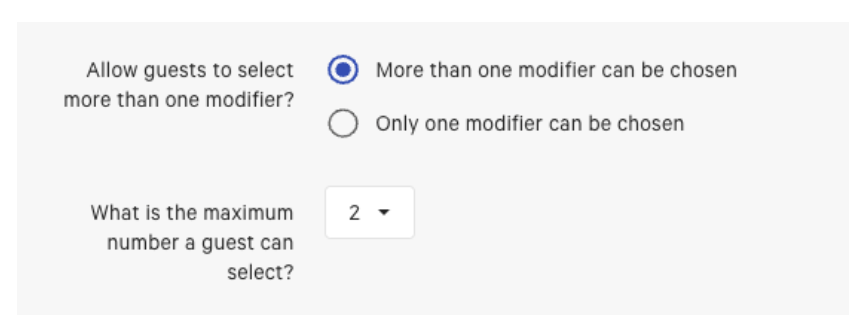
Expected outcome: Default modifiers appear correctly on the partner menu, guests can swap them within the limit you set, and the Menu Settings page no longer flags substitution pricing on default modifiers for those items.
Subgroups
Affects: DoorDash, Grubhub, Deliveroo, Skip. Not Uber Eats.
What this means: Subgroups are nested menu groups inside a parent menu group (for example, a "Beverages" group with subgroups for "Hot" and "Cold"). Third-party partners do not display subgroups, so any items inside a subgroup may not appear under the intended parent group on the partner menu, or the subgroup may be ignored entirely.
Symptom you'll see: Subgroups are not appearing under their parent menu group on the partner menu. Items inside subgroups may be missing, or the partner menu structure may not match what is configured in Toast Web.
How to reconfigure:
The recommended approach is to archive subgroups you no longer need, or to flatten the menu hierarchy by moving items from subgroups into their parent menu groups (or into their own menu groups).
To archive a menu group or subgroup:
- Select the three-dot menu (…) icon to the right of the subgroup's name.
- Select Archive.
- Select Save, then select Publish all changes.
If you would like certain items to be grouped, you will need to create a new menu group for those items to live in.
Note: Even though the subgroup has been archived, the items in that group still live in the Toast database and can be added to another group if needed.
Expected outcome: The Menu Settings page no longer flags subgroups for the affected partners, and the partner menu shows the expected groups and items in the expected order.
For a refresher on the relationship between menus, menu groups, and subgroups, see Create and Manage Menus, Menu Groups, and Subgroups.
Prompt for Quantity
Affects: DoorDash, Grubhub, Deliveroo, Skip. Not Uber Eats.
What this means: Prompt for Quantity prompts a server on the POS to enter a quantity when an item is selected (for example, items priced by weight or by the pound). Third-party partners do not support the quantity-entry prompt, so items configured this way do not appear on the partner menu.
Symptom you'll see: A menu item is missing on the partner menu, even though it is configured and visible on your Toast POS.
How to reconfigure:
- In Toast Web, select Menus and open the detail page for the item. You can reach the item via Advanced Properties or Edit Menus.
- Scroll to the Pricing section. Confirm you have a Base Price set and that the Pricing Strategy is configured.
- Scroll to the Properties section. Set Prompt for Quantity to No.
- Save your changes and publish.
Expected outcome: The item appears on the partner menu the next time the partner pulls the menu, and the Menu Settings page no longer flags Prompt for Quantity for that item.
For more about pricing items by quantity or weight, see Configure Items Priced by Weight.
Sequence Pricing
Affects: DoorDash, Grubhub, Deliveroo, Skip, Uber Eats — all five partners.
What this means: Sequence Pricing prices modifiers based on selection order — for example, the first two toppings are free, and each additional topping costs $0.50. Third-party partners do not support sequence-based pricing, so you have to break the modifier group into two: one that holds the included (free) modifiers and one that holds the extras (paid).
Symptom you'll see: Sequence-priced modifiers (for example, "first two free") are not pricing correctly on the partner menu.
Overview of sequence pricing settings in Toast Web.
Quick summary of the result:
| Group | Required? | Multi-select? | Max # selections | Pricing |
|---|---|---|---|---|
| Included Modifiers (original modifier group) | Servers must make a selection | More than one modifier can be chosen | 2 (matches the number originally free) | No additional charge |
| Extra Modifiers (new, deep-copied group) | Optional, shown on add | More than one modifier can be chosen | Up to the restaurant | Additional charge — price set by modifier group, Fixed Price matching the original extra-modifier price |
How to reconfigure:
- Open the item the modifier group is attached to. Open the modifier group's settings page. Note how many modifiers are included for free and the per-item charge for additional modifiers. (For example, the first two toppings are free, and additional toppings cost $0.50 each.)
- Rename the original modifier group slightly so it is easy to find — for example, add an asterisk (*) to the front of the name. Save.
- Return to the item page. In the Modifier Groups section, select the dropdown arrow next to + Add, then select Copy Existing Modifier Group.
- In the search box, enter the asterisk (or other character you added) to find the renamed modifier group. Select the modifier group, then select Make Deep Copy at the bottom left. The deep copy splits the modifier group into the original (Group 1) and a new copy (Group 2). Select Done, then Save.
- Scroll back to the Modifiers section. You now see two separate modifier groups. Rename each one appropriately (for example, "Milkshake Toppings (Included)" and "Extra Milkshake Toppings"). Remove the asterisk from the original group's name now that you can tell them apart.
- Open the first/original modifier group. Set Max # of selections to the number of options that should be included for free (for example, 2).
- In the Modifier Pricing Method section, set Select where pricing is set to No additional charge. Save.
- Return to the item level and open the new modifier group ("Extra Milkshake Toppings"). In the Properties section, set:
- Required? to This group is optional
- Multi-select? to More than one modifier can be chosen
- Max # of selections to Up to the restaurant
- In the Modifier Pricing Method section, set:
- Select where pricing is set to Additional charge — price set by modifier group
- Select pricing for all modifiers to Fixed Price
- Fixed Modifier Price to the per-item additional charge (for example, $0.50). Save.
Expected outcome: Guests can select the original number of free modifiers from the Included group, and any extras come from the new Extra group at an additional price. The Menu Settings page no longer flags Sequence Pricing for that modifier group.
Size Pricing
Affects: DoorDash, Grubhub, Deliveroo, Skip, Uber Eats — all five partners.
What this means: Size Pricing prices the same modifier differently based on the size of the parent item — for example, a side costs $1 on a small sandwich and $2 on a large sandwich. Third-party partners do not support size-based modifier pricing, so each size must become its own modifier group with a fixed price.
Symptom you'll see: Size-priced modifiers (for example, Small or Large) are not pricing correctly on the partner menu.
Size pricing overview in Toast Web.
How to reconfigure:
- Make a deep copy of the original modifier group that uses Size Pricing. In the Modifier Groups section of the item page, select the dropdown arrow next to + Add, then select Copy Existing Modifier Group.
- In the Select Modifier Groups to Copy pop-up, use the search box to find the original modifier group. Select it on the left side. Select Make Deep Copy at the bottom so you can change the new modifier group without affecting the original. Select Done.
- Select the pencil icon next to the original modifier group's name to rename it. Use a name that identifies the size (for example, "Small Sandwich Sides"). Save.
- Open the renamed modifier group. Scroll to the Pricing section. Choose the pricing method that matches your sides:
- If Small Sides have no additional charge, set How are modifiers in this group priced? to No Charge.
- If Small Sides have an additional charge that is the same across modifiers, choose All modifiers share the same price and enter the price.
- If Small Sides have different prices, choose Each modifier has a unique price and enter the price for each modifier in the Modifiers section. Select Save.
- Return to the deep-copied modifier group. Select the pencil icon and rename it for the next size (for example, "Large Sandwich Sides"). Save, then open the renamed group's configuration page.
- Scroll to the Modifier Group Pricing section. For the Large group, choose Fixed Price and enter the Fixed Modifier Price that all modifiers in the group share. If modifiers have different Large prices, choose Each modifier has a unique price and enter each price individually in the Modifiers section.
- If you have more than two size options, repeat the deep-copy and rename steps so you end up with one modifier group per size.
Expected outcome: Each size has its own modifier group with the correct fixed price, the partner menu shows the right price per size, and the Menu Settings page no longer flags Size Pricing for that modifier group.
Size-Sequence Pricing
Affects: DoorDash, Grubhub, Deliveroo, Skip, Uber Eats — all five partners.
What this means: Size-Sequence Pricing combines size and sequence pricing in one modifier group — for example, a small drink's first refill is free, but a large drink's first refill costs $1. Third-party partners do not support combined size-sequence pricing, so you need one modifier group for every combination of size and sequence level.
For example, three sizes (Small, Medium, Large) times two sequence levels (Included, Extra) means six modifier groups in total.
Symptom you'll see: Combined size and sequence modifiers are not behaving as expected on the partner menu.
How to reconfigure:
- Use the Size Pricing procedure above to deep-copy the modifier group once for each size, and set the Fixed Price for each size group.
- For each size group from Step 1, use the Sequence Pricing procedure to deep-copy it again so each size has a separate Included group and Extra group. Set pricing accordingly.
- When you finish, you have one modifier group per size × sequence-level combination (for example, "Small Included," "Small Extra," "Medium Included," "Medium Extra," "Large Included," "Large Extra").
Expected outcome: Each size × sequence combination has its own modifier group with the correct price, and the Menu Settings page no longer flags Size-Sequence Pricing for that modifier group.
Portions
Affects: DoorDash, Grubhub, Deliveroo, Skip. Not Uber Eats.
What this means: Portions let staff apply a modifier to only part of an item (for example, "First Half" or "Second Half" of a pizza). Third-party partners do not support portions, so any modifier group that uses portions needs to be deep-copied into a separate modifier group per portion, with Enable Portions? turned off on each.
Symptom you'll see: After enabling Portions on a pizza or other item, modifier options are missing from the partner menu, the toppings modifier does not show up online, or the price is wrong on the partner platform.
Note: This procedure keeps Portions on your Toast POS while adding a separate, portion-by-portion modifier group structure that third-party partners can read. You do not have to remove Portions from your POS to fix the partner sync — you add separate modifier groups for the partner-facing menu.
For example, if your portions are First Half, Second Half, and Whole, you end up with three modifier groups: "First Half Toppings," "Second Half Toppings," and "Whole Toppings."
How to reconfigure:
- Open the menu item or menu group that uses Portions. Note the current portions in Toast Web.
- Open the menu group or item with modifiers that use Portions. Scroll to the Modifier Groups section. Select the dropdown arrow next to + Add, then select Copy Existing Modifier Groups.
- In the Select Modifier Groups to Copy pop-up, select the modifier group to copy. Select Make Deep Copy at the bottom left. Select Done. Repeat until you have one copied group per portion. Select Save.
- Hover over each newly copied group and select the pencil icon to rename it to match a portion (for example, "First Half Toppings"). Select Save.
- Open the first renamed group. In the Modifier group settings section, set Enable Portions? to No. Adjust the prices of each modifier to match what the portion should cost. Save. Repeat for each new portion-named group.
Expected outcome: Each portion has its own modifier group with the correct price, the partner menu shows the right modifier options per portion, and the Menu Settings page no longer flags Portions for that item.
Alcoholic Items (Grubhub Only)
Affects: Grubhub only.
What this means: Grubhub does not support alcoholic items on its menus. Any alcoholic item included on a Grubhub-specific menu blocks sync for that menu or causes the alcoholic items to not appear on Grubhub.
Symptom you'll see: Alcoholic items are not appearing on Grubhub.
How to reconfigure:
Mark items as alcoholic on Grubhub visible menus.
All third-party delivery partners (DoorDash, Uber Eats, and Grubhub) require alcoholic items to be labeled. To mark items as "alcoholic":
- Navigate to the specific menu item that needs to be marked as alcohol.
- Scroll down to the Properties section.
- On the Does this item contain alcohol? dropdown menu, select Yes.
- Save and publish all changes.
For more information on labeling alcoholic menu items, see Label Menu Items as Alcoholic for more information.
For additional information on compliance and alcohol sales with Grubhub, visit Grubhub Alcohol Delivery.
Expected outcome: Grubhub-specific menus no longer contain alcoholic items, and the Menu Settings page no longer flags Alcoholic Items for the Grubhub menu.
For more about channel visibility on partner platforms, see Manage Your Menu Visibility Settings.
Frequently Asked Questions
Why are my menu items not showing up on DoorDash?
Menu items not showing up on DoorDash usually means one of the menu features on the Quick Fix table above is configured on that item or its modifier group. Open Takeout & delivery > Third-party ordering > Menu Settings in Toast Web and look for the incompatibility banner in the Menus section to see exactly which items or groups need to be reconfigured.
If the item appears on other platforms but not DoorDash, the issue may instead be channel visibility rather than a menu feature incompatibility. See Manage Your Menu Visibility Settings to confirm the item is visible to DoorDash.
Why is my menu not syncing to Uber Eats?
A menu not syncing to Uber Eats is usually caused by a menu feature that Uber Eats does not support — most commonly Pre-Modifiers, Substitution Pricing, or any of the size, sequence, or size-sequence pricing options on modifier groups. Open Takeout & delivery > Third-party ordering > Menu Settings in Toast Web and read the Menu Settings banner to see which feature is flagged, then use the Quick Fix table above to find the fix.
Why are my subgroups not compatible with DoorDash?
Subgroups (nested menu groups inside a parent menu group) are not displayed by DoorDash, Grubhub, Deliveroo, or Skip. To make the affected items appear on those partners, archive the subgroup or move its items into a parent menu group or a new sibling menu group. See Subgroups for the archive procedure.
Why is my time-specific menu always visible on DoorDash or Uber Eats?
A time-specific menu that stays visible at all hours on DoorDash or Uber Eats is usually caused by overlapping menu availability windows, or by an availability setting that has not been configured at the menu level. See Overlapping Menu Times for examples of supported and unsupported configurations, and for the steps to set availability explicitly under Advanced Properties.
Can I keep using Portions on my POS and still sync my menu to DoorDash or Uber Eats?
Yes. You can keep Portions configured on your POS for in-store ordering while creating separate per-portion modifier groups for the partner-facing menu. See Portions for the deep-copy procedure that produces one modifier group per portion (for example, First Half, Second Half, Whole) with Enable Portions? set to No on each. Your POS continues to use the original portioned modifier group; the partner platforms use the new per-portion groups.
Why is Grubhub showing duplicate menus instead of my existing ones?
Multiple menus may be assigned to your Grubhub account. To double-check what menus are set to be visible to Grubhub specifically:
- Go to Takeout & Delivery > Third party ordering > Grubhub > Menu Settings.
- Click on Edit to expand the menu and scheduling settings.
- Under the Menus section, verify that the correct menus have been selected.
- Save and publish any changes made.
If duplicate menus are still appearing on your Grubhub ordering page, please contact Grubhub Support for further assistance.
Related Articles
- Uber Eats, Just Eat, DoorDash, Grubhub, Deliveroo and Skip Integration Configuration Limitations
- Menu Time Conflicts on DoorDash and Uber Eats
- My restaurant isn't receiving third-party orders
- Manage Your Menu Visibility Settings
- Create and Manage Modifier Groups and Modifier Options