Get Started With Menu Manager
Last updated: Jun 23, 2026, 12:26 PM
The menu manager allows restaurants to quickly view menu data using search and filter tools so that you can easily keep your menus up-to-date.
- Menu Manager Overview
- Search and Filter Your Menus
- Make Changes in Full Menu View
- Update Pricing or Visibility
- Frequently Asked Questions
- Additional Resources
Menu Manager Overview
The menu manager provides a way to quickly view menu entities (items, modifiers, and price levels) and make certain changes in bulk. This can be especially helpful for restaurant groups with large menus or many locations, allowing you to save time managing menus by using search and filter tools to quickly find the data you wish to update. You can also go to the menu manager to preview how your menus will look on your POS using the View POS layout button. To learn more, see Can I preview how my menus will look on my POS?.
If your restaurant uses Toast Multilocation Management (MLM) or one of the Restaurant Management suites (learn more: Toast Suites Overview), you can also use the menu manager to schedule pricing updates to go live in the future – allowing you to control when your menu changes go live.
To access the menu manager in Toast Web, navigate to Menus > Menu management > Menu manager. In order to make edits on this page, you’ll need the 4.5 Edit Full Menu permission at any location or location groups you wish to update.
Search and Filter Your Menus With Menu Manager
When you first visit the menu manager, all of your menu items will be listed in a table that includes location information and pricing strategy. Above the table, you’ll see the following search and feature options:

- Use the Full menu, Items, Modifiers, and Price levels buttons to choose which data appears in the table. Full menu view gives you access to additional menu editing features -- learn more in the next section of this article.
- The search bar allows you to find an item, modifier, or price level by name (depending on which button you’ve selected).
- For items and modifiers, you can use the menu drop-down to show data for one or more menus.
- You can also narrow down your item and modifier data to one more more menu groups using the menu group drop-down.
- Selecting Clear all will remove any search or filter parameters you’ve selected.
If you use MLM, you'll also see a location drop-down that allows you to narrow your list to one more locations or location groups.
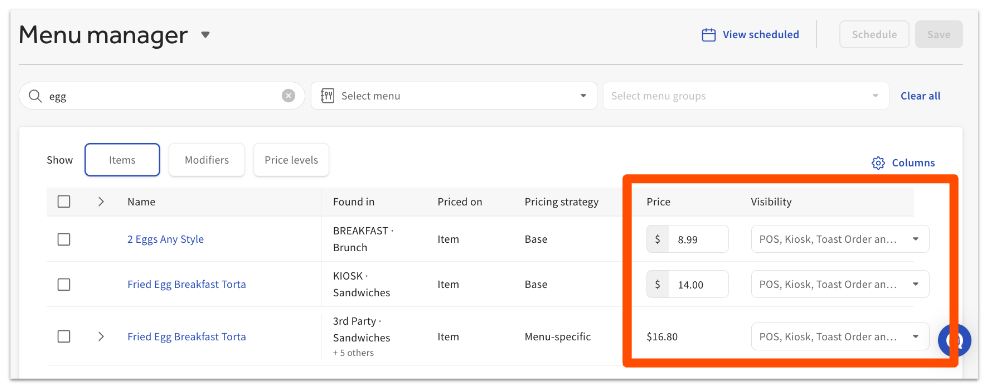
The data in the table will include the following information by default:

- Item/modifier name
- Target: the location or location groups that can see and use this item/modifier
- Found in: the menu location where the item/modifier is placed.
- If the item/modifier appears in multiple menu locations, you’ll see “+3 other” (or whatever number applies to for your item/modifier)
- For items, if the item appears in a menu group, you’ll see menu name and group name. If the item appears in a subgroup, you’ll see menu name and subgroup name (but not the group name).
- For modifiers, the Found in column will display the menu item or group the modifier applies to, and the name of the modifier group it belongs to.
- Priced on: indicates where the price is set.
- For items, the price is either set on the item itself or on the menu group.
- For modifiers, the price you specify in the menu manager will only apply for modifiers that are priced at the individual modifier level. Prices added in the menu manager will have no effect on modifiers ordered from groups that are priced at the group level, or groups that don’t charge for modifiers.
- Pricing strategy. Menu manager currently supports base pricing, size-specific pricing, menu-specific pricing, location-specific pricing, and location-specific pricing with nested menu-specific pricing. If you need to edit other pricing methods, you’ll have to do so outside of the menu manager.
- Price. Menu items or modifiers that use size-, menu- or location-specific prices (including location-specific prices with nested menu-specific prices) will have an expandable row that shows the base price per location, size, or location-menu combination.
Make Changes in Full Menu View (Menu Manager)
When you choose the Full menu view in the menu manager, you'll see additional functionality that makes managing your menus easier.
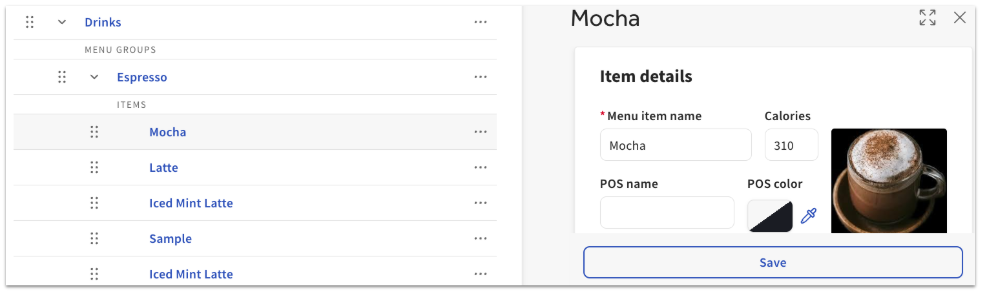
Full menu view displays all menus, menu groups, subgroups, and items in a hierarchical menu structure, similar to the Advanced properties page:
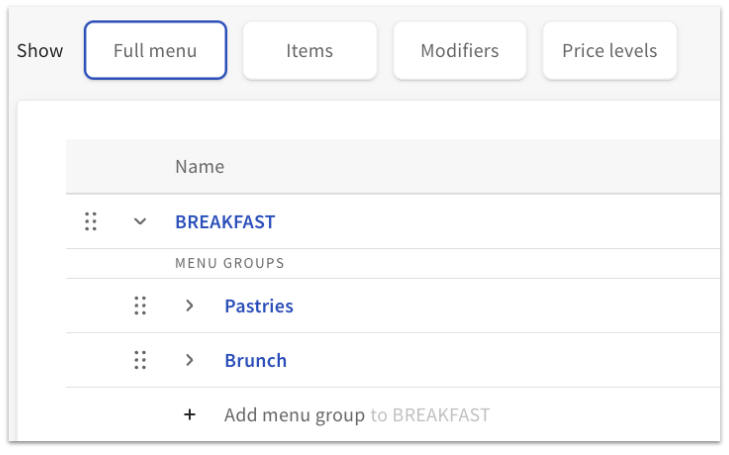
- Use the arrow icons on full menu view to expand or collapse your menus and menu groups.
- You can select + Add menu, + Add menu group, + Add subgroup, or + Add item to build out your menus directly in the menu manager.
- Use the six-dot icons to the left of any menu element to reorder them as desired.
- Select the name of any menu, menu group, or item to open a details panel on the right side of the screen and make changes to additional settings. You can access the full page editing view by selecting the expand icon in the top right corner of the details panel, next to the X.
- Select the three dot overflow icon on a menu group to either remove the menu group or alphabetize the items within it.
- Select the three dot overflow icon on an individual item to access additional actions like archive and remove.
All changes made on this page are saved automatically! Be sure to publish changes to push them to your POS.
Update Pricing or Visibility in the Menu Manager
Once you’ve used the search field or the filtering options to find the items/modifiers you wish to change, you can make those updates using the Price and Visibility fields on the menu manager table, as shown below.
If you’re ready to save and publish those changes now, select Save changes in the top right corner of the page, and then select Yes, save now on the confirmation pop-up. Be sure to publish your changes so that they’re reflected at all affected locations. To learn more about publishing, check out this Support Center article: Publish Changes in Toast Web.
If your restaurant uses Toast Multilocation Management (MLM) or one of the Restaurant Management suites and you'd like to schedule these changes for a future date and time, you can create a change set and use the scheduled publishing feature. For more information, check out this Support Center article: Set Up Scheduled Publishing With the Menu Manager.
Back to top
Frequently Asked Questions - Menu Manager
Can I bulk edit prices using the menu manager?
At this time, bulk price editing (for example, increasing prices for multiple items by a dollar or percentage amount) is not available. Look out for future updates!
Can I add a price to an item/modifier for another location or size?
No, the menu manager only allows you to update prices that are already set on a menu item or modifier. If you need to add a price for another location or size, navigate to the item/modifier details page first.