Networking & Devices Site Readiness Guide
Last updated: Oct 9, 2026, 11:36 AM
- Networking & Device Site Readiness Overview
- Site Readiness Checklist
- Am I Ready? Final Site Readiness Check
- Additional Details About Network Cabling
- Cabling Organization
- Handheld-Only and Mobile Sites for Site Readiness
- Additional Details about Electrical/Power
- Additional Details For Site Readiness
- Construction
- Additional Resources
Networking & Devices Site Readiness Overview
Basic install site readiness for networking and devices.
Your location must be properly prepared to ensure a smooth Toast installation. This guide outlines the site requirements for your space prior to implementing your system.
The following information is intended for customers who will have a Toast-monitored network. If you plan to be self-managed or work with a third-party network manager, please review our Toast Network Requirements and Toast Firewall Allowlist.
Before your install: Your Toast technician will connect, configure, and test your Toast hardware (terminals, printers, KDS, access points) once your site meets the checklist below. They will not run new network cabling, install wall mounts, provide networking equipment, or work in an area under active construction — these must be completed before your appointment, either by you or a licensed contractor.
Site Readiness Checklist
Short on time? Start with the Am I Ready? Final Site Readiness Check section below for the condensed version, then come back to this full checklist only if you need more detail. If you're not comfortable handling networking, cabling, or mounting yourself, you can hire a third-party low-voltage contractor to complete these steps before your install appointment.
Note: This checklist is written for brick-and-mortar installs. If you operate a food truck, mobile restaurant, or a temporary setup such as a pop-up, fair, festival, or event booth, skip the cabling, wall-mounting, counter cutout, and construction sections below— see Handheld-Only and Mobile Sites for Site Readiness below for what applies to you instead.
In general, your site is ready for a successful Toast install when the following is true:
You recognize the limits of your Toast install, including reviewing the terms of the onboarding package you purchased.
- Toast does not run networking cables.
- Toast will not complete the install if the Ethernet cables are less than 100MB (Cat5e).
- Toast does not provide networking infrastructure like ports, cords, or outlets.
- Toast does not set up wall mounts.
- For an on-site install, Toast does not mount wireless access points higher than 10 feet.
- Toast will not install if the location is in active construction. Active Construction means:
- Heavy construction is not fully complete.
- Construction machinery may be in use;
- Construction is required, which could compromise the hardware or cause it to be moved.
- If anyone in the building has to wear hard hats or other safety gear, or
- Any other construction that may put install technicians in danger.
You've procured an Internet connection, and it's fast enough to take payments.
- An Internet account must be established prior to the Toast installation.
- For most restaurants, this will be a landline Internet service (Cable or Fiber. DSL is not recommended since a 15 Mbps download speed is the minimum to use the system.
- For mobile restaurants or food trucks, this may be a 4G (or greater) mobile hotspot that must have an Ethernet port.
- If utilizing only a Handheld device, please note that cell phone hotspots are not recommended, as they often lack the reliability needed to run a POS system. Bandwidth is often throttled by the carrier, and/or the bandwidth may be used by other apps, causing the connection to lag or drop completely.
- Your Internet modem has an available port for the Toast router.
- Confirm your modem configuration with your Internet Service Provider (ISP).
- If you have dynamic IP (DHCP), no additional information is needed.
- If you have a static IP, please contact your ISP and record the following information:
- static IP address for Toast,
- default gateway,
- subnet mask,
- DNS (Domain Name System) 1, and DNS 2. This information is important to pass along to your Onboarding Consultant or technician regarding your networking install
- Two important steps to take to ensure your printers will work:
- Enable multicast or mDNS, as your printers use Bonjour service to be discovered.
- Disable client isolation.
You’ve taken time to plan out the space and decided where items will go.
- You’ve cleared a path for your install by removing trash, equipment, tools, or debris of any kind in the area where your install technician could be working.
- Access points are installed (or ready to be installed if ceilings are less than 10 ft high) in or on the outside of the building.
- Your network cabling (Cat5e or better) runs from the router or switch, to each piece of Toast hardware and item of networking equipment.
- This includes outdoor considerations, like wireless access points, and kitchens, like Flex 22’’ screens for your Kitchen Display System (KDS).
- Toast requires that all Ethernet cables be rated at 100 MB or higher.
- You have a power outlet within 6 feet of where you are placing your router, and all terminals or printers.
- A scale will require its own power outlet.
- Access points do not need an outlet in the ceiling. They operate on Power over Ethernet (PoE) by way of the switch or a PoE injector.
- Wall mounts for Toast devices are installed.
- The bar(s)/counter(s) are finished and, if necessary, holes are cut to accommodate the necessary cords and cabling.
Am I Ready? Final Site Readiness Check
Use this as your final check before your install appointment is booked.
You supply:
- Your Internet service and modem, with at least one free Ethernet port for the Toast router
- All network cabling, Cat5e or better, run from the router or switch to each Toast device, with every run kept under 300 feet
- A power outlet within six feet of your router and of each terminal and printer (a scale needs its own outlet)
- All wall mounts installed
- Counter and bar holes cut
- A ladder or step stool if access points, KDS screens, or cabling are going in above head height
- A clear, construction-free work area
Toast supplies your Toast hardware, router, switch, and access points only. Toast does not run cable, does not provide ports, cords, or outlets, and does not install wall mounts.
Note: Run an internet speed test and confirm every item above before your appointment is booked. If you cannot run cable yourself, hire a third-party low-voltage contractor before install day.
Additional Details About Network Cabling
Most Toast devices require Ethernet cabling to be run from the switch to the device. This includes:
- Standalone printers (both receipt printers and kitchen printers)
- Kitchen Display System screens
- Access points (in-ceiling)
- Kiosks
The only Toast devices that are currently configured to use wireless as their primary connection are:
- Toast Go® (Wi-Fi only, and Toast Go® 3 Wi-Fi + Cellular, which can also connect over cellular with no Wi-Fi network at all)
- S1 Handhelds
- M60 Handhelds
- Castles S1
- Verifone e285/e285p
- Castles AMS1
- Verifone P400/P400Plus
- Verifone V400m
These devices rely on the access points, which do require an Ethernet connection to the router or switch. Please note, you can run the Toast devices on Ethernet cables rated between 10 MB and 100 MB, although it's NOT recommended. Cables rated between 10 MB and 100 MB often lead to system inconsistencies. Any cable rated below 10 MB should not be used.
Every Toast handheld — including Toast Go, S1, and M60 — needs an internet connection to take payments and fire orders. The difference is that handhelds connect over Wi-Fi instead of Ethernet: they rely on an access point (or, in small spaces and food trucks, the Toast router's own Wi-Fi), and that access point still needs an Ethernet connection back to the router or switch, which in turn needs working internet service. If a handheld is your only Toast device, you still need: an Internet account established before install, a free port on your modem for the Toast router, a power outlet within six feet of the router, and Wi-Fi coverage across the whole area where you will be taking orders.
A single Cat 5e or Cat 6 cable must be run from the desired location of each of the above pieces of hardware to the location of the Internet modem or Demarc. Terminal cable drops must be terminated with an RJ45 FEMALE jack to the T568B wiring scheme, ideally into a wall plate or a surface mount box. Six to 10 feet of slack should be left on each end of each cable to accommodate last-minute adjustments. Each cable must be labeled with a matching identifier on each end. Use a different identifier on each cable to facilitate troubleshooting.
The home runs next to the Internet modem or DEMARC, should be terminated to a patch panel for organization and labeling purposes, as shown in the image below (left). However, if only a few cables are being run, they can be terminated to a wall-mounted plate as shown in the image below (right). Or, in some cases, the internet modem might not be located in a networking area (e.g., under the counter, host station, up on the shelf). In this case, the cables should terminate near the modem and be labeled as clearly as possible (for example: POS1, POS2, Kitchen, KDS, Dining Room AP, etc.).
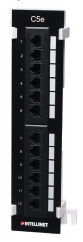
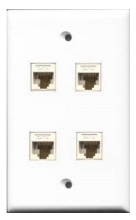
Note: As long as the correct Cat 5e or Cat 6 cables are used with a compatible splitter, it would be possible to connect two printers to one Ethernet port using a splitter.
Cabling Organization
Toast's network should be isolated. Only Toast hardware should be connected to the Toast Router/Switch. If our Onboarding Consultants are assisting with the installation remotely, it will be the responsibility of the location to keep Toast's network isolated. If you've purchased on-site installation, our technicians will assist with organization as much as possible; however, they can only organize Toast's network. If the location's other systems are disorganized, this may impede Toast's ability to install your system.
If your existing cabling is unorganized, it can lead to a number of challenges:
- Increased installation times are not accounted for in your quote.
- Difficult troubleshooting with Toast Support and other service providers.
- Communication problems leading to system instability.
If your cabling is disorganized, we can recommend contractors to help organize your network.
Handheld-Only and Mobile Sites for Site Readiness
This section applies to any handheld-only setup, whether permanent or temporary — food trucks, mobile restaurants, and temporary or pop-up setups such as fairs, festivals, or event booths. If this describes your setup, you do not need to complete the cabling, wall-mounting, counter-cutout, or construction sections above.
Handheld-only locations are supported — you do not need a terminal — but you still need the network underneath the handhelds: an established Internet account, at least one free Ethernet port on your modem or router for the Toast router, and an access point (or the Toast router's own Wi-Fi, which is intended for small spaces and temporary setups like food trucks, fairs, and event booths) positioned within range of your whole service area.
Printing is the main caveat: standalone receipt and kitchen printers still require an Ethernet cable run from the switch, so if you plan to print, cable those locations before install day.
Using your phone's hotspot: Cell phone hotspots are not recommended. Carriers often limit their speed, and other apps on the phone share the connection, which can make orders and payments lag or drop. If you run a food truck or pop-up, use a 4G or faster mobile hotspot or cellular router that has an Ethernet port. That lets you connect the Toast router and Toast printers. A phone hotspot can't connect to Toast printers.
Taking payments without any Wi-Fi network: If you only need to take payments — no printing, no other devices — a Toast Go® 3 with Wi-Fi + Cellular can process payments over its cellular connection alone, with no Wi-Fi network needed at all. Printing still requires a network: Cloud Printing lets a cellular Toast Go® 3 send print jobs over the internet, but only if at least one terminal is online on the same network as your printers.
For more on running Toast at farmers markets, outdoor events, and food trucks specifically, see Using Toast Devices at Farmers Markets, Large Outdoor Areas, and Food Trucks.
Note: Keep each cable run under 300 feet. If a device sits farther than that, place a switch closer to it.
Additional Details about Electrical/Power for Site Readiness
While Toast does not currently require isolated ground circuits, it's always a best practice to avoid plugging terminals into any outlet with appliances such as microwaves, refrigerators, or blenders. Motorized devices cause power fluctuations, negatively impacting Toast devices and leading to hardware instability.
Additional Details For Site Readiness
Ladders/Ceilings for Site Readiness
The Toast technicians do not travel with ladders. We require that customers provide ladders or step stools if necessary. Common installation activities that require ladders or step stools are:
- Wireless Access Point installation
- KDS installation
- Network installation
For more information, see Best Practices for Installing Wireless Access Points for some great pointers for installation.
Counter Tops for Site Readiness
If terminals or terminal bundles will be placed on counters or bars, especially customer-visible surfaces, then 2-3 inch holes must be cut into the surfaces before installation to allow the cables to run underneath. These holes must be located within two feet of each terminal. Remember that a cash register may be placed directly underneath the terminal, potentially blocking any holes for cords you’re planning out. Make sure not to drill holes too close to the exact location of the terminal. Check out this Product Spec Guide for more information on your hardware.
Wall Mounting for Site Readiness
Toast requires that customers install all wall mounts before installation. You can purchase and install any wall mount that meets the VESA (Video Electronics Standards Association) standards. If you've purchased a Kitchen Display System screen, you'll receive a wall mount with your hardware. You are still required to install it. Learn more about mounting your KDS Wall Mount.
Construction for Site Readiness
Toast does not recommend installing your POS hardware while there is, or will be, active construction.
Here are common problems we find with systems installed before or during construction:
- Dust from the construction gets into the terminals or handhelds and breaks them. Hardware broken by dust will not be replaced.
- The Toast network setup is interfered with as your other contractors work in the space. This leads to increased installation hours to fix any problems that may arise. Problems can be as basic as a contractor unplugging a network device to charge their cellphone or more complicated, like a contractor reworking the whole network to accommodate a security or music system.
- If Toast has to investigate or correct the network before your implementation date, it may lead to implementation overages.
Additional Resources