Get Help With the Toast Receipt Printer TP200
Last updated: Aug 20, 2026, 2:01 PM
- Before you begin
- Always try these three steps first
- Quick fix
- Understand your printer
- Troubleshoot by symptom
- Frequently asked questions
- Before you contact Customer Care
- Related articles
Before you begin
Applies to: Toast Web, Toast POS, Toast Now app, TP200 Toast Receipt Printer
Permissions needed: 7.1, 7.2, and 7.3 permissions
What you'll accomplish: Identify the symptom your TP200 printer is showing, walk through the matching fix, and (if the fix doesn't work) gather the right information to start a chat with Customer Care.
Unsure which printer you have? See Toast Compatible Printers.
Always try these three steps first
These three steps solve most TP200 printer issues and can be done on the floor.
|
Expected outcome: Your TP200 prints normally. If it does, you're done. If not, use the Quick Fix table below to identify your symptom.
If the problem isn't resolved after the three steps, also see Get Help: My Printer Isn't Working for additional general printer troubleshooting that applies across all Toast printers.
Quick fix
Find your symptom in the table below. Each row points to the matching troubleshooting section.
| Symptom | Most common cause | Quick fix | Self-service? |
|---|---|---|---|
| Red blinking light on the printer | Cutter debris, cover not fully closed, or print head overheated | A red blinking light usually means cutter debris, a cover that isn't fully closed, or an overheated print head. Full steps: see Red blinking light below. | Yes |
| Printer won't turn on (no lights at all) | Power cable or power adapter issue | If the printer won't turn on at all (no lights), check the power cable and power adapter first. Full steps: see Printer doesn't turn on below. | Yes |
| Printer won't print anything (test print or live orders) | Network connection, IP/serial number mismatch, or printer not on same network | If the printer won't print test prints or live orders, check the network connection and confirm the IP/serial number and network match. Full steps: see Printer doesn't print at all below. | Yes |
| Test slip prints but live tickets don't | Ethernet switch needs reset OR device/printer on different networks | If a test slip prints but live tickets don't, reset the Ethernet switch or confirm the device and printer are on the same network. Full steps: see the "Test print works but live tickets don't" section of Printer doesn't print at all below. | Yes |
| Paper stops mid-print or won't exit | Out of paper, paper jam, or debris in cutter/print head | If paper stops mid-print or won't exit, check for an empty roll, a paper jam, or debris in the cutter or print head. Full steps: see Paper stops or won't exit below. | Yes |
| Paper Feed light stays on | Paper roll loaded incorrectly or cover not fully closed | A Paper Feed light that stays on usually means the paper roll is loaded incorrectly or the cover isn't fully closed. Full steps: see Paper Feed light stays on below. | Yes |
| Paper doesn't cut after printing | Plastic centerpiece left in paper bay, debris in cutter, or cutter mechanism issue | If paper doesn't cut after printing, check for a plastic centerpiece left in the paper bay, debris in the cutter, or a cutter mechanism issue. Full steps: see Paper doesn't cut after printing below. | Yes |
| Receipts print faded or too light | Print head or platen roller is dirty | Faded or too-light receipts usually mean the print head or platen roller needs cleaning. Full steps: see Receipts print faded or too light below. | Yes |
| Receipts print crooked | Wrong printer model selected in Toast Web, or paper roll loaded crooked | Crooked receipts usually mean the wrong printer model is selected in Toast Web, or the paper roll is loaded crooked. Full steps: see Receipts print crooked below. | Yes |
| Printer prints blank paper | Wrong paper type or paper loaded backwards | If the printer prints blank paper, check for the wrong paper type or paper loaded backwards. Full steps: see Printer prints blank paper below. | Yes |
| Printer prints random symbols | Wrong printer model selected in Toast Web | Random symbols instead of text usually mean the wrong printer model is selected in Toast Web. Full steps: see Printer prints random symbols below. | Yes |
| Printer not working after a power outage | Network not fully recovered, or duplicate IP addresses across printers | If the printer isn't working after a power outage, the network may not have fully recovered, or there may be duplicate IP addresses across printers. Full steps: see Printer doesn't work after a power outage below. | Yes |
| Receipts show the wrong currency (for example, no Euro symbol) | Language pack setting in Toast Web | The wrong currency symbol on receipts (for example, a missing Euro symbol) usually points to the language pack setting in Toast Web. Full steps: see Receipts show the wrong currency below. | Yes |
| Red blinking light + buzzing sound, OR symptoms persist after trying the matching fix | Likely a hardware fault requiring replacement | A red blinking light with a buzzing sound, or symptoms that persist after trying the matching fix above, usually means a hardware fault requiring replacement. Full steps: see Before you contact Customer Care below. | No |
Prefer a guided experience? Try the Hardware, Networking, or Configuration step-by-step guides:
- Start hardware troubleshooting
- Start networking troubleshooting
- Start troubleshooting your settings configuration
Understand your printer
This section helps you identify the parts of your TP200 printer that the troubleshooting steps reference.
Printer buttons and ports
Use the images below to learn more about your TP200 Toast Printer components, buttons, and ports.
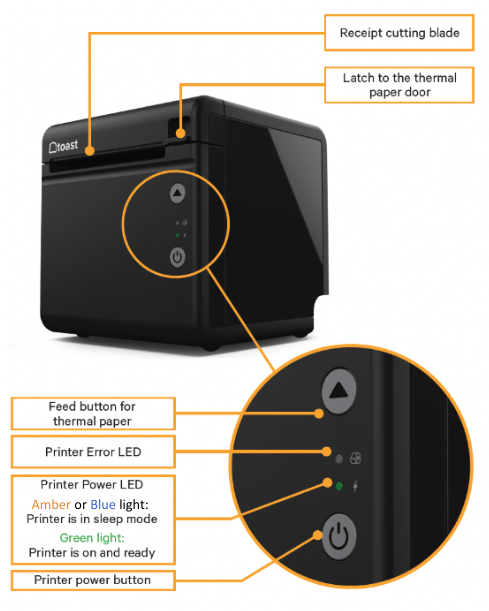
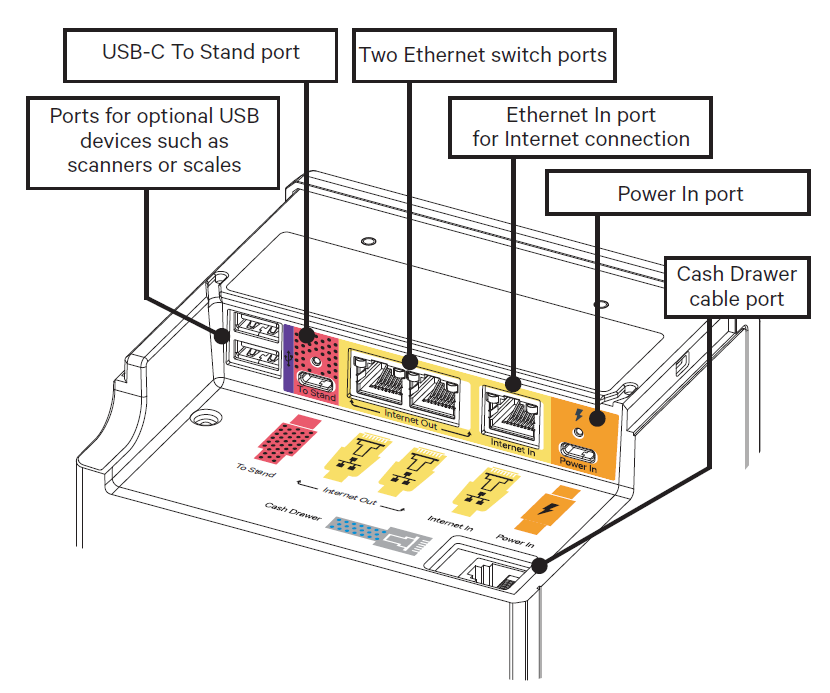
Printer lights
The LED above the Power button has two normal states and several error states.
Normal states:
- Amber or Blue LED: The power adapter is plugged in but the printer has not been turned on.
- Green LED: The printer is turned on and ready to print.
Error states:
Check out the table below for more information:
| Light | Function |
| Error | Under the error conditions outlined below, the error light will flash |
| Paper | Under the paper near-end conditions (learn more below), the paper light will turn on and remain on |
| Error | Buzzer | Light |
| HP error | Interval beep | Error light interval flash — to clear, press and hold the feed button for 60 seconds |
| Print head overheated | Six beeps | Error light flashes 6 times |
| Cutter error | Four beeps | Error light flashes 4 times |
| Paper near end | Two beeps | Paper LED light will turn on AND Error LED light will flash once |
| Cover Open | Three beeps | Error light flashes 3 times — the cover is open and needs to be closed |
Troubleshoot by symptom
Match your symptom to a section below. If your symptom isn't listed or the steps don't resolve the issue, see Before you contact Customer Care.
Red blinking light (also called red flashing light)
A red blinking light usually means one of three things. Try each cause in order.
Cause 1 — Cutter error: Clean the paper cutter of any debris (small paper fragments, dust, broken plastic).
Cause 2 — Top cover is open: Open the cover, then close it firmly. You should hear it snap into place. If the cover sensor still reports it as open after you've closed it firmly, see the note below.
Cause 3 — Print head overheated: Power off the printer and wait 15–20 minutes for the print head to cool down. Then power back on and retry.
Cause 4 — HP Error: To clear, press and hold the feed button for 60 seconds.
Important: If the red blinking light persists after trying all three causes — especially if the printer displays a "cover open" message even when the cover is firmly closed and you've heard it snap — this is typically a hardware sensor failure that requires a replacement printer. See Before you contact Customer Care.
Expected outcome: The red blinking light turns off. If not, escalate per the Important note above.
Printer doesn't turn on
Use this section if the printer has no lights at all (no amber, green, or blue LED).
If the printer has any light visible (amber, green, or blue), the printer has power — skip to Printer doesn't print at all instead. If there are no lights at all, take the following steps:
- Verify the power cable is fully plugged into the printer.
- Tighten the thumb screw on the power cable so the cable is fully secured to the printer.
- Check for a green light on the power adapter itself (the power brick in the middle of the cable).
- If there's a green light on the power adapter, power is reaching the printer. Press and hold the power button on the printer to turn it on until you see a green light on the printer.
- If there's no green light on the power adapter, try a different wall outlet to rule out an outlet issue.
Expected outcome: The printer's Power LED lights up green and the printer is ready to print.
If the printer still has no light and the power cable looks damaged: This is typically a hardware failure. See Before you contact Customer Care.
Printer doesn't print at all
Use this section if the printer has lights and seems on, but doesn't print receipts or tickets.
Print a hardware test slip first — this tells you whether the problem is with the printer itself or with how it's connected to your network.
- Power off the printer.
- Press and hold the Feed and power buttons simultaneously until you hear the printer make a noise.
- A test slip should print within a few seconds.
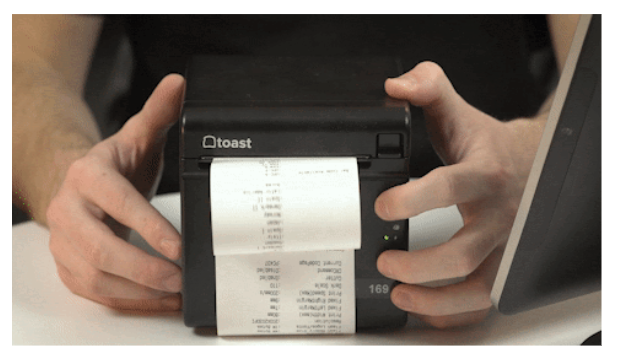
Important: Regardless of outcome, press and release the feed button to exit test mode.
Expected outcome: A test slip prints, showing the printer's IP address and DHCP status. Continue to Read the test slip: DHCP and IP address to interpret what it shows.
If no test slip prints (printer has a green light but nothing comes out): Please attempt again, and if nothing comes out, this could be a hardware fault. See Before you contact Customer Care.
If the printer prints a test slip but won't print live tickets from your Toast device: Reset the Ethernet switch and re-seat all cables.
- Open the printer door with paper sticking out slightly.
- Press the Feed button five times. The power light will flash when the reset is complete.
- Close the door. A small ticket should print saying "Ethernet Switch Reset."
- Unplug both the power and Ethernet cables for 30 seconds, then plug them back in and power on.
- Retry printing a live ticket from your Toast POS.
Expected outcome: Live tickets print from the Toast POS to your TP200.
If printing from a handheld device, make sure the device is connected to the correct Wi-Fi, so that it is on the same network as the printer.
If printing from a terminal, make sure the terminal has Wi-Fi disabled (terminals print over Ethernet) and the correct printer is selected under Printer Setup.
If you are attempting to Cloud Print, go to Get Help With Your Toast Go® 3 Handheld.
Read the test slip: DHCP and IP address
Your TP200's test slip shows two key pieces of information: whether DHCP is enabled or disabled, and what IP address (if any) the printer has on the network. Configuring Toast Web to match what the test slip shows is critical — a mismatch is one of the most common reasons a printer with a green light still won't print live tickets.
Note: Save AND Publish your changes in Toast Web. Both steps are required for printer configuration changes to take effect.
Read the DHCP status on your test slip first:
| If your test slip shows DHCP is... | Your TP200 uses... | What Toast Web needs |
| Enabled (default for printers shipped since June 2021) | A dynamic IP address | The Serial Number field populated; the IP Address field empty |
| Disabled | A static IP address | The IP Address field populated (with the IP from the test slip); the Serial Number field empty |
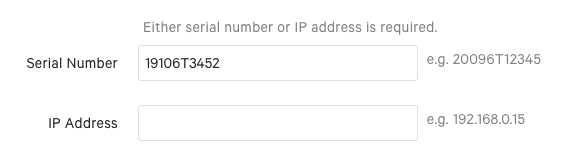
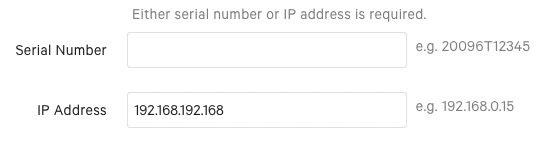
To update your TP200's configuration in Toast Web:
- Navigate to Toast Web > Payments > Checks & receipt setup > Printers and cash drawers.
- Select the name of your TP200 printer from the list.
- Update the Serial Number field or IP Address field based on the table above. Some serial numbers include the model number prefix (for example, TP200250106900668) — if so, enter the entire number in the Serial Number field. The serial number is case-sensitive.
- If both fields are populated, delete whichever one shouldn't be filled (per the table above).
- Select Save, then select Publish. Both are required.
Expected outcome: Your TP200's configuration in Toast Web matches what its test slip shows, and live tickets begin printing.
Need to change your printer's static IP address? See "Change the Static IP Address on Your Printer" (also titled "Changing Your TP200 Toast Printer's Static IP Address" on some pages).
Now check the IP address on the test slip:
- If the IP address shows a series of zeros (for example, 0.0.0.0): The printer isn't connected to the network. See "Network issue" below.
- If the IP address shows 192.168.192.168 or 192.168.192.169: This is the TP200's factory default IP. It means the printer can't reach your router. The Ethernet cable, wall port, or router may be the problem. See "Network issue" below.
- If the IP address shows your network's IP range (for example, starts with 192.168.168.x): The printer is on the network. If it still won't print live tickets, see "Configuration issue" below.
Network issue (no IP or factory-default IP):
- On the terminal connected to the TP200, navigate to Device Setup > Printer Setup. Confirm the TP200 appears in the My Printers list (likely shown as Offline).
- Select the TP200 and select Print test receipt (or Print test ticket for kitchen use). If nothing prints, continue below.
- Make sure the printer and your terminals or handhelds are on the same network. See "Forget a Network on a Toast Device" if you need to clear a non-Toast network from a terminal.
- If printing from a Toast Go, make sure the device is connected to the Toast-secured Wi-Fi. If printing from a terminal, make sure the terminal has wireless LAN turned off (terminals print over Ethernet) and the correct printer is selected via Device Setup.
- If nothing prints again, reset the Ethernet switch on the printer (open the printer door, press the Feed button five times — the power light will flash). Reseat the Ethernet cable on both ends, then power cycle the printer (off for two minutes, then on).
- Check the green light on the printer's Ethernet port. If it's not flashing, the Ethernet cable, wall port, or router is likely the issue.
- Try a known-working Ethernet cable. If you have two TP200 printers and only one is working, plug the broken one into the working one's cables to confirm whether the cable or wall port is at fault.
- If the Ethernet port light is still not flashing after trying a different cable, reset your Meraki router to refresh your network connection.
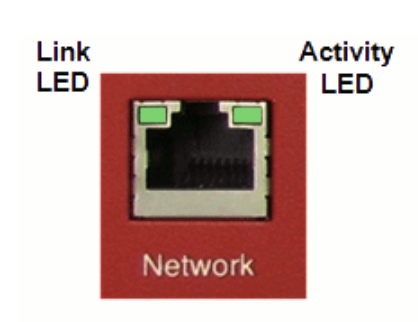
Expected outcome: The printer's Ethernet port light flashes, the printer gets a non-default IP address, and live tickets print.
If the Ethernet port light still doesn't flash after all of the above: This is typically a cable, port, or hardware fault. See Before you contact Customer Care.
Configuration issue (IP shows a normal address but tickets don't print or print to the wrong printer):
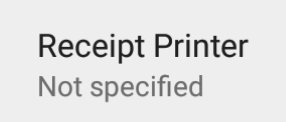
- On the terminal, under Device Setup, make sure the TP200 in question is set as the receipt printer for that terminal or device.
- If the TP200 is used for a prep station, make sure it's assigned to a prep station. See "Prep Stations Basics" for setup.
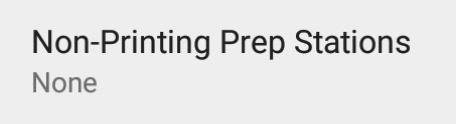
- If your restaurant uses non-printing prep stations (for example, a bar terminal), tickets won't print as a result. Navigate to Device Setup on the terminal and confirm. If you want this printer to print prep station tickets, select None for the non-printing prep station setting.
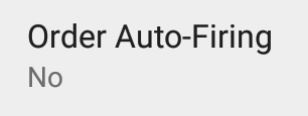
- Confirm you don't have more than one auto-fire device at your restaurant. Navigate to Device Setup on each device and confirm only one has auto-firing enabled. See Set Up Order Autofiring to learn more.
Expected outcome: Live tickets print to the correct TP200 with no duplication or wrong-station routing.
Note: At any point during these steps, retry a test receipt or ticket from your printer to confirm progress.
Paper stops or won't exit
The printer is either out of paper or there's a paper jam.
- Open the printer cover. If the paper roll is empty, replace it with a new 80 mm thermal paper roll.
- If there's still paper on the roll, check for debris on the cutter or print head.
- Clean out any debris, re-seat the printer paper, and close the cover.
Expected outcome: Paper feeds normally and tickets print fully.
If the cutter is jammed (stuck in the up position, won't retract, or paper isn't separating cleanly), see Fix the Cutting Mechanism on Your Printer for cutter-specific steps that apply to both TP200 and Epson M30 printers.
Paper Feed light stays on
The Paper Feed light typically means the paper roll is loaded incorrectly.
- Open the printer cover and remove the paper roll.
- Reinsert the paper so it exits on the opposite side of the cover (refer to the diagram).
- Ensure the latch is fully closed (you heard a snap) and the path is clear of debris.
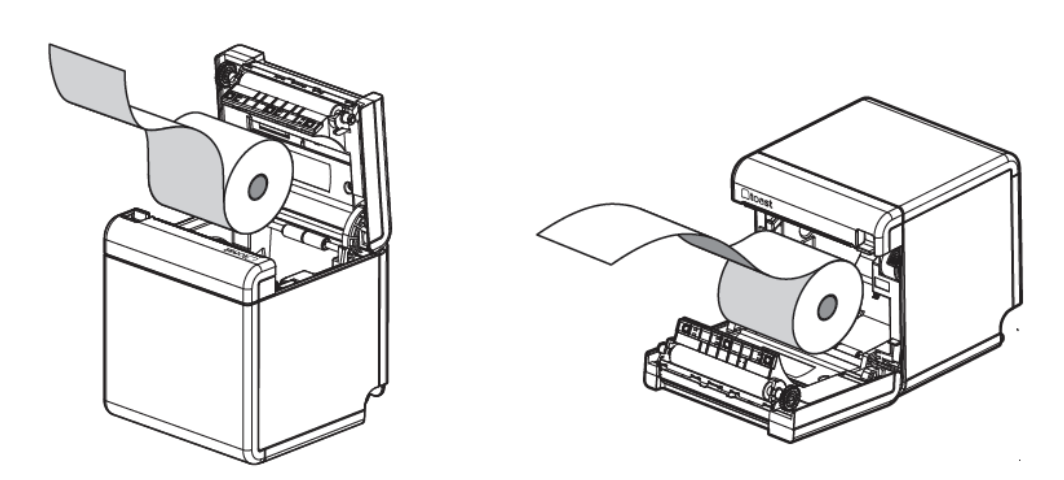
Expected outcome: The Paper Feed light turns off and the printer feeds paper normally.
If the Paper Feed light is still on after re-seating the paper: This is typically a paper-sensor hardware fault. See Before you contact Customer Care.
Paper doesn't cut after printing
If receipts are coming out uncut or only partially cut, the cutter may be obstructed.
- Open the paper reservoir and check for any extra plastic centerpiece that may have been left behind from a previous paper roll.
- Close the lid and attempt a test print by powering off the printer, then simultaneously holding down the power and Feed buttons.
- Clean any paper debris, paper bits, and dust from the cutting mechanism, the paper itself, and the print head.
Expected outcome: The cutter cleanly separates each printed ticket.
If the printout still has a partial cut or no cut at all after cleaning: The cutter may need replacement. See Fix the Cutting Mechanism on Your Printer for additional cutter-specific guidance. If cutter-specific steps don't help, see Before you contact Customer Care.
Receipts print faded or too light
The TP200 is a thermal printer — it doesn't use ink. Faded or unclear prints typically mean the print head or platen roller is dirty.
- Open the printer cover.
- Clean the print head gently with a cotton swab and rubbing alcohol.
- Clean the platen roller (the rubber roller the paper presses against) with the same swab.
- Let both dry completely. Close the cover and retry printing.
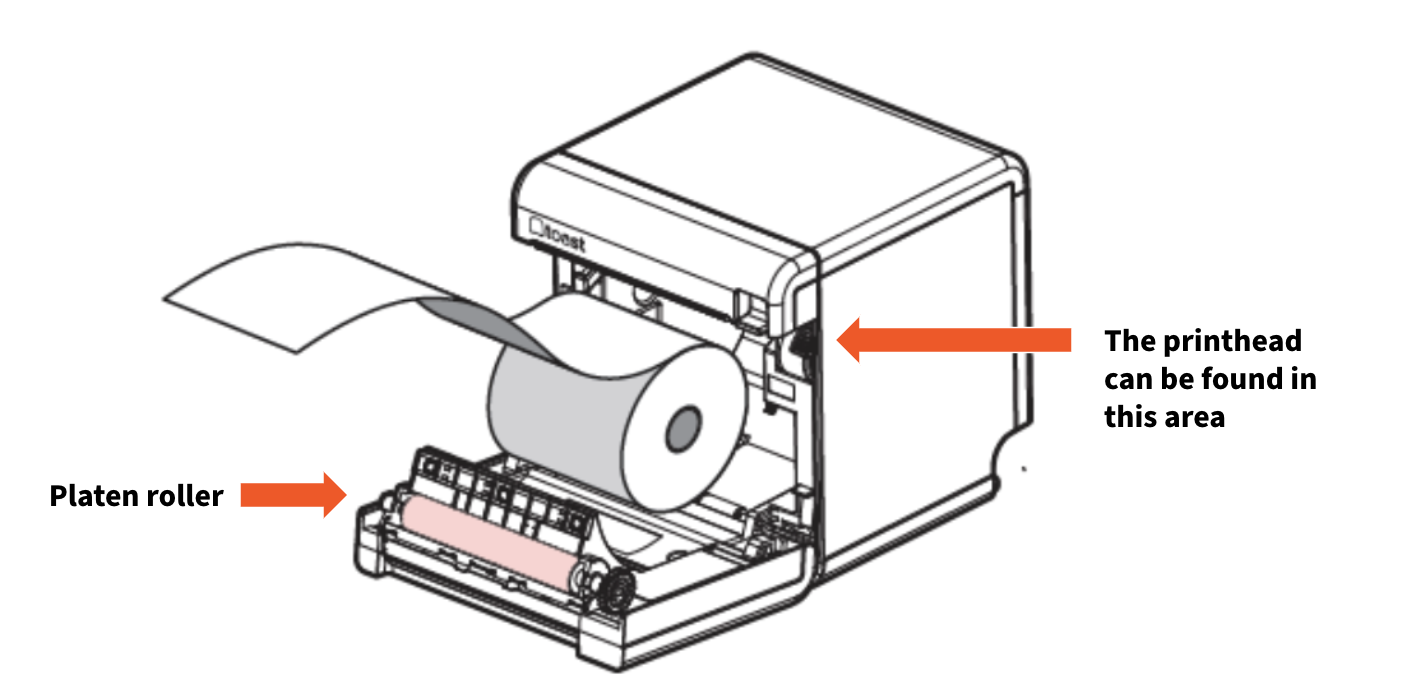
Printhead (image):
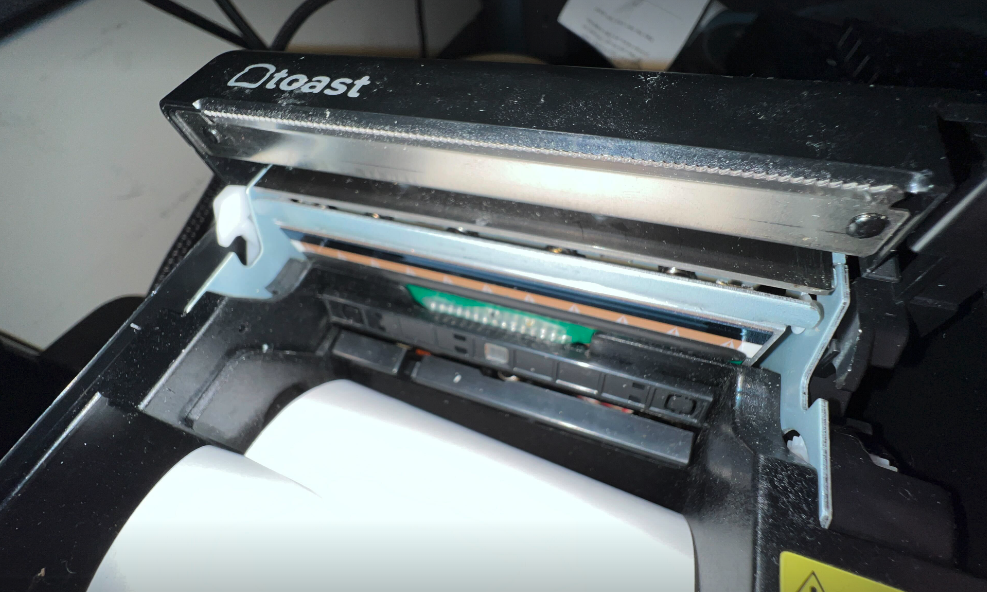
Expected outcome: Receipts print clearly and at full darkness.
For more detail on cleaning, see Clean Your Toast Printer's Print Heads.
If cleaning the print head and platen roller doesn't restore print clarity: The print head itself may be worn. The TP200 doesn't use an ink ribbon (unlike the Epson U220B kitchen printer), so a faded TP200 print typically points to a hardware-level issue rather than a consumable. See Before you contact Customer Care.
Receipts print crooked
Crooked prints are usually a configuration issue or a paper-loading issue.
- Log in to Toast Web and navigate to Payments > Checks & receipt setup > Printers and cash drawers. Select your TP200 and verify the Model is set to Toast TP200/TP200W. See TP200 Toast Printer Quick Start Guide for more on TP200 setup in Toast Web.
- Open the printer and make sure the paper roll is installed straight, not crooked.
Expected outcome: Receipts print straight and aligned.
Printer prints blank paper
A blank print typically means wrong paper or incorrectly loaded paper.
- Make sure you're using 80 mm thermal paper. Standard (non-thermal) paper won't print on a TP200.
- The paper may be loaded backwards. The paper should exit on the opposite side of the cover. Reverse the roll and try again.
- Clean the print head by following Clean Your Toast Printer's Print Heads.
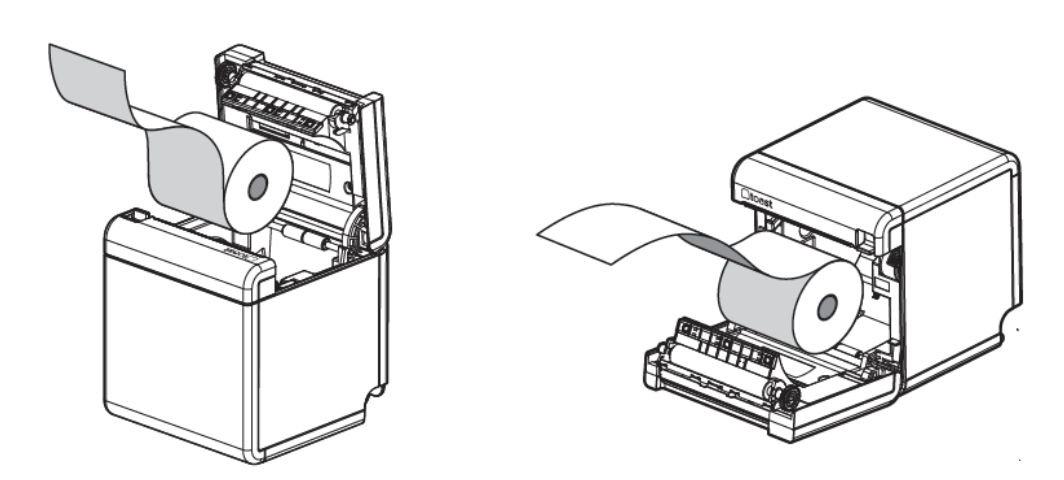
Expected outcome: The TP200 prints text and graphics normally.
Note: To confirm you have thermal paper, scratch the printable side with your fingernail. Thermal paper will leave a black mark; standard paper will not.
Printer prints random symbols
If your TP200 prints random characters or garbled output, the wrong printer model is likely selected in Toast Web.
- Navigate to Toast Web > Payments > Checks & receipt setup > Printers and cash drawers.
- Select the affected printer.
- Update the Model to Toast TP200/TP200W.
- Select Save, then select Publish.
- Power cycle the printer (off for 30 seconds, then on).
- Retry printing.
Expected outcome: The TP200 prints normal text and graphics.
Printer doesn't work after a power outage
After a power outage, printer functionality often takes longer to recover than terminals.
Important: Your Toast network MUST be back online before troubleshooting any printer. Your Toast-provided Meraki router should show a solid white light. See "What To Do After a Power Outage" for full network-recovery steps.
Once the network is confirmed working:
- Power off all printers.
- Power on one printer at a time, leaving each off for about a minute before powering back on. This prevents IP-address conflicts.
- On a terminal, navigate to Device Setup > Printer Setup and confirm the network has assigned a unique IP address to each printer. See "Printer Setup Overview" for more.
Expected outcome: Each printer has a unique IP address and prints normally.
Note: If a printer's IP address still ends in .168 or .169, repeat steps 1–3 once more. Those addresses mean the printer is still on its factory default IP and hasn't been assigned an address by your router.
If printers still don't function correctly after repeating the steps: See Before you contact Customer Care.
Receipts show the wrong currency
To change the currency type displayed on receipts, configure the language pack settings in Toast Web. See "Configure Your Printers to Display Euro" for the specific steps.
Frequently asked questions
How do I clean my TP200 printer?
For step-by-step cleaning instructions for the TP200's print head and platen roller, see Clean Your Toast Printer's Print Heads.
Also asked as:
- How do I clean my Toast Printer?
- How do I clean a thermal printer?
Can I use the TP200 as a kitchen printer?
Yes — the TP200 can be assigned to a kitchen prep station to print kitchen tickets. Setup is done in Toast Web under Payments > Checks & receipt setup > Printers and cash drawers (printer assignment) and Kitchen > Kitchen Stations > Prep Stations (prep station setup). For full prep station setup instructions, see "Prep Stations Basics."
Also asked as:
- Can a TP200 work as a kitchen printer?
- How do I set up a TP200 for the kitchen?
What paper does the TP200 use?
The TP200 uses 80 mm thermal paper (3 1/8" × 230'). The TP200 doesn't use ink or ink ribbons. Toast does not sell printer paper — purchase from any paper goods supplier. For brand recommendations and detailed paper specifications, see "Printer Paper Rolls and Ink Ribbons."
Also asked as:
- What paper does my Toast Printer use?
- What kind of paper do I buy for TP200?
Where do I buy a new power adapter or cable for my TP200?
For replacement parts (power adapter, USB-C cable, Ethernet cable, mounting bracket), visit Toast Shop or chat with Customer Care to order. This is outside the scope of self-service troubleshooting — contact Customer Care for a parts quote or order.
Also asked as:
- Where do I buy a new power adapter for my TP200?
- Where can I get a replacement TP200 power cord?
- Where do I order parts for a TP200?
Before you contact Customer Care
If you've worked through the matching symptom and the issue persists, the printer may need a hardware replacement. Before contacting Customer Care, gather the following — it speeds up your interaction significantly:
- The exact symptom you're seeing (a photo or video of the printer's lights and behavior is best)
- Your TP200's serial number — found on a label on the bottom of the printer, or shown on a hardware test slip
- The reference code that matches the symptom you tried to fix (see table below)
- The steps you've already tried from this article
- Whether other TP200 printers in the same location are working normally
- Whether the printer was dropped, exposed to water, or recently moved
Reference codes for Customer Care:
| Reference code | Use when... |
| #510 | Printer doesn't power on and has no light, or you notice the power cable is damaged |
| #511 | Printer has a green light but can't print a hardware test slip |
| #512 | Paper Feed light still on after reseating the paper roll |
| #513 | Printer has a partial cut or no cut at all after cleaning the cutter |
| #514 | Printer Ethernet port light still doesn't flash after trying a different cable and resetting the Meraki router |
| #515 | After a power outage, printers don't function correctly after repeating the recovery steps |
Start a chat with Customer Care:
- In Toast Web or Payroll Web — select the blue support button in the bottom right of any page
- In the Toast Now app — select the Support tab
Don't have the Toast Now app yet? Download it from the Apple App Store or the Google Play Store.
For more on contacting support, see "How to Contact Customer Support" or visit support.toasttab.com.
Related articles
- TP200 Toast Printer Quick Start Guide
- Get Help: My Printer Isn't Working
- Fix the Cutting Mechanism on Your Printer
- Clean Your Toast Printer's Print Heads
- Get Help: Troubleshoot Printer Error Messages