Toast Payroll: Add or Edit Earnings & Deductions
Last updated: Jul 7, 2026, 10:56 AM
Add or change an employee's earning or deduction — recurring on their profile or one-time inside an open payroll.
- Recurring vs. One-Time: Which One Do I Need?
- Before You Begin
- Quick Fix: Match Your Task to the Right Steps
- Add a One-Time Earning
- Edit a One-Time Earning
- Add a One-Time Deduction
- Edit a One-Time Deduction
- Add or Review a Recurring Earning
- Add or Review a Recurring Deduction
- Set Up a Garnishment, Child Support, Levy, or Lien
- Add a New Earning Code or Deduction Code (e.g., Bonus, 401(k), Medical)
- Frequently Asked Questions
- Before You Contact Customer Care
- Related Articles
Recurring vs. One-Time: Which One Do I Need?
A recurring earning or deduction appears on every payroll run. Recurring earnings are typically the employee's pay types — Salary, Regular (hourly), Tips. Recurring deductions are items withheld every pay period — meal deductions, health care premiums, 401(k), wage garnishments. These are added to the employee's profile.
A one-time earning or deduction only appears on the payroll you add it to. These are bonuses, a uniform deduction, an annual fee, or any other change that should not repeat. One-time items are added on the Employee Earnings step inside an open payroll.
Important: Changes to recurring earnings and deductions must be made before you select Preview to open the payroll. If you add or change a recurring item after Preview has been selected, it will not appear on that payroll run. Reset payroll to pick up the change, or add the item as a one-time entry on this run and then update the recurring profile for future runs.
This video covers the different actions you can take on the Employee Earnings step, including making one-time earning/deduction additions or edits.
Before You Begin
Applies to: Toast Payroll
Permissions needed:
- Toast Payroll permission to access employee profiles (typically Manager or HR+)
- Toast Payroll permission to open and run payroll (typically HR+)
What you'll accomplish: You will add or edit an earning or deduction so it pays out (or withholds) correctly on the next eligible payroll.
Quick Fix: Match Your Task to the Right Steps
Find your task in the table, then follow the section it points to.
| What you need | Where to go | Self-service? |
|---|---|---|
| Add a bonus to one paycheck | Yes — if a bonus earning code already exists. If not, see Add a New Earning Code or Deduction Code | |
| Add a one-time deduction (uniform, meal, fee) | Yes | |
| Edit an earning that's already on this payroll | Yes | |
| Edit a deduction that's already on this payroll | Yes | |
| Set up a recurring earning (Salary, Regular, Tips) | Add or Review a Recurring Earning — but check Positions or Jobs first since recurring earnings are almost always role-based | Yes |
| Set up a recurring deduction (401(k), medical, dental, meal) | Yes — if the deduction code already exists | |
| Set up a child support, garnishment, levy, or lien | No — Toast Payroll Customer Care sets these up from the court order | |
| Create a new earning code (e.g., "Bonus") or deduction code (e.g., new benefit) | Partial — you submit the request form; Customer Care builds the code | |
| A deduction shows $0, isn't withholding, or isn't showing up | Often yes — check the FAQ before contacting Customer Care |
Add a One-Time Earning
Use this when the earning should only apply to the payroll you are running right now (for example, a bonus or a missed-hours adjustment).
- Navigate to Payroll. Select Preview to open and begin a payroll run.
- Advance through the Preview Payroll step by selecting Next.
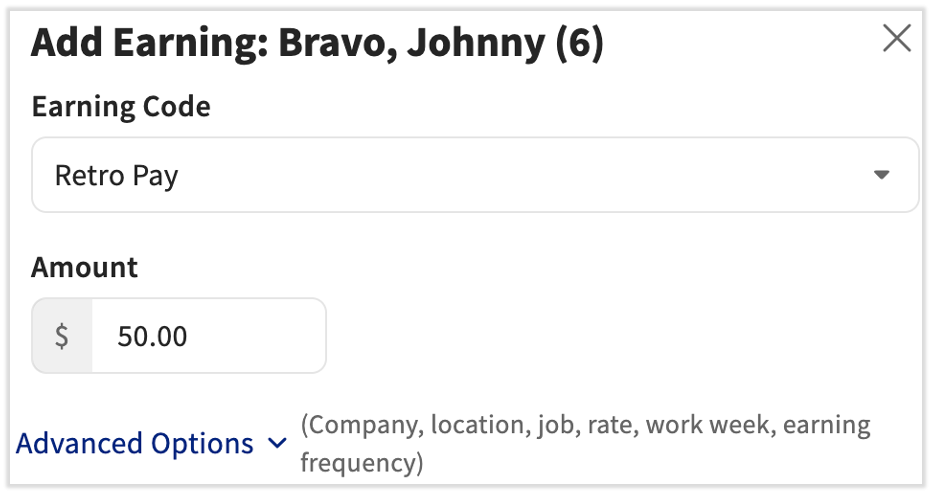
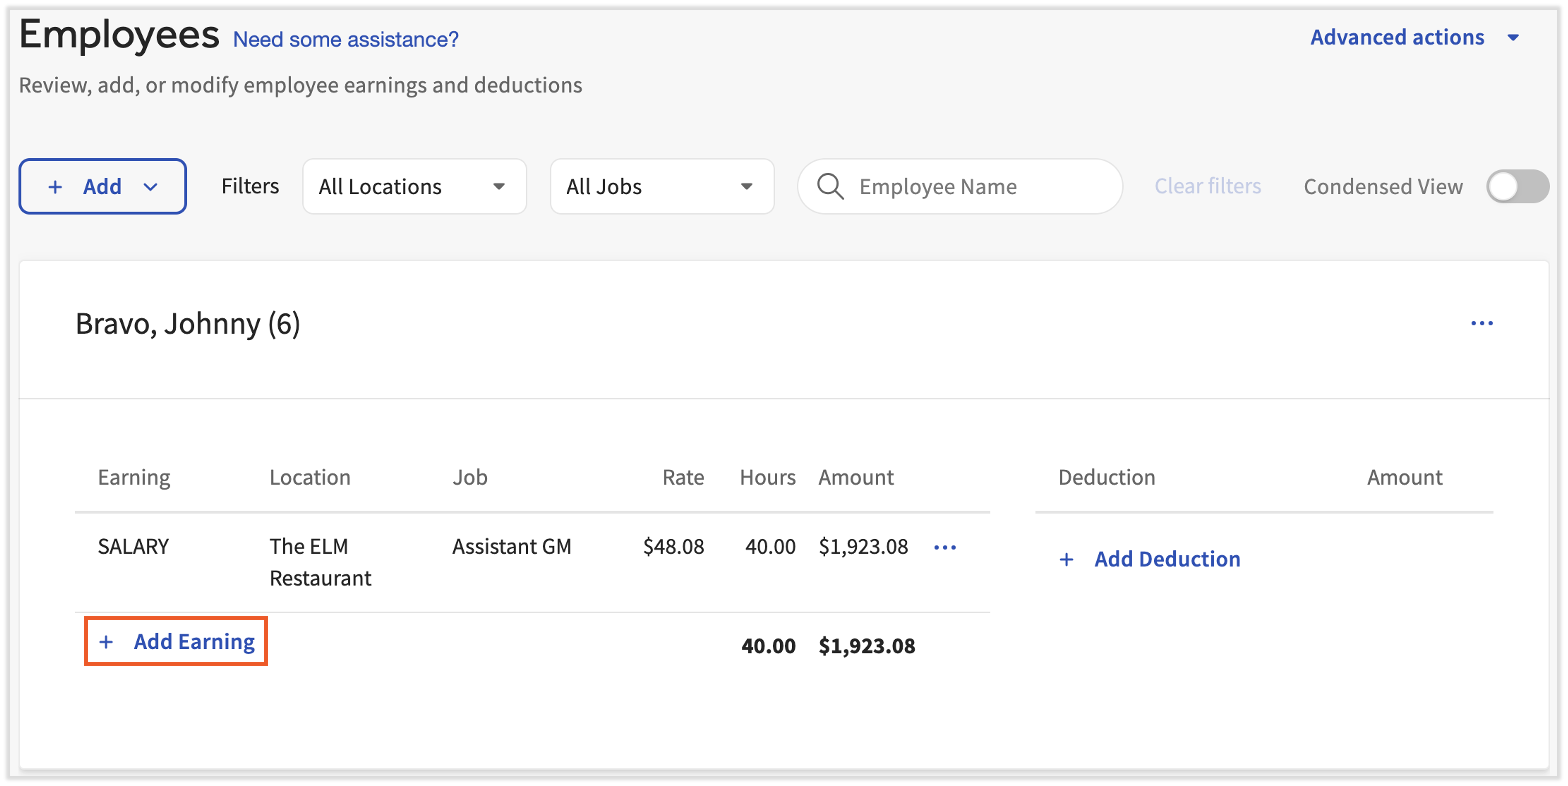
- On the Employee Earnings step, locate the employee and select + Add Earning.
- Fill out the Earning Code and Hours/Amount. Select Advanced Options to further customize this earning if needed (commonly used to edit wage rates).
- Select Add earning to finish.
Expected outcome: The new earning appears in the employee's row on the Employee Earnings step and is included in the payroll totals at the top of the page.
Note: If the employee is missing from this payroll, select Add employee. Only employees in the same pay group as this payroll will appear in the list.
Edit a One-Time Earning
Use this when an earning is already on the payroll but the amount, hours, or rate is wrong. The change applies only to this payroll — it will not update the employee's recurring profile.
- On the Employee Earnings step of an open payroll, locate the employee with the incorrect earning.
- Select the overflow menu (...) to the right of the earning, then choose Edit earning.
- Make changes as necessary. You can update Hours/Amount or use the Advanced Options menu to adjust location and rate.
- Select Change earning to save.
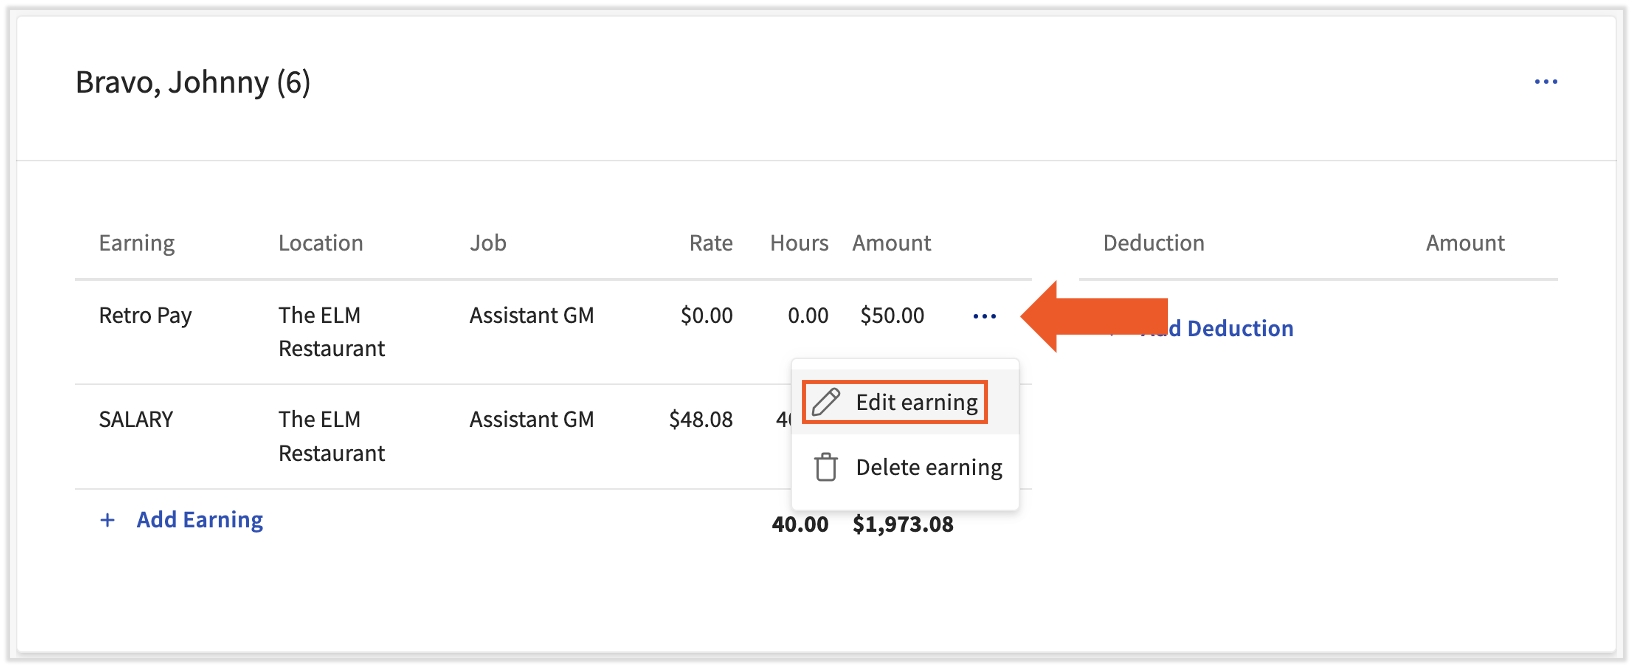
Expected outcome: The updated amount, hours, or rate appears on the earning line for this payroll only. The employee's recurring profile is unchanged.
Add a One-Time Deduction
Use this for a deduction that only applies to this payroll — for example, a one-time uniform fee, a meal deduction adjustment, or an annual membership fee.
- Navigate to Payroll. Select Preview to open and begin a payroll run.
- Advance through the Preview Payroll step by selecting Next.
- On the Employee Earnings step, locate the employee and select + Add Deduction.
- Choose the Deduction Type and select whether it is a percentage or a flat amount.
- Enter the amount or percentage of gross pay. Select Add deduction to finish.
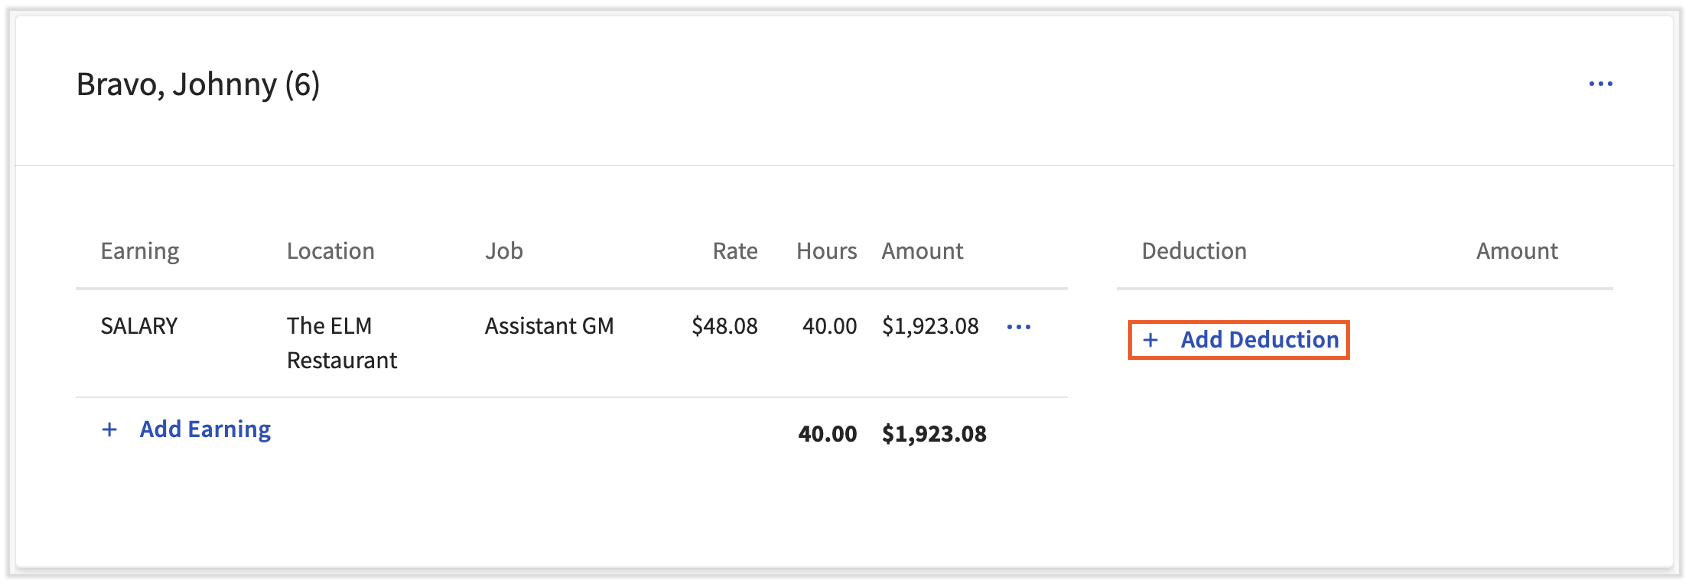
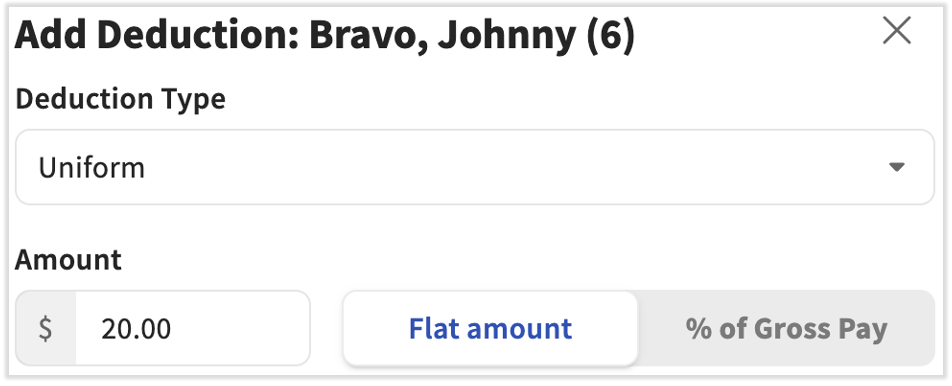
Expected outcome: The deduction appears in the employee's row on the Employee Earnings step and reduces the employee's net pay for this payroll only.
Edit a One-Time Deduction
Use this when a deduction is already on the payroll but the amount or type is wrong.
- On the Employee Earnings step of an open payroll, locate the employee with the incorrect deduction.
- Select the overflow menu (...) to the right of the deduction, then choose Edit deduction.
- Make changes as necessary. Select Save deduction to save.
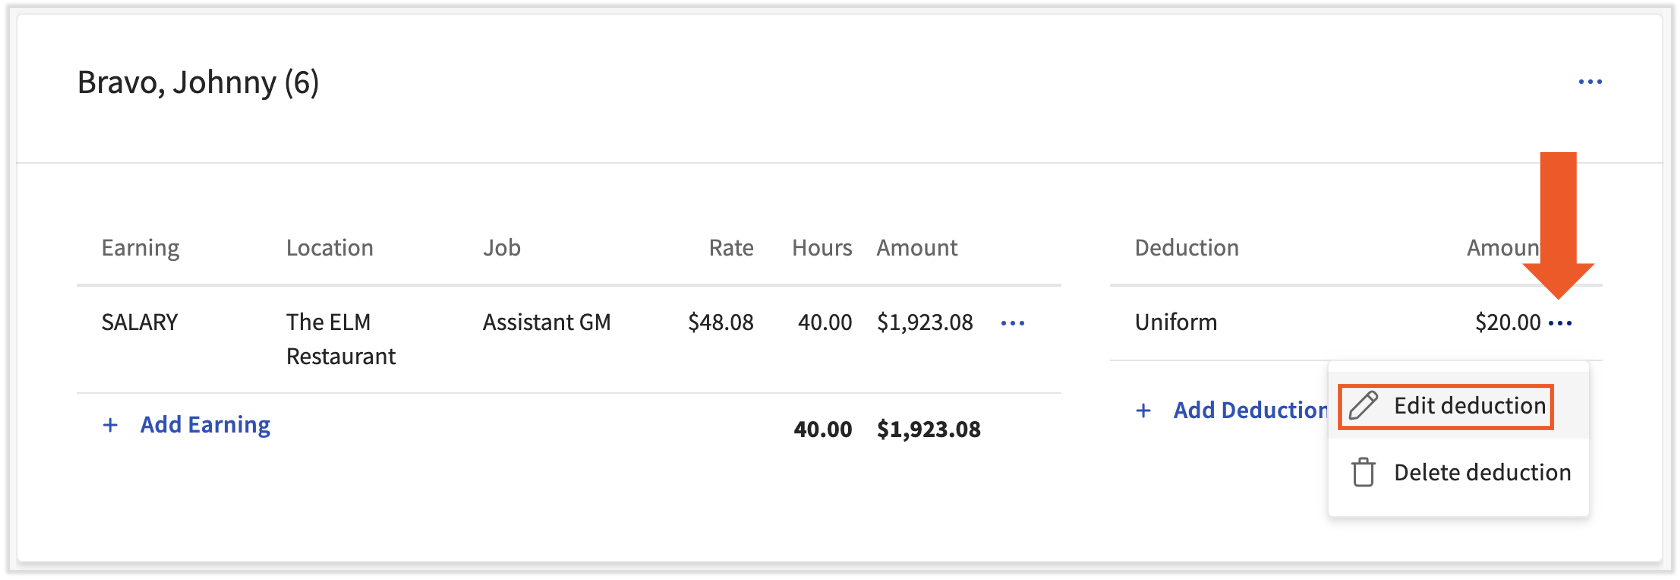
Expected outcome: The updated deduction appears on the deduction line for this payroll only. The employee's recurring profile is unchanged.
Note: If you are correcting an overpayment, a void and re-record may be a better fit than editing the deduction. See Toast Payroll: Request a Void.
The overflow menu on the Employee Earnings step also includes:
- Pay via Check — forces a live (paper) check for the employee, overriding direct deposit for this payroll.
- Create additional paycheck — useful for items like bonus checks.
The Advanced actions menu offers more features:
- Reset payroll — removes any edits you have made in payroll and returns you to the first step. Useful if you added a recurring change after Preview and need to re-pull the recurring data.
- Add custom import — uploads a spreadsheet of earnings or deductions, but only if Toast Payroll has set up a custom import template for you.
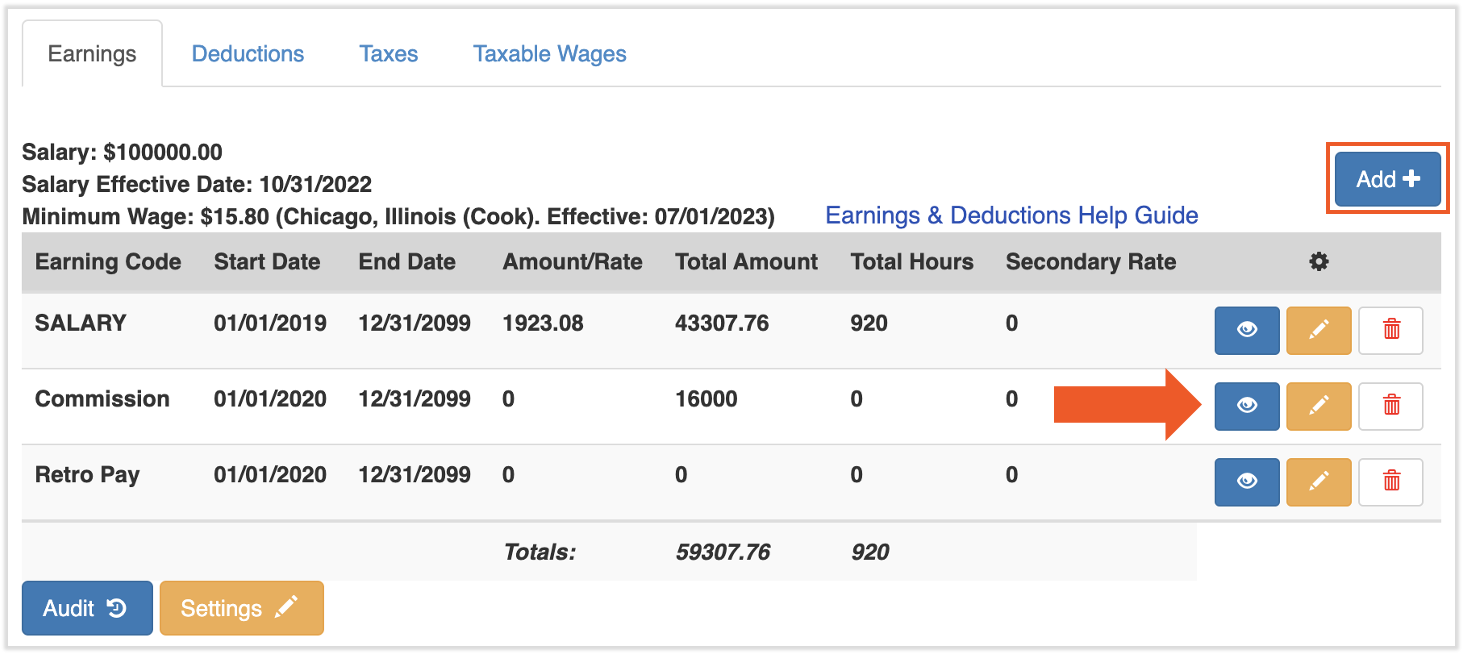
Add or Review a Recurring Earning
Important: Recurring earnings are almost always role-based. Before adding a recurring earning directly to an employee, check whether the earning belongs on the employee's Position or Jobs record instead. See Toast Payroll: Assign or Change Employee Jobs or Locations.
Recurring earnings must be added or updated before you select Preview on a payroll. Changes made after Preview will not appear on that payroll run.
- Navigate to the Team page or use the Search employees bar. Select an employee.
- Select Recurring from the left side of the screen.
- Scroll below the graph to view each earning. Active earnings are identified by the Start Date and End Date. When a payroll is opened, all active earnings are brought into the Employee Earnings step of the payroll process.
- To view a recurring earning's settings, select the eyeball icon next to it.
- To add a recurring earning, select the Add+ button and fill out the following fields before selecting Save:
- FEIN: Most employees work out of a single FEIN — adjust accordingly.
- Position: Apply the correct position (group of attributes, not the job they clock into) if an employee has more than one. Most employees only have a single position.
- Earning: The correct earning code should appear here. The earning code inherits properties such as hourly vs. salary, whether it is a tipped earning, and how it should be taxed.
- Year: Use the current year so this earning is available whenever you need it.
- Start and End Dates: Adjust these dates to allow for recurring earnings. End dates can be set far into the future (year 2099) so they do not disappear from the employee's recurring earnings.
- Amount: Enter the amount that the earning should add to the individual's gross wages. Depending on whether this is an hourly or salary code, this amount might be on an hourly or per pay period basis.
- Per Payroll Guaranteed Amount: Leave blank. This feature is outdated and has no applicability.
- Check Frequency: Enter the frequency at which this employee receives their paychecks.
Expected outcome: The recurring earning appears in the employee's recurring earnings list with the Start Date and End Date you specified, and will be brought into the Employee Earnings step of every regular payroll within that date range.
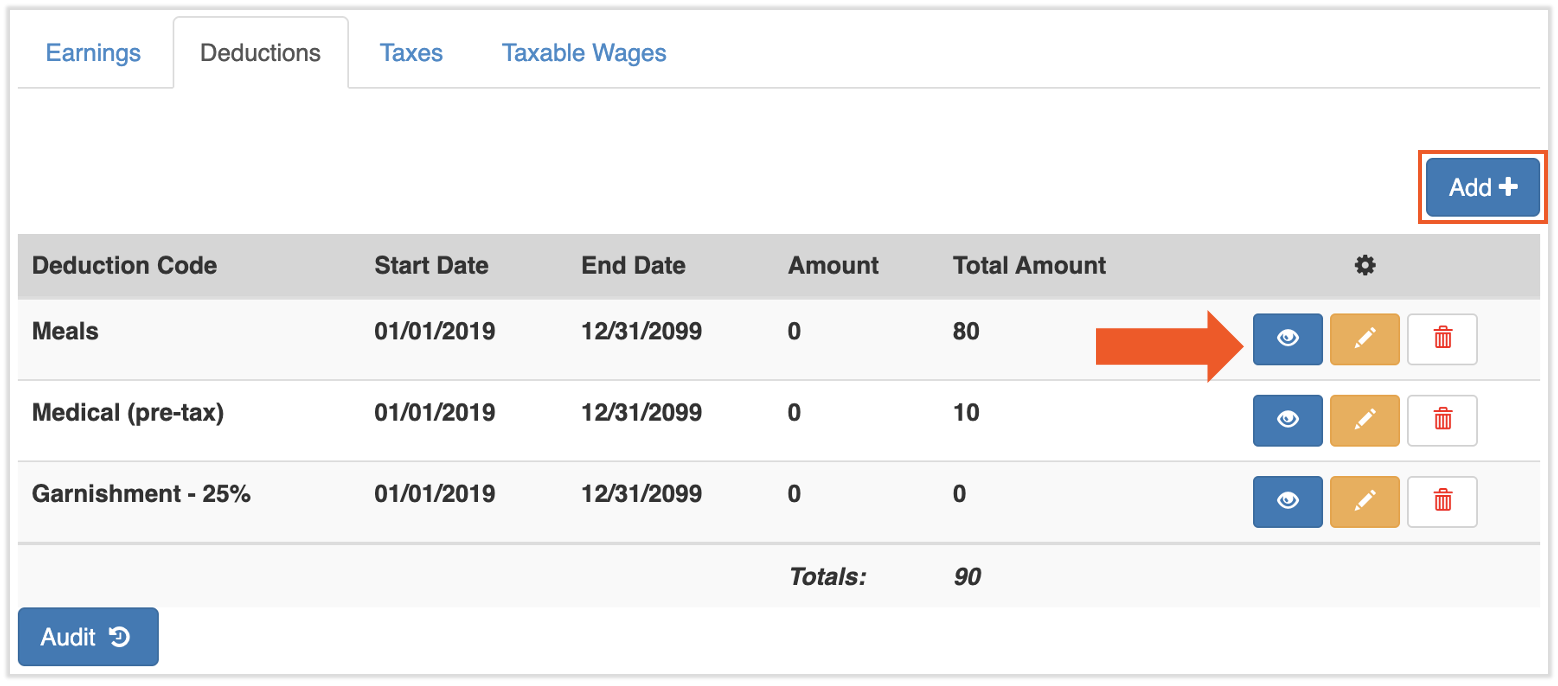
Add or Review a Recurring Deduction
Use this for benefit deductions, 401(k), HSA, meal deductions, and similar items that should withhold every regular pay period. For court-ordered deductions, see Set Up a Garnishment, Child Support, Levy, or Lien instead.
Recurring deductions must be added or updated before you select Preview on a payroll. Changes made after Preview will not appear on that payroll run.
- Navigate to the Team page or use the Search employees bar. Select an employee.
- Select Recurring from the left side of the screen.
- Scroll below the graph and select the Deductions tab. Active deductions are identified by the Start Date and End Date. When a payroll is opened, all active deductions are brought into the Employee Earnings step of the payroll process.
- To view a recurring deduction's settings, select the eyeball icon next to it.
- To add a recurring deduction, select the Add+ button and fill out the following fields before selecting Save:
- FEIN: Most employees work out of a single FEIN — adjust accordingly.
- Deduction: The correct deduction code should appear here. If the deduction code you need does not exist (for example, a new 401(k) plan or a new benefit), see Add a New Earning Code or Deduction Code.
- Vendor: Used when a deduction is sent to a third-party vendor. See Toast Payroll: Configure Vendors.
- Start and End Dates: Adjust these dates to allow for recurring deductions. End dates can be set far into the future (year 2099) so they do not disappear from the employee's recurring deductions.
- (%) or Amount: The amount or percentage of pay to be deducted with each payroll. Use either field, but not both — one will be left at 0.
- Limit/Goal: Enter the total amount that will be deducted over time. Leaving this as -99 means there is no limit and this field is blank (rather than using a 0, which could indicate otherwise).
- Adjusted Limit: Do not edit this field. Once the deduction has been saved, the Adjusted Limit copies from the Limit/Goal. Each time this deduction is processed in a payroll, the Adjusted Limit automatically reduces by the Amount or % Amount. You can use this number to track how much of the total deduction remains to be withheld. Once the Adjusted Limit hits 0, the recurring deduction will end.
Expected outcome: The recurring deduction appears in the employee's recurring deductions list with the Start Date, End Date, and amount or percentage you specified, and will be applied on every regular payroll within that date range — provided the employee earns enough in that pay period to cover it.
Set Up a Garnishment, Child Support, Levy, or Lien
If you have received a child support order, garnishment order, levy, or lien that directs an employer to withhold funds from an employee, do not enter the deduction yourself. Toast Payroll Customer Care sets these up from the court order to ensure the order is followed properly and the correct amounts are withheld.
What to do:
- Verify the employee is still with your company. If the employee no longer works for your business, notify the agency that sent the garnishment — you are not required to collect wages from a former employee.
- Select the blue chat dot in the lower-right corner of any Toast Payroll page.
- Send the complete garnishment notice to Customer Care, including all pages and supporting documents.
- Wait for confirmation that the recurring deduction has been set up. After setup, the deduction will run on every regular pay period (not off-cycle or supplemental payrolls) until the order is fulfilled.
Important: If any worksheets or answer sheets are included with the court order, it is the customer's responsibility to fill those out and return them. Toast Payroll cannot advise on how or whether to fill out those pages.
Note: Toast Payroll does not set up medical child support orders or levies that lack a court order. For more details on how garnishments work, what types are supported, and how payments are remitted, see Toast Payroll: Wage Garnishments FAQ and Toast Payroll: Child Support Payments Remittance.
Expected outcome: Once Customer Care confirms setup, the garnishment appears as a recurring deduction on the employee's profile and will withhold automatically on every regular payroll until the order is fulfilled or end-dated.
Add a New Earning Code or Deduction Code (e.g., Bonus, 401(k), Medical)
Earning codes and deduction codes are set up at the account level, not on individual payrolls. If a code does not yet exist (for example, you do not see "Bonus" in your earning options, or you need a new 401(k) deduction code), you must request it from Customer Care before you can use it.
To request a new earning code (Bonus, Mileage, Commission, etc.):
- Fill out the Earning Code Request Form. Note: Toast Payroll is currently unavailable in Quebec. A French version of this form will be made available when the product launches in your region.
- Send the completed form to Customer Care via the blue chat dot in the lower-right corner of any Toast Payroll page.
- Wait for the confirmation email from Customer Care. Once received, you can use the new earning code immediately.
Note: Toast Payroll does not support a maximum amount on earning codes. If you need to cap a bonus or other earning, you will need to track the cap manually.
To request a new deduction code (medical, dental, vision, 401(k), HSA, etc.):
- Fill out the Deduction Code Request Form. Note: Toast Payroll is currently unavailable in Quebec. A French version of this form will be made available when the product launches in your region.
- Send the completed form to Customer Care via the blue chat dot in the lower-right corner of any Toast Payroll page.
- Wait for the confirmation email from Customer Care. Once received, you can use the new deduction code immediately.
Important: If a deduction code is set up incorrectly or is not withholding properly, do not adjust the existing one — that can create tax complications. Instead, contact Customer Care via the blue chat dot to inactivate the old code and create a corrected version. See Change an Earning/Deduction Code's Tax Rate in Toast Payroll.
Note: If you use SimplyInsured to manage benefits, the request form method only applies to deductions SimplyInsured does not support. For SimplyInsured-supported benefits, email toastsupport@simplyinsured.com instead.
Expected outcome: Once Customer Care confirms the new code is set up, you can apply it as a one-time entry on the Employee Earnings step or add it as a recurring item on the employee's profile.
Frequently Asked Questions
Why isn't my deduction showing up on the payroll?
The most common reasons are timing-related:
-
- You added the deduction after selecting Preview. Recurring earning and deduction changes must be made before the payroll is opened. If you added or changed a recurring deduction after selecting Preview, it will not appear on that payroll. Either reset payroll to pull in the change, or add the item as a one-time entry on this payroll and update the recurring profile for the next run.
- The deduction's Start Date is after the check date. A deduction only applies to payrolls whose check date is on or after the deduction's Start Date.
- The deduction's End Date has passed. Check the End Date field on the recurring deduction.
Also asked as: "deduction didn't go through," "deduction isn't applying," "I added the deduction but it isn't showing up."
Why does my deduction show $0?
The most common reason is that the employee did not earn enough in this pay period to cover the deduction. The system may withhold some of the deduction, none of it, or all of it depending on disposable earnings.
Other reasons:
-
- Tips are excluded from garnishment calculations by federal regulation. If the paycheck is mostly tips, the deduction may show $0 even though the employee was paid. (See Toast Payroll: Wage Garnishments FAQ.)
- The deduction was added after Preview was selected. Reset payroll to pull in the recurring change, or add the deduction as a one-time entry on this payroll.
- The deduction has reached its Limit/Goal. Once the Adjusted Limit reaches 0, the recurring deduction stops withholding.
Also asked as: "garnishment shows $0 deduction," "garnishment isn't being calculated," "withheld nothing this payroll."
How do I add a Bonus to someone's paycheck?
Add it as a one-time earning on the Employee Earnings step using a Bonus earning code.
If you don't see a Bonus option when you select + Add Earning, your account doesn't have a bonus earning code set up yet. See Add a New Earning Code or Deduction Code to create a new earning code for use on payroll.
Also asked as: "How do I add a bonus while processing payroll?" "What earning option do I select for a bonus?" "I don't see Bonus in my earning options."
Can I edit or delete an earning code?
You can edit or delete a single earning on a specific payroll using the overflow menu (...) on the Employee Earnings step (see Edit a One-Time Earning).
You cannot edit or delete the master earning code (the underlying code in your Toast Payroll database) yourself. To inactivate or change a master earning or deduction code — including changing its tax rate — contact Customer Care via the blue chat dot. Best practice is to inactivate the old code and create a corrected version rather than editing the existing one, to avoid tax complications.
Can I add or edit an earning or deduction inside a Quick Calc?
No. Earnings and deductions cannot be added or edited within a quick calc. Quick calculations are used to record transactions outside of Toast Payroll, typically for tax compliance, and the add/edit functions are unavailable there. The quick calc appears on payroll as an earning or deduction the employee already processed and must be included even though it will not "take place" on the actual payroll itself. See Toast Payroll: Issue Manual Checks (Quick Calcs).
What's the difference between recurring and one-time?
A recurring item appears on every payroll run and is configured on the employee's profile under Recurring. A one-time item only appears on the specific payroll you add it to and is configured on the Employee Earnings step inside an open payroll. Use recurring for ongoing pay (Salary, Regular, Tips) and ongoing withholdings (401(k), benefits, garnishments). Use one-time for bonuses, uniform fees, meal adjustments, and any change that should not repeat.
Why did the employee's child support deduction stop withholding?
In many cases, the order has been fulfilled. Other possibilities:
-
- The garnishment was set up with an end date that has passed.
- The garnishment was cancelled or terminated by the court or creditor.
- The employee's wages on this check were mostly tips, which federal regulation excludes from garnishment calculations.
To investigate a specific case, contact Customer Care via the blue chat dot. See Toast Payroll: Wage Garnishments FAQ for more detail.
Can I add a recurring earning or deduction after Preview?
No. Recurring changes made after Preview has been selected will not appear on the open payroll run. You have two options:
-
- Use Advanced actions > Reset payroll to clear your edits and reopen the payroll, which will pull in the new recurring item.
- Add the item as a one-time entry on this payroll, then update the recurring profile so it applies on the next run.
Before You Contact Customer Care
Some items genuinely require Customer Care intervention — court orders, new earning or deduction code requests, and corrections to master codes. To speed up resolution, gather the following before sending a message via the blue chat dot:
- The employee's full name and the affected pay period or check date
- The earning code or deduction code name (or code number, if known)
- A description of what is wrong (for example, "deduction shows $0 on the 5/8 check," "need new Bonus earning code," "received child support order — see attached")
- A screenshot of the Employee Earnings step or recurring profile, if relevant
- For court orders: the complete garnishment notice including all pages and worksheets
For details on what Customer Care can and cannot do for garnishments, see Toast Payroll: Wage Garnishments FAQ.
Related Articles
- Toast Payroll: Employee Earnings Step
- Toast Payroll: Get Started With Earning Codes
- Toast Payroll: Get Started With Deduction Codes
- Toast Payroll: Wage Garnishments FAQ
- Toast Payroll: Earning and Deduction Timing
This content is for informational purposes and is not intended as legal, tax, HR, or any other professional advice. Please contact an attorney or other professional for advice.