Toast Payroll: Get Started With Onboarding and Implementation
Last updated: Jun 26, 2026, 3:34 PM
Set up your company in Toast Payroll—create your login, complete the Implementation Dashboard, and finish the Payroll Setup Checklist to run your first payroll.
- Toast Payroll Onboarding Overview
- Before You Begin
- Step 1: Create Your Toast Payroll Login
- Step 2: Complete the Implementation Dashboard
- Step 3: Complete the Payroll Setup Checklist
- Step 4: Sign Up for Toast Classroom
- Step 5: What to Do After Setup
Toast Payroll Onboarding Overview
Toast Payroll onboarding is the process of setting up your company in Toast Payroll so you can run your first payroll. You complete it once, as a new customer, with help from your Onboarding Consultant.
Onboarding has three main parts: creating your login, completing the Implementation Dashboard (where you enter your company, tax, location, and pay information), and working through the Payroll Setup Checklist (where you finish your profile, set up taxes and pay, and add your team). This article covers all three, plus training options and what to do once you are live.
For answers to common setup questions, read Toast Payroll: Onboarding and Setup FAQ.
Before You Begin
Applies to: Toast Payroll
Permissions needed:
- You must be the restaurant owner or payroll administrator. This is the person who logs in to Toast Payroll using the welcome email.
What you'll accomplish: A fully configured Toast Payroll account, with your company, tax, location, pay, and employee information entered, ready for your first payroll.
To reduce the time it takes to complete your company setup, have the following information on hand before you start:
- Company code: The code you create to label your Toast Payroll database. Choose something broad and easy to remember. It must be one word with no spaces or special characters.
- Tax account details: Your Federal Employer Identification Number (FEIN) and your state tax account numbers. To register for or locate your state tax account numbers, read Toast Payroll: Register for State Tax Accounts.
- Note: If you do not have your state tax account numbers when you complete the Implementation Dashboard, enter them in Toast Payroll as soon as you receive them to avoid tax filing complications. For instructions, read Toast Payroll: Get Help with Tax Accounts.
- Business legal name: The name your company is registered as with the IRS.
- Jobs: The positions employees use to clock in and out, such as Manager, Server, or Dishwasher.
- Payroll frequency: How often you pay employees (weekly, biweekly, semimonthly, or monthly).
- Suggested first check date: When your employees will be paid from your first payroll submission.
- Bank account information: The bank accounts you will use to pay employees and fund other payroll costs.
Step 1: Create Your Toast Payroll Login
Setting up your login is the first step. As the first user of your Toast Payroll database, the account you create here automatically links to Toast Web, so you can use the same email and password to sign in to both systems.
- Open your email inbox and find the email titled Welcome to the Toast Payroll family.
- Select the Register link near the bottom of the email. Select it only once to avoid creating multiple profiles.
- In Toast Payroll, create a password. Enter it again to confirm, then select Register.
- On the login page, enter your email address and password, then select Next.
- If you are asked for a company code, find it in the welcome email from step 1.
- After you sign in, you are taken to the Implementation Dashboard.
Expected outcome: You are logged in to Toast Payroll and viewing the Implementation Dashboard.
Step 2: Complete the Implementation Dashboard
The Implementation Dashboard is where you enter your company's initial information. Entering it quickly and accurately is the key to running your first payroll as soon as possible. The dashboard has three milestones: Tax Information, Locations and Jobs, and Payroll.
Note: The person completing this step must be the owner or payroll administrator. This is the same person who logged in to Toast Payroll in Step 1.
To open the Implementation Dashboard, navigate to payroll.toasttab.com and sign in with the login you created in Step 1. If you are continuing from Step 1, you are already there. Review the three milestones and what each requires, then select Begin first step when you are ready.
Milestone 1: Tax Information
- Confirm or edit your company code. Your company code is the name of your database in Toast Payroll. Also indicate whether you have paid employee wages in the current year through a previous payroll provider. Select Save and continue.
- Confirm how many FEINs your company uses, then select Save and continue.
- Enter the details of each FEIN, then select Save and continue.
- Read the information in the blue box and confirm how many state tax accounts you have, then select Save and continue.
- Enter the details of each state tax account, then select Save and continue.
- Select Next milestone to move on.
Expected outcome: Your company code, FEIN details, and state tax accounts are saved, and Milestone 1 is complete.
Milestone 2: Locations and Jobs
- Name your FEIN or FEINs, then select Save and continue.
- Add the locations for your account. These can be address abbreviations, parts of a town, different cities, or any labels you choose. Select Save Location for each location you add, then select Save and continue.
- Match each location to a company by selecting the corresponding bubble. Any location showing "Please assign a company" still needs to be matched. Select Save and continue.
- Add the address for each location by selecting Edit for each one, then select Continue.
- Add the job titles you employ at each location, such as Manager, Server, or Dishwasher. Select + Add job to add more than three jobs. Add as many as you can; you can add more after the Implementation Dashboard is finished. Select Save and continue.
- Review the jobs in each location for accuracy, then select Save and continue.
Expected outcome: Your FEIN names, locations, addresses, and jobs are saved, and Milestone 2 is complete.
Milestone 3: Payroll
- Set up your pay groups. A pay group is typically a set of employees paid on the same day and at the same frequency, but you can use pay groups in different ways. Choose how many pay groups you want, with a minimum of one per FEIN, name them, attribute each to an FEIN, then select Save and continue. To learn more, read Toast Payroll: Review Pay Groups.
- Choose your payroll preferences for each pay group:
- The bank holiday setting determines whether a check date that lands on a federal bank holiday moves before or after the holiday.
- The pay (check) frequency is how often you run payroll and how often your staff is paid.
- The work week start day tells Toast Payroll when to begin counting employee hours each week for overtime. This is a global setting based on the time entries it receives from Toast Web.
- Note: The work week start day also exists as a setting in Toast Web. Match the two so that reporting is identical across both systems. If the work week start day is misaligned between Toast Web and Toast Payroll, you may see discrepancies in overtime calculations and labor report matching. After onboarding, contact your Onboarding Consultant to confirm how this setting is configured
- The Day of Week Paid field is the typical weekday employees receive their wages. This can change based on different payroll processing scenarios.
- The Preferred First Check Date is when you estimate running your first payroll and paying employees through Toast Payroll.
- The Associated Pay Period should correspond to your first paycheck date. Double-check this page, then select Save and continue.
- Set up the bank account that will fund your payroll costs, including employee wages:
- Check-mark each pay group this bank account should apply to.
- Use the Check Number field to set a custom starting check number if you have an existing check-number system.
- Connect your bank account using Plaid and your online banking login (Option A), or enter your bank information from a voided check (Option B).
- For your check signature, submit an electronic signature in Option A, or download, sign, and re-upload the file in Option B.
- Select Add Bank Account if you need more than one, then select Save and continue.
- Create your own personal profile. Every staff member in Toast Payroll has a profile:
- Select whether you will receive a paycheck through Toast Payroll. Selecting No, I will not have a pay check removes some options further down the page.
- In Basics, select your Original Hire Date and your Pay Type (if you will have a paycheck). The 1099 Misc pay type lets independent contractors be paid and tracked through Toast Payroll, but Toast does not file taxes for individuals marked as 1099 Misc.
- Under Jobs & Pay, select your primary Location and the Job role you should have.
- If you will have a paycheck, mark whether you are paid hourly or salaried and enter your rate, then choose whether you are exempt from overtime. Salaried individuals are not currently configured as eligible for overtime.
- Select the pay group you belong to, then select Save and continue.
- If you skipped any steps, you may see a page that prompts you to finish them. Select Go to unfinished step to enter any missing information.
- On the Congratulations page, select Complete Setup to save your work and create your Toast Payroll account and profile. Your Onboarding Consultant will reach out to you shortly.
After you complete all steps, you will see a link to Enter Toast Payroll, where you complete your individual onboarding paperwork and then add your employees. This must be done before running your first payroll.
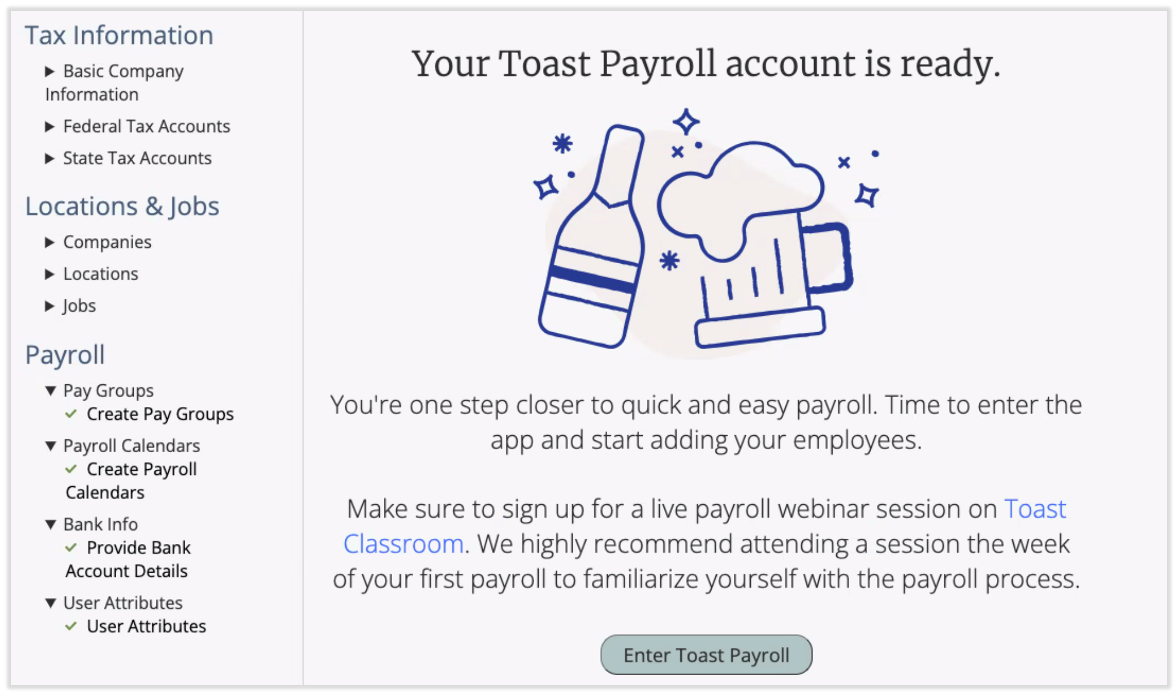
Expected outcome: The Implementation Dashboard is complete, your Toast Payroll account and profile are created, and you can enter Toast Payroll to continue setup.
Step 3: Complete the Payroll Setup Checklist
The Payroll Setup Checklist guides you through everything you need to do before running your first payroll. Most steps are your responsibility, some are completed automatically from your Implementation Dashboard, and a few are completed by your Onboarding Consultant.
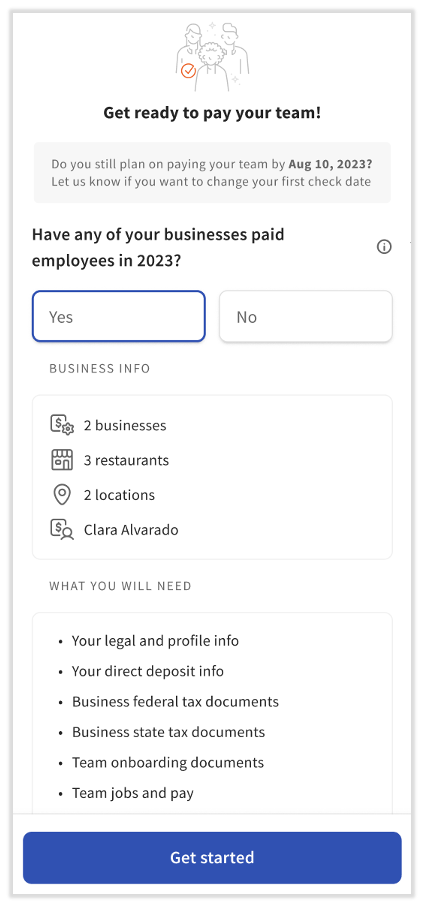
- Sign in to payroll.toasttab.com using the login you created in Step 1.
- When the pop-up appears on the right side of your screen, set the Yes/No option as needed (usually not necessary), then select Get started.
The Setup Checklist appears on the right side of the page. Only the user who completed the Implementation Dashboard sees this checklist. As you move through it, keep an eye on the Finish your payroll setup date at the top. This date is your first payroll run in Toast Payroll. If you do not finish the checklist before that date, Toast automatically moves the date to your next payroll run.
Note: If you close the checklist, reopen it by selecting the checklist icon in the upper-right corner of the Toast Payroll dashboard.
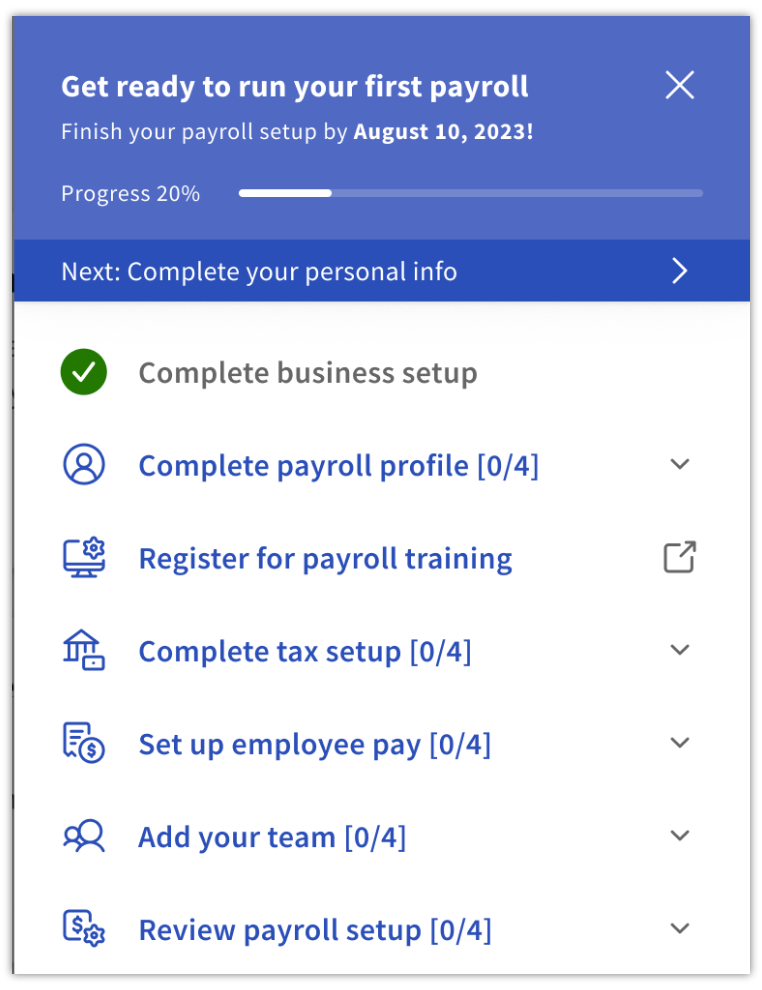
The checklist includes these sections:
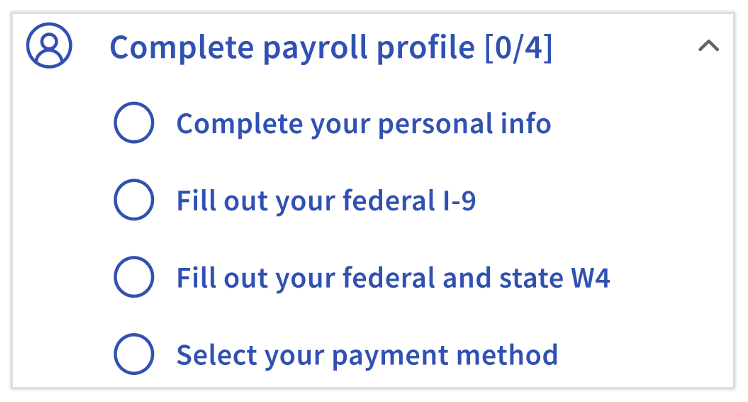
- Complete payroll profile: Finish the tasks on your payroll profile. Select each of the four tasks to be taken to the right place. Every staff member must provide personal information such as a Social Security number, Form I-9 information, Form W-4 information (federal, state, and local where applicable), and a payment method such as direct deposit. For details, read Toast Payroll: Get Help With Direct Deposit Accounts.
- Register for payroll training: Register for the webinar to learn how to set up Toast Payroll and run your first payroll accurately.
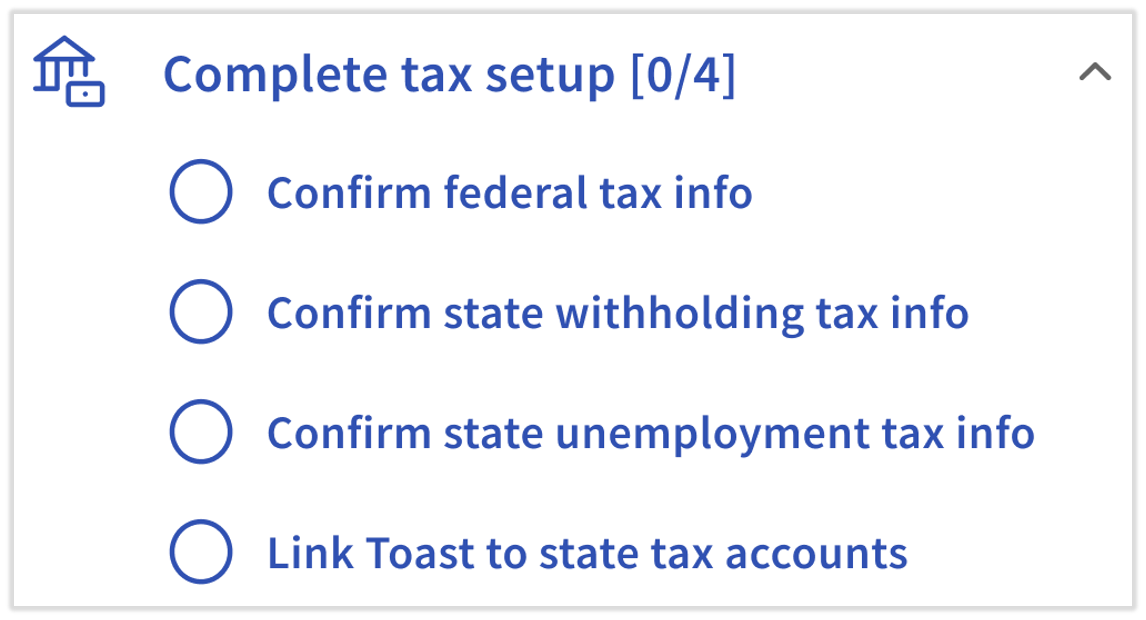
- Complete tax setup: Review the tax identification data you entered in the Implementation Dashboard. It is vital that Toast has this information as soon as possible. If you entered Applied For for a state unemployment or state withholding tax account, return to the Tax Accounts page in Toast Payroll and enter the numbers (and the SUTA rate or withholding payment frequency) as soon as you receive them. Contact your Onboarding Consultant if any tax information is incorrect. For state linking details, read Toast Payroll: State Third-Party Administrator Linking.
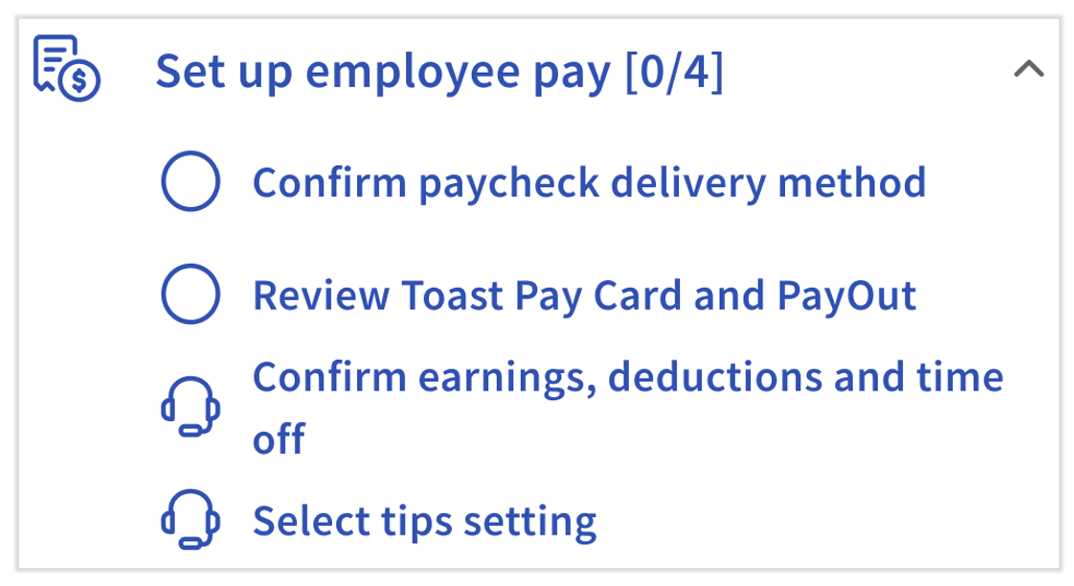
- Set up employee pay: You are responsible for the first two steps in this section: setting up your paycheck delivery method and reviewing pay card options. Your Onboarding Consultant sets up earnings, deductions, time off, and tips. A payment method is how an employee gets paid individually (paper check, direct deposit, or Toast Pay Card). Paycheck delivery is a company-wide setting for anyone who chooses the paper check method, with three options: self-printed, self-written, and Toast-printed.
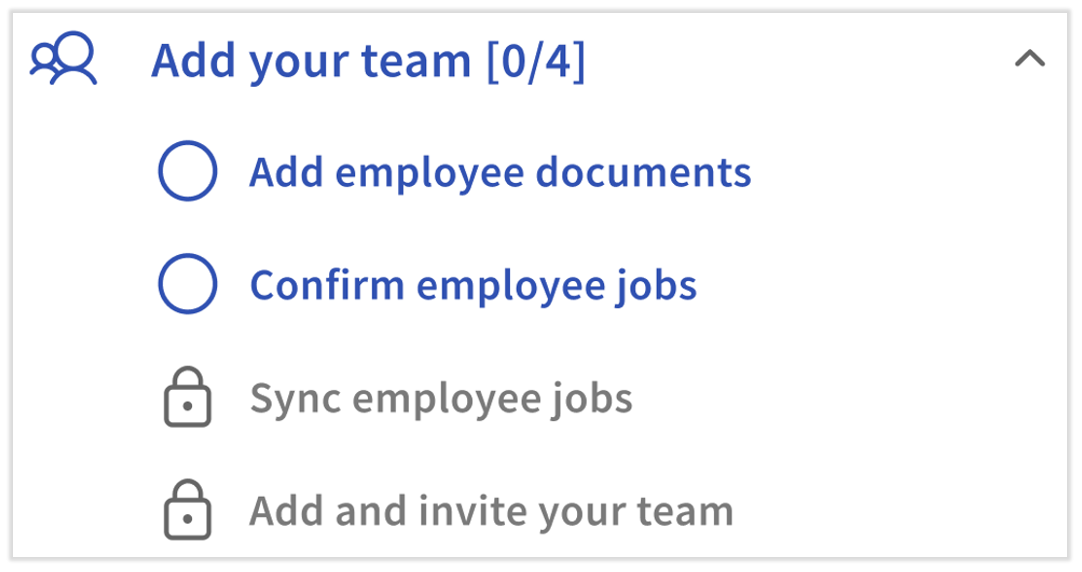
- Add your team: Add the documents you want employees to sign during their onboarding, then add or confirm all jobs in your database. Jobs are added in Toast Web and assigned to employees in Toast Payroll. Then add and invite your staff.
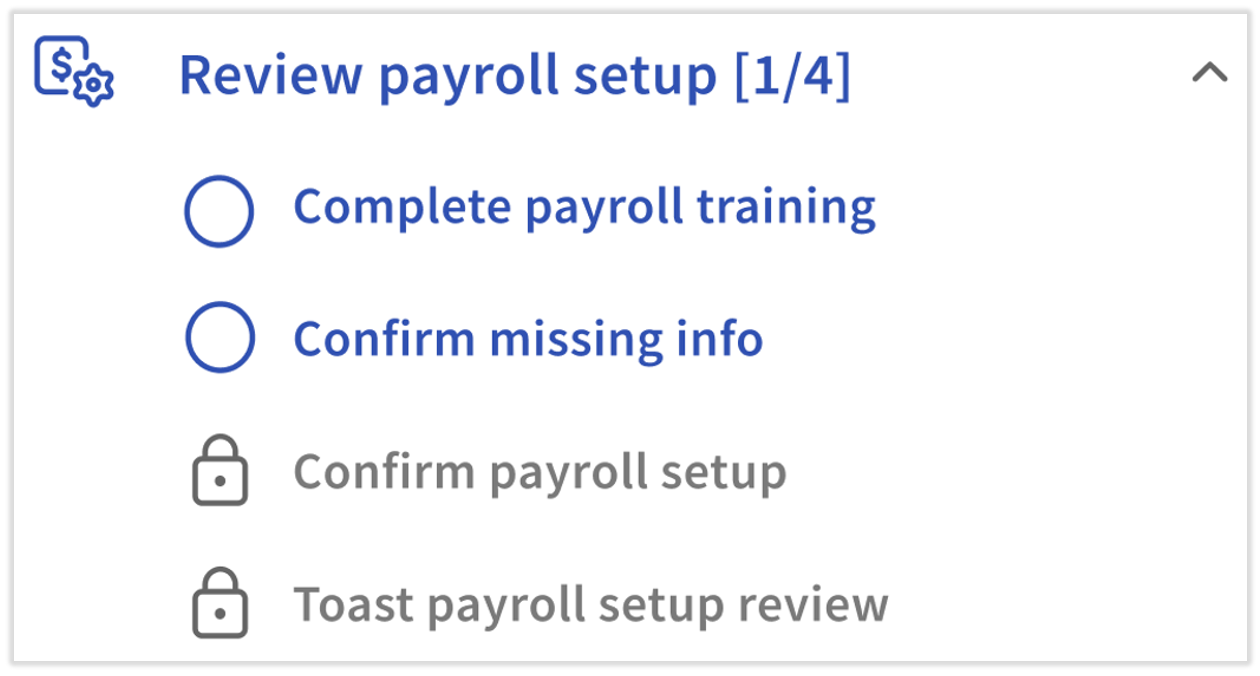
- Review payroll setup: Watch the payroll training video to see an example payroll run, then visit the Missing Data page and the Company Summary page to review the information you entered. Your Onboarding Consultant completes the final step.
Note: Hire all employees in Toast Payroll, not Toast Web. Hiring employees in Toast Web typically creates duplicate employee profiles and causes timesheet and tip syncing issues. The Duplicate Profile Detection feature can warn you when a duplicate profile is about to be created. For details, read Toast Payroll: Duplicate Profile Detection in Toast.
To add a new hire, complete the employer steps first. Toast then automatically sends a welcome email to each employee you hire. For instructions, read Toast Payroll: New Hire Employees (Employer Guide), and send Toast Payroll: Employee Onboarding (Employee Guide) to your employees so they can complete their own information.
If your Onboarding Consultant imported a large group of your staff, those employees do not receive the automatic welcome email. Instead, send them an invite email from the Team page so they can set their login. Imported employees should follow Toast Payroll: Imported New Hire Guide. Every imported employee must verify or add a Social Security number, complete a Form W-4, and confirm direct deposit information.
Expected outcome: Every checklist section is complete or assigned to your Onboarding Consultant, and you are ready to run your first payroll on the date shown at the top of the checklist.
Step 4: Sign Up for Toast Classroom
Toast recommends that all customers sign up for Toast Classroom in addition to watching the on-demand training video. These remote, classroom-style sessions are led by a Toast Payroll expert and cover pre-payroll maintenance, running and processing payroll, payroll reconciliation and troubleshooting, employee management, and more. You can ask questions and hear from other customers with similar questions.
To register, visit Sign Up for a Live Online Class.
Step 5: What to Do After Setup
After setup, a few recurring tasks help keep your payroll and taxes accurate:
- If you switched from another provider mid-quarter: Toast Payroll debits your business bank account within two weeks to recover taxes due at the end of the quarter. These should not yet have been remitted by your prior provider, but it is your responsibility to confirm this with that provider. Toast is not responsible for credits or double debits that result from not addressing this.
- Manage your payroll taxes in the Tax Center: The Tax Center is a hub in Toast Payroll with tasks to complete for successful quarterly tax filing. Check it often and complete its tasks to plan ahead and help prevent filing amendments and rejections. To open it, navigate to Taxes in the left-hand navigation. For details, read Toast Payroll: Manage Payroll Taxes.
- Confirm direct deposit setup: On the Direct Deposit page, navigate to Settings > Payroll > Direct Deposit to see which employees have incomplete direct deposit information and send them an email reminder. The second half of the report lists employees who are set up successfully. Employees without direct deposit are enrolled in the paper check method by default.
Related Articles
- Toast Payroll: Onboarding and Setup FAQ
- Toast Payroll: New Hire Employees (Employer Guide)
- Toast Payroll: Employee Onboarding (Employee Guide)
- Toast Payroll: Register for State Tax Accounts
- Toast Payroll: Duplicate Profile Detection in Toast
This content is for informational purposes and is not intended as legal, tax, HR, or any other professional advice. Please contact an attorney or other professional for advice.