xtraCHEF: Map Invoice Items
Last updated: Jul 2, 2026, 12:53 PM
Looking for more help? Sign up for a live Toast Classroom session with a Toast Expert to help you set up and get started with xtraCHEF!
Toast Classroom - First Steps with xtraCHEF by Toast
- Map Invoice Items Introduction
- Compare Categories and GL Codes
- Map Your Invoice Items
- Merge Duplicate Products
- Reprocess Invoices
- Default Categories and Predictive Mapping
- Next Steps
- Map Invoice Items FAQ
Map Invoice Items Introduction
Map invoice items is the starting point for all data and analytics in xtraCHEF. It is also the final step in a document's (invoices and receipts) reconciliation journey.
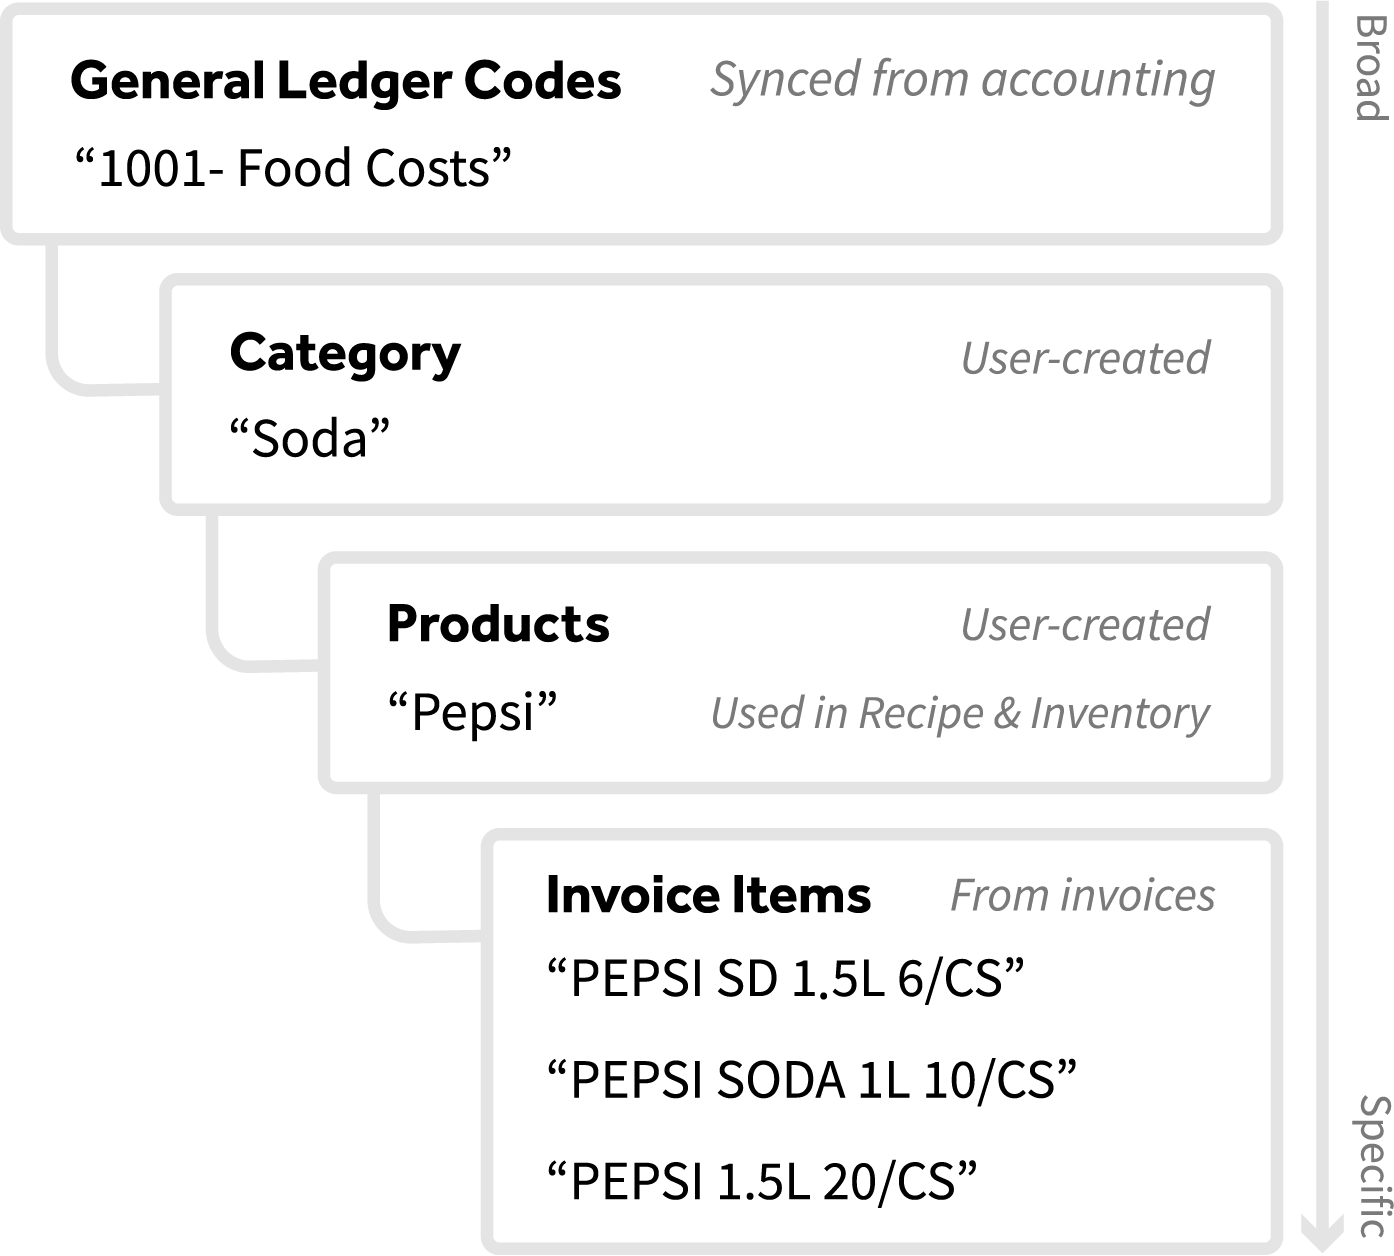
After uploading documents, xtraCHEF's automation will read and break out your purchases invoice item by invoice item. Map invoice items is where all of your individual purchases will be available for mapping to their corresponding purchase Category. Categories themselves are mapped to GL codes which your accounting system uses.

Each new item must be mapped in xtraCHEF the first time it appears on a processed invoice. Once assigned, however, xtraCHEF will remember your category selections and will automatically map those items on your behalf in the future.
Note: Automation is created over time by manually mapping invoice items to categories (and subsequent GL codes). Documents with never-before-seen Invoice Items or from new vendors will not continue in their reconciliation journey without you taking action and mapping them here.
As a result of mapping your documents, xtraCHEF will:
- Begin to develop machine learning and automation
- Complete the reconciliation journey for uploaded documents and extract them to any integrated accounting system (if applicable)
- Record purchase totals by the GL code, category, and invoice item for Reporting, Analytics, and additional food cost tracking-related insight (pictured below).
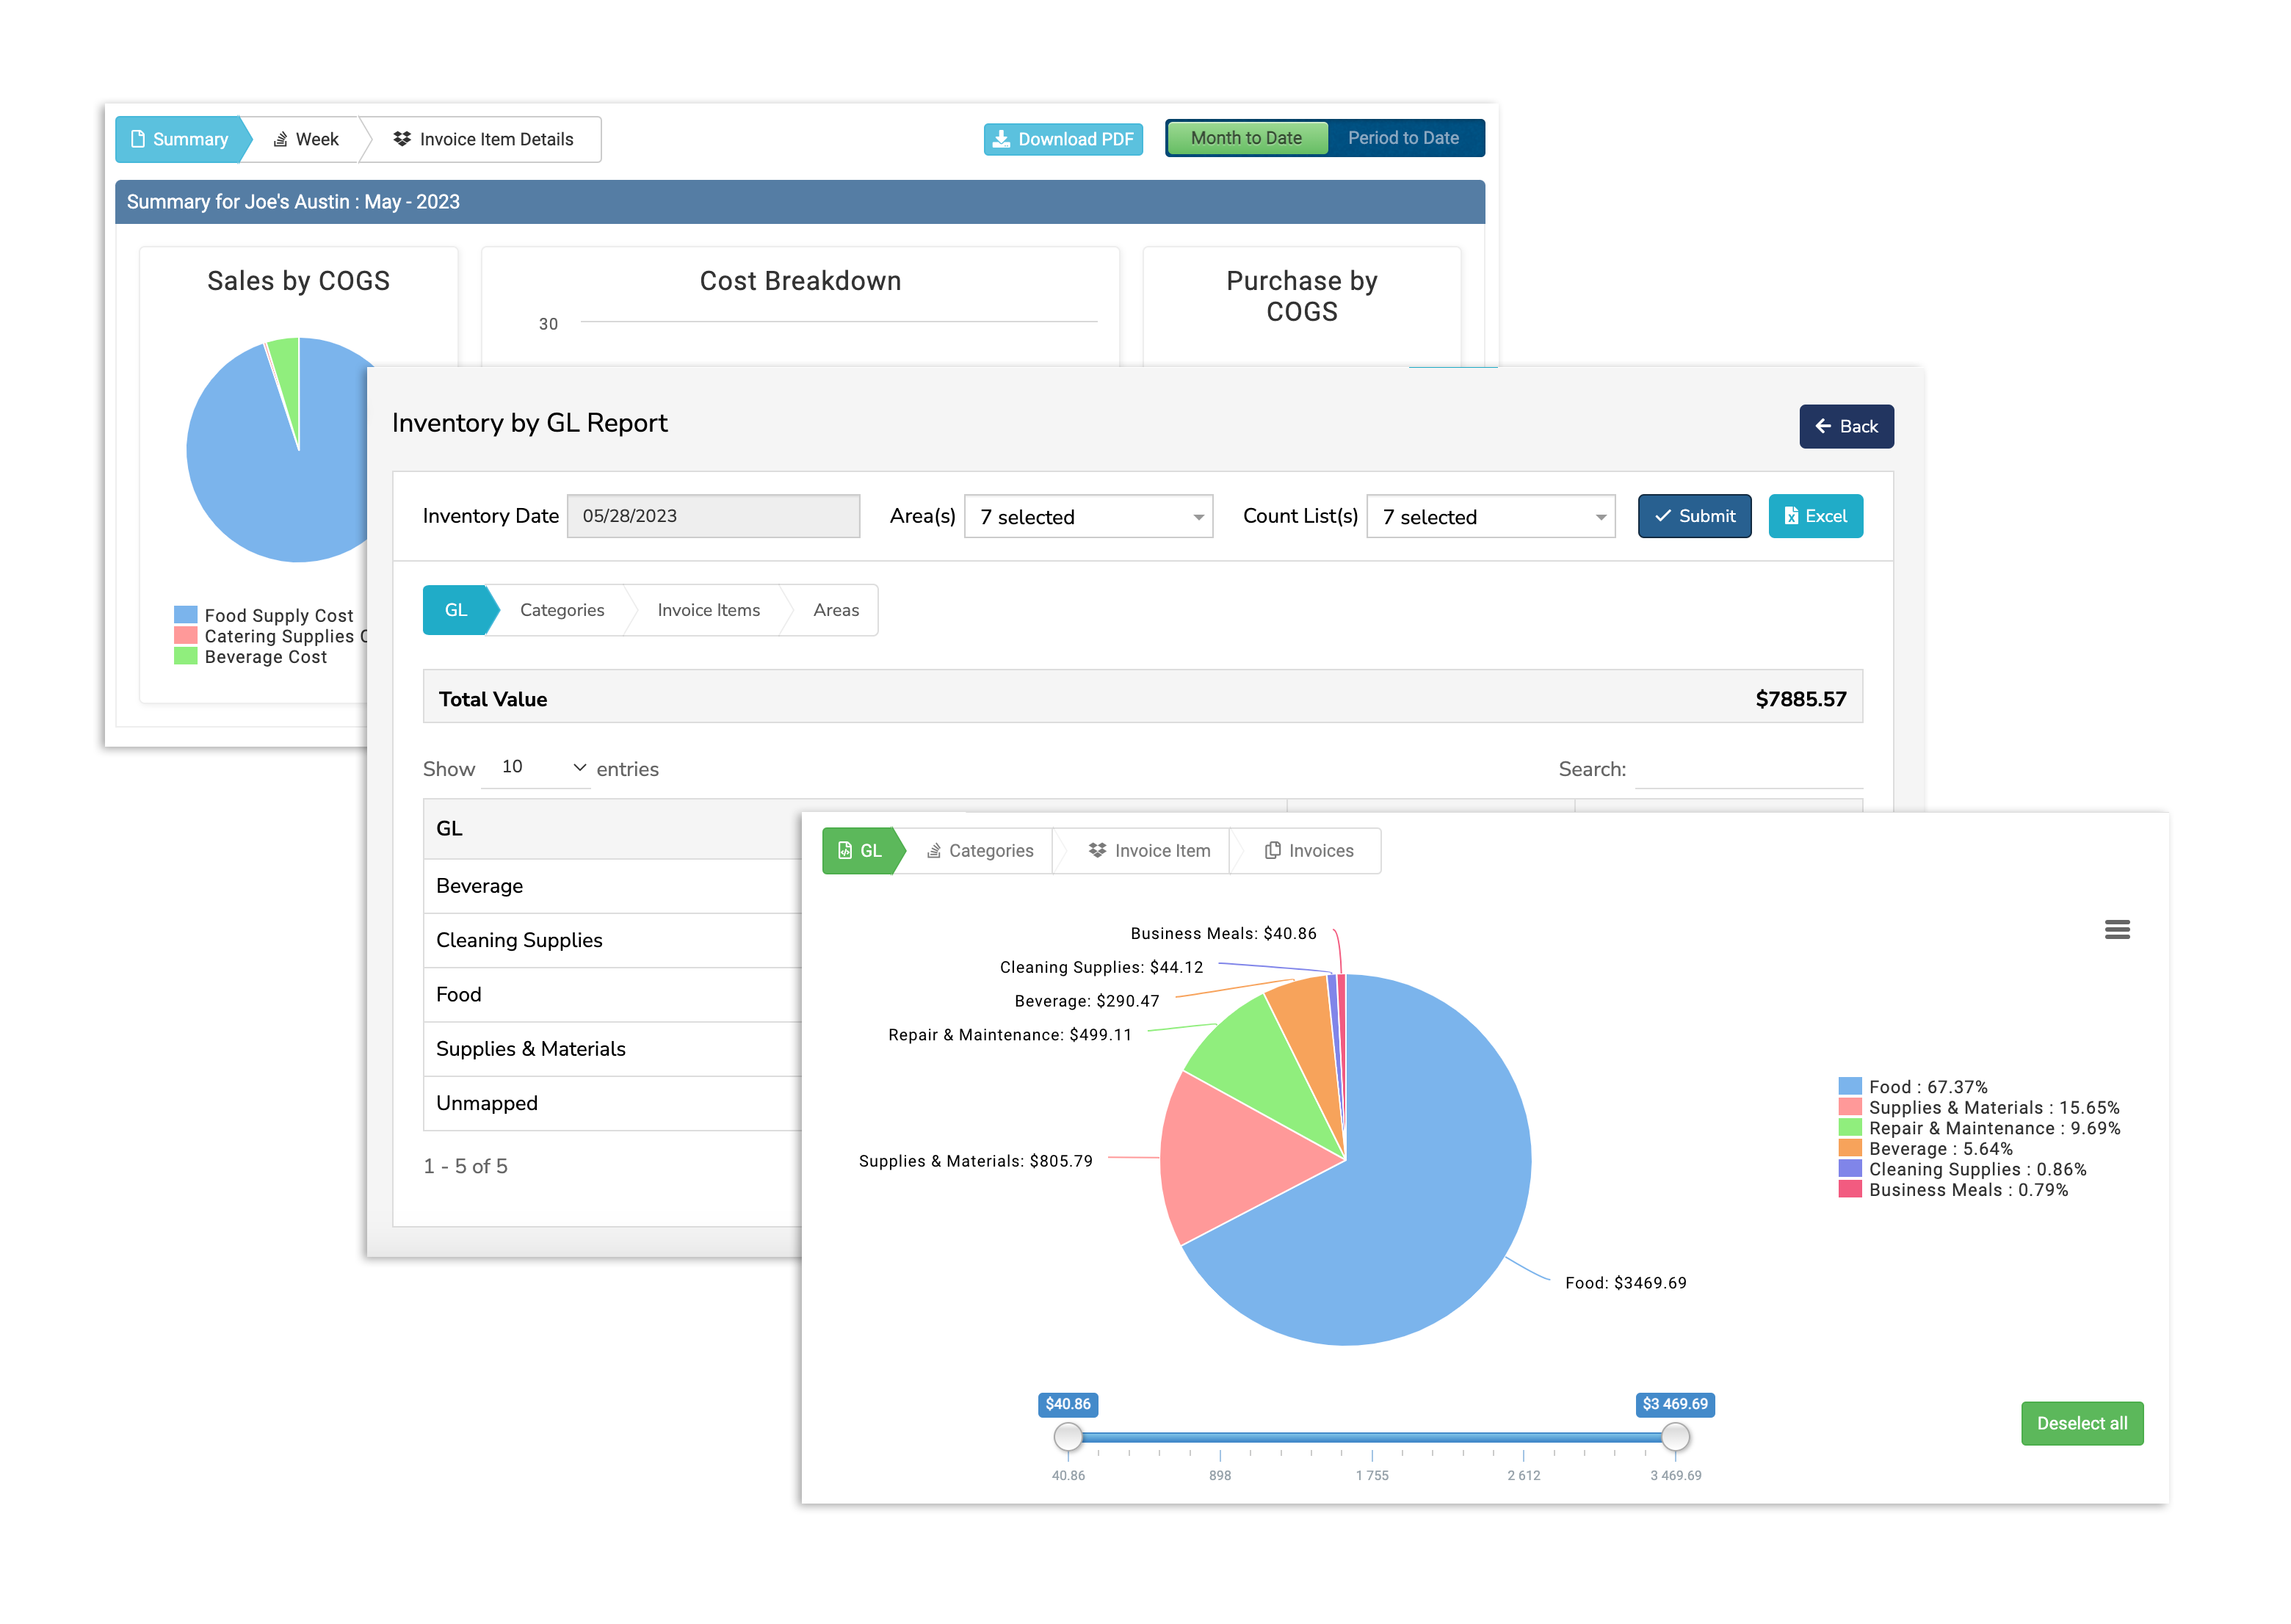
Compare Categories and GL Codes
In xtraCHEF, purchasing categories can be expanded in a detailed way (produce, meat, dairy) and could all be mapped to a single GL code called Food Costs. These purchasing categories provide a more analytical way of breaking down your purchasing data in order to gain better, more detailed insights into exactly what you're purchasing without having to clutter up your accounting software with multiple GL codes for essentially the same thing.
Map Your Invoice Items
The 3-minute video below covers the basics of mapping invoice items and highlights the benefits of 'coding' your items.
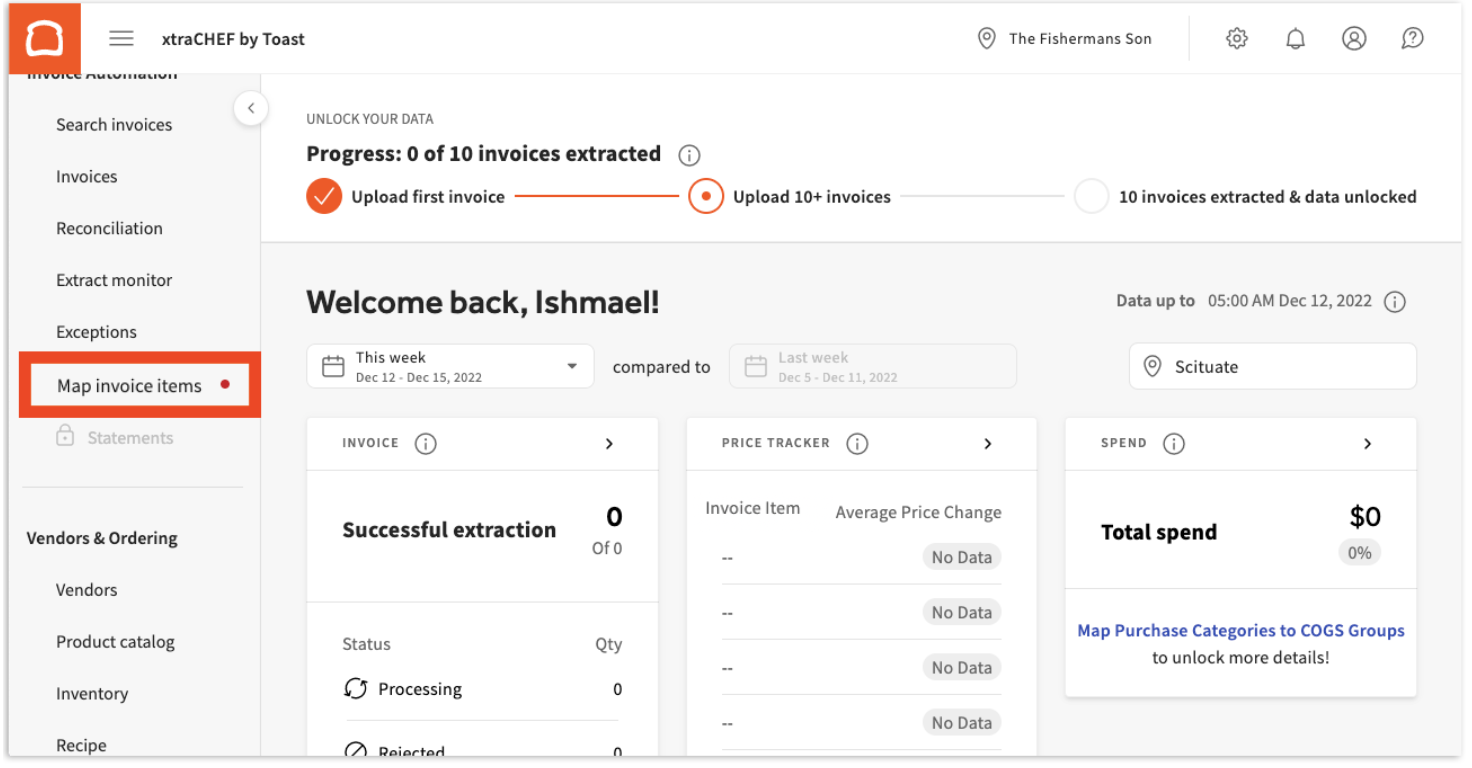
Begin by navigating to Map invoice items on your xtraCHEF navigation bar. If you have items awaiting mapping, you'll notice a red notification dot here.
On this page, any invoice items awaiting mapping can be assigned to a custom category (created in xtraCHEF) which is mapped to a General Ledger (GL) code (synced from your accounting).

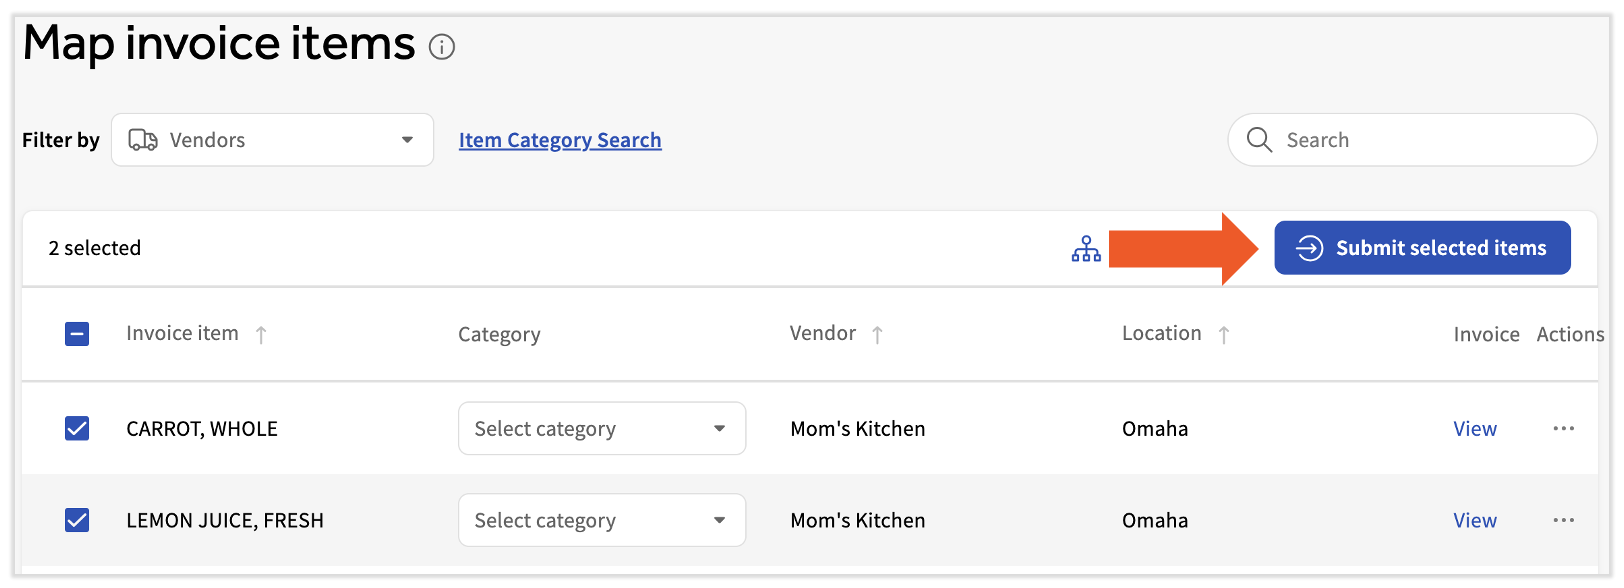
Map Invoice Items
From here, begin mapping your invoice(s) to a corresponding custom or default category. This can be done for the whole invoice at once or line item by line item. To do this, select the Category drop-down.
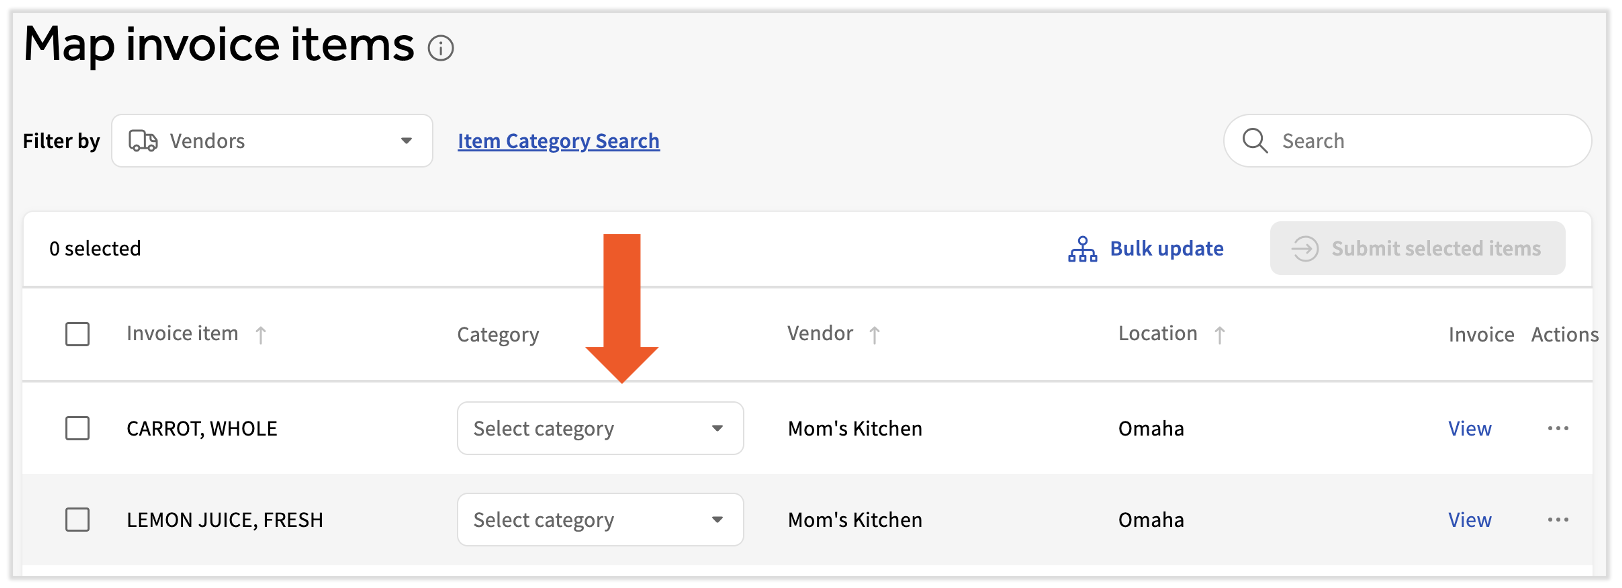
For more on default category options, see the Default Categories and Predictive Mapping section. Repeat this step for all items on your invoice. Once you have finished mapping, select your mapped invoice items and Submit Selected Items.
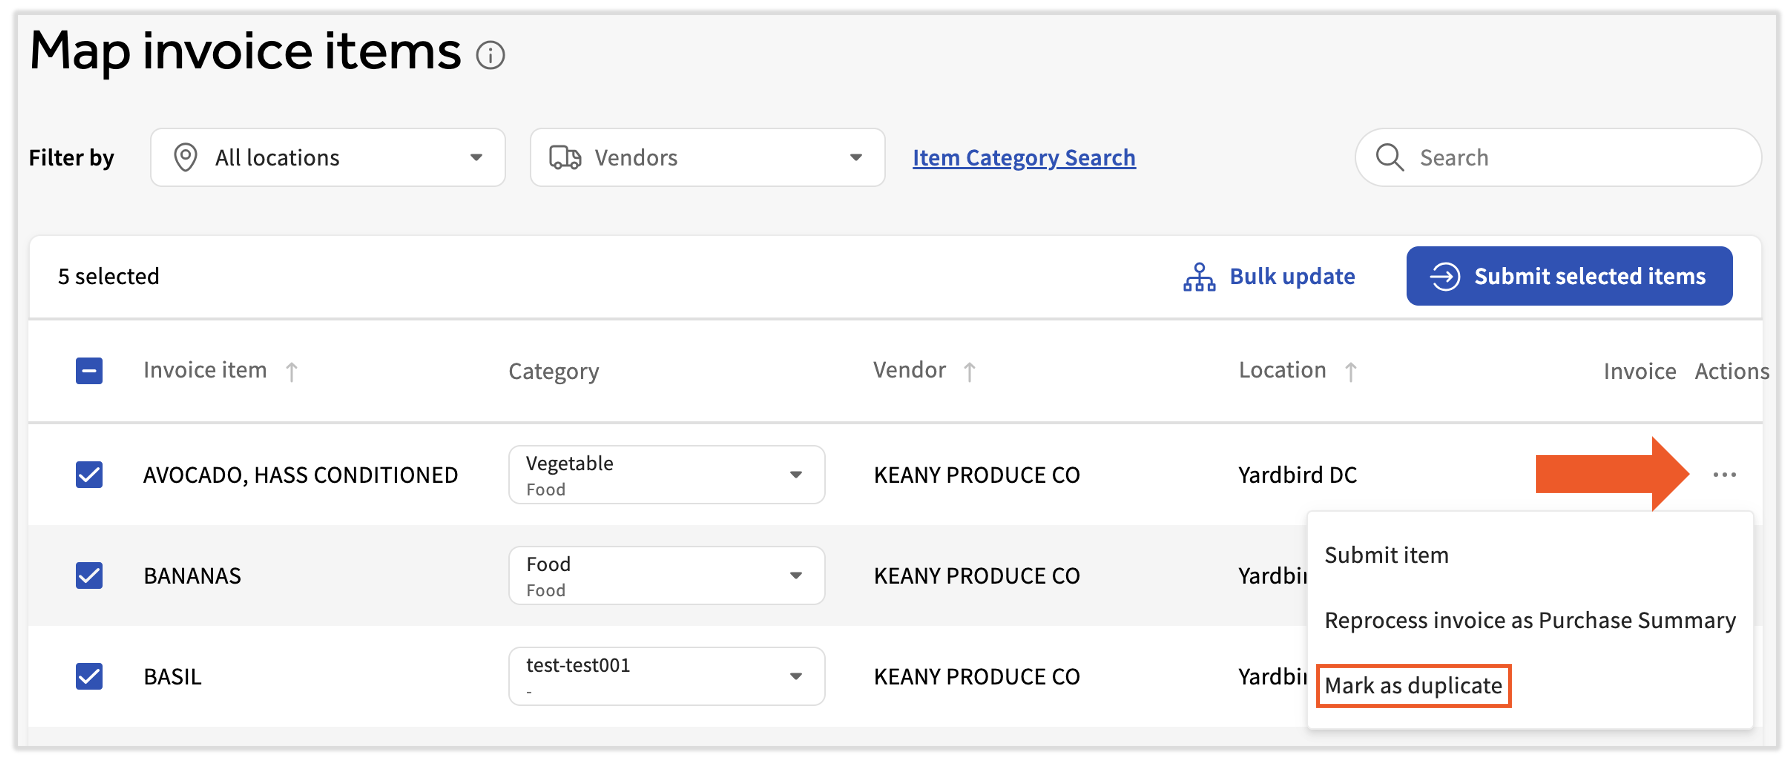
- Navigate to Map invoice items.
- Under the dotted options to the right of each row a new option Mark as duplicate will be available.
- Selecting that, we will initially use the existing distance algorithm and display the suggested products. Only products from the mapped vendor should be available. If the item duplication is due to vendor duplication, contact Customer Care.
- You can at any time type into the Search field to override the suggestions and search for products using a wildcard search using both Item Code and Item Description.
- Product properties of the original product will be displayed when the product is selected.
- Before merging the product, there will be clear messaging that the action cannot be rolled back.
- On Merge, the item should move out of the item mapping queue if a category is already assigned to the original product.
- If a category is not available for the original product, the item will remain in the item mapping queue for category assignment.
Reprocess Invoices
Invoices that xtraCHEF determines are not food or beverage-related may be read as 'Purchase Summary,' meaning the invoice's line items have been summarized under a single total amount rather than being broken out line-item-by-line item.
Purchase summaries help simplify the map invoice item process for you, should an invoice appear to only need a single category designation. However, in the event that an invoice and its items need to be split between multiple categories, xtraCHEF's Reprocess function can be utilized to have the invoice submitted again for detailed processing, either by Purchase Detail or Purchase Summary.
- Purchase Detail ensures all invoices are broken out by line item. This allows line item information to be read for both reporting and inventory and recipe features.
- Purchase Summary summarizes the invoice by total amount rather than reading line item specifics.
You can initiate a Reprocess by selecting the three dots icon located under the Action column and then selecting Reprocess Invoice as...
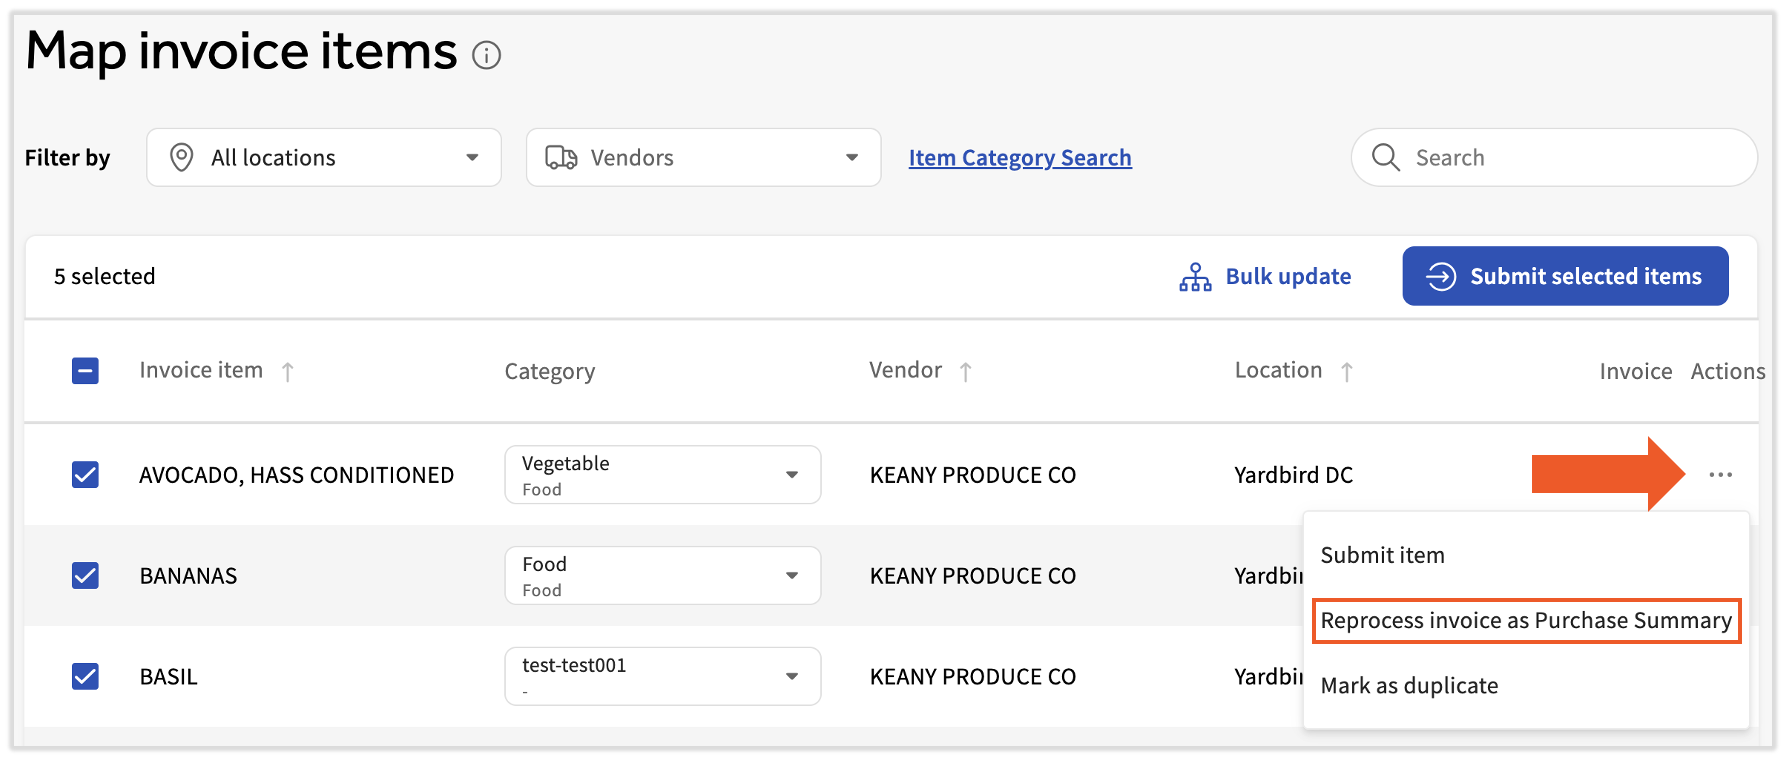
xtraCHEF will then ask you to confirm your decision. Select Reprocess.
Default Categories and Predictive Mapping
New accounts that opt to not connect with accounting platforms will have a set of 20 default categories to begin Map Invoice Items with.
Note: Your default category options can be further customized over time or as needed.
Additionally, xtraCHEF has the capability to use predictive mapping for default categories. Uploaded invoices and receipts that are reviewed by xtraCHEF will have a default category automatically assigned. Please note that these selections will await your review (and submission) in Map Invoice Items.
Next Steps
Congratulations on mapping your invoice items! With an entire document mapped to a corresponding category(s), your purchase information and data will be ready for an accounting extract (or applicable) and recorded in a number of xtraCHEF Reports and Analytics.
Want to familiarize yourself with some of the insight now at your fingertips? Visit xtraCHEF: Review Analytics Reports to brush up on the quick glance reports available to you on your Analytics page. Or, if you're looking for more detailed reports or data tables, consider reading xtraCHEF: Review Reports in the Reporting Module.
Map Invoice Items FAQ
How can I make a correction after I've incorrectly categorized a line item?
Navigate to the Item library in the left-hand navigation bar. Search for this line item and select the item's hyperlink. Here, you can modify several of the item's properties, including which product, category, and GL code (by way of category) this item matches up to. Select Save Changes once you're finished. Learn more about this process by visiting xtraCHEF: Get Started With the Item Library.
Why do my invoices keep reappearing after I select a category?
Be sure you're not mistakenly selecting Reprocess instead of Submit. Reprocess moves your invoice back to processing rather than moving it forward in the reconciliation journey.
My Invoices keep coming through as Purchase Summary. How do I change this?
You may have set Purchase Summary as your extract preference for the vendor. This can be changed via your Vendors page. Learn more about this process in xtraCHEF: Vendors