Manage Course Firing Options
Last updated: Mar 25, 2026, 1:49 PM
- Course Firing Overview
- Set Up Course Ordering
- Assign Courses to Menu Groups
- Required Courses
- Course Firing on the POS
- Change the Course of an Item
- Automated Course Firing
- Expediter Course Firing
- Additional Resources
Course Firing Overview
Watch the video overview below or follow the instructions in this article to enable and use course firing at your restaurant.
Note: At this time, coursing is only available with in-store ordering and not Toast Online Ordering or any of Toast's integration partners.
This 4-minute video covers setting up courses in Toast Web, assigning courses to menus and items, enabling course pacing and setting up required course prompting.
- In Toast Web, navigate to Kitchen > Pacing > Meal pacing.
- Check the box next to the Enable course pacing option.
| Course Pacing and Server Item Firing cannot be enabled at the same time. When enabling Course Pacing, make sure to turn off the Individually Send and Hold Items setting on the Front of house page. To learn more, visit our Support Center article: Use Server Item Firing at Your Restaurant. |
Here is what some of the available settings mean for your restaurant:
Modifier Course Firing - This allows you to fire modifiers as the same course, or a different course, than the menu item. This is helpful for prix fixe menus that are configured with every item as a modifier.
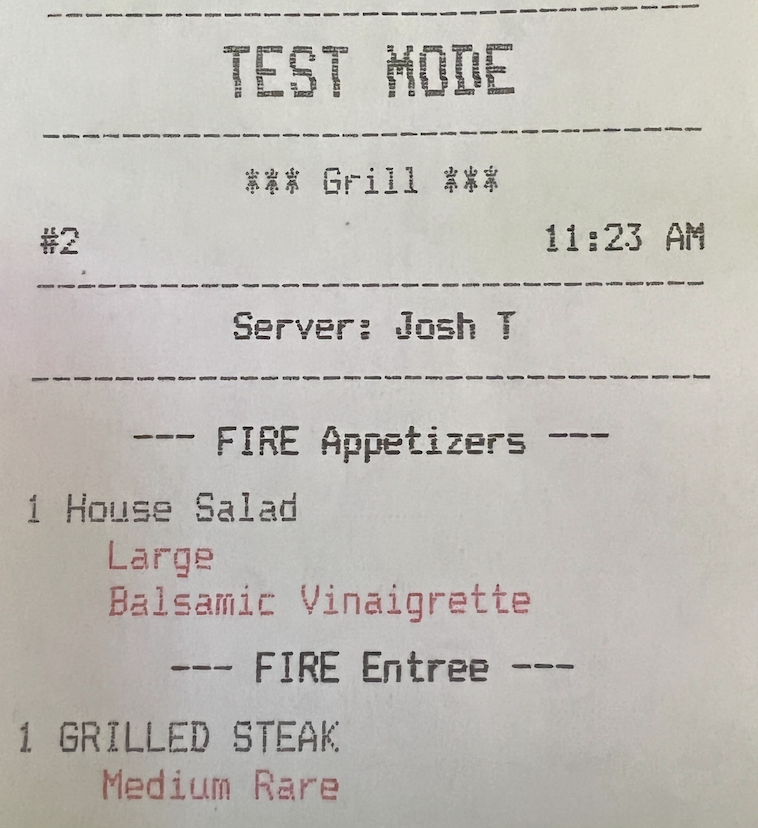
- Fire modifier to its configured course - This will allow the modifier to fire the course that has been set at the modifier level. In this example, the Grilled Steak modifier added to the House Salad menu item was fired as an Entree, whereas the House Salad was fired as an Appetizer. An example kitchen ticket is shown below.
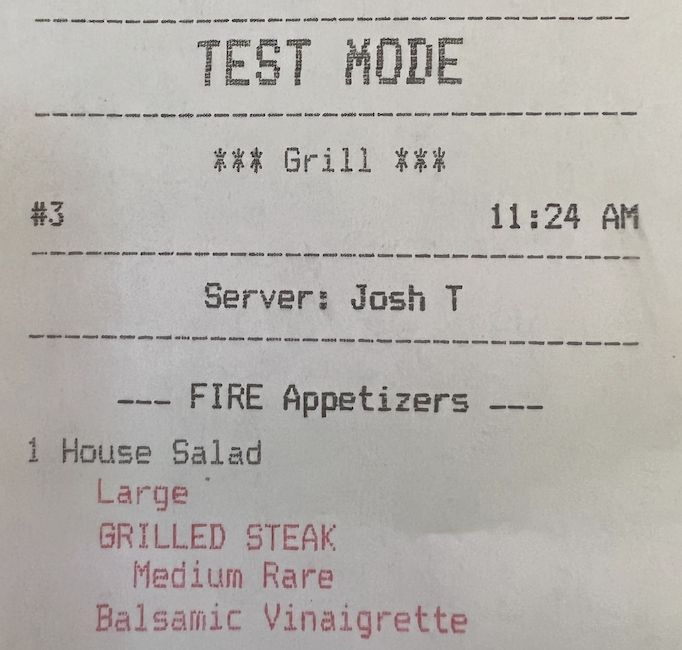
- Do not fire modifiers separately - This will ensure the menu item and modifier follow the course that was set at the menu item level. In this example, the House Salad menu item, and Grilled Steak modifier were both fired as Appetizers. An example kitchen ticket is shown below.
Sending Courses - Choose whether sending an order sends the whole ticket to the kitchen with only the chosen courses fired or simply sends the fired course.
- Send courses individually - When this option is selected, there is no more Toast Web configuration required. This option activates the Send, Hold, Stay behavior that your server can use on the POS. Your server is the one firing the course to the kitchen instead of the Toast Web configuration rules (see Use Server Item Firing at Your Restaurant for more information).
- Send all courses to kitchen immediately - When this option is selected, additional Toast Web configuration options will appear. These additional options allow you to decide how courses will be fired according to the rules you set in place. Some options will only work if the restaurant is using a Kitchen Display System or an expo station. This is notated in the options.
Be sure to save and publish any changes.
Set Up Course Ordering
To create custom courses, follow the steps below:
- Navigate to Kitchen > Pacing > Courses.
- Select + Add to create a new course. You can create as many courses as needed for your restaurant.
- If needed, select Order, then type in a number next to each course to reorganize the list. Select Done when you're finished.
- If needed, select the three dot overflow menu to the right of a course in order to archive it.
- Save and publish your changes.
Assign Courses to Menu Groups
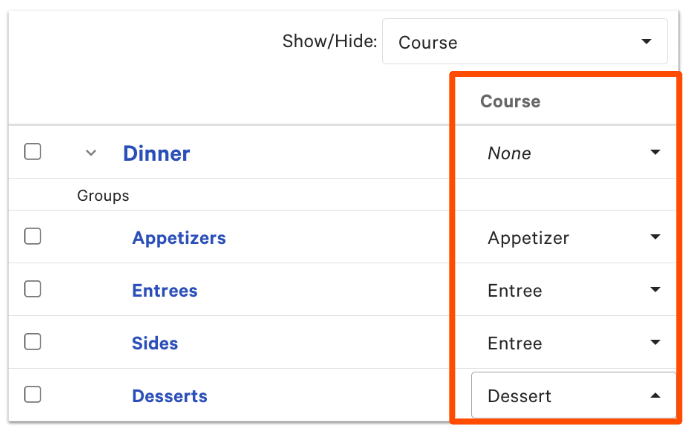
- In Toast Web, navigate to Menus > Bulk management > Advanced properties.
- Open the Show/Hide drop-down and select Courses.
- Expand your menu and assign courses to your menus, groups, items, or modifiers. In the image below, you can see courses assigned to groups.
Note: Typically, courses are added to a menu group (such as Appetizer, Dessert, or Entree) to avoid managing courses for each individual menu item.
- Save and publish your changes.
Required Courses
This setting prompts servers to have courses assigned to items before sending an order to the kitchen. There are three options for coursing:
- Required - Users will be prompted if items don't have a course assigned when they tap Stay or Send. All items must have a course before an order can be sent to the kitchen.
- Optional - Users will be prompted if items don't have a course assigned when they tap Stay or Send. Some items may have a course but it's not required that all items have a course to send items to the kitchen.
- Off - No items will be prompted to include a course selection.
Once courses are enabled, you can decide if they should be Required, Optional, or Off for Quick Order and Table Service modes.
- Navigate to Front of house in Toast Web.
- In the Quick order section, scroll down to the Coursing setting and select Required, Optional, or Off.
- In the Table service section, find the Coursing setting and select Required, Optional, or Off.
- Save and publish your changes.
If you're using required courses, you must have a "drinks" course set up in order for the next courses to fire. Otherwise, you may find that your appetizers or other menu items show as Hold on the KDS after servers manually selected a drinks course that was not assigned.
Back to top
Course Firing on the POS
Once courses have been configured in Toast Web (see section above), they will show on the POS when you input an order.
If courses are assigned by menu group, items added will default to their assigned course. If they are not assigned by menu group, the server can assign created courses while they input the order. Once all items have been coursed, select Send.
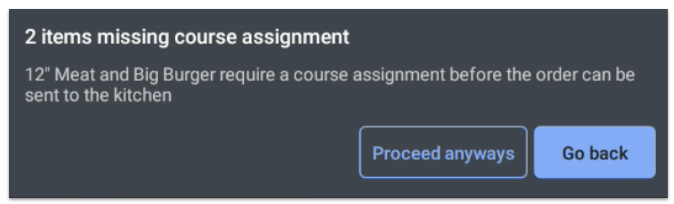
If coursing is required and not all items have been coursed, the server will see the following message on the POS:
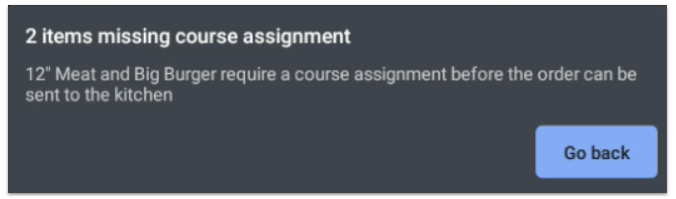
In this case, the server must select Go back and assign a course to items that are not coursed in order to send the order for fulfillment.
If coursing is optional and not all items have been coursed, the server will see the following message on the POS:
Want to practice? Select the button below! For an optimal interactive experience, we suggest accessing with a computer.
Change the Course Of An Item
In order to be able to change the course of an item, you must confirm the Course modifier is visible on your POS devices. Here is how to do this:
- In Toast Web, navigate to Front of house > Order screen setup > UI options.
- Scroll to the Order Screen section, and for the Additional Modifier Groups setting, make sure that the Enabled box is checked off for Course.
- Save and publish your changes to make the course modifier visible.
When placing an order on the POS, add an item then select the new Course option next to your modifier groups. This will allow you to change the course option of an item in both Quick Order or Table Service mode.
Automated Course Firing
With automated course firing, courses can be fired automatically instead of having servers choose to Send or Hold them. The expediter can also be given override controls of what is firing and when. With this feature enabled, a course can fire automatically once the line cook fulfills the previous course at their prep station.
There are multiple ways to configure Automated Course Firing. It can be done by scheduling courses to fire after a certain amount of time, or it can be done sequentially through the fulfillment of a prior course. Check out Automated and Expediter Course Firing to learn more.
Back to top
Expediter Course Firing
Giving course firing control to the expediter is a great way to manage the back of the house. Normally, when a server hits Send on a course, the pacing is taken out of the expediter's hands. With this feature enabled, the expediter will be able to manually fire courses at will. A server will still send something to the kitchen, but the expediter will do the actual firing of the course, having more control over the kitchen workflow. Check out Automated and Expediter Course Firing to learn more.
Back to top