Toast Flex 22 Installation Guide
Last updated: Mar 25, 2026, 1:47 PM
For customers located in Canada, Ireland, and the U.K., contact your Toast Sales representative or call Customer Care if you wish to add hardware.
- Prepare to Install Your Toast Flex 22
- Toast Flex 22 Installation
- Toast Flex 22 Mount Installation
- Toast Flex 22 Stand Installation
- Additional Resources
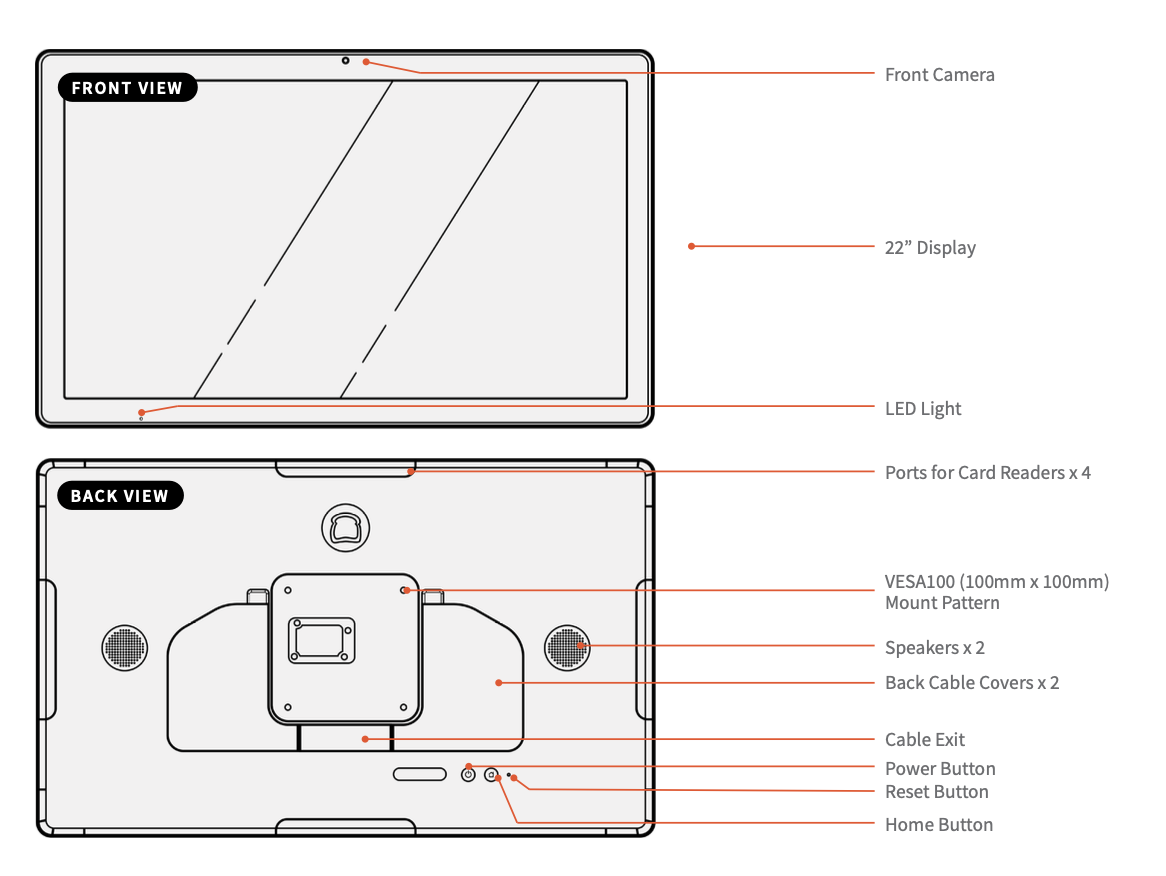
Prepare to Install Your Toast Flex 22
Like all our hardware, we designed the Toast Flex 22’’ to meet the demands of busy restaurants, making it durable enough for everyday spills, grease, and heat. More to love? The lightning-fast processing speeds, intuitive layout, and sleek design – all thoughtfully engineered by our team of restaurant experts to help you do what you do best. We hope you’re as excited about this as we are.
Use this article to install your new hardware. With intuitive, simple packaging, color-coded wiring, and easy step-by-step instructions, most people should be able to complete installation in under 30 minutes.
Begin by preparing for installation:
- Clean your counter, and make sure your counter space is cleared and wiped down.
- Unplug your current POS hardware and remove it from the counter so your counter space is completely clear.
- Wipe down the countertop with the alcohol wipe provided in your box.
Starting with a fresh surface makes it easier to install!
Toast Network Setup
Your Toast network (network managed by Toast) must be set up and established prior to connecting any of your hardwired or wireless devices. This network is created by connecting your Toast-provided Cisco Meraki router to your ISP (Internet Service Provider) modem. Your Meraki router must be connected directly to your modem, not through an intermediate device. This ensures that the Toast POS is isolated on its own secured subnet and meets PCI compliance standards (learn more: PCI Compliance Overview).
For more information on setup and installation visit Set Up Your Toast Network. In this article you will be able to select your router for next steps.
Need additional assistance with site readiness before your Toast hardware installation? Check out our Site Readiness Guide here!
Toast Flex 22 Installation
Download a printable version of this guide with the button below.
Screw Dimensions:
- 2.5 mm Allen wrench
- 4.0 mm Allen wrench
- Mount Arm set screws (3) - M5xL7 screw
- VESA Plate to Mount Arm screws (1) - M4xL10 screw
- VESA Plate to Terminal mounting screws (4) - M4xL15 screw
- Mount adapter screws (2) - M5xL25 machine screw
- Pole clamps (2) - 1/2" x 2 1/2" diameter hose clamp
- Wall mount (plaster) (2) - M5xL65 machine screw (if using provided toggle bolts, otherwise any plaster wall mount hardware rated for high weight that fits through the Mount Adapter holes will work)
- Wall mount (stud) (2) - M5xL60 self-tapping screw
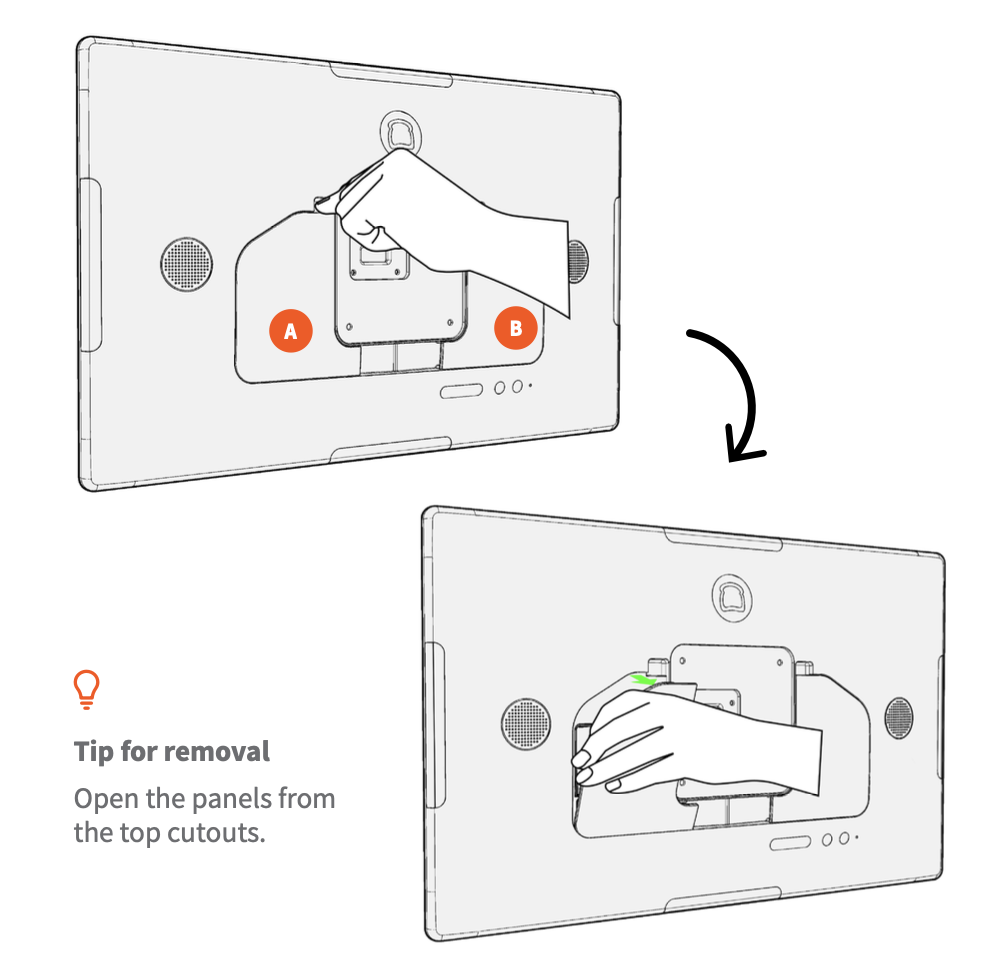
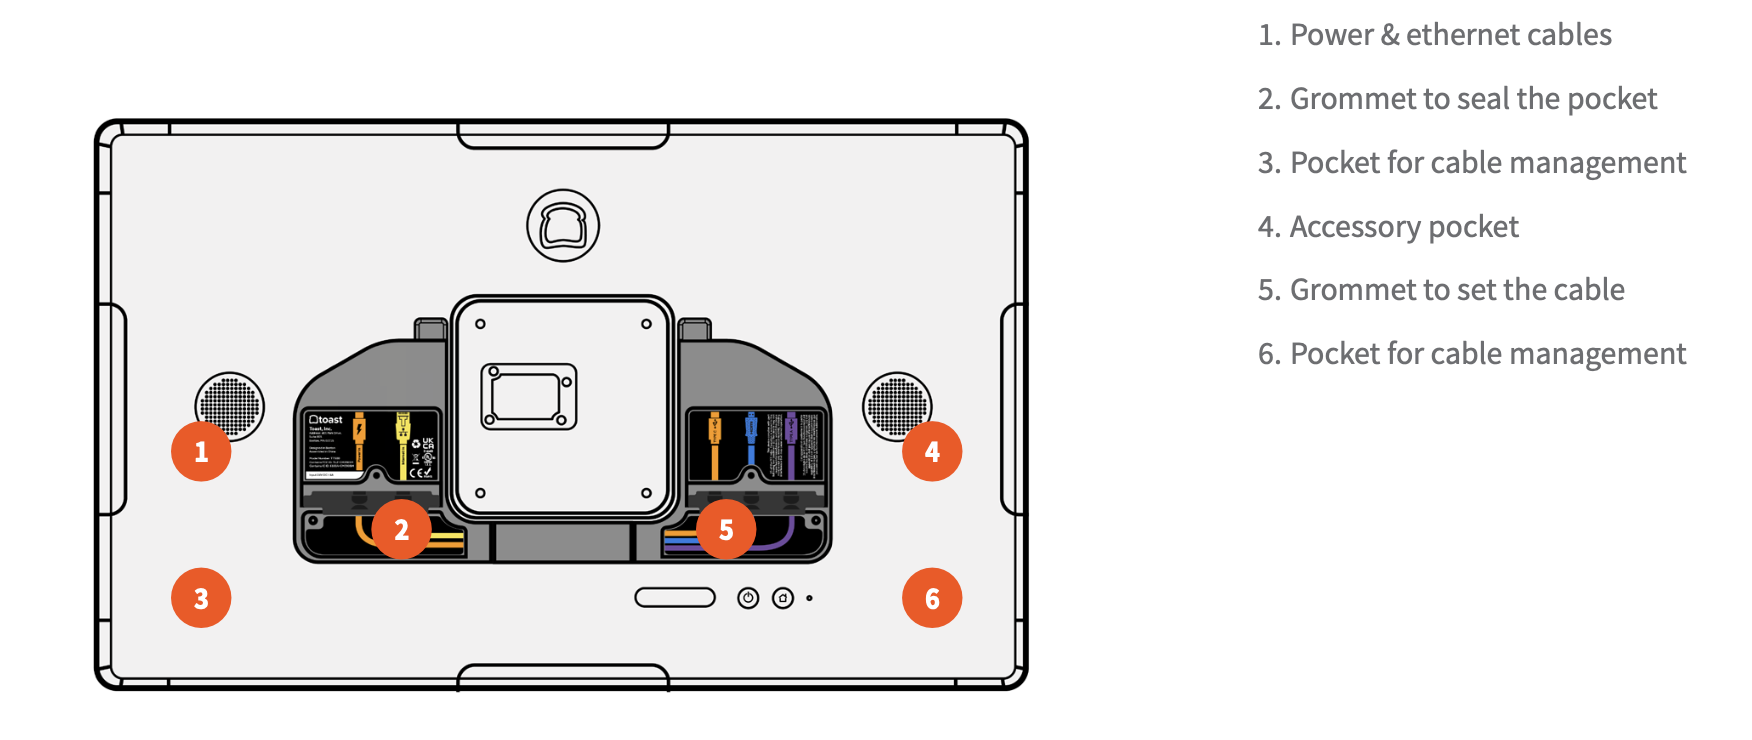
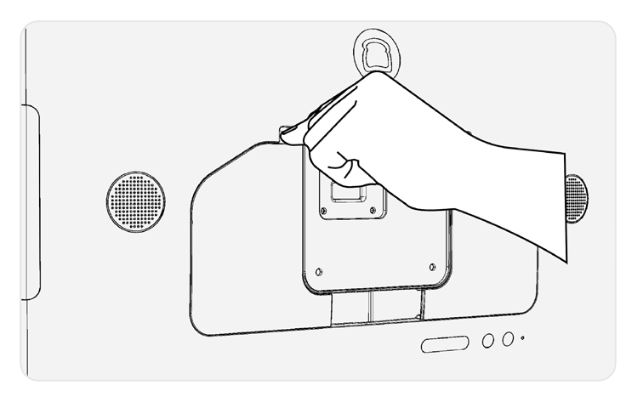
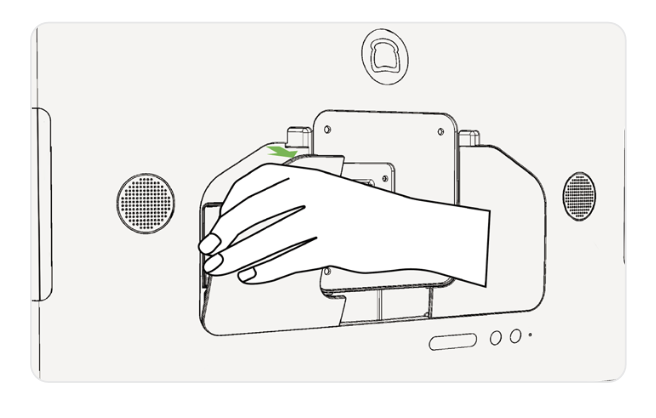
- Locate and remove the back panels (A and B) to expose the back pockets, as shown.
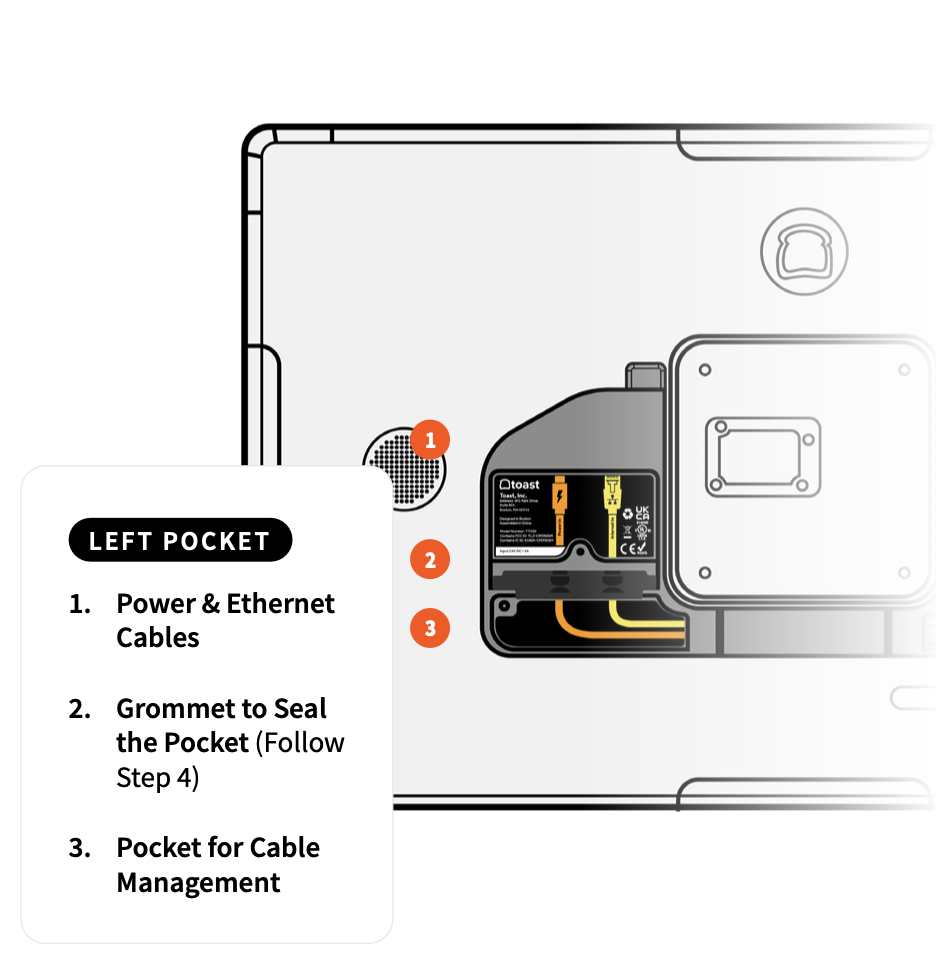
- Plug the USB-C power cable and the Ethernet cable (optional) into the left pocket.
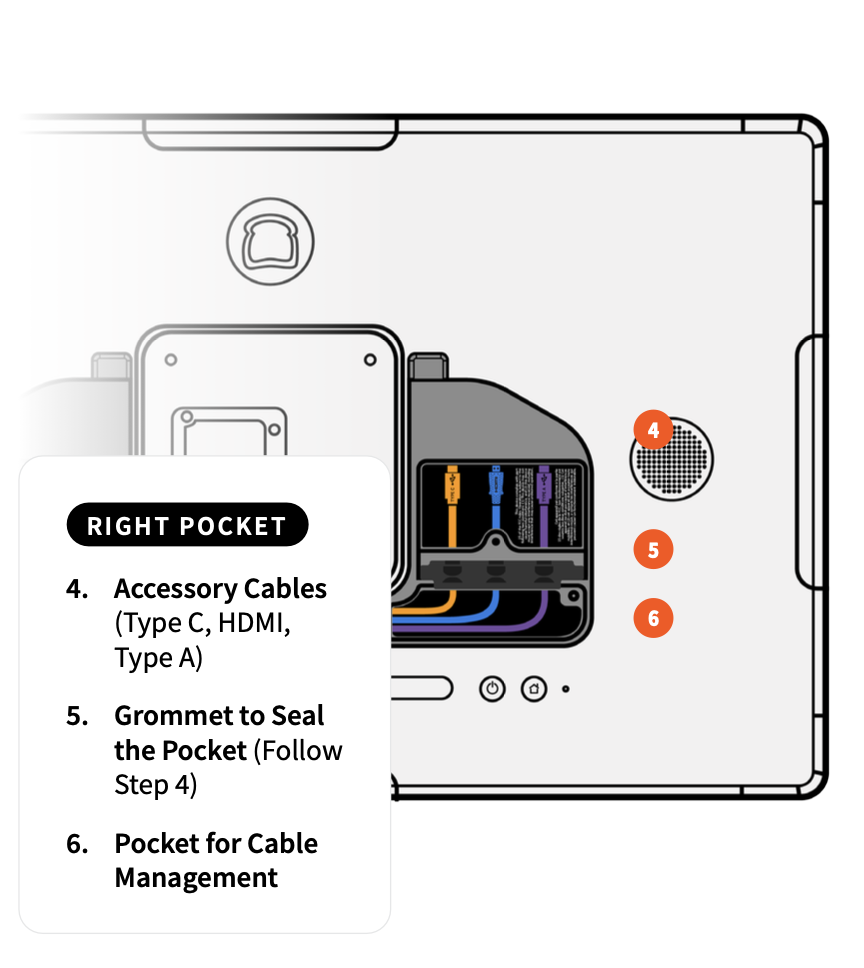
- Plug additional accessory cables into the right pocket as indicated (optional).
- Ensure that the cables are pushed all the way through the grommet notches, as shown.
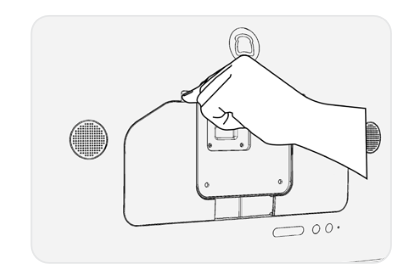
- Organize the cables at the exit of the lower pocket. Close the back cover by inserting the tabs on the bottom into the corresponding notches. Hinge upwards until the latches lock in place.
- Plug the power adapter into the wall unit and check LED status.
- When the LED is green, the adapter is providing power to your terminal and you are ready to proceed. Turn on your terminal using the power button located on the back.
- When the LED is amber, the wall outlet is providing power to the adapter but the adapter is not providing power to the terminal. Check the power cable at the back of the terminal and make sure that it is securely plugged in.
- When the LED is off, the adapter is not receiving adequate power from the wall outlet. Check your wall power or use a different power outlet.
- Log into your restaurant in the Toast app and complete basic setup.

Note: You may need to update the Toast app when you open it for the first time. See Update Your Toast App for instructions.
Toast Flex 22 Mount Installation
Download a printable version of this guide below.
Toast Flex 22 Mount Installation Guide
The following parts are included in the box with your Toast Flex mount:
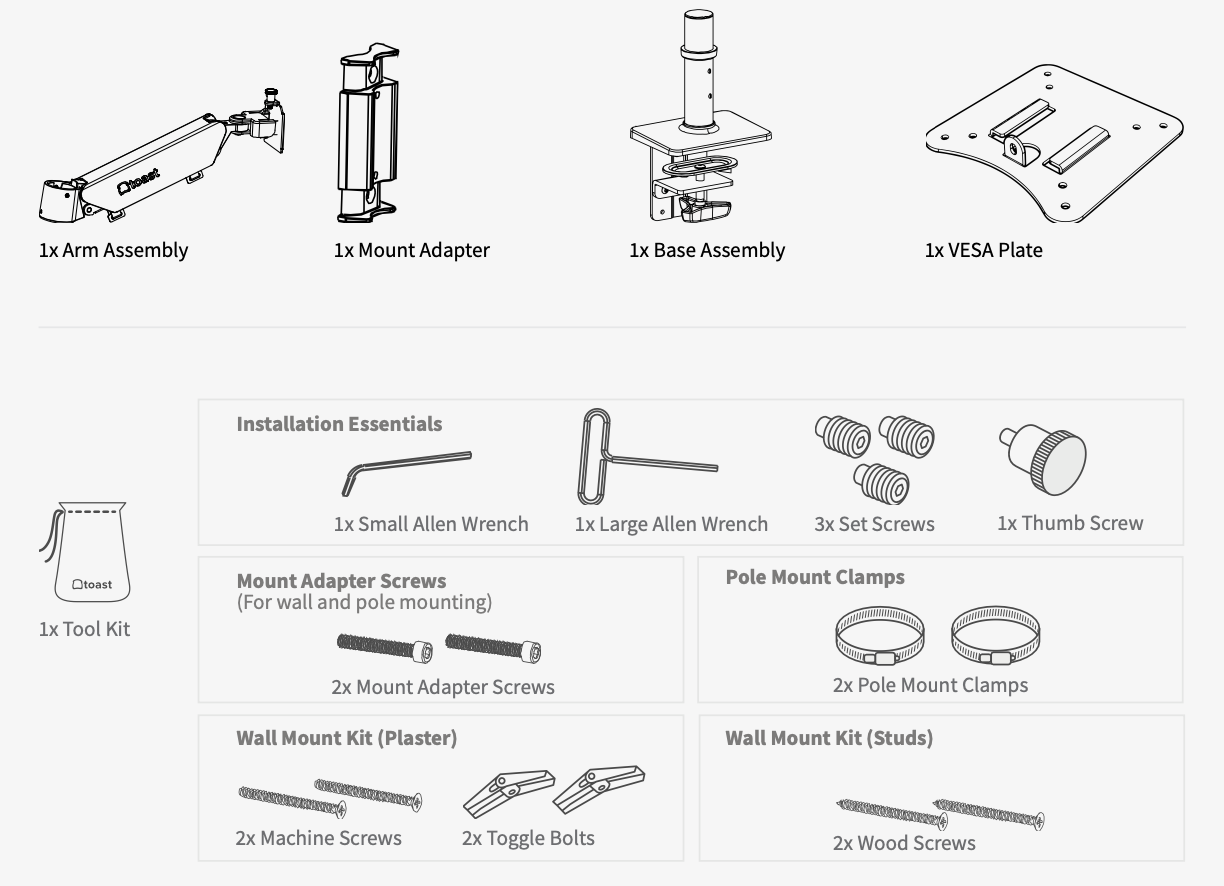
- 1 x arm assembly
- 1 x mount adapter
- 1 x base assembly
- 1 x VESA plate
- 1 x toolkit
Counter Mount Installation
- Begin by clearing your install area of any obstructions before you get started.
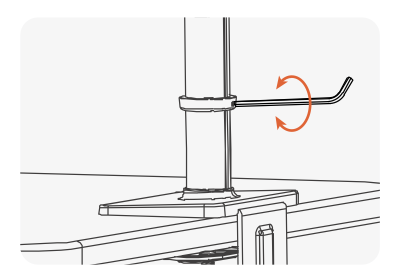
- Place the base assembly onto the counter and tighten the hand screw.
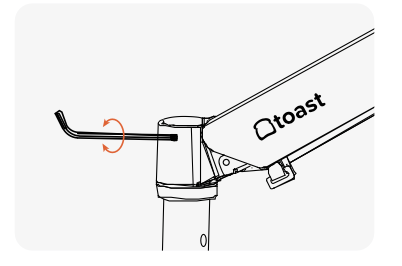
- (optional) Use the small Allen wrench to adjust the collar height.
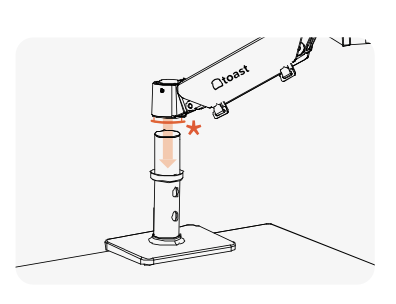
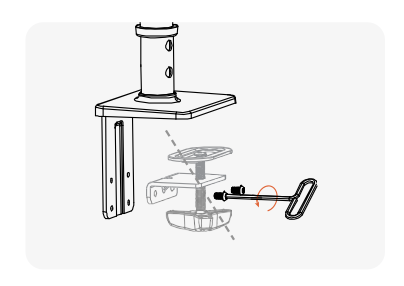
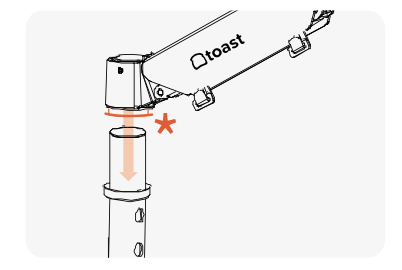
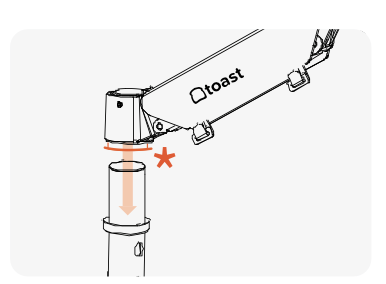
- Place the arm over the tube of the base assembly. If the sleeve falls out reinsert here* before attaching arm.
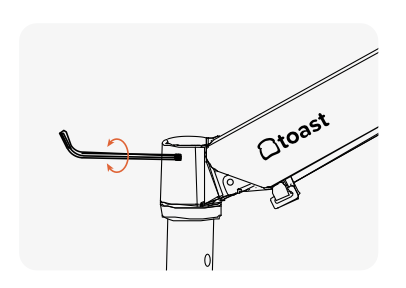
- Attach the arm to the base assembly using the small Allen wrench and the set screws. The arm will swing if screws are not fully tightened.
- Now it's time to connect to power and Ethernet. Jump to the steps listed below.


Wall Mount (Stud or Plaster) Installation
Tools needed:
- Phillps head screwdriver
- Hand drill with a 1/4" drill bit
- Begin by clearing your install area of any obstructions before you get started.
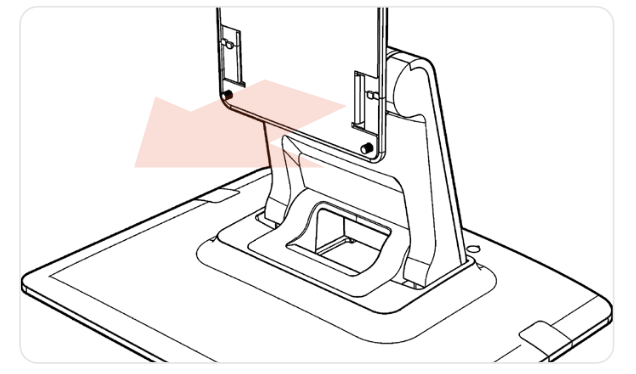
- Separate the tube.
- Remove the handscrew from the base assembly using the large Allen wrench.
- Use the small Allen wrench to remove the tube completely. You can set all other base assembly components aside.
- Remove the handscrew from the base assembly using the large Allen wrench.
- Continue with instructions for either the stud mount or the plaster mount.
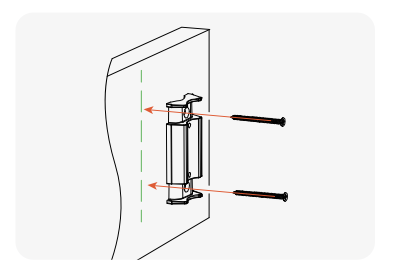
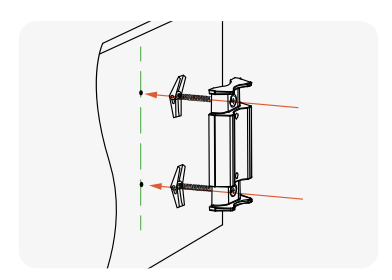
- Proceed after the mount is installed. Attach the mount adapter to the stud in the wall using a Phillips head screwdriver or hand drill (not provided).
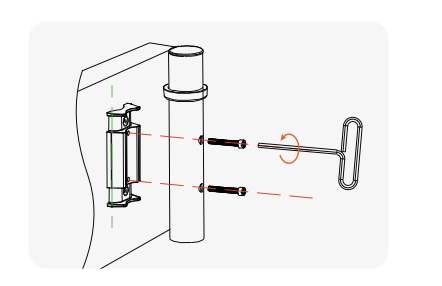
- Attach the tube from the base assembly to the mount adapter using the mount adapter screws and the large Allen wrench.
- Now it's time to connect to power and Ethernet. Jump to the steps listed below.
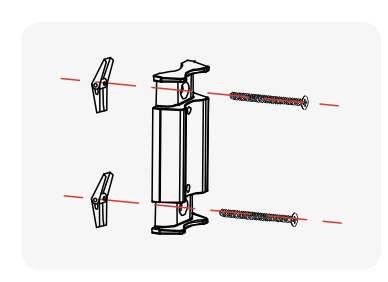
- Attach the plaster wall mount screws and toggle bolts to the mount adapter.
- Drill pilot holes into the plaster wall and install the mount adapter, toggle bolts first.
- Attach the tube from your base assembly to the mount adapter using mount adapter screws and large Allen wrench.
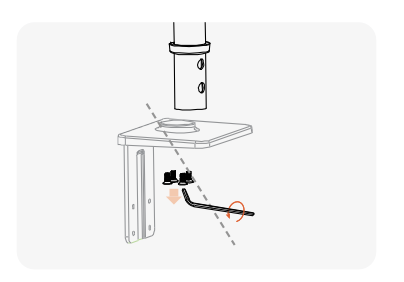
- Proceed after the mount is installed. Place the arm over the tube now mounted to the wall. If the sleeve falls out reinsert here* before attaching arm.
- Attach the arm to the base assembly using the small Allen wrench and the set screws. Note: The arm will swing if screws are not fully tightened.
- Now it's time to connect to power and Ethernet. Jump to the steps listed below.
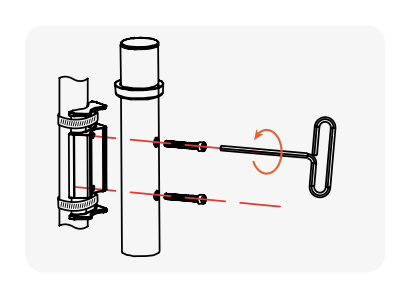
Pole Mount Installation
Tools needed:
- Flathead screwdriver
- Begin by clearing your install area of any obstructions before you get started.
- Remove the handscrew from the base assembly using the large Allen wrench.
- Use the small Allen wrench to remove the tube completely. You can set all other base assembly components aside.
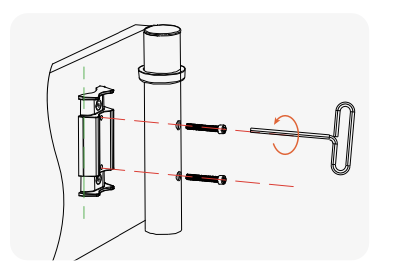
- Use a flathead screwdriver to loosen the pole clamps, then wrap the pole clamps around the mount adapter and pole. Re-tighten the pole clamps with the flathead screwdriver to secure the mount adapter to the pole.
- Attach the tube from the base assembly to the mount adapter using the mount adapter screws and the large Allen wrench.
- Place the arm over the tube now mounted to the wall. If the sleeve falls out reinsert here* before attaching arm.
- Attach the arm to the base assembly using the small Allen wrench and the set screws. The arm will swing if screws are not fully tightened.
- Now it's time to connect to power and Ethernet. Jump to the steps listed below.

Connect to Power and Ethernet
Connect to power and Ethernet according to the labels on the back of your Toast Flex 22” terminal.
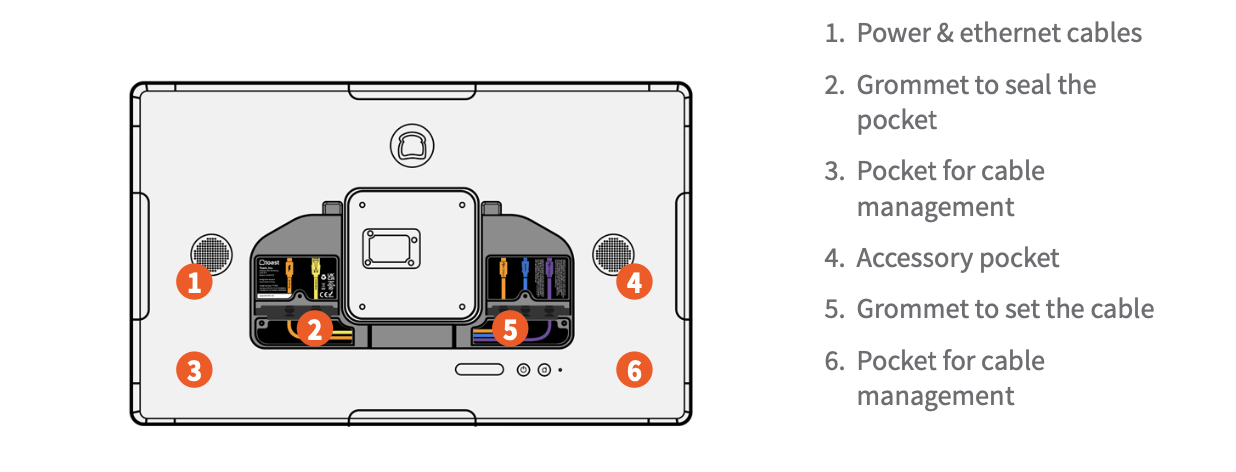
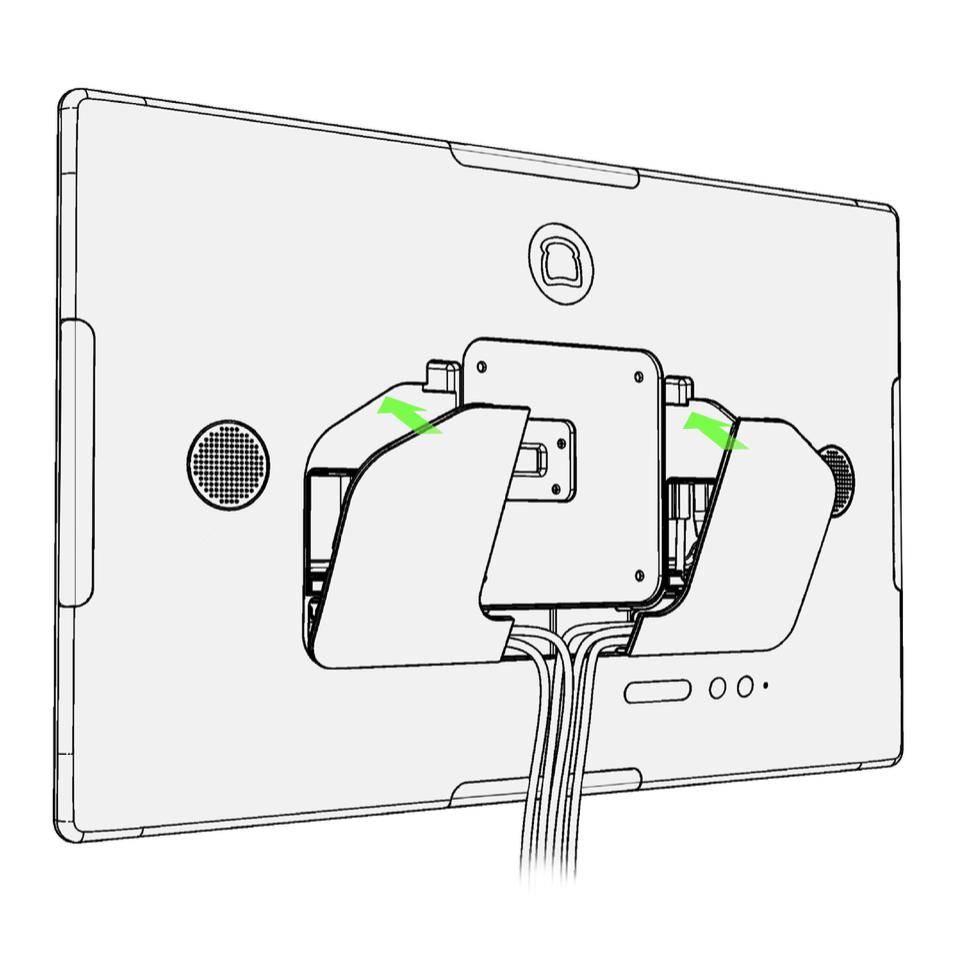
- Remove back panels. Open and remove the back panel from the top cutouts to expose the back pockets.
- Plug in your cables. Plug in the USB-C power and the (optional) Ethernet cable in the left pocket as shown.
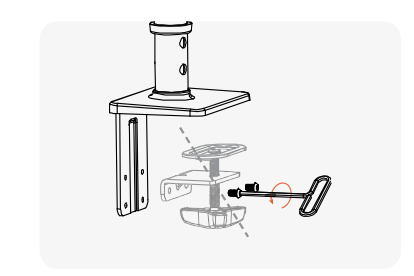
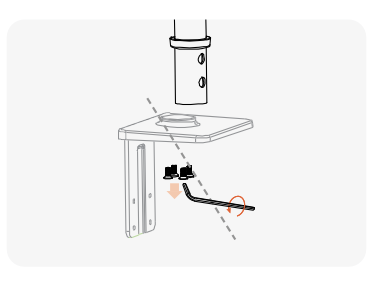
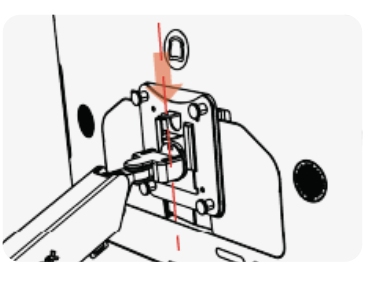
- Install VESA plate on the terminal. Use the 4 thumb screws to attach the VESA plate onto the back of the unit.
- Attach the Flex 22” terminal onto the mount. Slide the VESA plate onto the end of the arm within the support tabs.
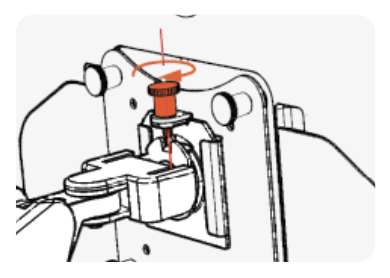
- Secure in place using the vertical thumb screw. That’s it! Save any parts you didn’t use for potential future use.
- Log into your restaurant in the Toast app and complete basic setup.

Note: You may need to update the Toast app when you open it for the first time. See Update Your Toast App for instructions.
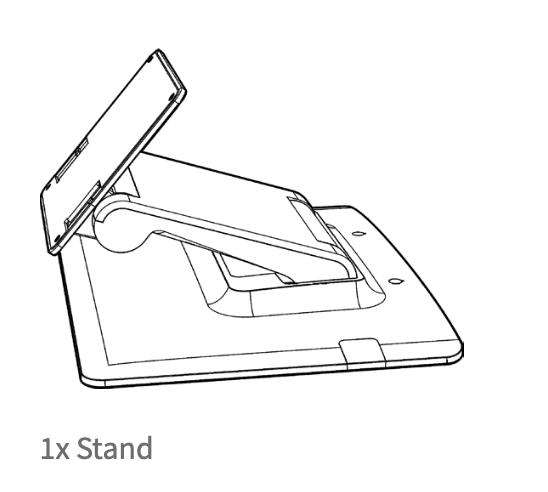
Toast Flex 22 Stand Installation
Download a printable version of this guide below.
Tools needed:
- 4 x thumbscrews found in general toolkit
- Begin by clearing your install area of any obstructions before you get started.
- Connect to power and Ethernet according to the labels on the back of your Toast Flex 22” terminal.
- Remove back panels. Open and remove the back panel from the top cutouts to expose the back pockets.
- Plug in your cables. Plug in the USB-C power and the (optional) Ethernet cable in the left pocket as shown.
- Place the display on a flat surface. Ensure the surface is clean and stable.
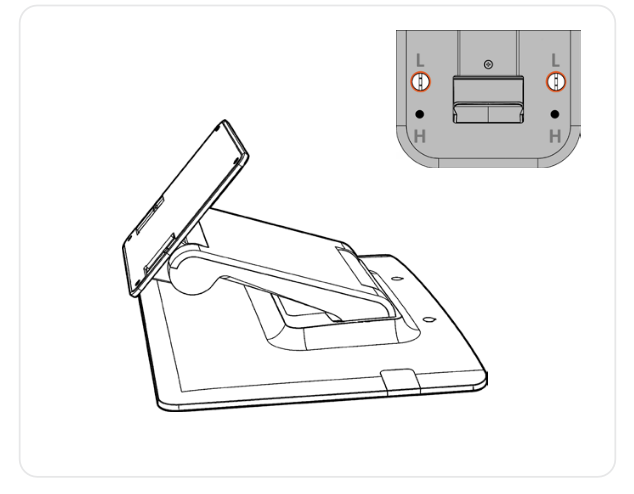
- Check the stand direction. Ensure the plate is facing towards the front of the stand.
- Choose your height. The stand can be configured in high or low mode, depending on your comfort. Flip the stand over to find the height options, marked by “H” and “L.”
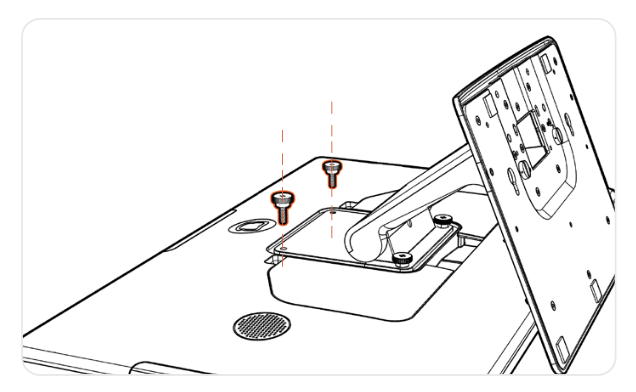
- If you'd like to change the height or your stand, unscrew the bottom screws, hinge the stand to the alternate position, and re-secure with the screws.
- If you'd like to change the height or your stand, unscrew the bottom screws, hinge the stand to the alternate position, and re-secure with the screws.
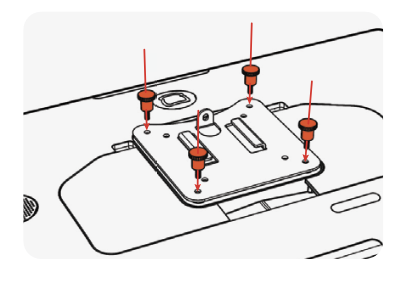
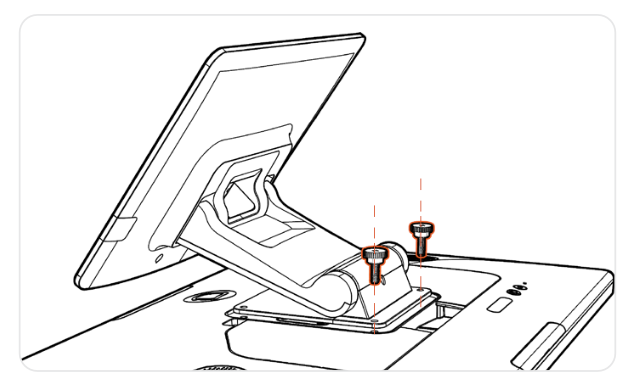
- Secure the stand with the thumbscrews. Start with the 2 screws at the top.
- Next, hinge the stand for easier installation of the bottom screws.
- Adjust the display angle. Move the top hinge to find the angle that works best for you.
- Log into your restaurant in the Toast app and complete basic setup.
Note: You may need to update the Toast app when you open it for the first time. See Update Your Toast App for instructions.
Great job setting up your Toast Flex 22 hardware! There are a few other things worth noting and exploring:
- Your Toast 22 Flex will utilize Toast Launcher to finish getting set up. Check out this Support Center article, Use Toast Launcher, for more details.
- If you've purchased your Toast Flex 22 as your KDS (Kitchen Display System screen) visit POS Device Setup Overview and Toast Flex for Kitchen Installation Guide for additional instructions.
- If you purchased your Toast Flex 22 as your Kiosk visit Get Started with Kiosk Mode and Set up Your Kiosk for additional instructions.
- If you're looking to learn more about installing a kitchen printer to go with your Toast Flex 22 visit our Toast Kitchen Printer Quick Start Guide.
- Consult Toast Flex 3 Hardware Compatibility to ensure your hardware is compatible.
- If you have further questions, reach out to the Toast Customer Support team via Support Center or by chatting in Toast Now with us. Start a live chat here with our Customer Support team. Chat is available in Toast Web and Payroll Web (blue support button in bottom right of every page) and the Support tab in the Toast Now app.
For more information on how to contact support view "How to Contact Customer Support" or go to support.toasttab.com.