Nómina Toast: Personalizar flujos de trabajo
Última actualización: 28 abr 2026, 4:22 p.m.
- ¿Qué son los flujos de trabajo?
- Ver flujos de trabajo en Nómina Toast
- Crear un nuevo flujo de trabajo
¿Qué son los flujos de trabajo?
Los flujos de trabajo son notificaciones, alertas y aprobaciones del sistema que se pueden enviar a un destinatario en relación con un evento o situación. Nómina Toast tiene varios flujos de trabajo y se pueden incluir diferentes tipos de destinatarios en su configuración. Por ejemplo, los gerentes pueden recibir alertas por cumpleaños de empleados o se puede configurar el equipo de RR. HH. para aprobar una nómina antes de que se envíe.
Los flujos de trabajo se utilizan con mayor frecuencia para mantener a la gerencia al tanto de la actividad relacionada con la base de datos. Este módulo no está equipado para actuar como plataforma de mensajería interna. Sugerimos usar la función de chat de la aplicación MyToast si deseas usar una plataforma de mensajería interna.
Ver flujos de trabajo en Nómina Toast
- Ve a Configuración > Flujo de trabajo.
- Esta página filtra automáticamente los flujos de trabajo existentes en la parte superior (consulta la columna Configuración). Los flujos de trabajo restantes no utilizados, ordenados alfabéticamente, se seguirán.
- Los flujos de trabajo se dividen en tres tipos:
- Flujos de aprobación: Para que algo se pueda enviar correctamente, debe ser aprobado por otra persona.
- Alerta/notificación: Cuando ocurra algo específico en Nómina Toast, se lo notificará a alguien.
- Alerta/recordatorio demorado: Las fechas preestablecidas activarán alertas para estos flujos de trabajo.
- Usa el botón Filtrar en la parte superior de la página para localizar rápidamente los flujos de trabajo por nombre, tipo o estado de configuración.
Crear un nuevo flujo de trabajo
- Ve a Configuración > Flujo de trabajo.
- Selecciona el nombre de un flujo de trabajo para comenzar.
- Selecciona el botón Agregar+.
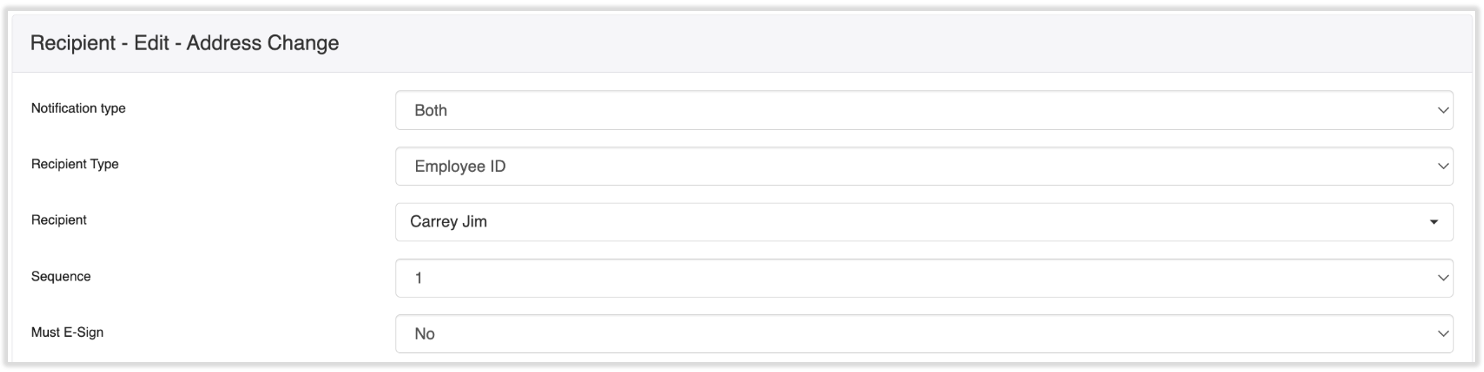
- Completa los siguientes campos:
- Tipo de notificación: Indica si quieres que las notificaciones se envíen a la dirección de correo electrónico registrada de la persona, como notificación de Nómina por hacer en su panel de Nómina Toast, o a ambas.
- Tipo de destinatario: A quién irá dirigida la notificación del flujo de trabajo. Las selecciones más populares se describen a continuación.
- Nota importante: Cuando configuras el tipo de destinatario en cualquiera de las selecciones de Informes a continuación, los perfiles de los empleados también deben tener esta información; de lo contrario, el flujo de trabajo fallará. Por ejemplo, si intentas configurar un flujo de trabajo para notificaciones de horas extra y quieres que la notificación se envíe al informe del empleado, debe haber una persona especificada en su perfil. Puedes encontrar o actualizar esta información en el perfil de un empleado > Puesto > Editar. Obtén más información sobre los informes a en Nómina Toast: Actualizar posiciones.
- Posición: Todos los usuarios asignados a esa posición recibirán la notificación del flujo de trabajo.
- En algunos casos, cuando se selecciona Puesto para Tipo de destinatario y se incluye una notificación por correo electrónico en el Tipo de notificación, la persona no recibirá un correo electrónico cuando se active el flujo de trabajo. Para evitar este error, puedes seleccionar Identificador de empleado e incluir manualmente a todos los empleados aplicables.
- Informes a posición: Todos los empleados que se presenten en un puesto específico recibirán la notificación del flujo de trabajo.
- Informes a: En pocas palabras, este es el jefe de un individuo. Las notificaciones de flujo de trabajo omitirán al gerente directo e irán al gerente del empleado.
- Informes al empleado: Todos los empleados que rindan cuentas al empleado llamado Destinatario recibirán la notificación del flujo de trabajo.
- ID del empleado: Un empleado específico recibirá la notificación del flujo de trabajo. Asegúrate de que no sea un empleado de demostración.
- Origen: La notificación del flujo de trabajo se enviará al empleado original.
- Grupo de flujos de trabajo o Grupo de flujos de ubicación: El flujo de trabajo se dirigirá a otro flujo de trabajo.
- Destinatario: Este campo se completa con el Tipo de destinatario correspondiente (si se seleccionó el ID del empleado, se completarán los nombres de los empleados).
- Algunos tipos de destinatarios (por ejemplo, los informes a) completarán un destinatario N/C porque este destinatario será diferente para cada empleado. En otras palabras, la persona a la que cada empleado rinde cuentas se configura individualmente en su perfil, por lo que esto es lo que se espera y el flujo de trabajo será exitoso, siempre que cada empleado tenga los informes que completar en su perfil.
- Secuencia: Si solo hay un destinatario, debe ser 1. Si hay varios destinatarios, selecciona el orden en el que te gustaría que se recibieran (p. ej., 1 para un gerente y 2 para un usuario de RR. HH.+).
- Debe firmar electrónicamente: Requiere que el usuario firme electrónicamente este flujo de trabajo al aprobar.
- Mensaje de título, cuerpo y firma electrónica: Completa estos campos con la información que el Destinatario debería tener cuando reciba esta notificación de flujo de trabajo. Es posible que algunos flujos de trabajo tengan botones azules encima de los campos Título y Cuerpo. Se utilizan como marcadores de posición que Toast completará automáticamente en función de la información específica del empleado. Por ejemplo, si iniciaste el Cuerpo con “Hola” y seleccionaste el botón azul “Candidato”, la notificación del flujo de trabajo colocaría el nombre del candidato en lugar del texto del botón.
- Puedes seleccionar Obtener vista previa para ver cómo verá el destinatario la notificación. De lo contrario, selecciona Guardar para crear un flujo de trabajo activo.