Manage Scheduling in Toast Web (for Employers)
Last updated: Oct 1, 2026, 12:12 PM
Build and publish schedules in Toast Web, manage time off and availability, and compare labor costs to your labor target with Scheduling Pro forecasting.
- Review Scheduling Settings
- Navigate the Full Schedule Tab
- Open Shifts vs. Scheduled Shifts
- Create Shifts
- Manage an Unpublished Schedule
- Publish Shifts
- Scheduling and Toast IQ
- Related Articles
Review Scheduling Settings
Before you begin using Scheduling, we recommend reviewing the product's settings. Scheduling settings are available to Admins only. Navigate to Team > Scheduling and in the very upper-right corner of the Scheduling page, select the gear icon.
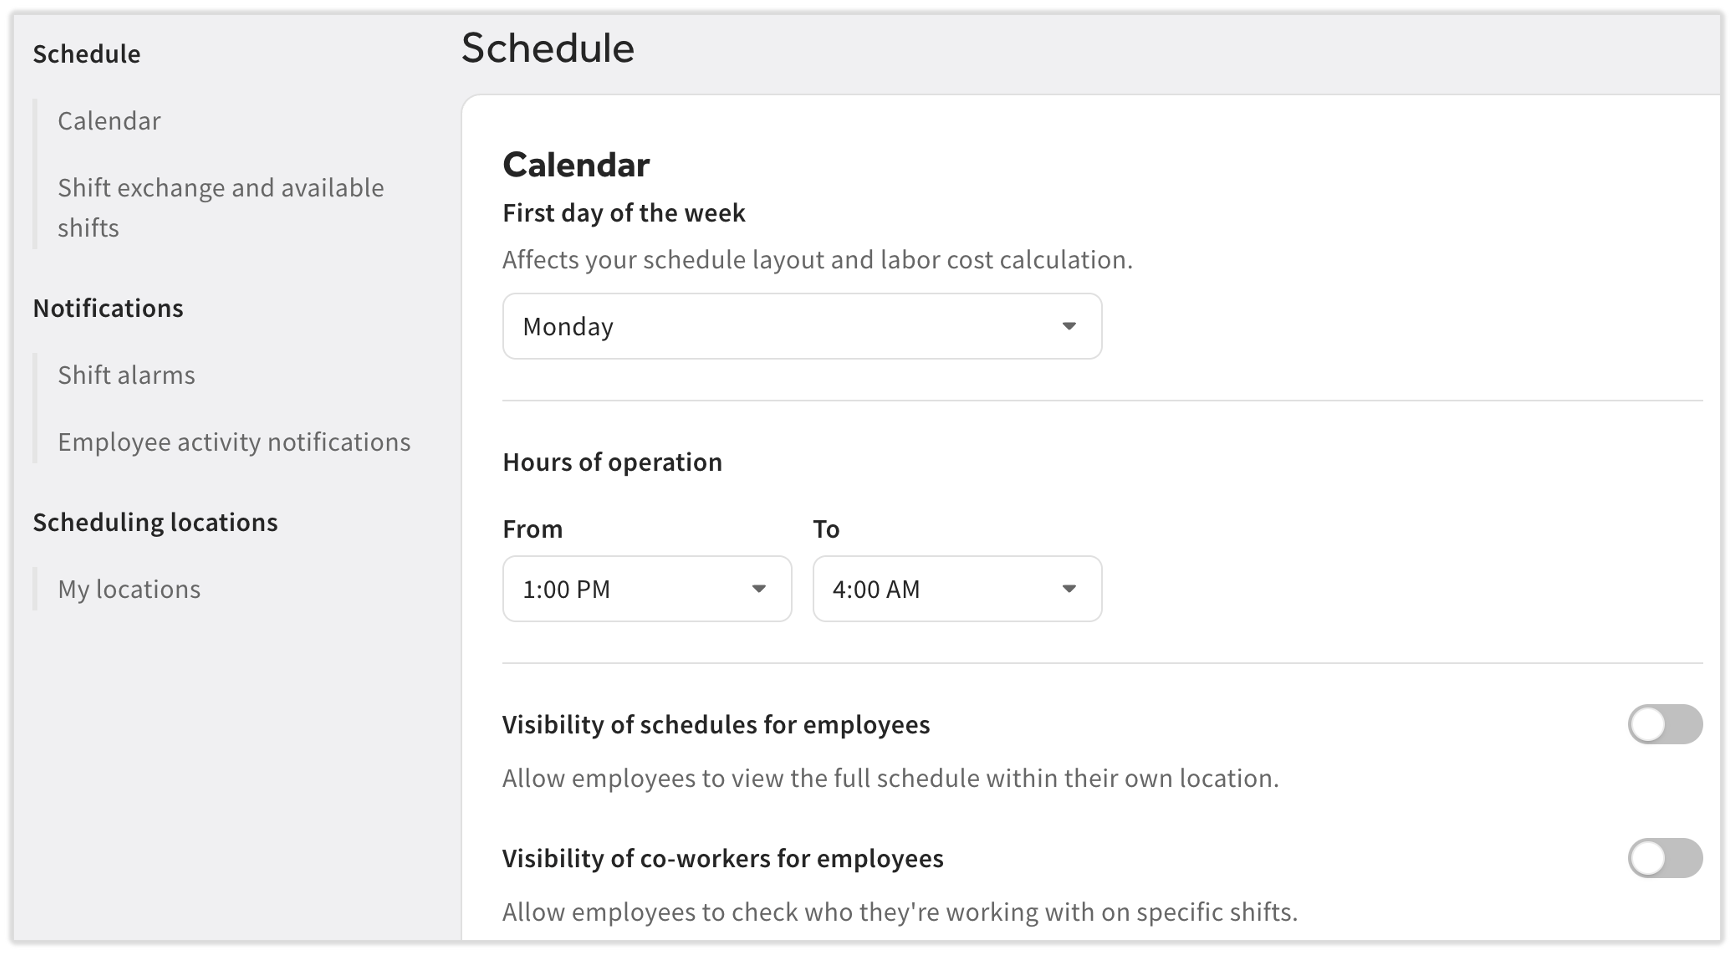
- First day of the week
- This should mirror the same settings you use in Toast Web and Toast Payroll (if applicable). If the settings are different, overtime reporting can be impacted.
- Hours of operation
- Setting hours here will pre-fill start times and end times in shifts you create; however, you can still create shifts outside of the hours you set here.
- Shift visibility for employees
- Visibility of schedules for employees: Enable this if you want every employee to see the entire location's schedule (the schedule for every employee), even on days an employee is not scheduled to work. This setting enables the Full schedule tab in the MyToast app for employees.
- Visibility of co-workers for employees: Enable this if you want each employee to see the co-workers on their own shifts only. This setting is unnecessary if you already enabled the first setting.
- Shift exchange and available shifts
- Allow employees to offer their shifts: When enabled, this allows employees to swap shifts (also known as trading two shifts). See the steps that two employees would take to swap shifts in Manage Scheduling in the MyToast App (for Employees).
- Automatically approve: When enabled, employees can pick up open and reopened shifts, make shift offers, and make shift swaps without any approval interaction from Managers or Admins.
- Personal shift alarms
- These are location-wide settings, so they will apply to all employees scheduled at this location.
- Employee activity notifications
- Enable this setting if Admins should receive notifications for the employee actions listed here
- Scheduling locations
- Select the three dots icon to upgrade a location to Scheduling Pro. Do this for all locations you'd like to use the Scheduling Pro features at.
Navigate the Full Schedule Tab
Date Range Selector and Week/Day Toggle
Navigate to Team > Scheduling. Use the date selector to choose the date range you want to view or build. You will always need to make two clicks here: one for the start date and one for the end date. You can choose a single day by selecting it twice. If you select a time period for longer than seven days, some functions are no longer available.

Set the Week/Day toggle if you'd like to view the schedule differently. Schedules by Day will see each hour of the selected day whereas schedules by Week will see each day of the selected week. Select Today to return to the current week or day.
Section By and Sort By
The Section by drop-down menu lets you view your schedule in a couple different ways with the goal of ensuring you have job and location coverage when and where you need it. For instance, if you select Section by job, the schedule will break down into individual job rows to help you ensure you've scheduled a dishwasher or a floor manager for every shift that you need one. If you select Section by location, you'll see each location's schedule grouped together rather than viewing all locations at once. Select Clear to return to the default view. Note: These views are not compatible with filters.
The Sort by drop-down menu is defaulted to the Employee view where all employees are listed in individual rows and all shifts are "combined" together. If you like, switch this to Start time in order to see the flow of shifts per day. This can help you visualize when your employees come into and leave work with the goal of ensuring you have enough coverage for each part of your day. These views are compatible with filters.

Filters
If your date selector is set to seven or fewer days, you can select Filters on the right side of the page. There are four filters here: Locations, Employees, Jobs, and Types (of shifts). When you open Scheduling, the Locations filter is already set to the Toast Web location you're logged into. To view or build the schedule for another location you have access to, update the Locations filter and select Apply Filters. Filters will stack, so you can have two or more filters working at the same time. There's also an additional filter as a checkbox: Hide empty rows. Hide empty rows will make the schedule easier to view if many employees do not have shifts assigned to them.
To remove specific employees from view:
- Navigate to Team > Scheduling.
- Select Filters on the right side of the page.
- Select the Employees drop-down.
- Select the Select all employees checkbox.
- Deselect each employee you want to hide from the view.
- Select Apply Filters.
Expected outcome: The schedule displays only the employees you left selected.
Note: Employees you filter out are not affected by changes you publish while the filter is applied. Select Clear all under the date range selector before publishing if you want your changes to reach everyone. Filtering does not remove anyone from a schedule. To remove a former employee, see Sling by Toast: Manage Employee Profiles and Terminate or Archive an Employee in Toast Web or Payroll.
To remove the filters you've set, look under the date range selector. Select the X for a single filter or select Clear all to remove all filters at once.
Open Shifts and Scheduled Shifts
Once you begin to build your schedule, there will be two sections at the top of the Full schedule view: Open Shifts (purple row) and Scheduled Shifts (white row). Note: If you used Sling prior to using Toast, you may also see a row for Unassigned shifts. See the Optimize Staffing With Unassigned Shifts section of Sling by Toast: Create a Schedule to learn more.
- Open shifts are shifts that are created without a specific employee assigned. They are available for anyone with the assigned job to pick up. If an open shift does not get picked up, it will remain on the schedule, but will not be covered by an employee. With Scheduling Basic, only one open shift is allowed for each scheduled shift you've created.
- Scheduled shifts are shifts you've created and assigned to a specific employee. They can be unpublished or published, but once published, these are part of the employee's schedule and will be visible in the MyToast app.
Create Shifts
Note: If you create a shift, but don’t assign anyone to it, and then publish that shift, employees will see it on the Open shifts page in the Shifts tab of the MyToast app and can begin to pick up shifts.
- Navigate to Team > Scheduling.
- In the upper-right corner of the Scheduling page, select Create > Create shift or select a tile directly from the Full schedule view.
- You must be assigned the Admin or Manager system role to create shifts. See the Scheduling System Roles section of Get Started With Scheduling in Toast Web if you do not see the Create button.
- A sidebar opens where you enter shift details. Only fields with a red asterisk are required.
- While you're building this shift, a shift preview image is displayed at the bottom to show you how the shift appears on your Full schedule view. Learn more below.
- While you're building this shift, a shift preview image is displayed at the bottom to show you how the shift appears on your Full schedule view. Learn more below.
- Select the Date.
- Select the Start time and End time.
- You can create an open-ended shift (one without a specific End time) by selecting the Open ended checkbox in End time. This is commonly used for front-of-house (FOH) staff or other roles that are "cut" based on a restaurant's volume. If you like, you can select a specific End time along with the Open ended checkbox to assist with labor cost tracking. When this checkbox is selected, any End time you set will not be visible to the employee.
- The times you see here will always be in the time zone of the company's location, even if you are in a different time zone when you create the shift.
- If you have more than one location in Scheduling, you can select any Location you have access to. Otherwise this option will be grayed out.
- Select a Job.
- If you decide to select an option for Repeat, other settings will appear here.
- You can select This week and choose each day of the week you'd like to schedule this shift during the week.
- You can also select Every week or Every X weeks and choose the days of the week you'd like to schedule for. Then select the End repeat on date (up to one year in the future). Repeating shifts are scheduled through and including this date.
- Repeating shifts will appear with a ↻ icon.
- If a repeating shift overlaps with an existing shift, you'll receive a warning before you publish.
- Select one or more Employee(s) to schedule specific people. Otherwise, create an open shift (one that any employee with that job can pick up) by leaving the employee field blank and customizing the Number of open shifts setting. To save this work, either one or more employees must be selected or the open shifts setting must be greater than zero.
- Create multiple shifts at once by selecting more than one employee OR by selecting one employee and also increasing the Number of open shifts to a number other than zero. With Scheduling Basic, open shifts are limited to one per published shift.
- If an employee you'd like to select is grayed out, they are not assigned to the Job you set just above or they may have just been assigned to this job. If they were just assigned, the system may take up to 15 minutes to reflect this change (due to syncing with Sling).
- If an employee was recently added to Toast Web or Toast Payroll, it can take up to 15 minutes before that person is visible in Scheduling. Wait 15 minutes and refresh the page if you cannot find a new employee.
- If you add a Shift note, this is visible to anyone that can view the shift. Consider the two visibility settings if you add a note.
- At the bottom of the sidebar, choose your publish option.
- Yes, publish now to allow employees to view the shift on their schedule. This is the same as publishing the shift from the Full schedule view.
- If you select Yes, publish now for an open shift, employees will be able to pick it up right away.
- Otherwise, select No, publish later to keep it from any employee's visibility.
- Select Save.
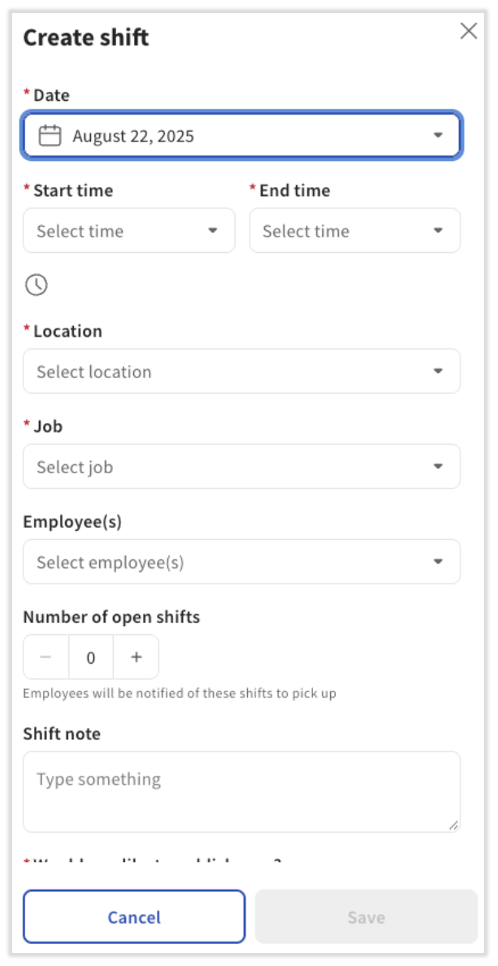
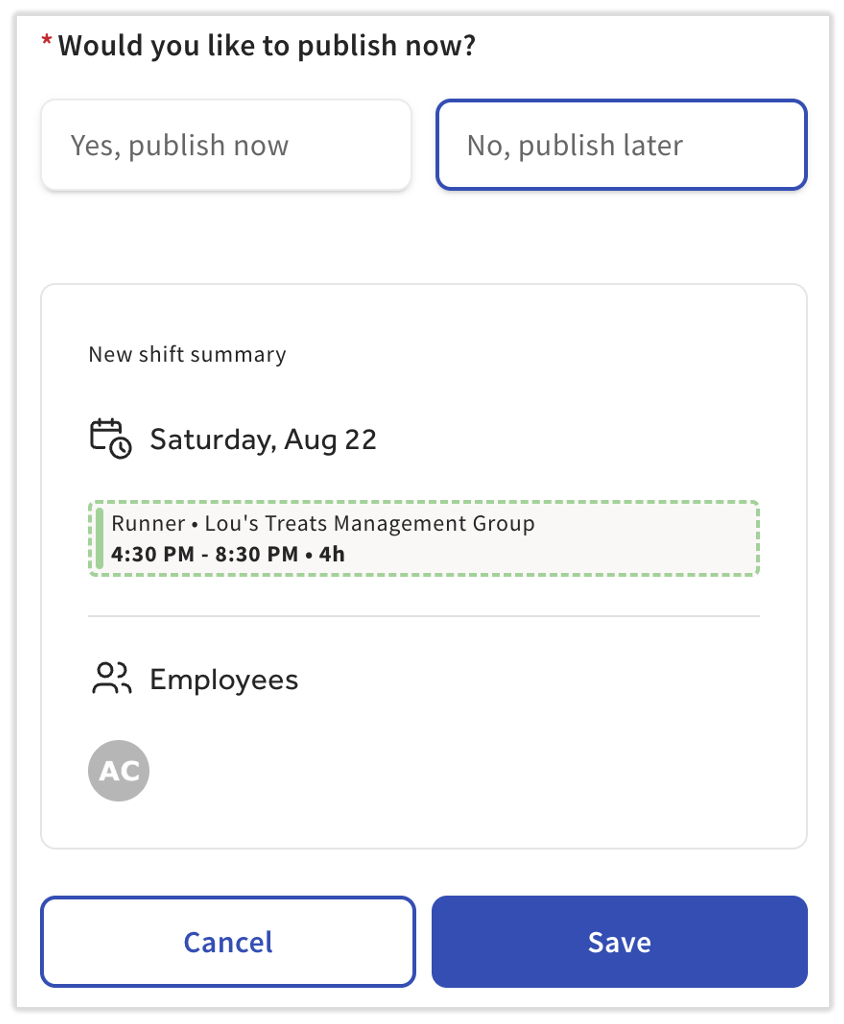
Expected outcome: If published, the shift appears on the Full schedule view and in the MyToast app. Unpublished shifts have a dotted-line border and can be edited or dragged and dropped to a different day or employee.
Shift Preview Image
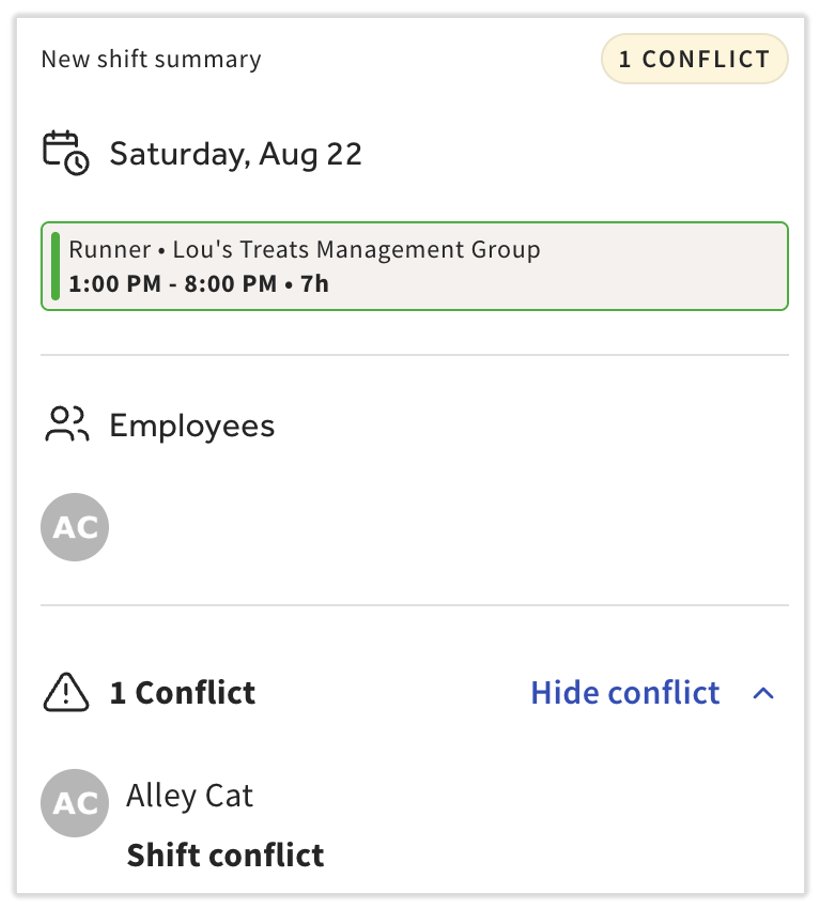
As you build a shift by making selections in the sidebar, you'll see an image at the bottom that shows you how the shift will appear on the calendar. Note: This preview image only appears after a Start time, End time, and Job are entered. If you are creating an open-ended shift (one without an End time), the preview image will not appear.
- A solid border indicates you've published this shift to the schedule (you've selected Yes, publish now). The example below contains a published shift.
- A dotted border assumes you’ll publish this shift later (you've selected No, publish later).
- The number of circles under Employees indicates the number of employees (or possible employees for open shifts) you've selected above.
- The circles will contain initials if you’ve assigned an employee(s) or will be blank if you're creating open shifts.
- Overlapping shifts for a single employee and/or time off conflicts appear in a shift preview image and will appear again during shift publication.
Copy Shifts From One Day/Week to Another
This feature is commonly used for schedules that may not differ much from day to day or week to week. If a previous day or week contains all or a majority of the same shifts you want to include in an upcoming day or week's schedule, consider copying the shifts from that previous time period to save time creating your schedule. Note: If an employee clocks into a shift they were not originally scheduled for, that shift appears on the schedule retroactively, but it will not copy over with this tool.
- Navigate to Team > Scheduling.
- From the Full schedule view, first select a single day or a seven-day period from the date range selector. This is the day or week you want to copy from.
- Now, select Tools. If you do not see the Tools button, check your date selection to confirm you've selected exactly one day or seven days.
- In the drop down menu, you'll see Copy shifts above the day or week you've selected. Hover on this and a new drop-down will appear with the upcoming days or weeks you can copy a schedule to. There is a limited number of selections you can copy a schedule to.
- If you do not see the Copy shifts option, check your date selection to confirm you've selected exactly one day or seven days.
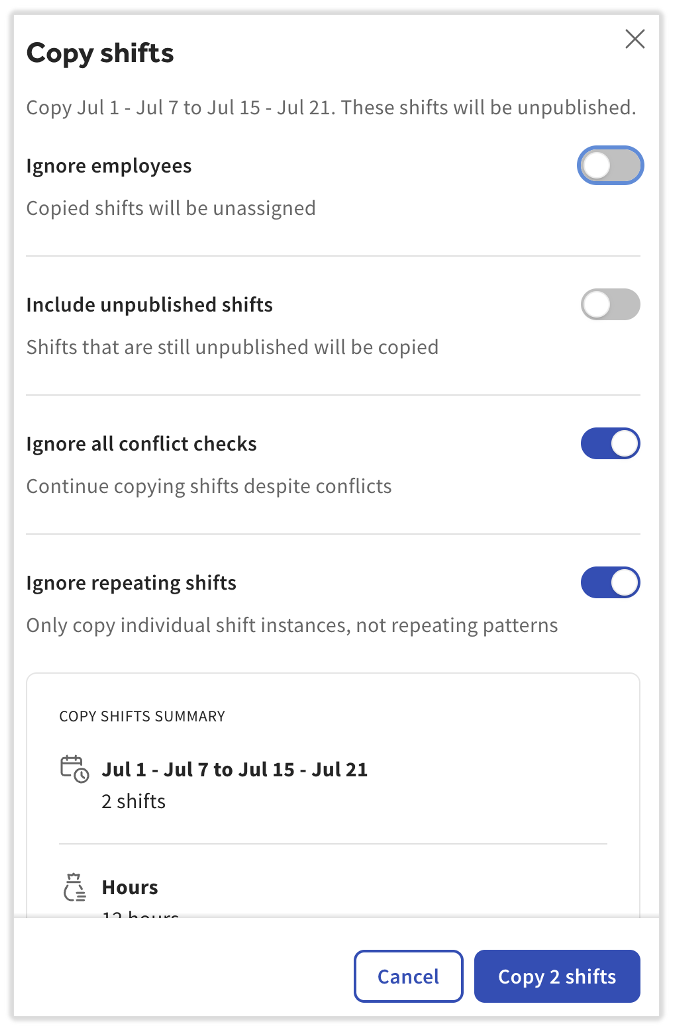
- Next, review the confirmation pop-up where you can make a couple selections.
- Ignore employees: If this is toggled on, all shifts you copy over will remove the assigned employees. This way, you can use the same template of shifts, but assign them to different employees.
- Include unpublished shifts: If there are unpublished shifts in the date(s) you chose to copy from, use the toggle to decide if these should be included in the day or week you're copying to.
- Ignore all conflict checks: Toggle this on or off to allow or remove conflict checks (such as existing shifts, time off, or availability conflicts).
- If you toggled Ignore employees on, this selection will not have any effect since all shifts will be unassigned to specific employees.
- Ignore repeating shifts: When this is toggled on, the Repeat setting will not be copied over to the day or week you're copying to. Toggle this off if you'd like to maintain the Repeat rules attached to the shifts you're copying.
- Once you're ready, read through the tile at the bottom to quickly confirm the selections you've made and select Copy X shift(s). The schedule will duplicate and you can edit and/or publish the shifts as normal.
Manage an Unpublished Schedule
Before you've published a schedule, you may have a set of shifts that you have not yet finalized or published. There are a number of actions you can take here:
- Unpublish a published shift by selecting it and then selecting No, unpublish.
- Publish an unpublished shift by selecting it and then selecting No, publish it.
- Edit a shift by selecting it. If it's a repeating shift, you'll have the option to edit just the one you selected or all the future repeating shifts.
- Drag a published or unpublished shift to a different tile. Published shifts copy, and unpublished shifts move. The copied or moved shift automatically becomes unpublished. Dragged shifts keep the location's time zone in both the Week and Day views, even if you're working from a different time zone. The copied/pasted shift will automatically become unpublished as a result of this action.
- Delete a shift. Select it and select Delete from the bottom of the sidebar. If it's a repeating shift, you'll have the option to delete just the one you selected or all the future repeating shifts.
- Approve or deny shift swaps or open shift pick ups (as long as the Automatically approve setting is disabled). These will be marked with Needs approval at the bottom of the shift on the Full schedule view.
- Use the Section by job setting to review each job per day (on the Week view) or hour (on the Day view) and make sure you have the correct coverage in place.
- Use the weather forecast to tailor your schedule to the volume you might expect based on good or bad weather.
- If you use Scheduling Pro, the revenue forecasting feature can show you how your schedule stacks up to sales and labor projections based off your own historical data.
- Publish the entire schedule.
Weather Forecast
When you're looking at a single location, Scheduling shows a weather forecast along the top of the Week view. Scheduling opens to the location you're logged into, so the forecast appears by default. If you've selected more than one location, navigate to Filters and select a single location under Locations to see the forecast again. The forecast can help with staffing and guest count estimates, and it refreshes periodically. US customers see temperatures in Fahrenheit, and customers outside the US see temperatures in Celsius.
Time Off Requests
You can either create time off on behalf of an employee or approve the time off an employee requested through the MyToast app. When managed through Scheduling, time off is always unpaid since Scheduling does not connect to any payroll systems to ensure the employee is paid for these hours. Note: The times seen in time off reflect the time zone of the location and not the person viewing or creating the time off.
To approve or deny an employee's time off request that they submitted through MyToast:
- Navigate to Team > Scheduling.
- From the Full schedule view, select Filters.
- In the Types drop-down menu, select Time off and then select Apply filters.
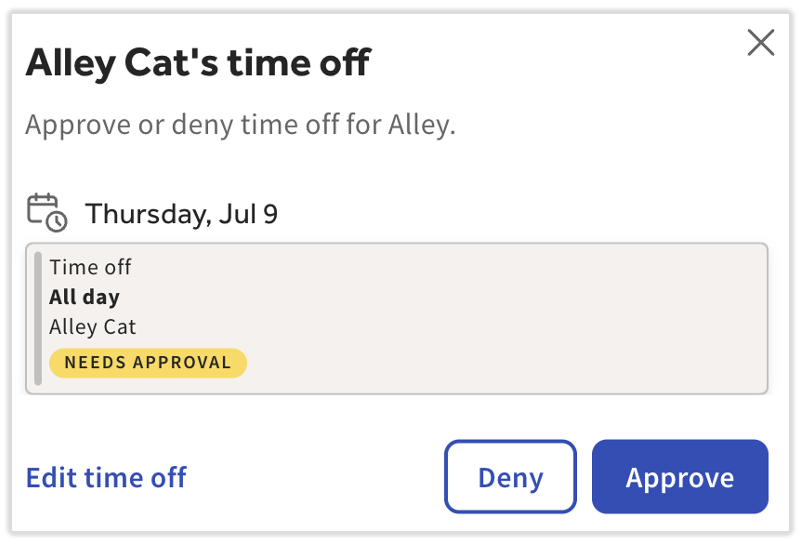
- Select a tile containing the Needs approval badge. A request that covers multiple consecutive days appears as one time off entry, so you approve or deny all of its days at once.
- If they left one, review the Note if an employee added to their request.
- Select Approve or Deny. Approving the request will add it to the Full schedule view whereas denying the request will remove it completely. The employee will be notified in either case.
- You can also select Edit time off to adjust the request before you approve it. You'll be able to change the date, time, and All day fields as applicable. You can even delete the request entirely from here.
To create time off on behalf of an employee:
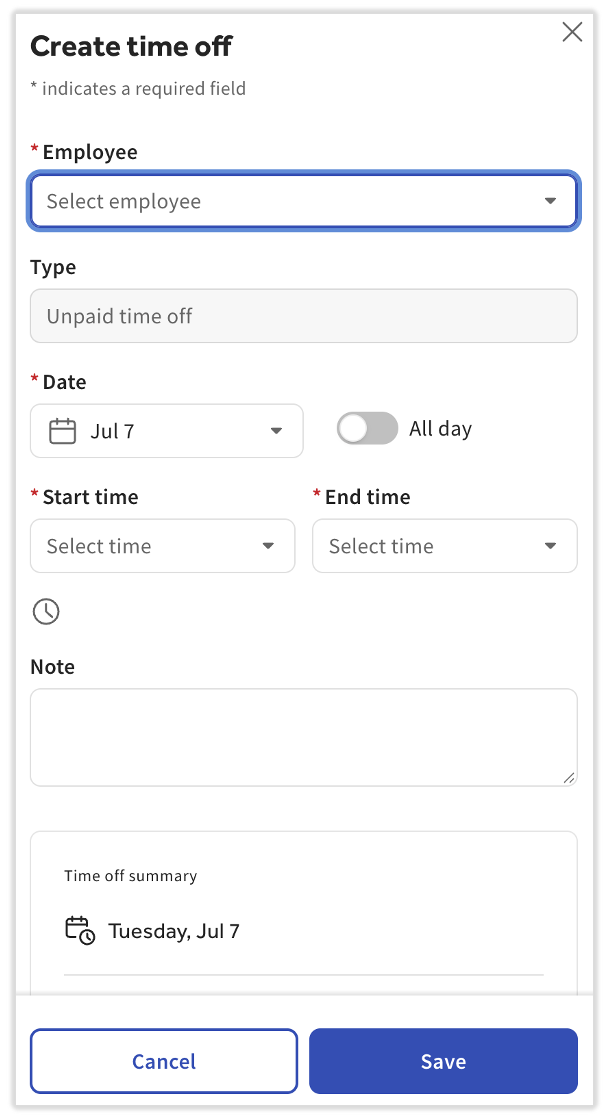
- From the Full schedule view, select Create > Create time off.
- Select the Employee first.
- For a single day of time off:
- Choose the Date, Start time, and End time that they need time off for.
- If the employee requested the whole day off, enable the All day toggle. Start and End times will disappear.
- For multiple partial days of time off:
- Choose one of the Dates, Start times, and End times that they need time off for.
- Select Save and repeat this process from step 1 for each partial day off.
- For multiple full days of time off consecutively:
- Choose the first Date that they need time off for.
- Enable the All day toggle.
- You'll see that the Date field changed to the Start date field. You can now set an End date field to account for all the consecutive days this employee needs time off for.
- You'll see an image being built out at the bottom of the sidebar. This image is very similar to the shift preview image you see when creating a shift. Use it to confirm how the time off request will appear on your schedule.
- Select Save. The request will be approved automatically, regardless of Scheduling settings.
Revenue Forecasting (Pro Only)
Sales and labor insights help managers make smarter scheduling decisions by showing projected sales, labor costs and hours, and labor cost targets directly within the schedule. Forecasting reflects real-time updates to the schedule.
To view revenue forecasting:
- Navigate to Team > Scheduling.
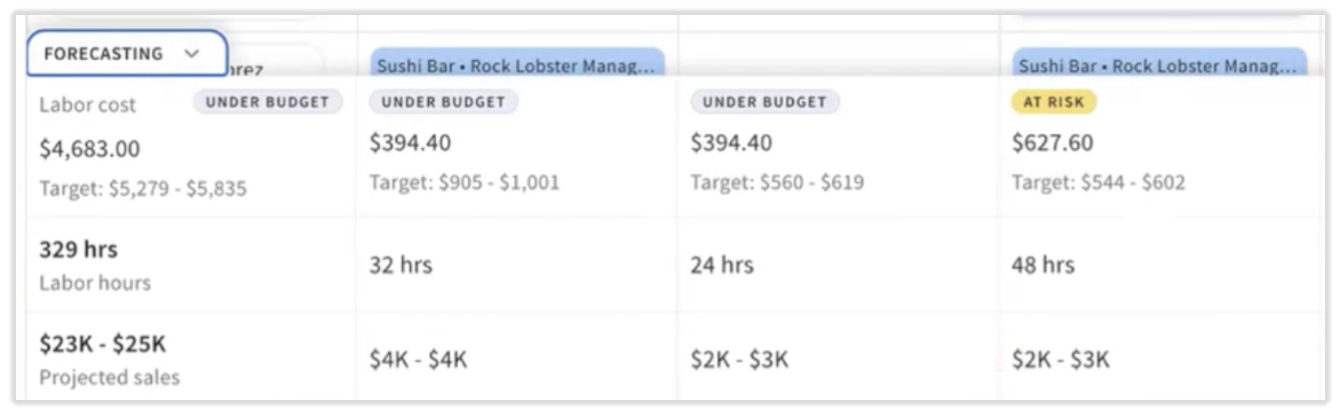
- In the lower-left corner of the Full schedule view, you'll see a Forecasting tab. Select it to expand the revenue forecasting pop-up menu.
- There are three rows for Admins and Managers to use to help adjust the schedule:
- Labor cost (see more below):
- This includes a status indicator badge for each day and the overall week (on the far left side). There are four different badges:
- On Target (green): You're within the labor range.
- At Risk (yellow): You're within 5% of the upper bound of the range.
- Over Budget (red): You're more than 5% over the upper bound of the range.
- Under Budget (gray): You're more than 5% below the lower bound of the range.
- Your current labor costs based on wage/job data in Toast Web and the schedule.
- Your target labor range. This is a calculation based on the projected sales and your restaurant's labor target. See Notes about the target labor calculation below.
- This includes a status indicator badge for each day and the overall week (on the far left side). There are four different badges:
- Labor hours: This is based on the schedule you’ve built in Toast Web.
- Projected sales: This is based on historical sales data. Select Projected sales to open the Sales projection page in Toast Web, where you can review your projections. To learn more, see Toast Benchmarking: Advanced Sales Projections.
- Labor cost (see more below):
- Each of these rows are dynamic and will update to reflect any changes you make to the schedule (Labor cost and Labor hours) or filters you add to the calendar view (all three rows). If shifts are hidden by filters (job, employee, shift type), their hours and costs are excluded from calculations.
Notes about Labor cost:
- Labor cost calculations:
- Include hourly wages only (not salaried employees)
- Do not include PTO and unpaid breaks
- Shifts included in Labor cost math:
- Assigned published shifts (uses employee’s wage in Toast Web)
- Assigned unpublished shifts (uses employee’s wage in Toast Web)
- Unassigned published shifts (if a base job wage exists)
- Unassigned unpublished shifts (if a base job wage exists)
- Open published shifts (if a base job wage exists)
- Open unpublished shifts (if a base job wage exists)
- Open and assigned shifts with a pending offer or swap (uses the currently-assigned employee's wage)
Notes about the target labor calculation:
- Your labor target is based on Toast Benchmarking data for restaurants similar to yours, grouped by concept type, location, and size.
- If benchmarking data isn't available for your restaurant, Scheduling uses a 23% labor target.
- Labor target range: Projected sales × your labor target %
- For example, if projected sales are $1,000–$1,500 and your labor target is 23%, then your labor target range will be $230–$345 because:
- Lower bound calculation: 1000 × 0.23 = 230
- Upper bound calculation: 1500 × 0.23 = 345
- For example, if projected sales are $1,000–$1,500 and your labor target is 23%, then your labor target range will be $230–$345 because:
Notes about Projected sales:
- Projected sales are based on your restaurant’s historical sales data. The more data available, the more accurate your projections will be.
- 120+ days of data: Toast uses advanced forecasting models to generate the most accurate projections based on your sales patterns.
- 90–119 days of data: Projections are based on a weighted average of similar days (for example, comparing recent Mondays to past Mondays).
- 30–89 days of data: Projections are based on a simple average of recent similar days (such as the last few Mondays).
- Less than 30 days of data: Projections will not be available.
- Holidays, milestone weeks, or specific events are not captured in projected sales because it’s an average over a range of days.
If you use Scheduling Pro and you do not see the forecasting feature, check these three requirements:
- This feature is only seen on the Week view of Scheduling, so make sure the toggle is set correctly.
- This feature is only seen when you're viewing a single location. If you have multiple locations, navigate to Filters and select a single location under Locations.
- This feature is only available to Admins and Managers who also have permission 4.10 - Employee Jobs & Wages.
Team Availability Tab (Pro Only)
This tab uses contains much of the same functionality as the Full schedule view; you can use the date selector, the Section by and Sort by drop-down menus, and the Filters option to view this information in different ways.
We recommend viewing this tab with the Sort by drop-down menu set to Employee. That way, each row will show who has requested to be left off the schedule for individual days. Keep in mind, availability and time off are different functions.
- Availability is typically used to announce the days that an employee would like to be unscheduled for every week of work.
- Time off is typically used for days that normally fall into an employee's available days, but they would like to be unscheduled for only that specific day.
Both availability and time off can be overriden by anyone who is creating a schedule, but it might be best to confirm with an employee before overriding either their availability or time off since employees can assume that both may indicate they will not be scheduled on a certain day.
Publish Shifts
Publishing a shift makes it visible to the employee and any other staff (subject to your visibility settings). Unpublished shifts are only visible to admins and managers, which can be useful while you are still building the schedule.
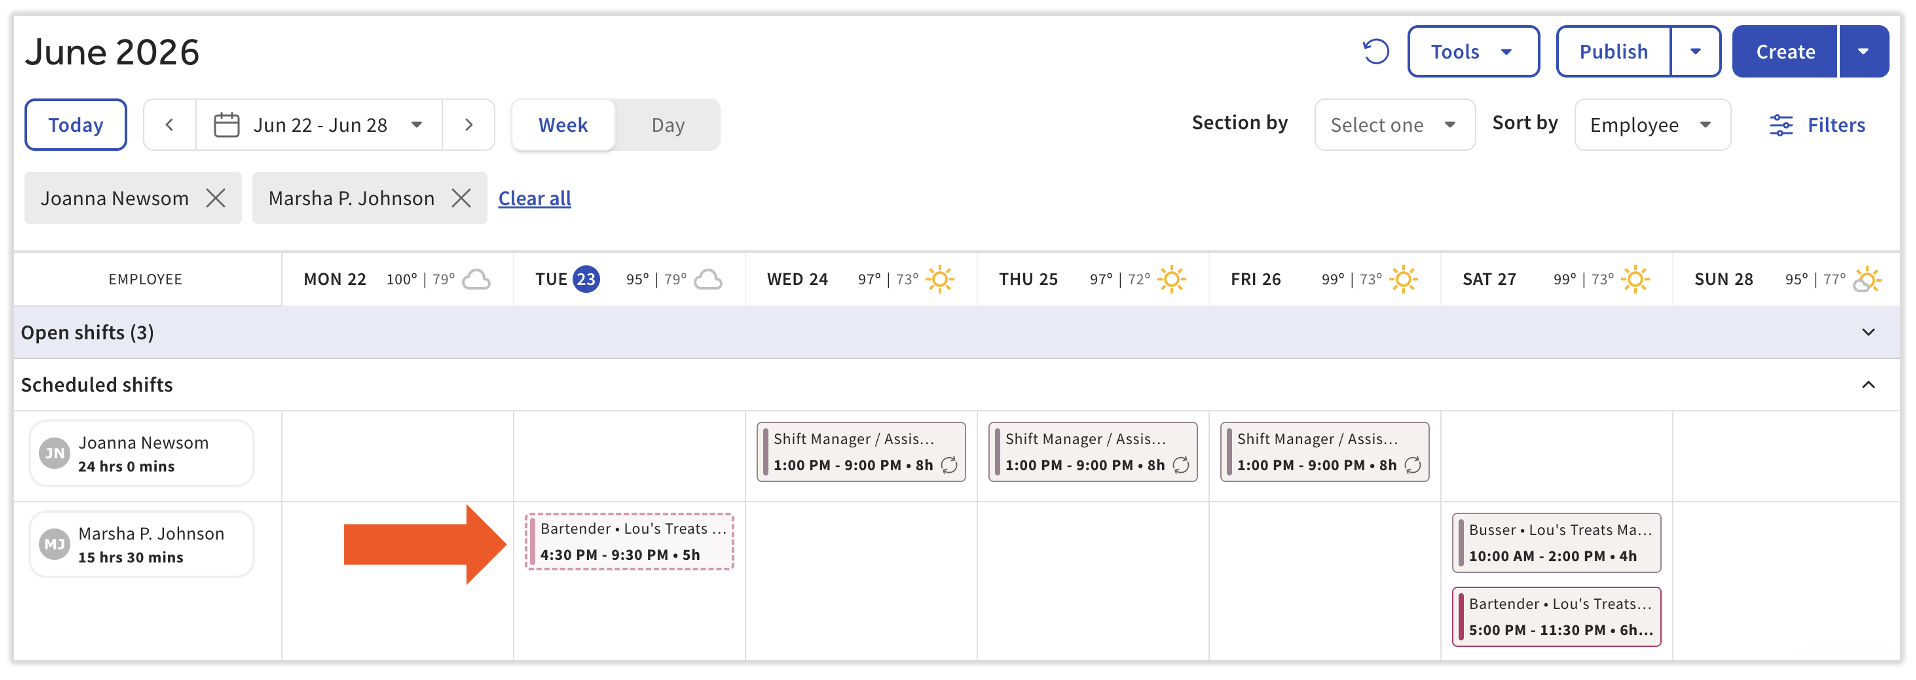
To publish every unpublished shift, simply select Publish in the upper-right corner of the page. In the image below, all shifts are published besides the one highlighted by the arrow.
Expected outcome: Every shift in your current view with a dotted-line border is published and the dotted borders disappear.
Note: Publishing applies to your current view. If a filter is applied, employees you filtered out do not receive the published changes. Select Clear all under the date range selector before publishing if you want your changes to reach everyone.
To publish a specific set of shifts:
- Select the down arrow on the Publish button.
- Select Publish selected.
- Select the checkbox on each shift you want to publish.
- Select Publish.
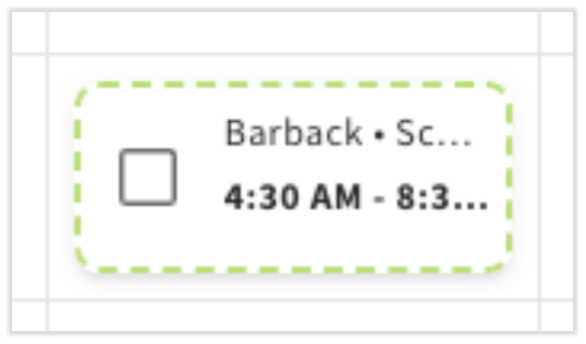
Expected outcome: Only the selected shifts are published. The remaining unpublished shifts stay on the Full schedule view with their dotted-line border and without visibility to employees.
Scheduling and Toast IQ
Although there are no Scheduling functions in the Toast Now (operator's) app, you can use Toast IQ to assist you with Scheduling. Among other things, Toast IQ can help you create, edit, and view schedules. Try asking it things like:
- Who is working on Friday?
- Who has time off for next week?
- Help me create a schedule.
- Assign an open shift to X employee.
- Does next week's schedule align with my sales/labor forecast?
With the Admin system role, Toast IQ can see all your schedule data from Scheduling, including employee names, job roles, work locations, scheduled shifts, time off, and availability, so try being creative with what it can assist you with. This data is not shared with third parties and is stored securely along with the rest of your company's data. The only ways Toast uses this data is to show schedule information and help Admins and Managers make scheduling edits.
If Toast IQ is not showing expected schedule data, check your system role in Toast Web by navigating to Team > Employees, selecting the edit pencil for your profile, and then selecting Scheduling permissions. Check the System role field for either Admin or Manager. If you have the Manager system role, keep in mind that you'll only be able to interact with data in location that you're a part of.
Note: System roles can otherwise be edited in Sling Scheduling. Learn more about system roles here.