Toast Flex 14 Installation Guide
Last updated: Jul 7, 2026, 3:12 PM
Interested in purchasing additional hardware for your restaurant? Navigate to Toast Shop now! For customers located in Canada, Ireland, and the U.K., contact your Toast Sales representative or call Customer Care if you wish to add hardware.
- Toast Flex 14 Installation Overview
- Before Getting Started
- Toast Flex 14 Setup
- Toast Flex 14 + Toast Printer Setup
- Card Reader Setup
- Toast Flex 14 for Kitchen Setup
- Additional Resources
Toast Flex 14 Installation Overview
Toast hardware was developed to withstand the most demanding restaurant conditions - spills, grease, and heat - so your restaurant is always running at full speed. With a restaurant-grade structure, best-in-class processing speeds, intuitive layout, and sleek design, Toast hardware makes it easier for you to run your restaurant, delight guests, and generate revenue.
Use this guide to install your new Toast Flex 14. We designed the setup to be completed within 30 minutes with intuitive, simple packaging, color-coded wiring, and easy-to-follow instructions.
To download a printable version of this installation guide, select the button below.
Before Getting Started
- Clean your counter, and make sure your counter space is cleared and wiped down.
- Unplug your current POS hardware and remove it from the counter so your counter space is completely clear.
- Wipe down the countertop with the alcohol wipe provided in your box.
Starting with a fresh surface makes it easier to install!
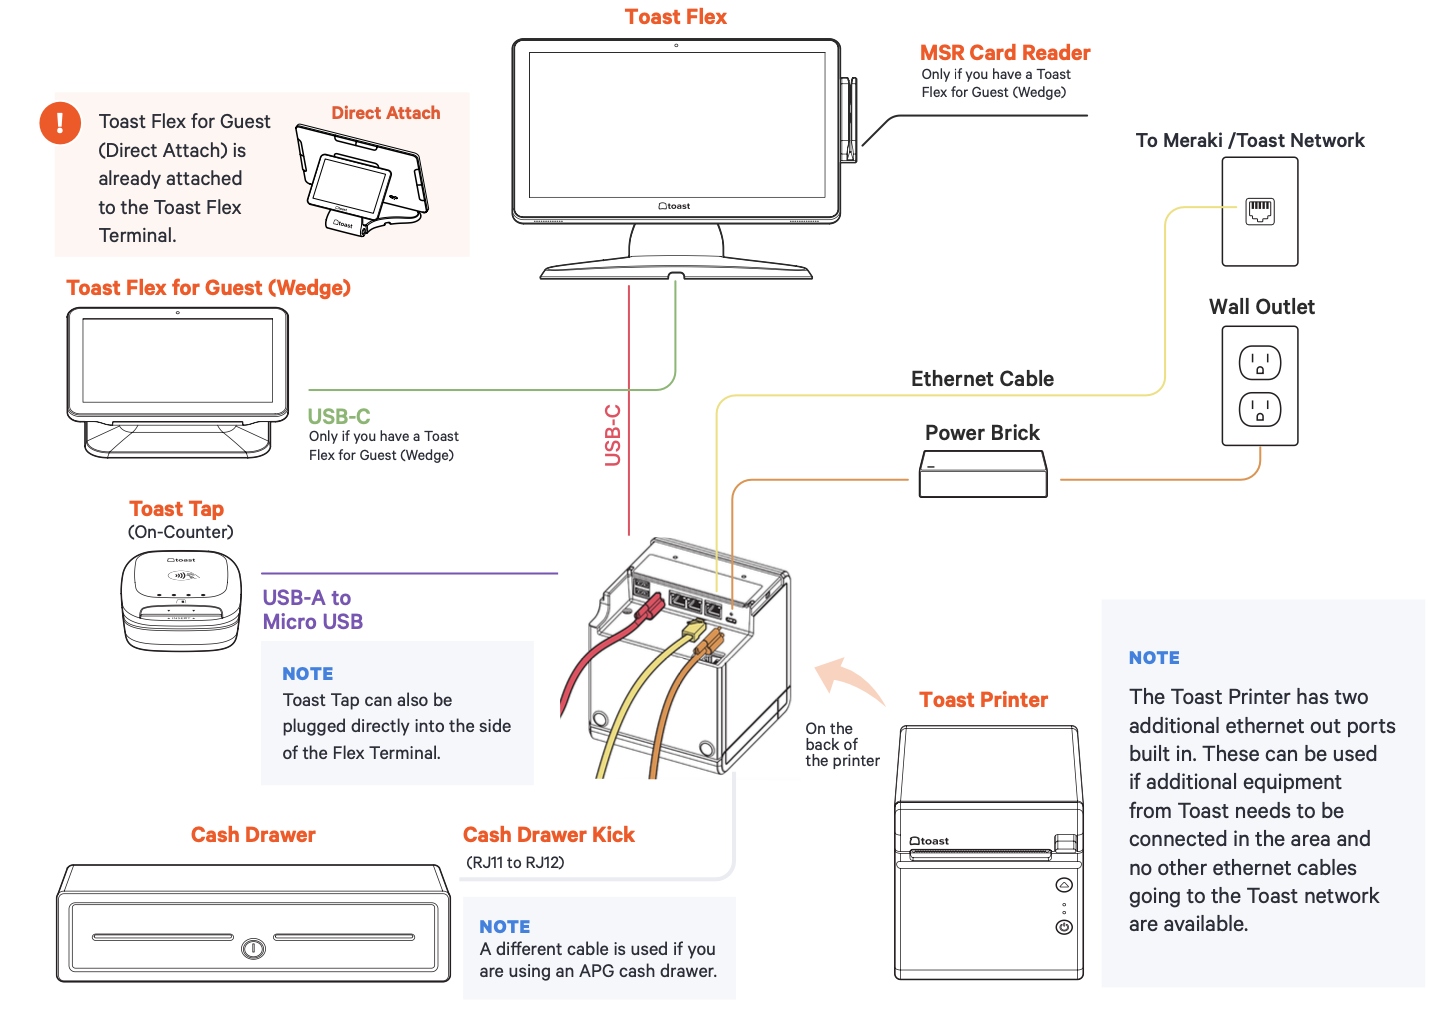
Cabling and Site Readiness
Use the cabling diagram as a guide for how your system will be wired when it’s all set up. If you need additional assistance with site readiness before your Toast hardware installation, you can read Networking & Devices Site Readiness Guide.
Toast Network Setup
Your Toast network (the network managed by Toast) must be set up and established prior to connecting any of your hardwired or wireless devices. This network is created by connecting your Toast-provided Cisco Meraki router or Toast router to your ISP (internet service provider) modem. Your router must be connected directly to your modem, not through an intermediate device. This ensures that the Toast POS is isolated on its own secured subnet and meets PCI compliance standards. Learn more in this Support Center article: PCI Compliance Overview.
For more information on network setup and installation, visit Set Up Your Toast Network.
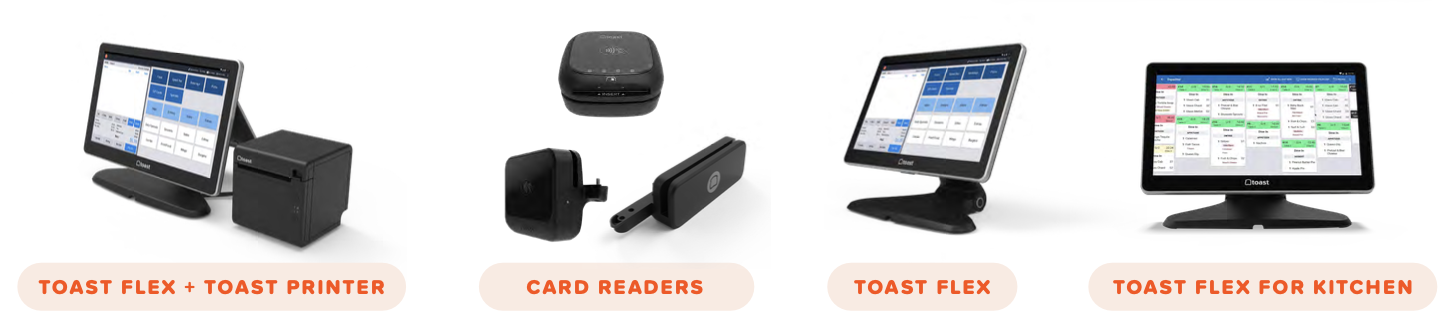
Hardware Bundles
The Toast hardware suite can be combined with other approved Toast devices, such as an Epson printer. Depending on your restaurant setup, you may have ordered specific pieces of the Toast hardware suite to upgrade or outfit your business.
You’ll follow the installation instructions for the hardware bundle you purchased.
Toast Flex 14 Setup
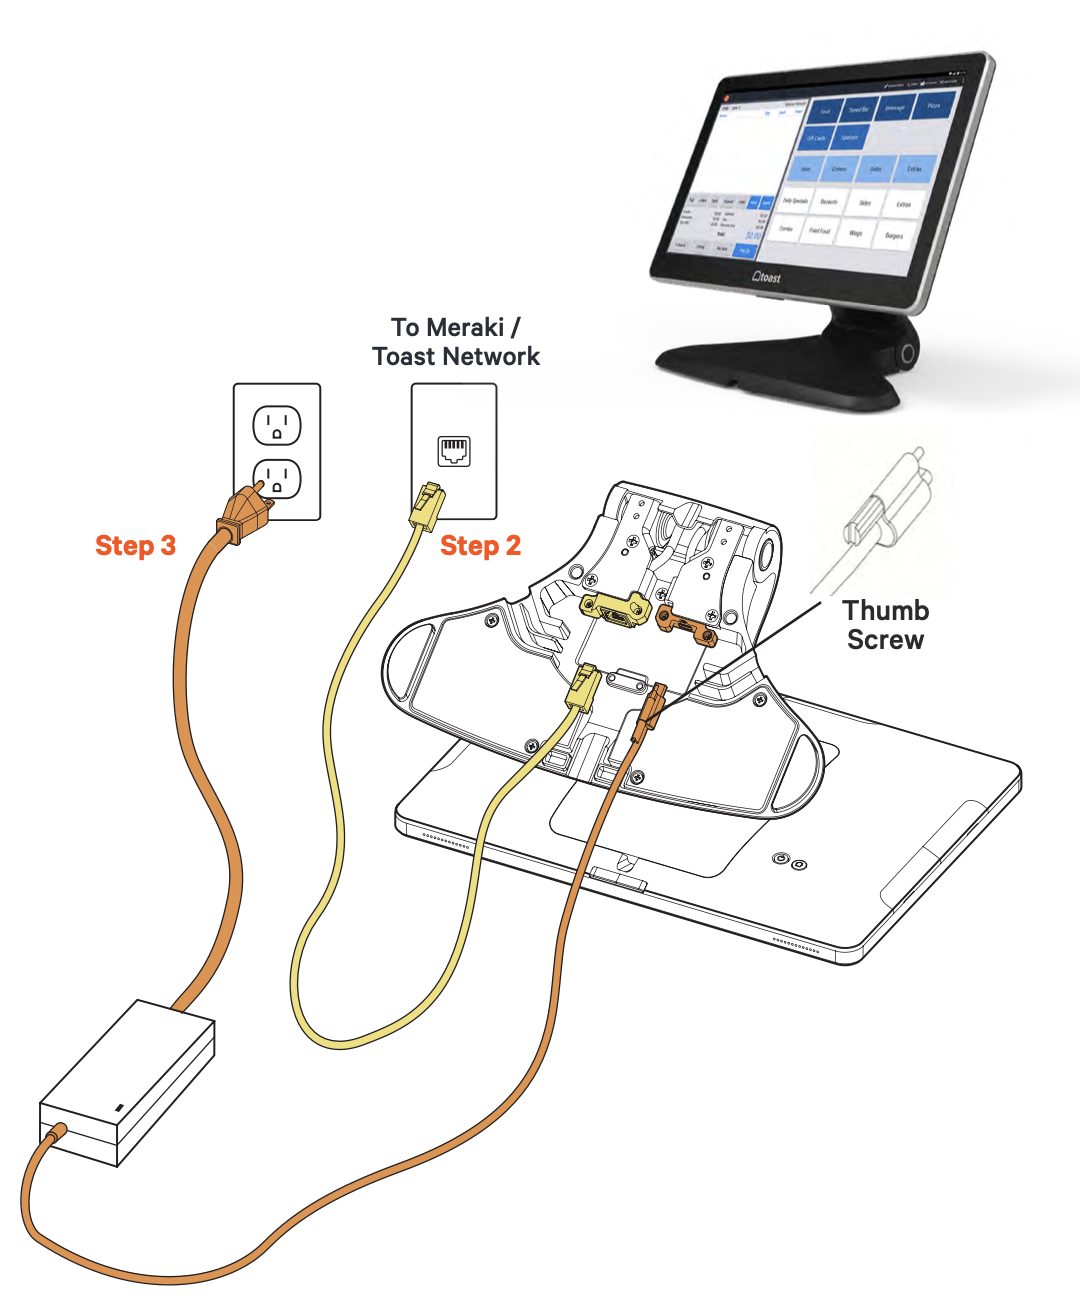
- Unpack the Toast Flex terminal and place the terminal on your counter.
- Remove the box labeled “Connect.” This box contains two yellow Ethernet cables: one 3 ft. cord and one 7 ft. cord. Choose the cord length that best suits your restaurant and connect it from the Toast Network to the yellow port labeled “Internet IN” on the base of the Toast Flex terminal stand.
- Remove the power box labeled “Power.” Plug in the power cord from the wall into the orange port located at the base of the Toast Flex terminal stand. Use the thumb screw to secure it. Ensure the thumbscrew is tight to avoid connectivity issues.
- Set up payment using one of the options below:
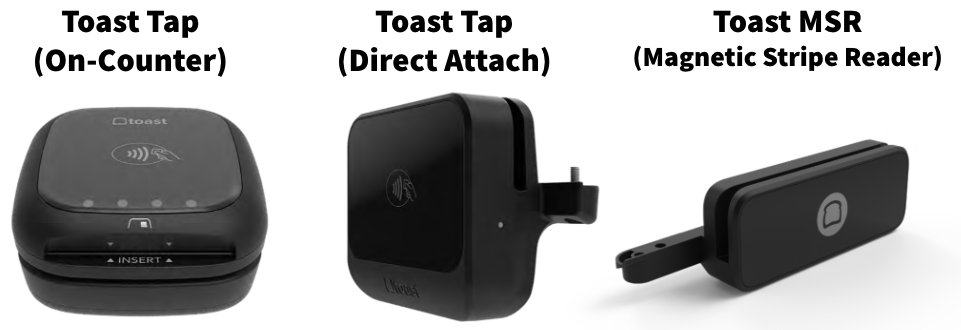
- If you're attaching your Toast Tap™ to your Toast Flex only, plug the USB-A end of your cable directly into the side of the Toast Flex.
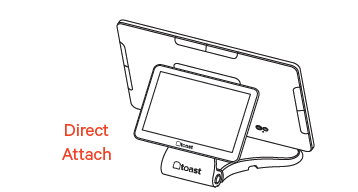
- If you have Toast Tap™ (Direct Attach to Toast Flex), this will already be adhered to your Toast Flex terminal. For more information on card reader setup, review the Toast Tap™ (On-Counter) Installation Guide
- Power on the Toast Flex (power button is on the back side of the terminal screen) and follow the Toast setup instructions that appear on the screen.
- Log into your restaurant in the Toast App and complete basic setup. You may need to update the Toast app when you open it for the first time. To learn more, check out this Support Center article: Update Your Toast App

Toast Flex 14 + Toast Printer Setup
Check out our video guide on installing your Toast Flex 14 with Toast Printer or read the steps below.
- Unpack your hardware:
- Unpack the Toast Printer first. It'll contain a USB-C to USB-C cable with a red end and an orange end. It'll also contain a wall mounting bracket, paper, and a Toast TP200 Printer Quick Start Guide.
- Unpack the Toast Flex terminal box next.
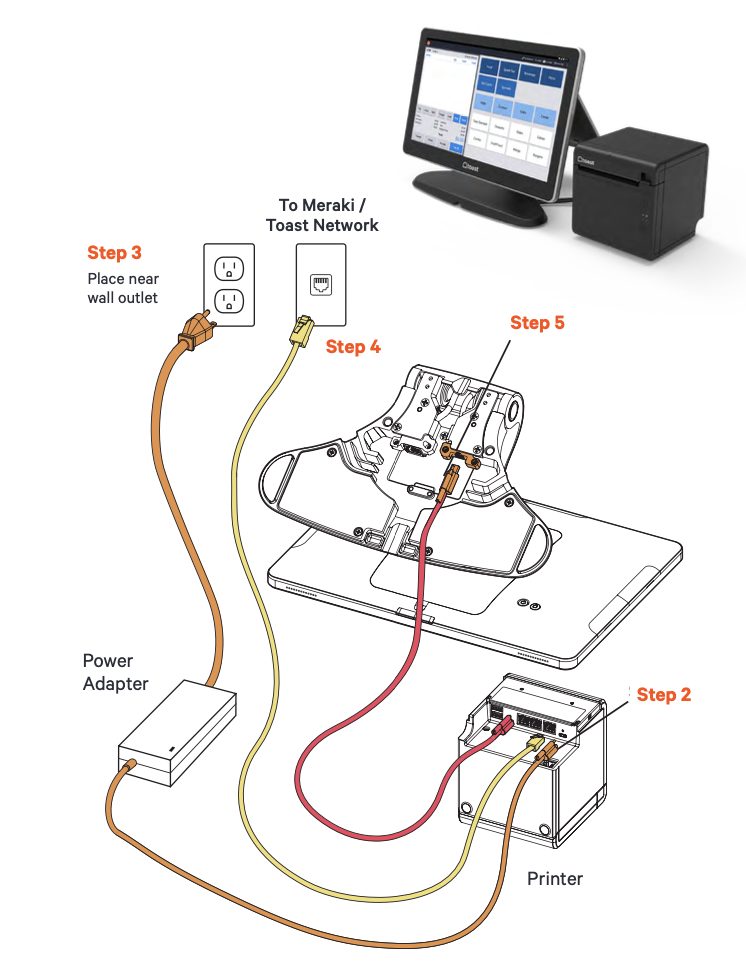
- Next, remove the box labeled Power. This box contains the power adapter. Plug the power adapter into the orange port labeled Power In on the Toast Printer. Use the thumb screw to secure it.
- Then, place the other end of the power adapter near the wall outlet, but don’t plug it into the outlet yet. Placing it near the outlet now will help you know where you want to coil or hide your cables at the end of the installation.
- Next, remove the box labeled Connect. This box contains two yellow Ethernet cables. One is 3 ft and one is 7 ft. Choose the cord length that best suits your restaurant and connect it from the Toast network to the yellow port labeled Internet IN on the Toast Printer
- Take the red end of the USB-C cable and plug it into the red To Stand port on the Toast Printer. Take the other end and connect it to the orange port on the base of the Toast Flex. Use the thumb screw to secure it. Ensure the thumbscrew is tight to avoid connectivity issues.
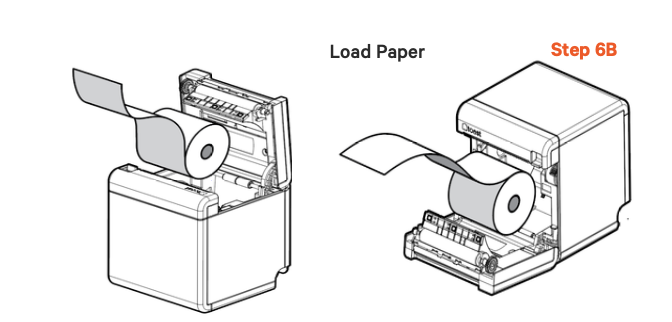
- Next, it's time to load the printer paper. To do this:
- Pull the latch on the front of the Toast Printer and open the cover.
- Insert the full-size roll of 80 mm thermal paper. The paper should exit on the opposite side of the cover. See the images below on how to position the paper correctly.
- Close the Toast Printer cover.
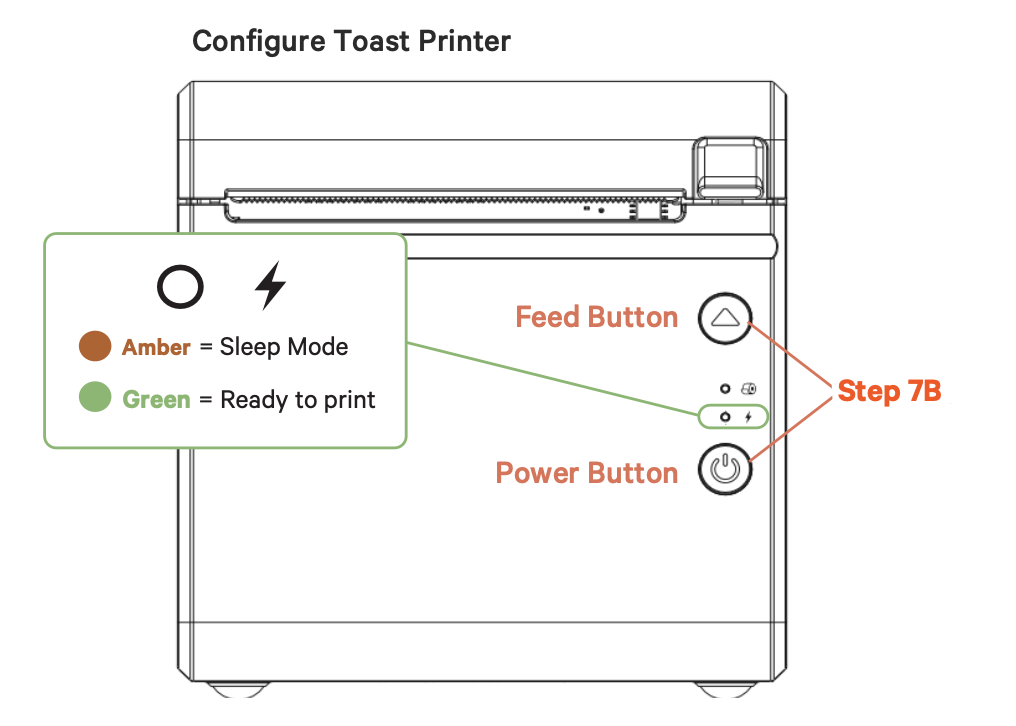
- Configure your Toast Printer to start working. To do this:
- Plug the orange cord into the wall outlet. (From Step 3) Then, hold the power button until the LED is amber. This puts the printer into Sleep mode so you can configure it.
- Hold the Feed button and the Power button at the same time, then release the Power button. Your Toast Printer will print out the printer’s test form and the amber LED will turn green.
- If the paper feeds but doesn’t print, please make sure you’ve inserted the paper in the correct orientation. See the image shown above on the page.
After configuring your Toast Printer, the LED will be amber if the printer is in Sleep mode. This happens if the printer is turned off. To power it back on, hold the Power button until the LED turns green. For more information regarding printer setup, check out this Support Center article, Printer Setup Overview.
How to Add Peripherals
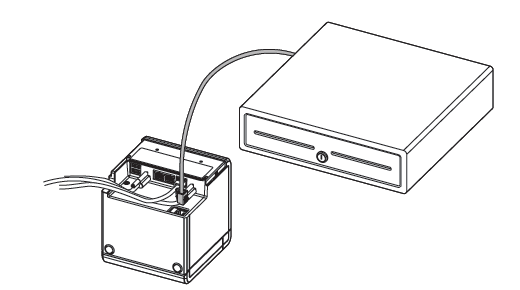
- If you have a cash drawer, plug in the cash drawer cable to your Toast Printer.
- Set up your guest-facing display screen:
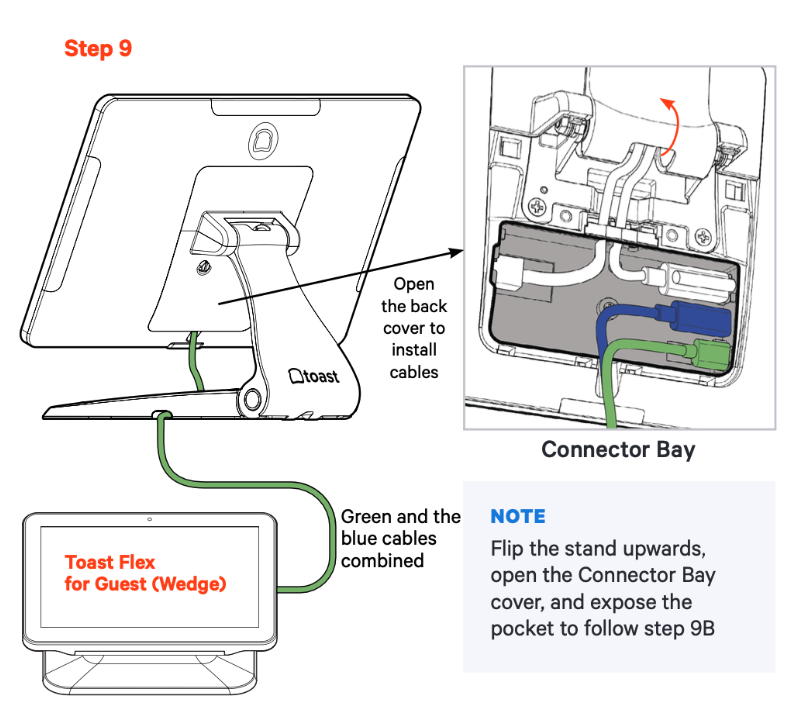
- If you have a Toast Flex for Guest (Wedge), gently flip and place your Flex Terminal so that the display faces down and unscrew the two thumb screws and lift up to remove the back plate.
- Grab the free ends of the 5ft. Extension Cable and connect the green (GFD) and blue (HDMI) cables to the Flex Terminal. Make sure ‘UP’ text is facing up when plugging in. Place the cable through the slot in the top of the terminal. Put back on the back plate and screw in the two thumb screws.
- For more information on Guest Display set up check out Get Started with Your Guest-Facing Display.
- If you're using the direct attachment for Toast Flex for Guest, this is already in place on the Toast Flex terminal.
- If you're using the direct attachment for Toast Flex for Guest, this is already in place on the Toast Flex terminal.
- Set up payment using one of the options below:
- If you are attaching your Toast Tap™ to your Toast Flex and Toast Printer set-up, plug the USB-A end on your cable into your Toast Printer. To learn more about this setup, visit Toast Tap™ (On-Counter) Installation Guide.
- If you have Toast Tap™ (Direct Attach to Toast Flex), this will already have adhered to your Toast Flex terminal. To learn more about this, check out Toast Tap™ (Direct Attach) Installation Guide.
- Power on the Toast Flex terminal (power button is on the back side of the terminal screen) and follow the Toast setup instructions that appear.
- Log into your restaurant in the Toast app and complete basic setup.
- Note: You may need to update the Toast app when you open it for the first time. To learn more, see Update Your Toast App.
- Turn on EMV (Europay, MasterCard, Visa). EMV must be turned on to accept payment on your new Toast system. See the Card Readers section of this article for EMV setup instructions.
- If you have any additional printers to set up, this is done via the Printer Setup feature in the Toast app. For more information, check out Printer Setup Overview.
- Note: Your new Toast Flex terminal stand can be raised higher or lower if desired.
- Note: Your new Toast Flex terminal stand can be raised higher or lower if desired.
Card Reader Setup
Begin by unpacking your Toast card reader.
Configure EMV in the Toast App
Your Toast system is EMV capable. EMV is a credit card payment process that checks cards embedded with a computer chip for their legitimacy. Enabling EMV will allow for dipping and tapping of credit cards on the Toast Tap.
- Navigate to the main menu dashboard of the Toast app on your Toast Flex (if you're on an order screen, you can access the main menu by selecting the back arrow in the top-left corner), then select Device Setup under the Setup section.
- Scroll to the Payment Processing section and select EMV Enabled.
- Select Check for Updates to look for updates to your card reader. If you don't see an update, skip to the last step.
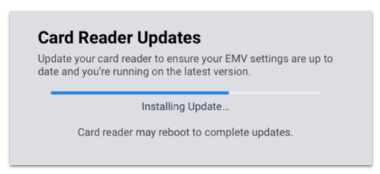
- Select Install Update. The update normally takes a few minutes to complete. If you decline the update, you will not be able to use EMV until this update is installed.
- You’ll see the screen below as the update processes. If you get an error message, please try again in a few minutes. Make sure to not let your session log out.
- If the update was successful, you’ll be able to select Yes for the Enable EMV chip read setting. Select Continue to confirm your selection.
Toast Tap™ Dual Card Reader Configuration
When setting up your Toast Tap™ (On-Counter), you may have a second screen attached to your terminal - also known as a Toast Flex for Guest or Guest-Facing Display. If so, you have the ability to utilize 2 card readers at once. Check out the instructions below to set these readers up and take payments. For more information on card reader setup, check out the Toast Tap™ (On-Counter) Installation Guide.
From the main menu of the Toast POS app, select Device Setup from the Setup section. Scroll down to Card Readers, and you should see two different readers:
- The Toast Tap™(shows as BBPOS Chipper 2X(USB)) - This should be set to Guest Pay when used with another card reader.
- The MagTek DynaMag(USB) - This is your swipe-only reader on the terminal, and should be set to Employee Pay.
After taking a guest’s order and selecting Pay on your POS, you’ll see a button for Credit, just like the option for Cash or a Gift Card. Once selected, the screen will prompt your guest with instructions to complete the payment.
It’s important to note your Toast Tap™ can only be paired up with a swipe-only reader (also known as an MSR reader). It is not possible to use two Toast Tap™ readers on a single Toast Flex.
Back to top
Toast Flex 14 for Kitchen Setup
You can set up your Toast Flex 14 for Kitchen on its stand or mounted to the wall. For detailed instructions, check out this Support Center article: Toast Flex for Kitchen Installation Guide.