Get Started With the Uber Eats Integration
Last updated: Oct 8, 2026, 12:02 PM
Set up the Uber Eats direct integration with Toast so orders fire straight to your kitchen, your menu syncs in minutes, and you can manage availability without double-entry.
In This Article:
- Uber Eats Integration Overview
- Before You Begin
- Video Walkthrough
- Timeline and Process Overview for Uber Eats
- Step 1: Add the Uber Eats Integration in Toast Shop
- Step 2: Complete the Onboarding Checklist in Toast Web
- Step 3: Connect Your Uber Eats Account
- Step 4: Confirm Your Dining Options for Uber Eats
- Step 5: Confirm Your Other Payment Option for Uber Eats
- Step 6: Confirm Your Menu Visibility and Image Settings
- Optional: Configure Additional Uber Eats Settings
- Frequently Asked Questions
- Related Articles
Uber Eats Integration Overview
Uber Eats offers a direct integration between your Toast POS (Point of Sale) and the Uber Eats marketplace.
This connection lets your restaurant:
- Receive orders placed on the Uber Eats app directly on your Toast POS — no need to manually enter orders from a tablet into Toast
- Manage your Uber Eats menu through Toast Web — menus, including 86'd items (an item removed from the menu because it is no longer available), sync within minutes
- Report Uber Eats orders in real time — orders use a unique payment type and dining option for ease of reporting and tracking
The integration does not currently support:
- Viewing future scheduled orders
- Pre-modifiers
- Auto-application of discounts
- Images for menus, groups, and modifiers (Uber Eats does support images on items)
- Self-delivery (you cannot use self-delivery for Uber Eats orders)
- Virtual concepts or ghost kitchens (the ghost kitchen on Uber Eats must map one-to-one to a unique Toast location)
Before You Begin
Applies to: Toast Web, Toast POS, Uber Eats marketplace
Permissions needed:
- 8.4 Manage Integrations
- 8.5 Toast Shop Purchases
What you'll accomplish: A working Uber Eats integration that delivers Uber Eats orders directly to your Toast POS, with a synced menu and a payment type and dining options configured for accurate reporting.
Note:
- The Uber Eats integration is a one-to-one integration. Only one Toast account can be integrated with one Uber Eats account. If you manage multiple restaurant locations, you must set up the integration separately for each location, with a unique Uber Eats account per Toast account. This one-to-one relationship is required for proper functionality.
- Toast recommends setting up your Uber Eats account before completing the integration checklist. If you do not have an Uber Eats account, the last step of the checklist directs you to the Uber Eats account setup page to create one.
Video Walkthrough
Timeline and Process Overview for Uber Eats
To integrate Toast with Uber Eats, follow these high-level steps:
- Sign up for a third-party integration through Toast Shop. The integration is added automatically to Toast Web.
- Start with the Onboarding Checklist within your Toast Web account. Complete the first and second steps by providing the menus and any price increases needed for Uber Eats.
- Proceed with the remaining steps when you see the message "You are all set with Toast, now complete your setup with Uber Eats."
- Note: If your checklist displays “Toast Setup in Progress,” it indicates that your request has been sent to a Third-Party Setup Agent. This will occur for any MLM Locations.
- Log in to your Uber Eats business account by selecting I have an account from the Checklist. Follow the steps to confirm the correct location and menus are being used, and set an activation date.
- Receive an email confirmation from Uber Eats when you are ready to take orders.
The table below lists the time, responsibility, and support contact for each setup step.
| Step | Time | Responsibility | Support contact |
|---|---|---|---|
| Sign up | 3–5 min | Restaurant | Contact Customer Care |
| Complete menu and pricing details | 3–5 min | Restaurant | Contact Customer Care |
| Complete Self-Service Activation Steps | Varies | Restaurant | Contact Customer Care |
| Receive Toast confirmation | Instant | Restaurant | Contact Customer Care |
| Receive partner confirmation | 3–5 min self-activation | Uber Eats | Uber Eats website or email
|
Important: Toast Customer Care cannot help with partner integration questions once the process is complete from Toast's end. After Toast finishes its part, reach out to Uber Eats directly:
- United States: Email restaurants@uber.com or call 833-ASK-EATS (833-275-3287).
- United Kingdom: Email ukirestaurants@uber.com or call +448081785518 (daily WhatsApp support is also available via this number from 7:00 AM to 9:00 PM).
- Ireland: Email ukirestaurants@uber.com or call +35314854350.
For U.S. based customers who want more information on Marketplace Facilitator Taxes and how they affect your restaurant when integrating with Uber Eats, see Understand Marketplace Facilitator Laws.
Step 1: Add the Uber Eats Integration in Toast Shop
If you haven't added Uber Eats yet, see the steps required below on how to add it before continuing.
US Based Customers
If you haven't added Uber Eats yet, visit Toast Shop to add it before continuing. (Note: Skip to Step 2 if your sales representative already added the integration, as it will appear automatically in Toast Web.)
- In Toast Shop, select Learn More next to the Uber Eats icon.
- Add the integration to your cart and proceed to checkout.
- On the confirmation page, select Confirm Selections to add the integration.
- Read the Terms and Conditions, select the checkbox I accept the terms and conditions, then select Submit.
Expected outcome: You are taken into the setup flow in Toast Web, where you can select menus for Uber Eats, increase prices if you choose, and sign the Uber Eats contract if you are a new customer.
UK and Ireland Based Customers
- Sign up for the third-party integration by requesting a demo via Toast Shop, contacting your Customer Success Manager, or reaching out to Toast Customer Care.
- After signing up, you will receive an email confirming your purchase.
- The integration will be automatically added to your Toast Web account.
Note: If you encounter an error page, confirm that the permissions 8.4 Manage Integrations and 8.5 Toast Shop Purchases are enabled on your account. These permissions are required to access the steps in the setup checklist.
Step 2: Complete the Onboarding Checklist in Toast Web
After purchase, an onboarding checklist appears in Toast Web that you must fully complete before the integration will work.
- In Toast Web, select Setup at the top right of the home page to find the onboarding checklist.
- Work through every item in the checklist. The checklist prompts you to:
- Select the menus to use with Uber Eats
- Decide whether to apply a price increase to your Uber Eats menu and modifier items.
- Note: Applying a flat fee to low-cost modifiers can result in unexpectedly high prices for customers. It is suggested to apply a percentage increase to modifiers to avoid this.
- Sign the Uber Eats contract (if you do not already have one)
- Note: If your checklist displays “Toast Setup in Progress,” it indicates that your request has been sent to a Third-Party Setup Agent. This will occur for any MLM Locations.
- Note: If your checklist displays “Toast Setup in Progress,” it indicates that your request has been sent to a Third-Party Setup Agent. This will occur for any MLM Locations.
- After you complete every item, you will see the message: "You are all set with Toast, now complete your setup with Uber Eats."
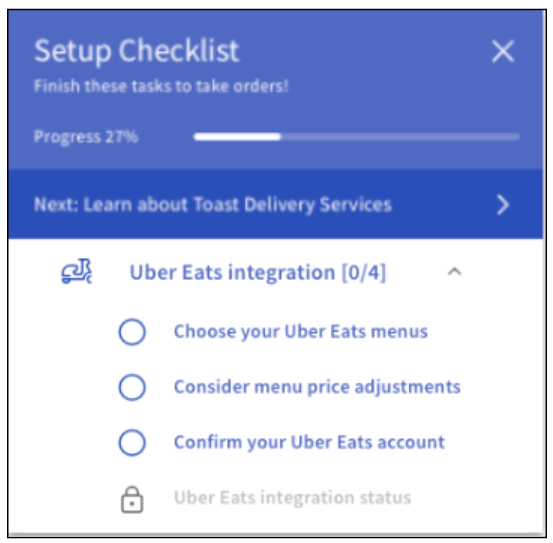
Expected outcome: The Toast portion of setup is complete, and you can move on to connecting your Uber Eats account.
Note: If the page times out before you finish, you can return to the setup checklist anytime in Toast Web. The checklist appears at the bottom right of your screen with a line item for the integration.
Step 3: Connect Your Uber Eats Account
After completing the Toast checklist, the setup workflow guides you to connect your Uber Eats account.
- If you do not have an Uber Eats account, select Create an Uber Eats account to create one on the Uber Eats site, then return to Toast Web.
- Once your account exists, select Yes, I have an Uber Eats account, then Continue. You are taken to the Uber Eats portal page titled Link your Point of Sale system with Uber.
- Select Login. Enter the email you used to sign your Uber Eats contract, then enter the verification code that was sent to your email.
- Note: Ensure your Online Ordering Schedule is set up before you proceed. If Third Party Hours are not set, you may experience delays in activation.
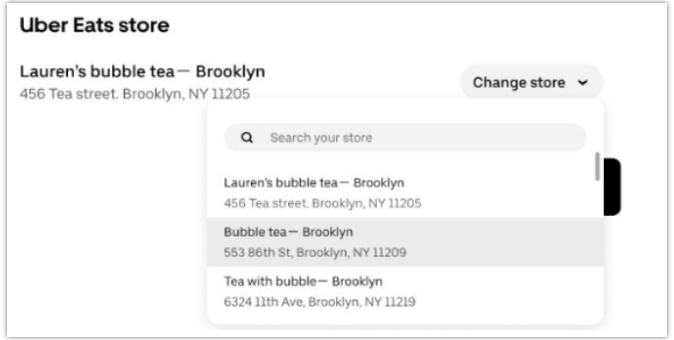
- Verify that your selected Toast store matches the selected Uber Eats store. If not, use the drop-down menu to select the correct one, then select Next.
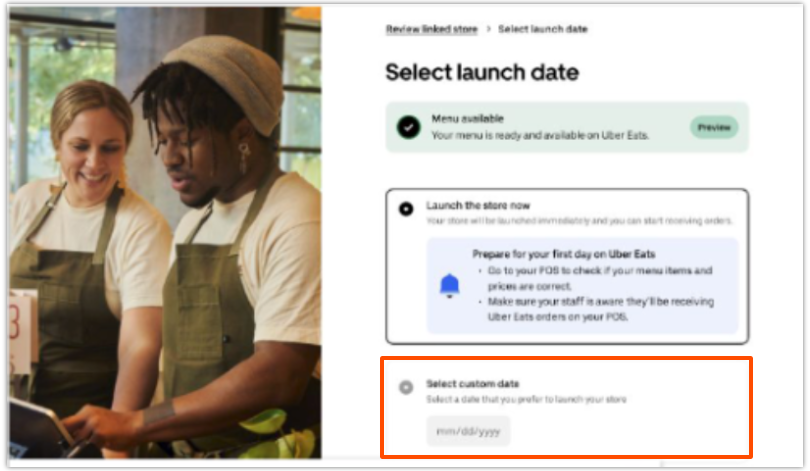
- On the Select launch date screen, see whether your menu is available:
- If your menu is available, select Launch the store now to start receiving orders immediately, or Select a custom date to go live on a future date.
- If your menu is still processing, select Automatically launch store to start receiving orders as soon as the menu becomes available, or Select a custom date to go live on a specific future date.
- Select Finish to complete your Uber Eats setup.
Expected outcome: You see a message stating that you've completed Uber Eats setup. You receive a confirmation email from Toast that the Toast setup is complete, and a confirmation email from Uber Eats once your integration is fully active and ready to receive orders.
Note: If you see "Test Mode" or a message that the integration is "waiting on Toast," this means Toast has not yet completed its part of the setup on the back end. Continue completing every item in the Toast Web checklist. If you've finished the checklist and the message persists, contact Toast Customer Care to confirm activation.
Step 4: Confirm Your Dining Options for Uber Eats
For Uber Eats orders to flow into Toast, two Uber Eats-specific dining options must exist. Toast creates these during the initial setup.
- In Toast Web, navigate to Kitchen > Dining options > Dining options.
- Confirm the following two dining options exist:
- Uber Eats Takeout with the behavior set as Take Out
- Uber Eats Delivery with the behavior set as Delivery
Expected outcome: Both dining options appear on the Dining options page.
Note: These dining options appear greyed out — they are not editable and cannot be deleted. Even if you have an existing dining option labeled "Uber," a new one is still created for the integration. Uber Eats uses the Delivery option for orders delivered to the guest and the Takeout option for pickup orders. If you do not offer pickup orders through Uber Eats, the dining option for pickup is simply not used.
To learn more about dining options, see Set Up Your Dining Options.
Step 5: Confirm Your Other Payment Option for Uber Eats
For orders to flow successfully from Uber Eats into Toast, an Uber Eats payment option must exist in Toast Web. Toast creates this during initial setup.
- In Toast Web, navigate to Finance > Related > Settings > Other payment options
- Confirm that Uber Eats appears as another payment option.
- If it does not appear, select + Add to create a new other payment option, fill out the required fields, and Save and publish your changes.
Expected outcome: Uber Eats is listed as another payment option in Toast Web.
Important: All Uber Eats orders will fail if this payment option is not configured. Always confirm that the Uber Eats other payment option exists before taking orders.
To learn more, see Set Up Other Payment Options.
Step 6: Confirm Your Menu Visibility and Image Settings
Uber Eats can pull your menu directly from Toast. To allow Uber Eats to display the menu, you must confirm visibility settings and (optionally) image settings.
- In Toast Web, navigate to Menus and select your Uber Eats menu.
- From the Menu details page, scroll down to Properties and confirm that Visible to: Online Orders: Partners is selected.
- If you use multiple third-party online ordering partners, you can use the menu builder to control which menus are shared with each partner.
- Save and publish your changes.
Expected outcome: A Toast menu specialist confirms your menu is configured correctly so Uber Eats can retrieve it. The Uber Eats marketplace pulls your menu within minutes of any update.
Note: The Uber Eats-Toast integration syncs item photos. Photos for menus, groups, and modifiers are not currently supported. For item photos to sync, images must be:
- Less than 10 MB
- In JPEG, PNG, or GIF format
- Between 320 px and 6000 px in both width and height
Note: If you are an existing Uber Eats customer switching to the Toast integration, you lose the ability to add items or categories to your menus through the Uber Eats portal. Edits must be made in Toast Web, and Uber Eats picks up the changes within minutes.
To learn more about menu visibility, see Set Menu Visibility in the Menu Builder.
Optional: Configure Additional Uber Eats Settings
After completing the steps above, you can configure these optional settings to fit your restaurant's operations.
Uber Eats Menu Price Increases
To re-adjust your Uber Eats menu prices after onboarding, increase the price in Toast Web.
- In Toast Web, navigate to Third party ordering > Uber Eats > Menu Settings > Increase menu price.
- Apply a price increase as a fixed amount or percentage on top of the base price to menu items and/or modifiers
- Note: applying a flat fee to low-cost modifiers can result in unexpectedly high prices for customers. It is suggested to apply a percentage increase to modifiers to avoid this.
- Save and publish your changes.
Expected outcome: Uber Eats displays the increased price; the base price on your Toast POS menu is unchanged.
Order Ready Settings
Uber Eats orders follow whatever Order Ready behavior you have configured for the Kitchen Display System (KDS).
- If the Order Ready toggle is enabled, Uber Eats orders are automatically marked as Order Ready once fulfilled by your kitchen.
- If the toggle is disabled, you must manually mark Uber Eats orders that appear in the Orders Hub Active tab as Order Ready when they are ready for pickup or for the delivery driver.
To check this setting, in Toast Web navigate to Takeout & delivery > Orders Hub > Kitchen Display System (KDS).
Revenue Centers for Uber Eats
Uber Eats orders can be automatically assigned to a specific Revenue Center for reporting. To set this up, create a Revenue Center with one of the following exact names:
- Uber Eats
- UberEats
- Uber
- Eats
Expected outcome: Once a Revenue Center with one of these names exists, Uber Eats orders automatically link to it in real time. You do not need to apply the Revenue Center to a table, service area, or device, and you do not need to notify Uber Eats.
Note: Custom Revenue Center names are not supported. If you use a name other than the ones listed above, your orders will not be assigned to a Revenue Center. Once you've created and assigned a Revenue Center for Uber Eats, do not edit or archive it — doing so causes future orders to fail.
To learn more, see Revenue Centers for Third-Party Online Ordering Integrations and Create and Assign Revenue Centers.
Alcohol Labeling for Uber Eats
If you are an Uber Eats integration customer, you can mark items as containing alcohol directly in your Toast menu. Once Uber Eats approves you to sell alcohol on the Uber Eats merchant platform, they use the labeling assigned in your Visible to: Online ordering: Partners menus.
To learn how to label alcoholic items, see Label Menu Items as Alcoholic.
Marketplace Facilitator Tax (MPF Tax) for Uber Eats
In the U.S., Marketplace Facilitator Tax means Uber Eats collects sales tax from the guest and remits it to the state, without the restaurant ever seeing the tax money.
For the list of U.S. states where Uber Eats collects and remits sales taxes due to Marketplace Facilitator laws, see Marketplace facilitator: frequently asked questions (external link).
For U.S. customers who would like more information on how this affects your restaurant, see Understand Marketplace Facilitator Laws.
Manage Third-Party Ordering From the POS Payment Terminal
You can manage your third-party online ordering channels — including Uber Eats — directly from the Payment Terminal on your Toast POS for added flexibility during peak volume or unexpected disruptions.
To open the Payment Terminal, open the main menu on your Toast POS and select Payment Terminal.
From the Payment Terminal, you can:
- Enable or disable Toast Online Ordering and third-party ordering channels at any time
- Snooze orders (20 minutes, 40 minutes, or until tomorrow)
- View quote times for Toast Online Ordering
- Access guest, driver, and support information
Note: Any changes made on the Payment Terminal are reflected in Toast Web, and vice versa.
To learn more, see Manage Third-Party Availability With Snooze and On/Off Functions.
Frequently Asked Questions
General & Account Setup
Which Uber Eats account do I sign into during setup?
During setup, sign into the Uber Eats business account that is tied to the location you are integrating. The integration is one-to-one — only one Uber Eats account can be linked to one Toast account. If you manage multiple locations, each Toast account must be linked to a unique Uber Eats account.
I am part of a restaurant group. Do I have to set up each location separately?
Yes. Multi-location groups must complete the setup process individually for each restaurant location using the Uber Etas integration.
Can I link multiple Uber Eats accounts to one Toast account, or vice versa?
No. This is a one-to-one integration. Only one Toast account can be integrated with one Uber Eats account. If you manage multiple restaurant locations (such as a food hall or ghost kitchen), each Toast account must be linked to a unique Uber Eats account. This one-to-one relationship is required to maintain proper functionality across all locations.
I don't have an Uber Eats account yet. Can I set one up during integration?
Toast recommends that customers set up their Uber Eats account before completing the integration checklist. Every location using the integration requires a corresponding Uber Eats account, as required on the last item of the checklist. If you do not have an Uber Eats account before completing the checklist, the last step directs you to the Uber Eats account setup page to begin the account creation process. Integrations may be delayed because both a Toast and an Uber Eats account are required.
Can I test the integration before going live on Toast POS?
No. Orders must flow directly into an operational POS. Orders sent to a non-operational POS will fail.
What are the pricing options to add third-party ordering (3PO) integrations?
For customers based in the U.S., third-party ordering integrations can be added individually or as a bundle, through Toast Shop. For customers based in Ireland and the UK, you can sign up for the third-party integrations by requesting a demo via Toast Shop, contacting your Customer Success Manager, or reaching out to Toast Customer Care.
I didn't finish setup and the page timed out. What should I do?
You can return to the setup steps anytime in Toast Web after logging in. A checklist at the bottom right of the screen contains a line item for the integration setup.
Onboarding & Status Updates
Why does my Uber Eats setup screen say "Test Mode" or "Waiting on Toast"?
A "Test Mode" or "waiting on Toast" message during setup means Toast has not yet completed its part of the setup on the back end. Continue completing every item in the Uber Eats setup checklist in Toast Web (under Setup at the top right). If you've finished the checklist and the message persists for more than a few hours, contact Toast Customer Care to confirm activation.
How long does it take to go live on the Uber Eats-Toast integration?
If you have set up your menus and pricing correctly, your integration goes live once you receive confirmation from Uber Eats after logging in or creating a new account.
Why was there a delay in my integration activation?
Toast sends an initial email for setup and another email confirming setup is complete. Follow the instructions in the confirmation email and select the Uber Eats link to sign up and activate your account. These emails are sent to the email address linked to the Toast account. If you have not received any emails from Toast, confirm the email address linked to the account with your team, sales rep, or Toast Customer Care. All onboarding steps must be completed to trigger Toast's review and confirmation email. If you have received the Toast confirmation email and completed the next step but the integration is still not set up, contact Uber Eats.
Can I see where my restaurant is in the Uber Eats onboarding process?
No. There is no integration status visible in the Toast platform at this time. Review your email for updates from Toast or Uber Eats.
How do I switch from a middleware provider (e.g., Chowly) to the Toast direct integration?
When you switch from a middleware provider to the Toast/Uber Eats direct integration, the previous middleware connection and associated menus are automatically disabled as part of the integration process. If, after switching, you experience canceled or missed orders, contact Uber Support immediately to confirm the previous middleware integration has been fully removed and only the Toast menus are active.
Menu Management & Pricing
How do I apply different menu prices for Uber Eats versus my POS?
Navigate to Third Party Ordering > Uber Eats > Menu Settings > Increase Menu Price to apply flat-fee or percentage-based increases specifically for online marketplace orders.
What happens if I update my menu in Toast Web?
If you are a current Uber Eats customer switching to the Toast direct integration, you lose the ability to add items or categories to your menus through Uber Eats Manager. Toast Web is the single source of truth for your menu. Any item, category, or price updates saved in Toast Web sync to the Uber Eats platform within minutes. Manual edits made directly inside the Uber Eats Manager portal will be overwritten.
What happens when I 86 an item?
86ing an item on your Toast POS or Toast Web updates the Uber Eats marketplace in real time to prevent guests from ordering unavailable items.
Why isn't the menu I want to select appearing during setup?
Ensure the target menu has its visibility set to Visible to: Online Orders: Partners under Menu Properties. If you have not built the menu yet, create it first, then return to the setup checklist.
Do item photos configured in Toast appear on Uber Eats?
Yes. Item-level photos sync automatically if they meet Uber Eats dimensions (between 320 px and 6000 px) and file size requirements (under 10 MB). If you use separate menus for on-premise dining and third-party ordering integrations, make sure item images are added to all of your menus.
Are there any limitations for my menu?
The Uber Eats integration does not currently support pre-modifiers and sequence pricing. If these are configured in your Toast menu, Uber Eats cannot pull your menu from Toast. The integration also does not support overnight hours configured on a menu's Availability — for example, if a menu is configured to be available from 10 p.m. to 2 a.m., Uber Eats cannot sync. The workaround is to split the menu into two separate menus: one covering the hours before midnight (10 p.m. to 11:59 p.m.) and another covering the hours after midnight (12 a.m. to 2 a.m.). The integration also does not support menus with an Availability of less than 60 minutes — every menu must be available for at least one hour.
Order Flow & POS / KDS Behavior
How do incoming Uber Eats orders appear on the POS and receipts?
-
- POS Screen: Displays an itemized breakdown, the guest's first name, last initial, and an Uber Eats order ID in the Tab Name field.
- Receipt Printers: Standard receipts print automatically as soon as the order is placed.
- Kitchen Display System (KDS): Orders appear as ASAP with an elapsed timer showing how long the ticket has been open.
Why are Uber Eats delivery orders showing in Delivery Mode?
If your restaurant uses Toast Delivery Services or in-house delivery, orders assigned to the Delivery behavior automatically route to Delivery Mode. To clear these orders at the end of the shift, create a dedicated "dummy" driver employee profile in Toast Web and assign the orders to that profile. Uber Eats delivery orders automatically clear out of unassigned status at the end of each day.
My orders aren't appearing on my KDS or POS. How do I fix this?
Order routing failures are typically caused by an unconfigured payment method, missing dining options, or incorrect auto-fire settings. Verify that:
-
- Both Uber Eats Takeout and Uber Eats Delivery exist under Kitchen > Dining Options.
- Uber Eats is listed under Payments > Other Payment Options.
To troubleshoot, see Get Help With Uber Eats Direct Integration Issues.
Does the Uber Eats integration respect manual approval rules or online ordering prep times?
No. All incoming Uber Eats orders automatically fire directly to the kitchen as ASAP. Prep time calculations and driver dispatch timing are managed entirely by Uber Eats. For questions about how Uber Eats generates these times, contact Uber Eats support.
Can I set up schedule overrides for holidays or special operating hours?
Yes. Configure holidays or special hours as a Schedule Override in your Toast Online Ordering Schedule. These updates reflect automatically on the Uber Eats platform.
Do Uber Eats promotions and discounts sync to Toast reports?
Yes, Discounts on Orders will display in Toast Reporting and will be reflected in the following reports:
-
-
- Sales Summary report
- Discounts Summary report
- All Discounted Orders report
- Orders report > Discount Amount
- Order Details report > Single Order View
-
For more information, see Third-Party Ordering Discount Reporting Overview.
Will Postmates orders flow into Toast POS?
Yes — but only if you were already receiving Postmates orders on your Uber Eats tablet before setting up your direct integration with Toast. For customers who have other questions, contact Uber Eats directly.
Revenue Centers & Financials
How do I assign a Revenue Center for Uber Eats orders?
Create a Revenue Center with one of these exact names: Uber Eats, UberEats, Uber, or Eats. All orders through the Uber Eats integration automatically map to that Revenue Center. To learn how to create Revenue Centers, see Create and Assign Revenue Centers.
Why am I not receiving orders under my Uber Eats Revenue Center?
Confirm you have a Revenue Center created. Check the spelling of the Revenue Center name in Toast Web. It must exactly match one of the accepted values: Uber Eats, UberEats, Uber, or Eats. For deeper troubleshooting, see Create and Assign Revenue Centers.
What happens to guest tips placed on Uber Eats?
Guest tips entered on the Uber Eats marketplace are paid directly to delivery drivers and managed entirely by Uber Eats.
Delivery, Ghost Kitchens, & Offboarding
Can I use my own drivers (Self-Delivery) for my restaurant's Uber Eats orders?
No. Self-delivery is not available with the Uber Eats direct integration at this time.
Can I run a ghost kitchen or virtual concept using this integration?
Virtual concepts are supported only if the ghost kitchen profile on Uber Eats maps one-to-one to a unique, standalone location profile in Toast Web.
How do I disconnect or cancel the Uber Eats integration?
To remove the connection, navigate to My Integrations in Toast Web and remove Uber Eats.
Important: Removing the integration from Toast Web does not stop monthly software billing. You must submit a cancellation request through the Subscriptions page in Toast Web to end billing.
Support & Escalations
Should I contact Toast or Uber Eats for assistance?
-
- Contact Uber Eats Support for: Live order cancellations, guest refunds, missing delivery drivers, menu display errors on the marketplace app, and marketplace operating hours.
- Contact Toast Customer Care for: Toast Web configuration, missing payment methods, menu builder errors, and initial setup checklist failures.
What Is the Contact Information for Uber Eats?
Below is the contact information for reaching Uber Eats support by region:
-
- United States: Email restaurants@uber.com or call 833-ASK-EATS (833-275-3287).
- United Kingdom: Email ukirestaurants@uber.com or call +448081785518. (WhatsApp support is available to UK based customers daily from 7:00 AM to 9:00 PM using the same UK phone number.)
- Ireland: Email ukirestaurants@uber.com or call +35314854350.