Toast Retail: Build Your Import Template
Last updated: Jul 7, 2026, 2:41 PM
- Retail Import Template Overview
- Download Your Template
- Build Your Template
- Upload Your Template
- Frequently Asked Questions
- Additional Resources
Retail Import Template Overview
The retail import template allows you to set up your item library by adding an entire list of items all at once. This method is best if you have an export available from a prior POS, or if you’re building up a list of inventory items. The template can also be used after go-live to add more items to your library in bulk.
For more information on the other ways to add items (selecting existing menu(s) or starting a new item library), check out this Support Center article: Toast Retail: Set up Your Item Library.
If you’re working with an Onboarding Consultant (OC), send them an email with your inventory spreadsheet or POS export file for help with formatting the import template.
Download Your Retail Template
Ready to get started? Begin by selecting one of the links below.
- Download Toast Retail Template
- Download Toast Retail MLM Template
Note: If you don't have access to Excel, you can open these files using Google Sheets.
Build Your Retail Template
To build your Toast Retail import template, you'll need to fill out all of the information you have about your items. The Template tab of the spreadsheet is where you’ll add your inventory information. Below is a description of the fields that are included in the template.
Notes:
- If any required fields are missing, your import will not be successful. It’s important to provide as many key item details as possible to import it all into Toast Web at once, so we recommend adding all data you have available.
- If you sell bundles or alternate packages of certain products (e.g. selling individual bottles and 4-packs of the same beverage), you’ll be able to create those at a later point. You should add all individual items to your import template.
You can also review the Example tab of the spreadsheet to see a few items that are fully filled out.
| Column name | Description | Required? |
| name | The item name is what you’ll see in reports, and what your guest will see on their receipt. | Required for all items |
| optional (variation) | You’ll use this column to capture any items that come in different variations. “Size” is a common variation - you can look at the Example tab of the spreadsheet to see what this would look like. Basically, you’ll have the same item name listed on several different rows of your template, with each row representing a different variation (e.g. S/M/L/XL if you’re adding a size variation).
To add more variation types, you can add more columns to the right or left and name it appropriately (e.g. color (variation)).
Items can have more than one variation, for example, a t-shirt that is sold in different sizes and different colors. The total number of variations supported for an item is 256. Each variation option set (e.g. size) is limited to 25 values. | Recommended for items sold in different variations |
| pos name | A shortened name that helps staff easily ID items on the POS. | Optional |
| description | The item description will appear on your online ordering site and kiosks. | Optional |
| category group | The first level of organization for your retail items (e.g. Clothing).
| Required for all items. |
| category | The second level of organization for your retail items (e.g. Women’s Clothing). This is useful for separating items into different groups for ease of reporting or ease of use on the POS.
| Required for all items. |
| subcategory | An optional third level of organization for your retail items.
Note: Keep in mind that if you try to add more than 1,500 items to the same subcategory, the subcategory will automatically be split into multiple subcategories. | Optional |
| price | A single, positive number (not a price range, or text as a price) that indicates what your guests will pay for the item. | Required for all items except items with a price composed embedded barcode. |
| cost | The cost of the item (what you pay your suppliers for the item). | Necessary for tracking margins or COGS. |
| barcode | Note: If you copy and paste barcodes into this template, pay special attention to the barcodes to ensure that none of the leading zeros have gone missing. Not all barcodes start with zero, but if your spreadsheet auto-detects and removes a zero from the front of a barcode, it will not work properly after import.
Scannable barcode number.
| Required for items that will be tracked or sold via barcode scanning. |
| plu | Product look-up (PLU) codes are item numbers that can be helpful to manually search for items on your POS screen. | Optional |
| brand | The name of the company that produced the item.
You can only add one brand per item. If you have two items with the same name from different brands, the item should appear as separate rows on your template. | Optional |
| supplier | Adding the supplier of an item enables you to create purchase orders in Toast Retail. | Required if you want to add supplier item id. |
| supplier item id | Used to identify the item according to a product code provided by your suppliers. | Optional |
| selling strategy | The selling strategy determines if an item will be sold individually (EACH), or by weight. If you’re selling weighed items, review this section of this article for best practices. | Required for some items sold by weight.
See instructions here. |
| embedded amount type | PRICE COMPOSED or WEIGHT. See instructions here. | |
| unit of measure | Units that an item is measured in (LB, OZ, KG, or G). | |
| prompt for quantity | This setting tells the register whether the cashier will enter a specific quantity when the item is sold.
Note: If your guests often purchase large quantities of an item (even if it’s not sold by weight), you may want to set this field as TRUE. | |
| inventory quantity | Current amount of inventory on hand.
Note: We generally discourage entering inventory quantity if your counts will change prior to going live with Toast. | Optional |
| receiving units | If your business purchases items in cases or other groupings of inventory, you can configure your receiving units on the item level to make updating your stock easy and quick.
| Optional |
| receiving unit quantities | This is where you can enter the quantity of items that come in a single receiving unit that you get from a supplier. If there are multiple unit quantities for an item, they should be listed in the same order as the receiving units were added, separated by semi-colons with no spaces (e.g. 12;128). | Optional |
| image URL | A public-facing URL to the image for this item (a URL that anyone can access without needing an account or credentials). | Optional |
| custom attribute (select) | Custom attributes (select, text, or number) allow you to capture additional information for more flexible item searching and reporting. For example, you might choose to add the region that wine comes from as a custom attribute.
Note: Custom attributes will not import unless they are created in Toast Web first. To learn more about how to configure custom attributes, check out the Custom Attributes section of this Support Center article, Optimize Toast Retail.
You can make multiple copies of this column if you’re using different custom attributes across your item library.
| Optional
|
| custom attribute (text) | ||
| custom attribute (number) |
Configure Weighed Items on Your Retail Template
If you’re selling pre-weighed items, using a produce scale, or using a scale attached to the POS, use these configurations:
- In the selling strategy column, select WEIGHT
- Leave the embedded amount type column empty
- In the unit of measure column, select whichever unit will be used to weigh the item. The options are LB (pounds), OZ (ounces), KG (kilograms), or G (grams).
- In the prompt for quantity column, select TRUE
If you're using a deli scale that prints barcodes, use these configurations:
- In the selling strategy column, select EMBEDDED BARCODE
- The embedded amount type column cannot be empty. You must either type in PRICE, PRICE COMPOSED, or WEIGHT. To learn more about the difference between these types, check out the Configuring the Embedded Amount Type section of this Support Center article, Set Up Embedded Barcodes/SKUs and Amount Types.
- In the unit of measure column, select whichever unit will be used to weigh the item. The options are LB (pounds), OZ (ounces), KG (kilograms), or G (grams).
- In the prompt for quantity column, select FALSE
Check out this video overview for instructions:
Upload Your Retail Template
With your template complete, you're ready to import items into Toast Retail.
If you’re working with an Onboarding Consultant, email your Excel file or Google Sheets link to them for review. If you’re using Google Sheets, make sure you update the sharing settings to Anyone with the link can edit.
If you’re importing items to Toast Retail yourself, follow the steps below.
Note: Importing a Toast Retail template using the steps below will always create new items -- it will not update items that have already been imported into Toast. For that reason, you should always use a new template (without the existing items) if you have new items to add to Toast Retail.
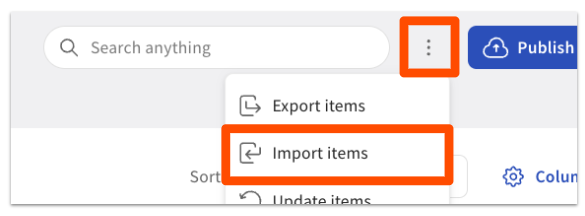
- Navigate to the Item Library in Toast Web.
- Select the three-dot overflow menu next to the search bar, and then select Import item.
- Upload your file. If you used Excel, you can upload the XLSX file directly into the Import item workflow. If you’re using Google Sheets, you’ll have to select File > Download > Comma Separated Values (.csv) first to export your file for the import workflow.
- Once your file is uploaded, the next step in the workflow is Map columns, where you’ll ensure that the column names in your uploaded file are correctly matched to the template columns.
- If you didn’t change any column names on the import template, these mappings will automatically populate a matching value in the Template Columns drop-downs.
- If a column is Unmapped, use the Template Columns drop-down to select the correct match from the list of optional columns.
- Custom attributes and variations will all need to be manually mapped.
- Select the drop-down under Template Columns and then select + Add new.
- Select the correct data type definition from the Data type drop-down:
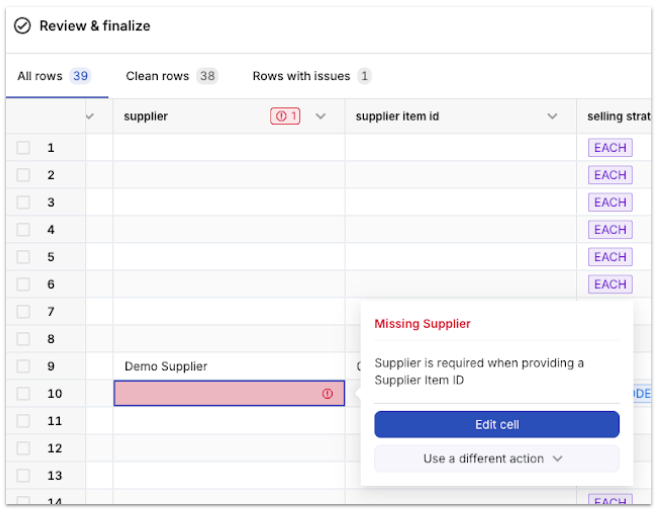
- After column mapping, you’ll be directed to the Review & finalize screen, where you’ll see any errors or warnings detected that may impact the import. Details of the error can be reviewed by selecting a cell in the grid. Errors and warnings may be resolved directly in the grid, or you can make changes in your template file and reupload it.
- Warnings will appear in orange text with an exclamation alert symbol next to them. They will not prevent you from importing your Toast Retail template. You can address the warning, or you can leave it as-is and fix any item details at a later time. For example, the "Barcode: Check Digit Mismatch" message is a warning that will not prevent a successful import.
- Errors will appear in red text with an exclamation alert symbol, and will prevent you from a successful import. Be sure to make the appropriate edit before proceeding.
- Once you’re done resolving any errors or warnings, you can finalize your import.

Frequently Asked Questions: Retail Import Template
Can I add barcodes after I import my Retail template? What if I have to add hundreds of barcodes?
Yes, if you don't have barcodes ready when you're creating your Toast Retail template, you can add a barcode to the items later (after you’ve imported your other item data). The quickest way to do this is to connect a barcode scanner to your computer (desktop/laptop), open the item details page and click into the Barcode field, and then scan the physical barcode. Even if you have a significant number of barcodes to add, using the scanning feature may be more efficient than importing the template, because the Toast Retail smart scan feature may find matches and populate some item data for you.
As a reminder, you can also use a scanner to add barcodes directly into the Toast Retail template. Scanning a barcode is always quicker and more accurate than manually typing it in.
Can I make updates in bulk after I've uploaded my Retail template for the first time?
Yes, there are a couple of options for making bulk updates to your Retail item library:
-
- Select multiple items in your item library using the check boxes to the left of the item names and use the bulk actions drop-down.
- Export your item library, make changes in a spreadsheet, and then import the file to Update items.
For detailed instructions on both of these methods, see the Bulk Update Items section of this Support Center article, Optimize Toast Retail.
How do I fix the "Variants must have matching values for field description" error on the Toast Retail template?
When importing items with variations, all of the variants need to have the same value for the following columns: name, description, category group, category, subcategory, brand, and custom attribute. Once you've confirmed that these columns match for each relevant item, continue with your import.
How do I fix the "Similar value already exists" warning on the Toast Retail template?
The "similar value" warning may indicate that you've misspelled something in the template, which could cause you to create separate versions of the same thing. For example, if you see "Brand: similar value already exists", that could mean there are two brand names with very similar spellings and the system is suggesting that you review the values before importing. Remember, a warning message will not prevent you from completing your Toast Retail import.
How do I fix the "Missing header names" error?
If you see a message that says you are missing header names on your Toast Retail template, try the following steps:
-
-
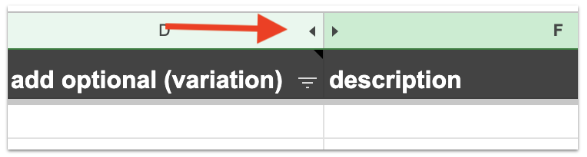
- Check for any hidden columns (indicated by two arrows facing away from each other, as pictured below).
- Ensure that all of your variants have the same values as described in a previous FAQ question.
- Check for any hidden columns (indicated by two arrows facing away from each other, as pictured below).
-