Mejores prácticas para la configuración del menú
Última actualización: 24 abr 2026, 11:07 a.m.
- Mejores prácticas para la configuración del menú - Resumen
- Asignar categorías de ventas
- Asignar tasas de impuestos
- Asignar estaciones de preparación
- Configurar ajustes para artículos abiertos
Mejores prácticas para la configuración del menú - Resumen
Después de haber creado un nuevo menú en Toast, es importante revisar algunos ajustes para esos elementos del menú para asegurar que tu configuración esté completa y tus informes sean precisos. Utiliza este artículo como una lista de verificación para revisar algunos de estos ajustes clave:
- Categorías de ventas: Asigna categorías de ventas a tus elementos del menú para ayudar a desglosar tus datos de ventas en tus informes de Toast.
- Impuestos: Asegúrate de que los impuestos aplicables estén configurados y aplicados a todos los elementos del menú.
- Estaciones de preparación: Si estás utilizando un sistema de visualización de cocina (KDS), asignar estaciones de preparación asegurará que tus elementos del menú y grupos de menú se impriman y/o muestren en el lugar adecuado de tu cocina.
- Artículos abiertos: Si tienes elementos "abiertos" añadidos a tu menú, asegúrate de revisar los ajustes de tu menú para que estos elementos funcionen como deseas.
¿Todavía tienes preguntas sobre cómo construir o editar tus menús? Consulta Comenzar con Menús para aprender más.
Volver al inicio
Asignar categorías de ventas
En Toast Web, navega a Menús > Configuraciones > Categorías de ventas, y crea las categorías de ventas que te gustaría rastrear para tu restaurante (por ejemplo, Comida, Alcohol, Venta al por menor, etc.). Luego, utiliza propiedades avanzadas (Menús > Gestión masiva > Propiedades avanzadas) para ver todos tus artículos del menú de un vistazo y asignar categorías de ventas a nivel de menú, grupo o artículo.
Si hay un artículo específico dentro de un grupo que requiere una categoría de ventas única, puedes asignar primero una categoría de ventas al grupo completo y luego cambiar la asignación de categoría de ventas para ese artículo en particular.
Para obtener instrucciones más detalladas, consulta este artículo del Centro de Soporte: Configurar categorías de ventas.
Volver al inicio
Asignar tasas impositivas
| De conformidad con el Acuerdo de comerciante de Toast, celebrado entre tú y Toast, reconoces y aceptas que Toast no tiene la obligación de determinar si se aplican impuestos a tu negocio o tus transacciones, como tampoco tiene la obligación de calcular, cobrar, declarar ni remitir impuestos ante las autoridades fiscales como resultado de los pagos. |
Para aplicar tasas impositivas a tus artículos del menú, primero deben crearse tus tasas impositivas específicas (Menús > Configuraciones > Gestionar tasas impositivas). Luego, puedes modificar la configuración básica de impuestos para todos los artículos del menú en la página de propiedades avanzadas. Utiliza este artículo para obtener instrucciones sobre cómo crear y asignar tasas impositivas: Configurar tasas impositivas y ajustar opciones fiscales.
Si estableces tu(s) tasa(s) impositiva(s) en ‘predeterminado’, la tasa impositiva se adjuntará a todos los menús y artículos recién creados. Si necesitas aplicar ciertas tasas a menús o artículos del menú específicos, sigue los pasos a continuación.
Si tu negocio es parte de una cuenta de gestión de múltiples ubicaciones (MLM) o cuenta empresarial con Toast, usa la Guía de la plataforma Toast en su lugar para asignar y ajustar tus impuestos. Asegúrate de revisar el Objetivo y Propietario tanto de tus impuestos como de los artículos del menú (si se comparten) antes de realizar cualquier cambio en cualquiera de las configuraciones.
Asignar estaciones de preparación
Para restaurantes que utilizan un KDS, deben crearse estaciones de preparación para dirigir tus grupos y artículos del menú al dispositivo/imprenta correcta. Primero, crea tus estaciones de preparación navegando a Cocina > Estaciones de cocina > Estaciones de preparación. Luego, utiliza propiedades avanzadas para dirigir tus artículos del menú a la estación correcta. Los artículos del menú que no están asignados a ninguna estación de preparación se dirigirán por defecto a TODAS las estaciones de preparación. Para obtener instrucciones detalladas, consulta este artículo del Centro de Soporte: Configurar y asignar estaciones de preparación.
Las estaciones de preparación para clientes con MLM se crean tanto a nivel corporativo como a nivel de ubicación. Una versión maestra de cada estación de preparación se configura generalmente para el grupo en su conjunto, mientras que se crean versiones específicas para cada ubicación. Las impresoras deben configurarse específicamente para cada ubicación, que luego se pueden aplicar a la versión específica de la ubicación. Para instrucciones específicas de MLM para estaciones de preparación, consulte Gestionar estaciones de preparación con la gestión de multilocalización de Toast.
Volver al inicio
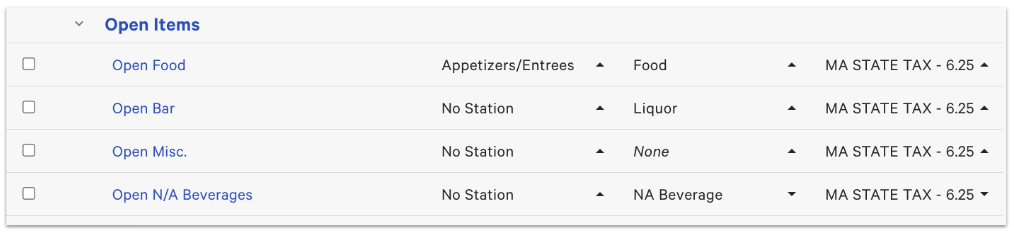
Configurar ajustes para artículos abiertos
Si tiene artículos abiertos en sus menús (por ejemplo, Comida Abierta, Bar Abierto, Misceláneos Abiertos), entonces todos los ajustes mencionados anteriormente (categorías de ventas, tasas de impuestos, estaciones de preparación) también deben asignarse a esos artículos. Utilice la página de propiedades avanzadas para expandir sus menús y ver todos estos ajustes a la vez, o abra la página de detalles de un artículo específico para ver todos los ajustes disponibles de un vistazo.
Para obtener más información sobre cómo crear o usar artículos abiertos en su POS, consulte este artículo del Centro de Soporte: Crear un artículo abierto o un artículo de menú con precio abierto.
Volver al inicio