Toast Payroll: Configure Custom Payroll Imports
Last updated: Jul 6, 2026, 4:52 PM
Custom Import Introduction
| With the provisions in the One Big Beautiful Bill, Toast Payroll has updated reporting to be displayed weekly rather than by pay period. This means that if you are a biweekly or semi-monthly pay frequency customer, you'll need to update any existing custom imports to reflect this. |
Many customers have integrated systems which automatically import hours and, in some cases, tips into Toast Payroll via timesheets. If you need to add earnings and/or deductions to Toast Payroll, the custom import option allows you to add data in bulk by creating and importing a formatted spreadsheet (.csv). If you create and upload a custom import into Toast Payroll, be sure to review carefully so you're not entering duplicate earnings or deductions into your automated system.
There are three steps to this process: create a template, fill out your template, and import your filled-out template into Toast Payroll. You must complete all steps to successfully import your values so they can be calculated on your payroll. If you have additional questions, see Toast Payroll: Get Help With Custom Payroll Imports.
Create a Custom Import Template
if you import the same types of data for each pay group, you can use one custom import template. If your pay groups have different import needs (e.g. one pay group needs to import hours and tips, but another pay group only needs tips imported), you can create more than one template. Note: If you would like to import a file for multiple locations, please contact us via the blue chat dot in the lower-right corner of any Toast Payroll page to discuss your next steps.
There are three general types of templates you might use:
- Hours-Only: This will import hours for employees who do not clock into a Toast POS (commissary kitchen, corporate, etc.) or for un-integrated systems.
- Hours and Tips: This will import hours worked along with earnings and/or tips that were not recorded in or synced from Toast Web. This is helpful for off-site catering and buy-out events where you calculate hours and tips differently than your typical method.
- Tips/Earnings-Only: This will import amounts that were not recorded in or synced from Toast Web. This is best for one-time payments such as bonuses or weekly tip breakouts that are calculated outside of Toast Web (third-party tip software).
If you'd like assistance with setting up a template, contact us via the blue chat dot in the lower-right corner of any Toast Payroll page.
Create an Hours-Only Custom Import Template
- First, create and format a data spreadsheet which will become your template. Open a spreadsheet that can be saved as a .CSV file; you can use Microsoft Excel, but Google Sheets is often the most effective.
- In row 1, create the following columns:
- EE (employee) Number
- EE Name
- Job
- Regular Hours
- Overtime Hours
- Week
- Once the template is finished with all the column headers you want to include, save it as a .CSV (comma separated values) file. Remember where you saved this template. You'll upload it to Toast Payroll in the very next step and then use it anytime you want to add this type of import.
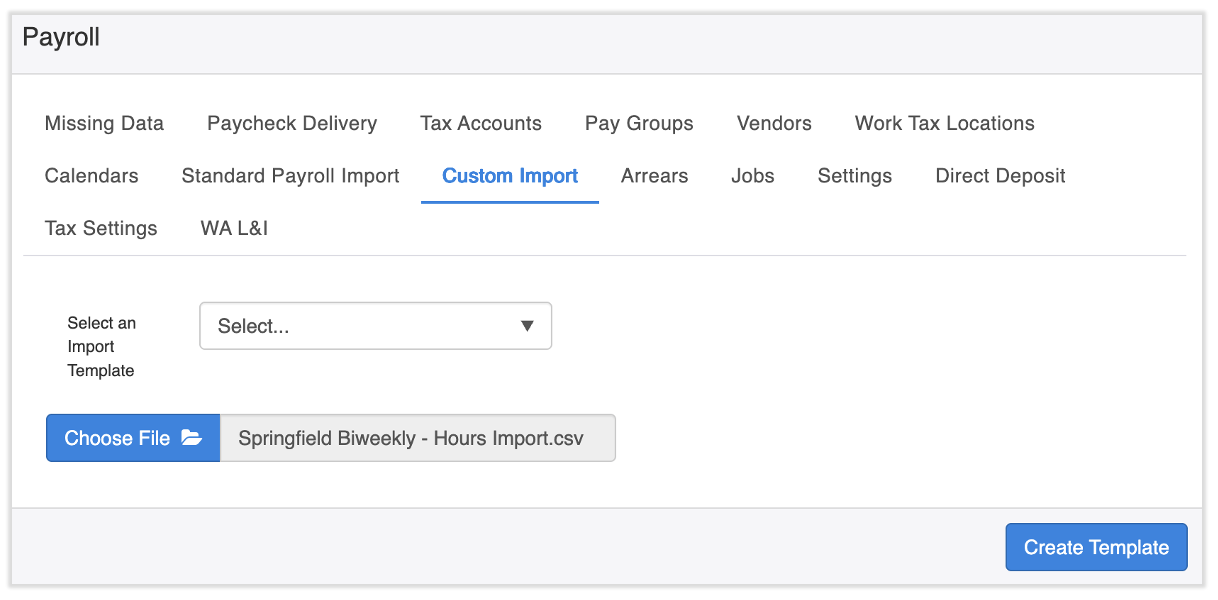
- Consider naming your template something memorable, such as the "pay group" "pay frequency" - Hours Import (e.g. Springfield Biweekly - Hours Import).
- Using Google Sheets, select File > Download > Comma Separated Values.
- With Excel, select File > Save As and select the CSV format before saving.
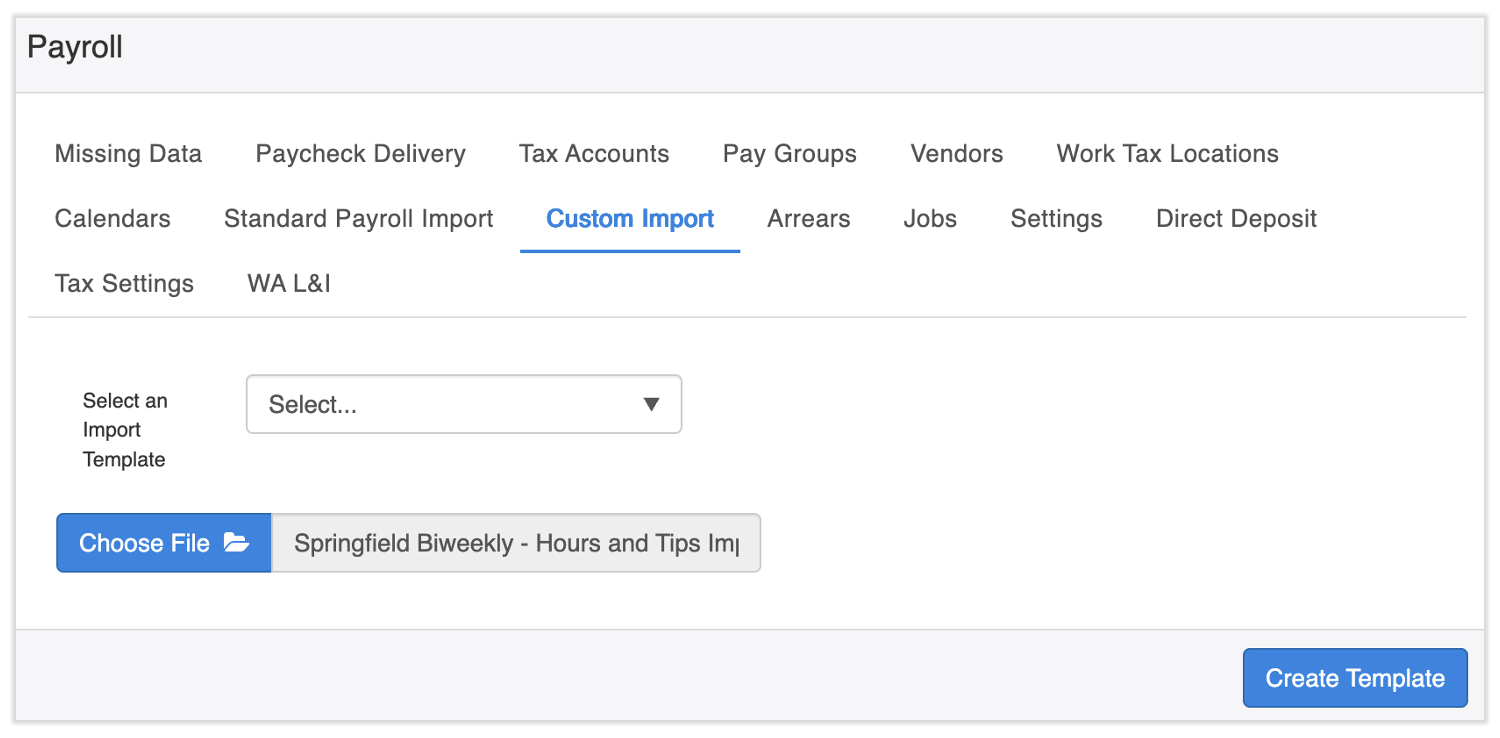
- In Toast Payroll, navigate to Settings > Payroll > Custom Import.
- Now we'll upload the blank template to Toast Payroll so it can be formatted to recognize what you're importing when you upload a file with data.
- Do not update the Select an Import Template drop-down menu. It should continue to say Select....
- Next, select Choose File and upload the .CSV template you just saved. Once uploaded, it will appear in the line with the Choose File button.
- Select Create Template.
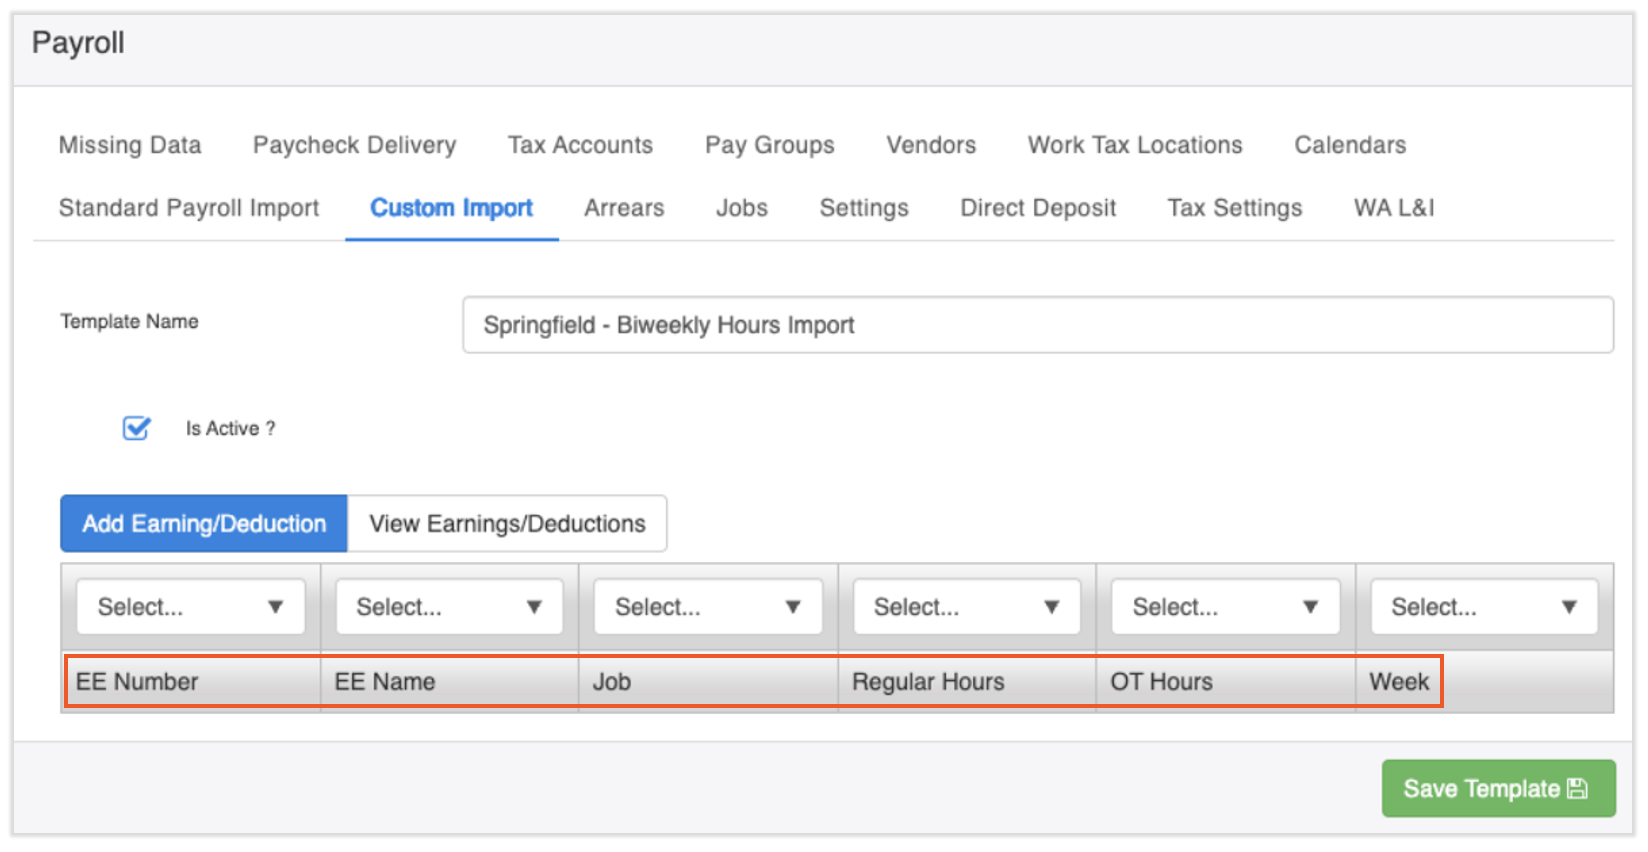
- In the pop-up, name your template the same as your named your spreadsheet file in step 3 above. For the Is this template row based or column based? drop-down menu, select Column. Select Create Template to continue.
- Once the page refreshes, you'll see the column headers based on the spreadsheet you just uploaded and formatted.
- Now you'll map the columns to Toast Payroll. Starting with the left-most Select drop-down:
- EE Number: Select Employee Number
- EE Name: Do not make a selection.
- Job: Select Job
- Regular Hours: Do not make a selection.
- Overtime Hours: Do not make a selection.
- Week: Select Week
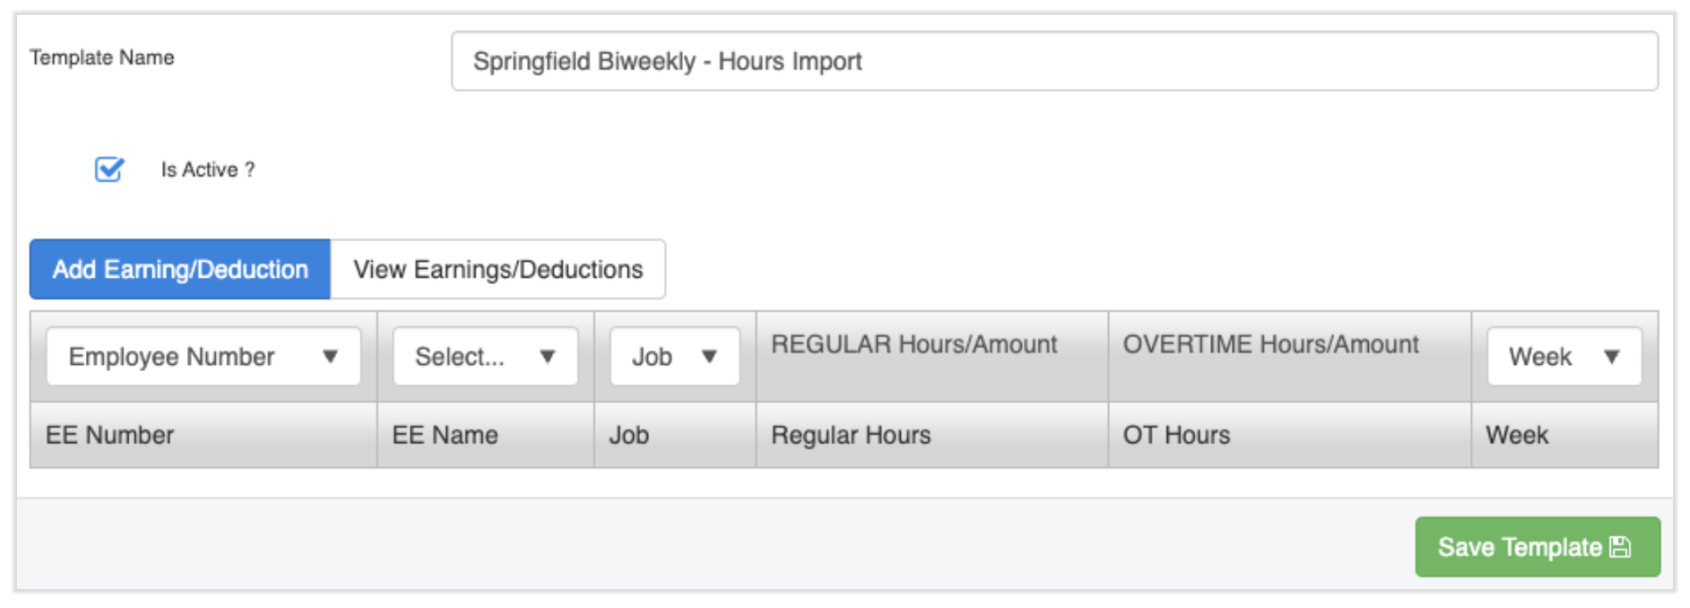
- Then select Add Earning/Deduction to produce a pop-up. Make the following selections:
- Earning Code: Select REGULAR
- Earning Amount: Select Regular Hours
- Earning Rate: Leave this blank as the system will apply the rate on the employee's profile.
- Earning Week: Leave this blank too as the Week column was already mapped in the step above.
- Select Save.
- Select Add Earning/Deduction again and make the following selections:
- Earning Code: Select OVERTIME
- Earning Amount: Select OT Hours
- Earning Rate: Leave this blank as the system will apply the rate on the employee's profile.
- Earning Week: Leave this blank too as the Week column was already mapped in the step above.
- Select Save.
- Your results should look like this. EE Name is expected to be left blank, it's only used for spreadsheet reference:
- Select Save Template. Now skip ahead to the Fill Out Your Template section.

Create an Hours and Tips Custom Import Template
- First, create and format a data spreadsheet which will become your template. Open a spreadsheet that can be saved as a .CSV file; you can use Microsoft Excel, but Google Sheets is often the most effective.
- In row 1, create the following columns. CC stands for credit card, but refers to all non-cash tips or gratuity:
- EE (employee) Number
- EE Name
- Job
- Regular Hours
- Overtime Hours
- Cash Tips Owed
- CC Tips Owed
- Cash Tips Paid
- CC Tips Paid
- Grat Owed - Cash
- Grat Owed - CC
- Grat Paid
- Week
- Once the template is finished with all the column headers you want to include, save it as a .CSV (comma separated values) file. Remember where you saved this template. You'll upload it to Toast Payroll in the very next step and then use it anytime you want to add this type of import.
- Consider naming your template something memorable, such as the "pay group" "pay frequency" - Hours and Tips Import (e.g. Springfield Biweekly - Hours and Tips Import).
- Using Google Sheets, select File > Download > Comma Separated Values.
- With Excel, select File > Save As and select the CSV format before saving.
- In Toast Payroll, navigate to Settings > Payroll > Custom Import.
- Now we'll upload the blank template to Toast Payroll so it can be formatted to recognize what you're importing when you upload a file with data.
- Do not update the Select an Import Template drop-down menu. It should continue to say Select....
- Next, select Choose File and upload the .CSV template you just saved. Once uploaded, it will appear in the line with the Choose File button.
- Select Create Template.
- In the pop-up, name your template the same as your named your spreadsheet file in step 3 above. For the Is this template row based or column based? drop-down menu, select Column. Select Create Template to continue.
- Once the page refreshes, you will see the column headers based on the spreadsheet you just uploaded and formatted.
- Now you'll map the columns to Toast Payroll. Starting with the left-most Select drop-down:
- EE Number: Select Employee Number
- EE Name: Do not make a selection.
- Job: Select Job
- Regular Hours: Do not make a selection.
- Overtime Hours: Do not make a selection.
- Cash Tips Owed: Do not make a selection.
- CC Tips Owed: Do not make a selection.
- Cash Tips Paid: Do not make a selection.
- CC Tips Paid: Do not make a selection.
- Grat Owed - Cash: Do not make a selection.
- Grat Owed - CC: Do not make a selection.
- Grat Paid: Do not make a selection.
- Week: Select Week
- Then select Add Earning/Deduction to produce a pop-up. Make the following selections:
- Earning Code: Select REGULAR
- Earning Amount: Select Regular Hours
- Earning Rate: Leave this blank as the system will apply the rate on the employee's profile.
- Earning Week: Leave this blank too as the Week column was already mapped in the step above.
- Select Save.
- Select Add Earning/Deduction again and make the following selections:
- Earning Code: Select OVERTIME
- Earning Amount: Select Overtime Hours
- Earning Rate: Leave this blank as the system will apply the rate on the employee's profile.
- Earning Week: Leave this blank too as the Week column was already mapped in the step above.
- Select Save.
- Repeat this work for the remaining Earning Amounts, but select the Earning Code most applicable to your Earning Amount. You can use the same Earning Code for more than one Earning Amount if you like. If you need a new earning code, fill out this form and submit it to us via the blue chat dot in the lower-right corner of any Toast Payroll page.
- Toast Payroll is currently unavailable in Quebec. A French version of this form will be made available when the product launches in your region.
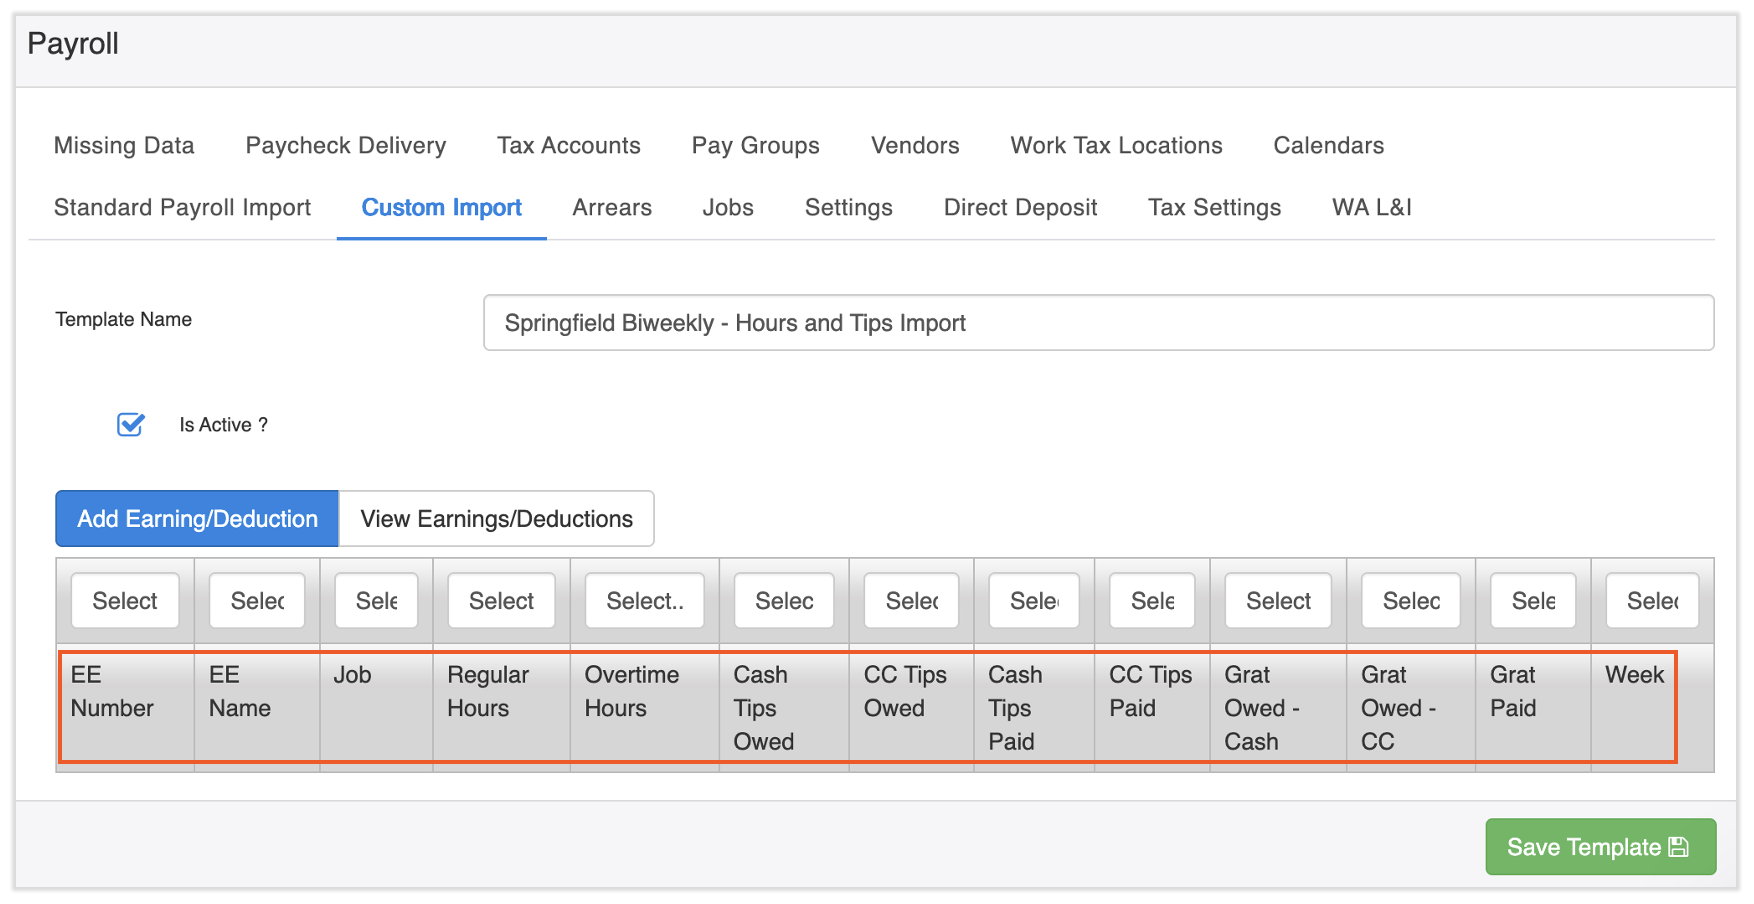
- Your results will look something like this, although you may have different Earning Codes in your system. EE Name is expected to be left blank, it's only used for spreadsheet reference:
- Select Save Template.


Create a Tips-Only Custom Import Template
- First, create and format a data spreadsheet which will become your template. Open a spreadsheet that can be saved as a .CSV file; you can use Microsoft Excel, but Google Sheets is often the most effective.
- In row 1, create the following columns:
- EE (employee) Number
- EE Name
- Job
- Cash Tips Owed
- CC Tips Owed
- Cash Tips Paid
- CC Tips Paid
- Grat Owed - Cash
- Grat Owed - CC
- Grat Paid
- Week
- Once the template is finished with all the column headers you want to include, save it as a .CSV (comma separated values) file. Remember where you saved this template. You'll upload it to Toast Payroll in the very next step and then use it anytime you want to add this type of import.
- Consider naming your template something memorable, such as the "pay group" "pay frequency" - Tips Import (e.g. Springfield Biweekly - Tips Import).
- Using Google Sheets, select File > Download > Comma Separated Values.
- With Excel, select File > Save As and select the CSV format before saving.
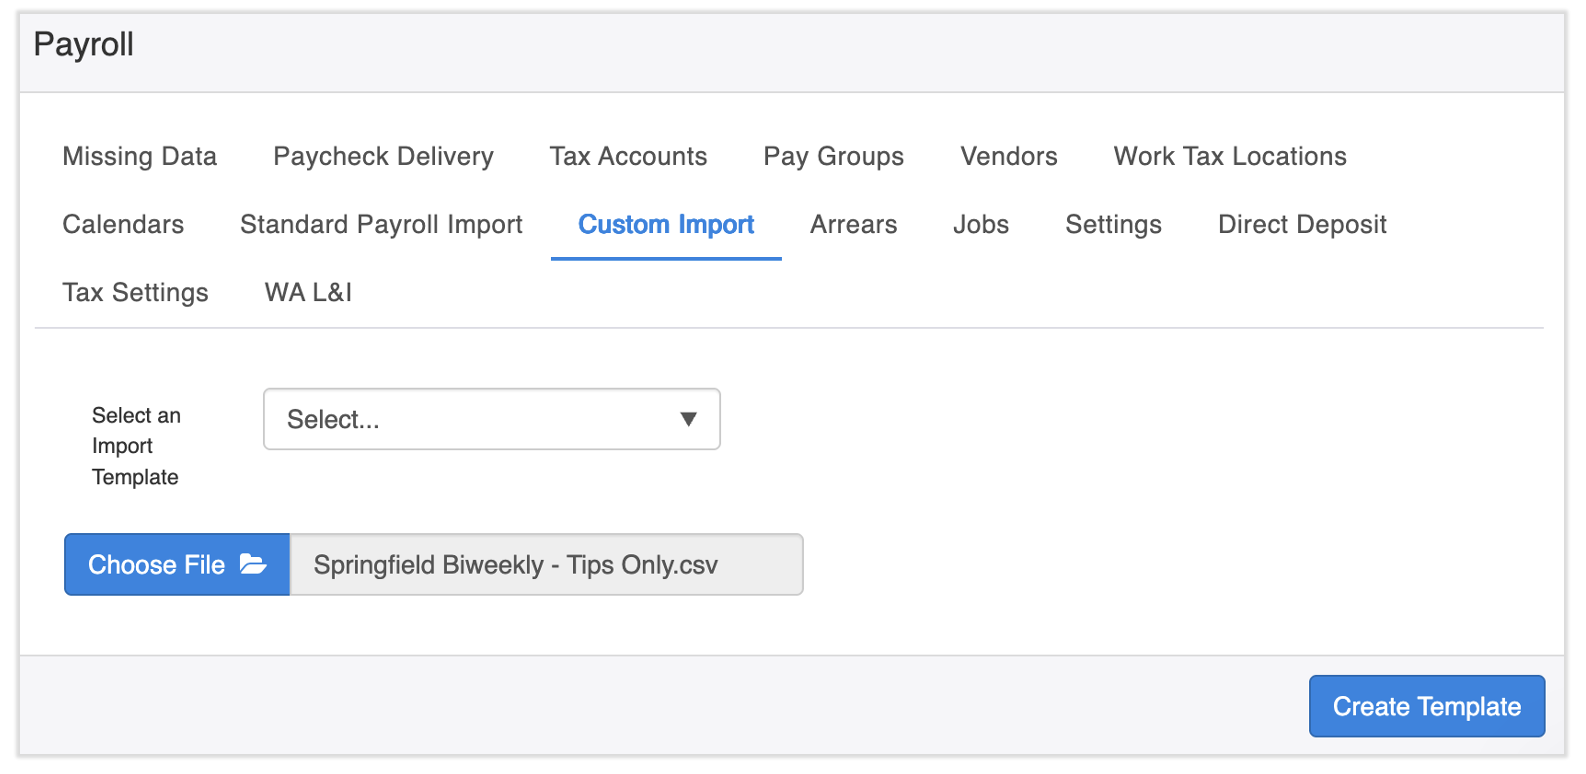
- In Toast Payroll, navigate to Settings > Payroll > Custom Import.
- Now we'll upload the blank template to Toast Payroll so it can be formatted to recognize what you're importing when you upload a file with data.
- Do not update the Select an Import Template drop-down menu. It should continue to say Select....
- Next, select Choose File and upload the .CSV template you just saved. Once uploaded, it will appear in the line with the Choose File button.
- Select Create Template.
- In the pop-up, name your template the same as your named your spreadsheet file in step 3 above. For the Is this template row based or column based? drop-down menu, select Column. Select Create Template to continue.
- Once the page refreshes, you will see the column headers based on the spreadsheet you just uploaded and formatted.
- Now you'll map the columns to Toast Payroll. Starting with the left-most Select drop-down:
- EE Number: Select Employee Number
- EE Name: Do not make a selection.
- Job: Select Job
- Cash Tips Owed: Do not make a selection.
- CC Tips Owed: Do not make a selection.
- Cash Tips Paid: Do not make a selection.
- CC Tips Paid: Do not make a selection.
- Grat Owed - Cash: Do not make a selection.
- Grat Owed - CC: Do not make a selection.
- Grat Paid: Do not make a selection.
- Week: Select Week
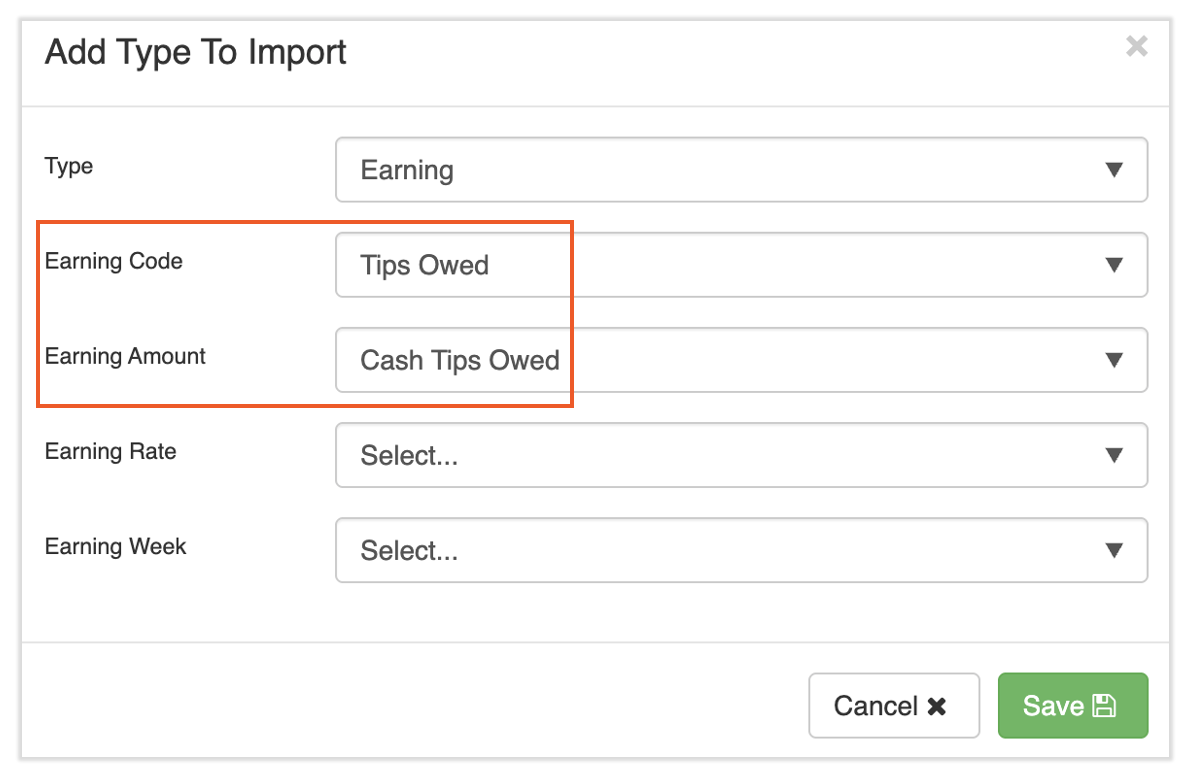
- Then select Add Earning/Deduction to produce a pop-up. Make the following selections:
- Earning Code: Select the earning code most applicable to your Earning Amount. In this example, Cash Tips Owed is the Earning Amount, so you're looking for a tips earning code that pays the employee on payroll. It may or may not be labelled as a cash earning code.
- Earning Amount: Select Cash Tips Owed
- Earning Rate: Leave this blank as the system will apply the rate on the employee's profile.
- Earning Week: Leave this blank too as the Week column was already mapped in the step above.
- Select Save.
- Repeat this work for the remaining Earning Amounts, but select the Earning Code most applicable to your Earning Amount. You can use the same Earning Code for more than one Earning Amount if you like. If you need a new earning code, fill out this form and submit it to us via the blue chat dot in the lower-right corner of any Toast Payroll page.
- Toast Payroll is currently unavailable in Quebec. A French version of this form will be made available when the product launches in your region.
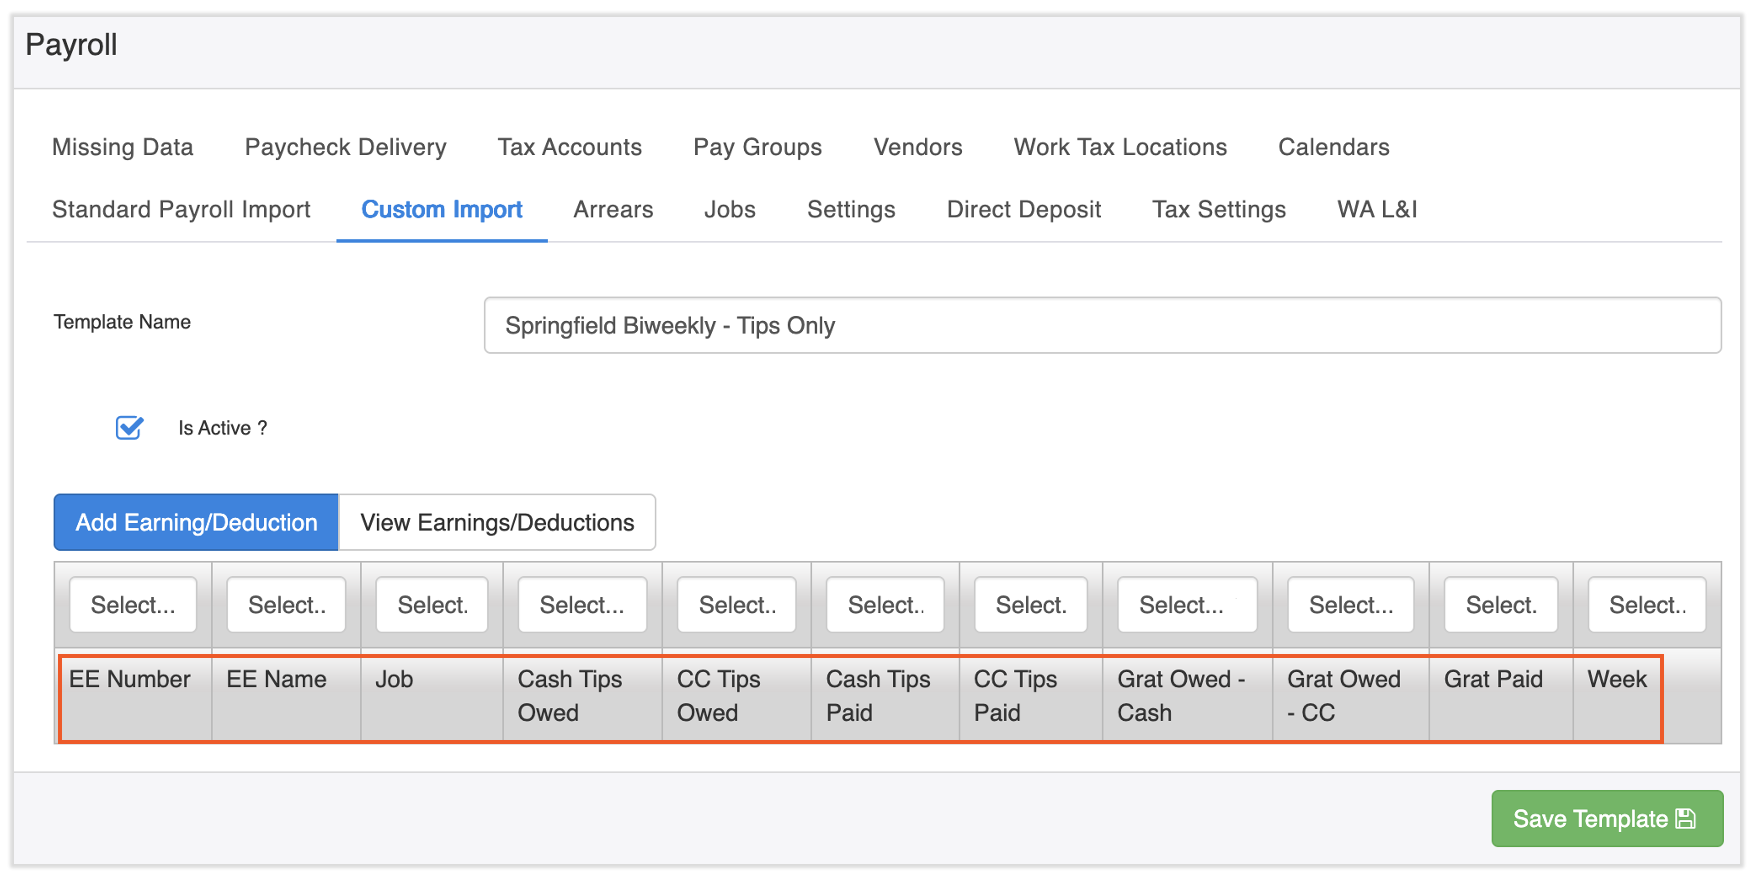
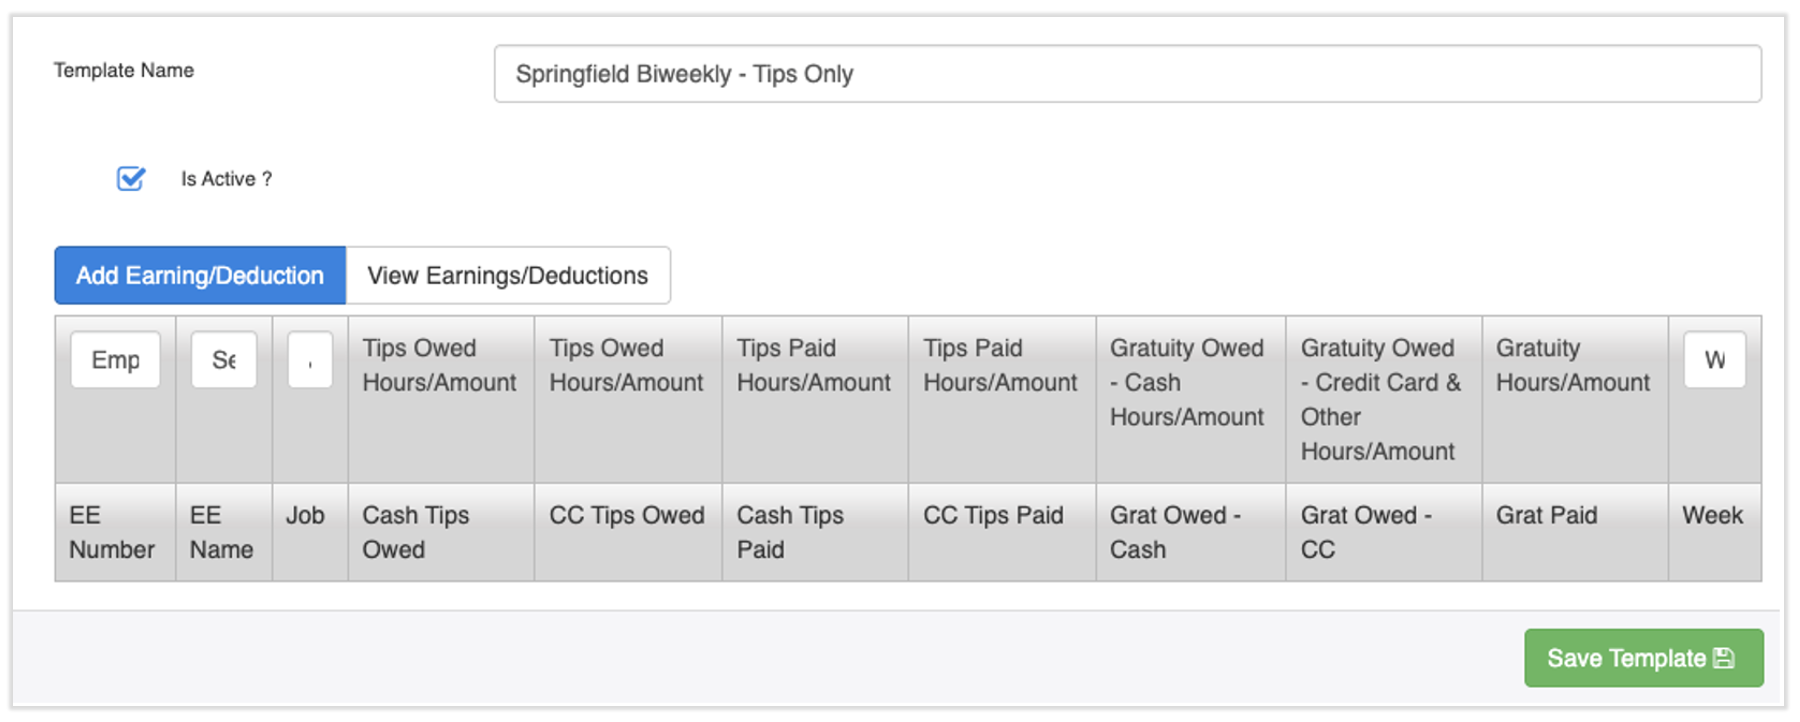
- Your results will look something like this, although you may have different Earning Codes in your system. EE Name is expected to be left blank, it's only used for spreadsheet reference:
- Select Save Template.

Fill Out Your Template
- With your template now set up and mapped in Toast Payroll, you're now ready to add data and import it.
- Use Save As rather than Save in order to save each copy of your import uploads.
- Make sure to name each file by the pay period so you don't upload the wrong timeframe into your payroll.
- Fill out the following values based on what template you've chosen to format in the previous section:
- EE Number: Located in the employee's profile in Toast Payroll.
- You can also export this by navigating to Reports > Standard to search for and download the Active Employee List.
- EE Name: The employee's name
- Job: The name of the job worked as it appears in Toast Payroll.
- If an employee has worked more than one job in your restaurant, you will have multiple rows for that employee.
- Regular Hours: You will input the hours you want imported into Toast Payroll here. Do not include any hours that have synced into Toast Payroll via timesheets or you will have recorded hours twice.
- Regular hours will need to be split by week, so if you're exporting this information directly from Toast Web (i.e. exporting the Labor Summary data), you can export two/three separate reports, one for each week of the biweekly or semi-monthly pay period.
- Overtime Hours: You will input any overtime hours you want imported into Toast Payroll here. Do not include any overtime hours that have synced into Toast Payroll via timesheets or you will have recorded hours twice.
- Overtime hours will need to be split by week, so if you're exporting this information directly from Toast Web (i.e. exporting the Labor Summary data), you can export two/three separate reports, one for each week of the biweekly or semi-monthly pay period.
- Week: This cell should reflect what week your employee's tips or hours worked should be associated with in the payroll.
- Week 1: If the employee had hours or tips associated with the first week of the pay period, enter a 1 in this column. If you have a weekly payroll, all of your values in this column will be 1.
- Week 2: If you have a biweekly or semi-monthly payroll, some of your tips and earnings will be collected in the second week of the pay period. When that happens, enter a 2 in this cell. If your employees have worked throughout the whole pay period, you will have more than one line per person, per week (see image below).
- Week 3: For semi-monthly customers only. If your employee collected tips or worked hours in week three, enter a 3 in this cell. If your employees have worked throughout the whole pay period, you will have more than one line per person, per week (see image below).
- Note: For all tip and gratuity columns, these custom import values should only be used for tips or gratuity that needs to be manually added (vs. direct sync or Toast Tips Manager methods; each method is explained in the Bring Tips From Toast Web to Payroll section of Toast Payroll: Manage and Integrate Tips). If you use Toast Tips Manager or the direct sync method, be cautious because you could have duplicate amounts causing mistakes in payroll.
- Tips and gratuity are not the same. Refer to Difference Between Service Charges and Tips for clarification.
- Cash Tips Owed: Cash tips that have not been paid to the employee. When imported into payroll via this custom import, this amount will appear on your payroll and will be paid to the employee once you submit your payroll.
- CC Tips Owed: Credit card tips that have not been paid to the employee. When imported into payroll via this custom import, this amount will appear on your payroll and will be paid to the employee once you submit your payroll.
- Cash Tips Paid: Cash tips that were given to the employee, but haven’t been recorded on payroll. When imported into payroll via this custom import, this amount will appear on your payroll, but will only be recorded (not paid) to the employee.
- CC Tips Paid: Credit Card tips that were given to the employee, but haven’t been recorded on payroll. When imported into payroll via this custom import, this amount will appear on your payroll, but will only be recorded (not paid) to the employee.
- Grat Owed - Cash: Cash gratuity that has not been paid to the employee. When imported into payroll via this custom import, this amount will appear on your payroll and will be paid to the employee once you submit your payroll.
- Grat Owed - CC: Credit card gratuity that has not been paid to the employee. When imported into payroll via this custom import, this amount will appear on your payroll and will then be paid to the employee once you submit your payroll.
- Grat Paid: Cash or credit card gratuity that has been given to the employee, but hasn't been recorded on payroll. When imported into payroll via this custom import, this amount will appear on your payroll, but will only be recorded (not paid) to the employee.
- EE Number: Located in the employee's profile in Toast Payroll.
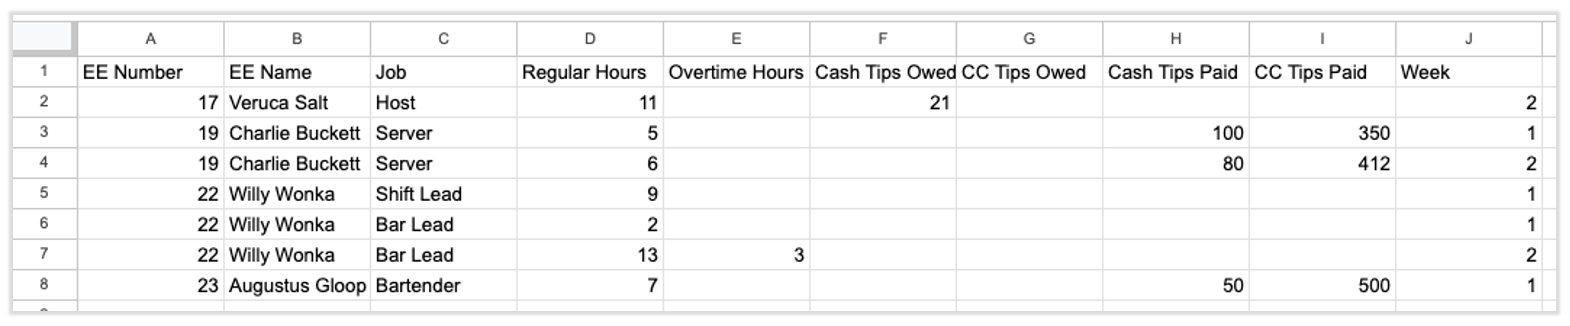
This image reflects an hours and tips import for a biweekly pay period:
Import Your Data
Once a template has been created in Toast Payroll and you have a sheet filled out and ready for upload, you can import it into your payroll run. Check Toast Payroll: Prepare to Run Payroll for a list of items to complete before beginning your payroll.
- Navigate to Payroll and select Preview for the appropriate payroll.
- On the Preview payroll step, select Next.
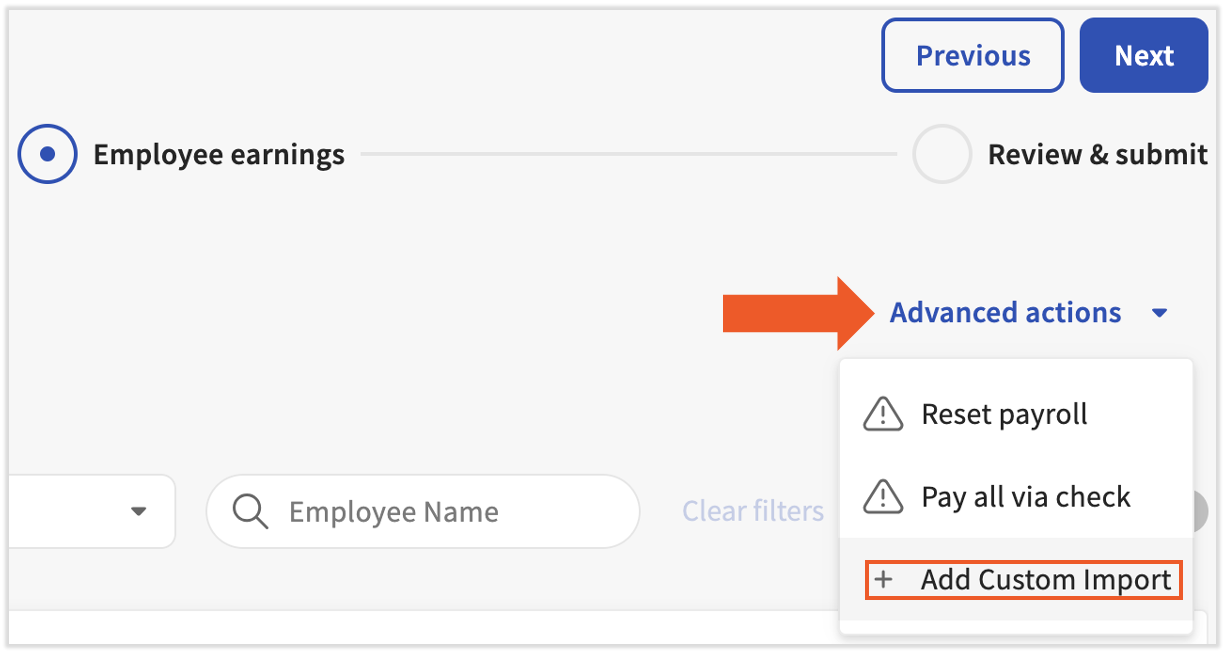
- From the Employee earnings step, select the Advanced actions drop-down menu and choose +Add Custom Import.
- If your custom import includes terminated employees, they will not be imported unless they are already added to the payroll. If this is the case, select +Add > Add employee before selecting +Add Custom Import. In the pop-up, locate the employee and select Add employee. Only employees within this pay group will appear in this list.
- If your custom import includes terminated employees, they will not be imported unless they are already added to the payroll. If this is the case, select +Add > Add employee before selecting +Add Custom Import. In the pop-up, locate the employee and select Add employee. Only employees within this pay group will appear in this list.
- This will bring you to the import page. Locate the name of the import template from the drop-down menu. Then select the Choose File button and upload your filled-out CSV spreadsheet. An example of a filled-out spreadsheet appears below.
- Do not add dollar signs in front of monetary values. Adding dollar signs will cause exceptions (import errors) and the earnings/deductions cannot be imported properly. Periods indicating dollars and cents are allowed (e.g. $35.50 is not allowed, but 35.50 is).
- Select the Preview button to see the spreadsheet as Toast sees it. This will allow you to view any errors that may have come up during the template setup or editing the spreadsheet. When you're ready, select the Import button to view a summary of the import.
- Before progressing, review and note any exceptions in the Exceptions tab. These may need to be addressed on the Employee Earnings step.
- Select Next to continue with payroll where you will see the imported values on the Employee Earnings step.
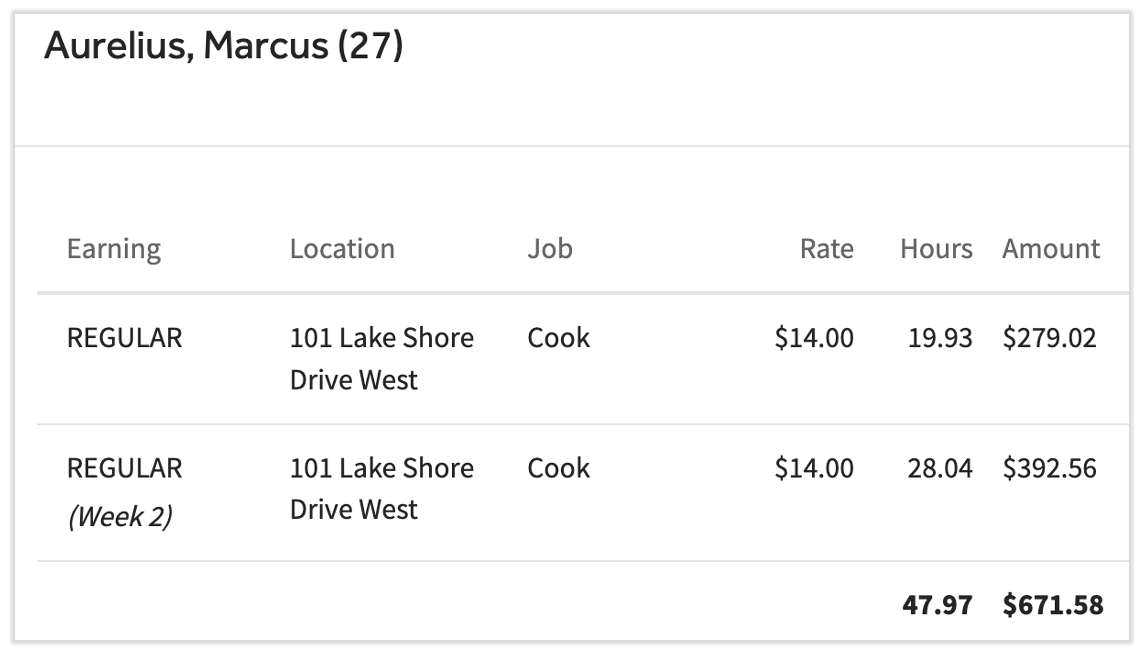
- Your payroll will have separate earning and/or deduction line items based upon your entry in the Week column. Note the Regular (Week 2) earning below:
- Your payroll will have separate earning and/or deduction line items based upon your entry in the Week column. Note the Regular (Week 2) earning below:
This content is for informational purposes and is not intended as legal, tax, HR, or any other professional advice. Please contact an attorney or other professional for advice.