Toast Tables Deposits, Prepayments, Add-Ons and Cancellation Fees
Last updated: Jul 27, 2026, 9:05 AM
Learn how to configure Toast Tables deposits, prepayments, add-ons and cancellation fees in Toast Web.
In this Article:
- Toast Tables Prepayments, Cancellation Fees, Deposits, and Add-Ons Overview
- Best Practices For Deposits
- Set Up Toast Tables Deposits as an Alternate Payment Option
- Turn on Start Order on POS
- Set Up A New Deposit Rule
- Set Up A New Prepayment Rule
- Set Up An Add-On
- Set Up A New Cancellation Fee Rule
- Apply Rules to Schedules or Experiences
- Additional Resources
Toast Tables Prepayments, Cancellation Fees, Deposits, and Add-Ons Overview
| Payment type | Is this charged at booking? | When is the revenue recognized? | What is this best used for? |
| Prepayments | Yes | After completed reservation date | Ticketed events, prix-fixe menus, or any situation that needs the full item price + tax/fees captured immediately |
| Add-Ons | Yes | After completed reservation date | Optional add-ons for your reservations such as wine-pairings, champagne toasts, merch, etc. Note: Add-ons are always built within a prepayment rule |
| Cancellation fees (no-show / late cancellation) | No- Card is held at booking, but no charges occur unless the guest does not show or cancels after the cancellation window has passed | Only if fee is charged at late cancellation date or no show date | When you want protection, but prefer not to charge guests at booking. Protects revenue without an upfront charge. Note: Cancellation fees are only available to customers in the United States. Non-US customers do not have the ability to set up cancellation fees. |
| Deposits | Yes | After completed reservation date | Reservation security for large parties / busy services. Deposits are collected pre-tax and designed as a security amount to be applied to the final bill. Deposits are not intended to be used as full prepayment and are not the same as credit card holds. |
Note: Deposits are not the same as credit-card holds. Reservations that require a deposit are charged at booking, and the restaurant may retain the deposit if the guest cancels outside the configured refund window.
Best Practices For Deposits
To set up deposits for Toast Tables, you will need to set up an alternate payment option, enable Show Order on POS, create a deposit rule, and attach your new deposit rule to the applicable shifts and dining areas.
Here are a few things to consider as you build out deposit rules:
- Large parties: Consider using deposits to secure only large party tables that operationally will cost a lot if they don't show. Guests are more used to this across the market.
- Peak hours: Consider only using deposits for tables during peak times. For example, make a service period from 7-8 p.m. called Peak and assign deposits only to these reservations. This pushes guests to book earlier and later times to avoid the deposit. Those guests who are serious about your restaurant and want these time slots may have a higher willingness to pay for peak times.
- Size of deposit: Consider playing around with the deposit amount until you find your sweet spot that is most palatable to your guests. For example, $/€/£20 per person may be too high, but $/€/£5 or $/€/£10 per person might be less of a deterrent for your guest market.
Follow the steps below to ensure you set up your deposits for Toast Tables correctly.
Note: Any availability will show up on Google when no deposit is required. If a deposit is required, it won't show the time as available on Google. For example: If a table of one to five people doesn't require a deposit, but a table of six people does, then Google will not show availability for parties of six.
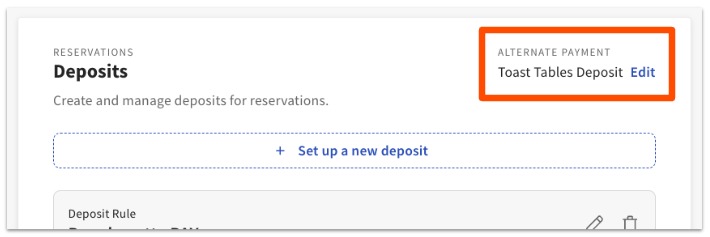
Set Up Toast Tables Deposits as an Alternate Payment Option
For reporting accuracy, you'll want to set up a new alternate payment option called Toast Tables Deposit (or whatever name you prefer).
To set up a new alternate payment option:
- In Toast Web, navigate to Waitlist & Reservations > Settings > Deposits.
- Select Edit as seen in the image below.
- If you need to create a payment type, select the new alternate payment type link. When creating the alternate payment type, U.S. customers need to select Yes for the Treat as discount setting. This ensures the tip is calculated on the entire amount of the order before your deposit is applied to the order total.
- Navigate back to Waitlist & Reservations > Settings > Deposits.
- Select Edit again.
- Select your newly created alternate payment option from the dropdown menu.
- Select Save.
Note: For customers in Australia, Canada, Ireland, and the UK, when a Toast Tables Deposit is applied as a payment on a guest's check, the final amount due upon closing the check will be the basis for the tip prompt. This calculation excludes any previously collected deposits or pre-payments (for more information, please see How are Tips calculated in Toast). To change this configuration, please contact Toast Customer Care.
International Customers: Call Toast Customer Care at the following numbers:
- Australia: +61 879 478 066
- Canada: +13434516295
- Ireland:+35319131083
- UK: +442045713302
Turn on Start Order on POS
For deposits to work, Toast Tables needs to start orders on the POS at the time of seating in order to automatically apply the deposit balance from the deposit reservation at the correct table.
To enable the Start Order on POS setting:
- In Toast Web, navigate to Waitlist & Reservations > Settings > Toast integrations.
- Toggle on Start Order on POS.
Enabling Start Order on POS will do the following:
- Start a held order on the POS for the assigned server when a host seats a booking in the Toast Tables app. Held orders appear as red tables on the POS. Servers should be instructed to be on the lookout for red tables and add items to these orders instead of starting new orders.
- Require a server to be assigned to a booking at the time of seating. The Toast Tables app will always require a server to be assigned to the booking.
- Add guest information (name, phone, and party size) to the order in the POS. This will, in turn, feed your Guestbook data. For more information, see Access Your Guest Data with Guestbook.
If the order has an attached deposit, there will be a negative balance on the order with the alternate payment type you've chosen, e.g., Toast Tables Deposit (more on this in the next section). When servers add items to the order, this will bring up the balance.
Set Up a New Deposit Rule
To set up a new deposit rule:
- Navigate to Waitlist & Reservations > Settings > Deposits.
- Select + Set up a new deposit.
- Enter a Deposit Rule Name for easy reference later (e.g. "Parties of six or more during dinner").
- Use the drop-down for the How do you want to charge? setting to determine if you want to set your deposit to be collected per booking (e.g. for parties of six or more we require a $/€/£100 deposit) OR per person (e.g. for parties of six or more, we require a deposit of $/€/£10 per person).
- Enter a Min and Max number for the Party size setting.
- Note: You can create separate rules for different party size ranges if you wish. For example, you could charge a $/€/£100 deposit for all parties of 8 or more, or you could charge $/€/£100 for parties of 8-10, $/€/£150 for parties of 10-12, and $/€/£200 for parties of 12 or more. A Min value is required, but you can choose to leave the Max field blank to indicate no upper limit (if you're making a single rule).
- Use the Cancellations are refundable until drop-down menu to select your desired refund timeline.
- You can expand the Preview deposit policy drop-down to view the automated policy that will be shown to all guests, and choose whether you’d like to automatically cancel unpaid reservations that are triggered from the host app and Toast Web if a guest does not pay their deposit. Based on your chosen configurations, Toast Tables will provide this automated payment and refund policy to the guest along with any notes you’d like to provide to the guest.
- Add an optional guest-facing deposit description to provide any additional context you wish to provide for guests (other than what is provided by the automated policy).
- Select Create when you're finished.
- Once this is complete, you will need to attach your configured deposit rule to the applicable schedule and shift following the steps in the Apply Rules to Service Periods and Dining Areas section below.
Set Up A New Prepayment Rule
To set up a new prepayment rule:
- In Toast Web, navigate to Waitlist & Reservations > Settings > Prepayment Rules.
- Select Create a Prepayment Rule. Note: When building your prepayment rules, it is important to remember that prepayment must be associated with a menu item. Consider using these rules to secure payment for prepaid experiences such as buffets, fixed-menu meals, etc.
- Follow the prompts to adjust the details for your prepayment rules.
- In the Items section, select + Included Item.
- Locate the item you would like to associate with your prepayment rule.
- Select Add.
- Once this is complete, you will need to attach your configured prepayment rule to the applicable schedule and shift following the steps in the Apply Rules to Service Periods and Dining Areas section below.
Set Up An Add-On
- Navigate to Waitlist & Reservations > Settings > Prepayment Rules.
- Select the prepayment rule you would like to add an add-on to.
- Scroll down to the Item section.
- Select + Add on item.
- Note: During this step, it is important to select + Add on item instead of + Included item. If you select + Included item, it will be included in the price of the prepayment NOT included as an optional add-on connected to the prepayment rule.
- Create an add-on name.
- Select Unlimited quantity or Limited quantity.
- If you select Limited quantity, add a number to the next field to add your desired limit. Use the dropdown to select if this limit is per person or per booking.
- Add an optional description.
- Select Continue.
- Select the menu item you would like connected to this add-on rule.
- Select Save.
You will now need to attach the prepayment rule containing your add-on to a schedule or experience. To learn more, see Apply Rules to Schedules or Experiences below.
Set Up A New Cancellation Fee Rule
To set up a new cancellation fee rule:
Note: Cancellation fees are only available to customers in the United States. Non-US customers do not have the ability to set up cancellation fees.
- In Toast Web, navigate to Waitlist & Reservations > Settings > Cancellation Fees.
- Enter your business phone number.
- Select Save & Confirm.
- Select Create rule.
- Configure the settings for your cancellation fee rule to your liking and select Create.
- Once this is complete, you will need to attach your configured cancellation fee rule to the applicable schedule and shift following the steps in the Apply Rules to Schedules or Experiences section below.
It is required to have a valid phone number for your business to enable cancellation fees as guests will be directed to call your business for any changes or cancellations after your configured cancellation window.
To learn how to cancel reservations with an attached cancellation fee, see Manage Toast Tables Reservations Cancellation Fees.
Watch this video walkthrough to learn more about cancellation fees.
Apply Rules to Schedules or Experiences
Next, you'll choose when and where you’d like the rule to apply. For example, you can choose to make this rule applicable only during brunch time, or only on the patio.
- In Toast Web, navigate to Waitlist & Reservations > Schedules or Experiences.
- Select the schedule or experience to which you would like to add a rule.
- If you have selected schedules, within your selected schedule select the shift from the Select a shift dropdown to which you would like to attach a rule.
- Note: You can attach the same rule to multiple shifts.
- Scroll to Payments & Fees.
- Scroll to deposits, prepayments, or cancellation fees, and within your desired section select + Add existing rule.
- Select your desired rule, and select Continue.
- Select the applicable dining areas.
- Select Add.
Since deposit, prepayment, and cancellation fee rules are assigned at the schedule or shift level, you have the ability to set different rules for both your daily schedule, and any special schedules or special dates as needed.
| Only one rule type (deposits, prepayments and add-ons, or cancellation fees) can be selected at a time. Newly applied rules types will only impact future bookings. They will not be applied retroactively to existing reservations. |
Additional Resources
- Use Toast Tables Deposits
- Get Started with Toast Tables
- Use Toast Tables
- Toast Tables: The Guest Experience
- Troubleshooting FAQ for Toast Tables